Explaining your location to someone can be difficult, especially if the person is new to the area. With the advancement in technology, it has become very easy to share your current location with friends and family. But there are times when one is confused about how to send location on the iPhone?
As many of us are familiar there are two prominent options for maps on the iPhone – Google Maps and Apple Maps. These make it quite easy to share and receive the locations. Check out the different ways to share locations from iPhone to Android and other Apple devices.
Want to know how to send location on the iPhone? There are a few ways to do it depending on which apps you use. We have explained each of those below. Take your pick.
How to Send Location on iPhone?
The messages app and Find My app makes it even more convenient to share the location. You can check out how to send location on iPhone conveniently using these apps.
Prerequisites-
There are some prerequisites you need to do on the iPhone to share the location.
1. Location Should Be Enabled
To enable location, go to Settings ➜ Privacy ➜ Location Services and toggle the switch so that it turns green.
2. Share My Location Should Be Enabled
Once you enable Location Services, under the same settings, you will see Share My Location. To learn how to send location on iPhone, click on Share My Location and enable it.
Use Apps to Send Location on the iPhone
We have access to many apps on our iPhone. So, how to send location on iPhone via apps? Well, some of them can be used to share the location with the people we want. You can use Google Maps or Apple Maps. However, with some apps, you need to use Apple Maps by default.
Messages App
Once you enable location and share my location via the Messages App. Here’s how it’s done.
Using Apple Maps to Share Location on iPhone
You can use Apple Maps to send the location to the iPhone users, but not Android users.
Step 1: Open the Message app on your iPhone and tap on the conversation thread you wish to share your location.
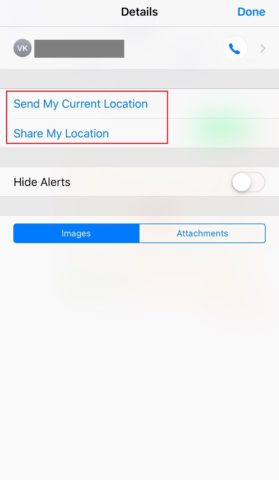
Step 2: Click on the conversation name, so that you can see the information icon at the top of the conversation (below the name). Click on it.
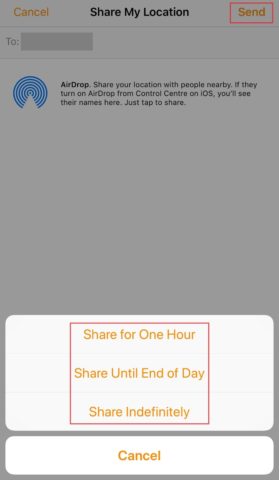
Step 3: Click on the option you want to share. “Send My Current Location” will share your current location. If you wish to share your location for a specific time period, say 1 hour, which would include your movement, then select “Share My Location”.
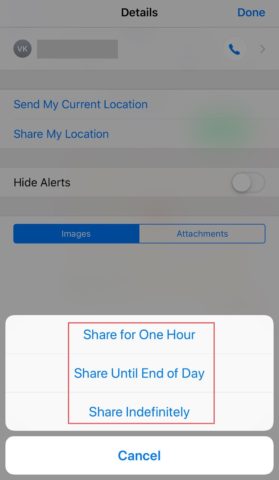
Step 4: If you choose, “Share My Location”, then you need to select the time you want to share the location. It can be for one hour, one day, or an indefinite period.
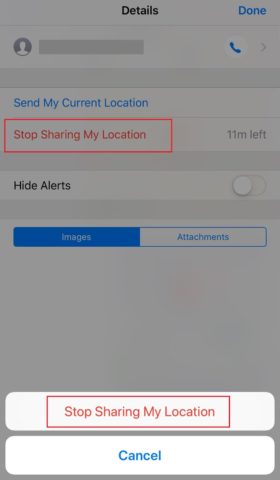
Step 5: To stop sharing the location, follow steps 2 and 3. Click on Stop Sharing My Location. When the confirmation is asked, click on Stop Sharing My Location to stop.
The above procedure is for Apple Maps. If you wish to send the location to an Android user, you need to use Google Maps.
Using Google Maps to Share Location on iPhone
As shown in the image below, the location sent to Android users using Apple Maps is not readable.
Hence, we need to use Google Maps in such a scenario.

You can easily learn how to send location on iPhone using Google Maps with the steps mentioned below.
Step 1: Open the conversation you wish to send the location.
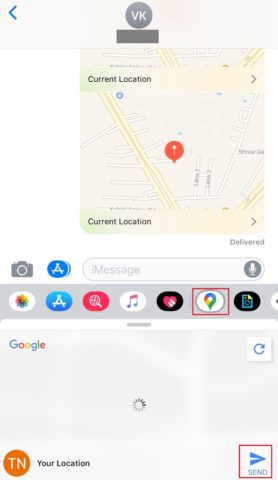
Step 2: Click on the Maps icon from the options shown at the end of the conversation. For a better idea, check out the image shown below. Once the map gets loaded with your current location, click on SEND in the bottom right corner.
Note: With Google Maps, you cannot share your location updates for a specific time like done with Apple Maps.
Tip: You can share your current location directly with iPhone users. You need to type I’m at, and you will get a suggestion to send your current location. You can attach the location using Apple Maps. Well, this works when you are sending a location to iPhone users.
Using Find My Friends App for iOS 12 and before
You can learn how to send location on iPhone using Find My Friends app. This app can only be used to share the location with other iPhone users. For iOS 12 and earlier versions, the app was named Find My Friends.
If you have a device with iOS 13 or above, then skip to the next section.
Step 1: Open Find My Friends app and click on Add seen in the top right corner.
Step 2: Add the contact and click on Send. Next, select the duration you wish to share the location.
Now, the follower will be seen on your screen.
Step 3: If you wish to stop sharing the location, click on the follower name. Now, click on Stop Sharing My Location.
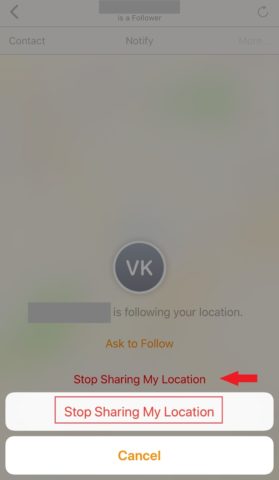
The follower cannot follow your location now.
Using Find My App for iOS 13 and above
Find My App is similar to Find My Friends. There is only a small difference in the name and the user interface. You can find how to send location on iPhone using Find My app with the instructions given below.
Step 1: Open Find My app. Click on People and then on Start Sharing Location.

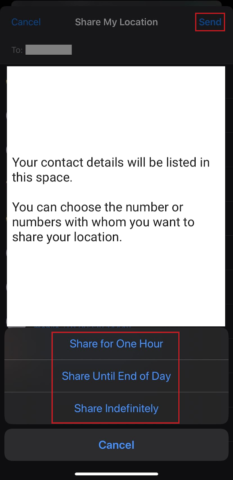
Step 2: Add the contacts you want and then click on Send in the top right corner. Once you click on Send, select the duration for which you want to share the location.
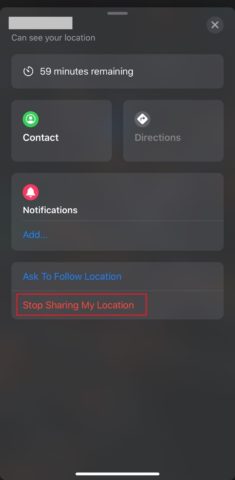
Now, you can see the follower on your screen.
Step 3: To stop sharing the location, click on the follower name. Click on Stop Sharing My Location to stop the follower from having your location.
If you are not comfortable with Find My apps, you can use the Map Apps directly to share the location using your favorite app.
Use Google Maps to Send Location on the iPhone
Google Maps are more popular than Apple Maps due to the obvious reason for more detailed location data. Google Maps makes it possible to share the location from iPhone to Android.
Let’s see how to send location on iPhone using Google Maps. With the most recent update of Google Maps, it is now extremely convenient to share location updates.
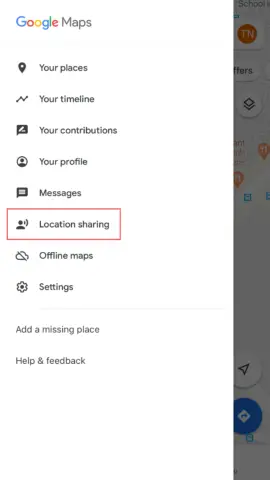
Step 1: Open Google Maps and click on 3 dash lines. Next, click on Location sharing.
Step 2: Click on add participants icon in the top right corner of the screen. Next, adjust the amount of time you want people to access your current location. Select the app using which you want to share the location.
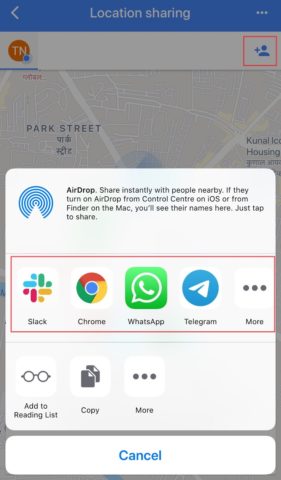
If the app is not seen in the list, click on “More”. You can also copy the link and share it in the app.
Step 3: You can disable the location sharing by toggling the button next to People with this link can see your location.
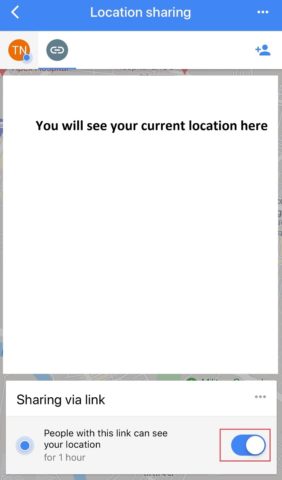
Step 4: You can increase the time adjusted in step 2. Click on People with this link… statement. Now, click on + sign to increase the time by 1 hour and then click on SAVE.

You can send the link to multiple people at the same time using different apps.
Use Apple Maps to Send Location on the iPhone
You can send your current location using Apple Maps. Unfortunately, Apple Maps doesn’t have any provision for sharing the location for a specific time, unless you use the message app.
If you just wish to know how to send location on iPhone using Apple Maps, then follow the steps given below.
Step 1: Open Apple Maps and click on Current Location.
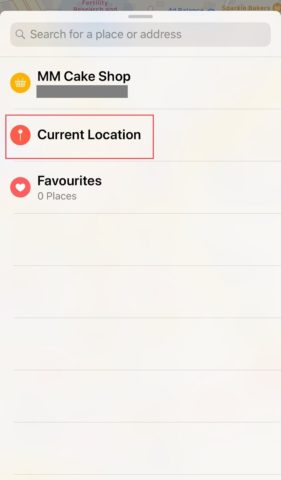
Step 2: Once the map gets your current location, click on Share.
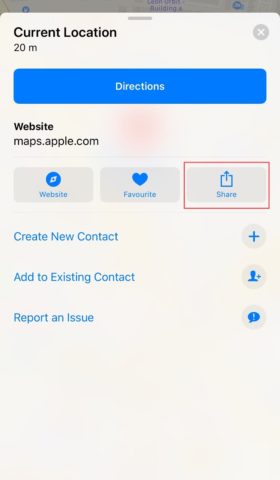
Step 3: Select the app you wish to use for sharing the location.
In this way, you can share your current location using Apple Maps to Android as well as iPhone users. In the case of Android users, the shared link will open in Google Maps.
Sharing ETA using Apple Maps
You can share your Estimated Time of Arrival (ETA) with friends and family, once you start your car journey. Using the driving mode on the iPhone can make the journey safer. You need to use Apple Maps to share the ETA. Let’s see how to send ETA using Apple Maps.
Note: Link the driving mode article (need to publish driving mode article first)
Step 1: Put in your location and start the navigation.
Step 2: Pull up the tab from the bottom of the screen and click on Share ETA.
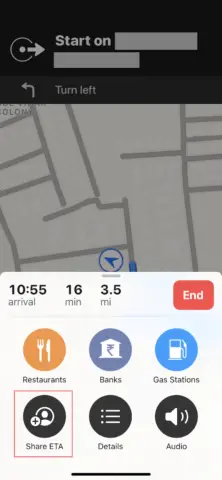
Step 3: Select the contact from your contact list. Now, this person can see your live ETA.
Sharing ETA with a friend can give him/her a better idea of your current location.
Conclusion
With all the different ways and means mentioned above, you now know how to send location on the iPhone conveniently. Google Maps and Apple Maps bring a lot more ease in sharing the location with the iPhone and Android users. You can opt for any of the Apps mentioned above, based on your comfort and convenience.
Also, check:
- A Step-by-step Guide On How To Set Alarm On iPhone
- Learn How To Backup iPhone Fast
- A Complete Guide On How To Turn Off Safe Mode On iPhone


