The processor can cross ideal temperature when you have any demanding processes running on your PC/laptop, or overclock your CPU. Windows do not have any simple method or inbuilt app to check CPU temperature in Windows 10.
If your CPU’s high temperature bothers you, then you need to keep a check on your CPU’s temperature. To keep a check on CPU temperature, you require some third-party software. You can still check the CPU/GPU temperature by entering the BIOS settings. Users who upgrade from Windows 7 to Windows 10 with limited system specification also complain about high CPU temperature issues. If your system is capable enough to handle the upgrade, the reason for the high processor temperature may differ.
How to Check CPU Temperature in Windows 10?
Entering the BIOS to check the processor’s temperature is the tiresome process. A third-party application can continuously monitor your CPU temperature in Windows 10, without any extra efforts.
One of the most popular third-party applications is Core Temp. It is light-weight and no-fuss applications that provide you with other vital information along with the right CPU temperature. With Core Temp, you can find the temperature of all the core processors. It is the best CPU temp monitor.
1. How to Use Core Temp to Check PC Temperature?
Download Core Temp from its official website or the link below.
Once the .exe file is downloaded, click on it to start the installation process. Follow the wizard and check the third screen of the installation window. You need to uncheck all the options under Additional icon recommendations and then click on Next.

You can also uncheck options under Additional shortcuts and Languages if you don’t wish to have them. These options are not crucial for Core Temp installation, and hence can be ignored.
Once Core Temp is installed, you can see the CPU temperature in the application and system tray.

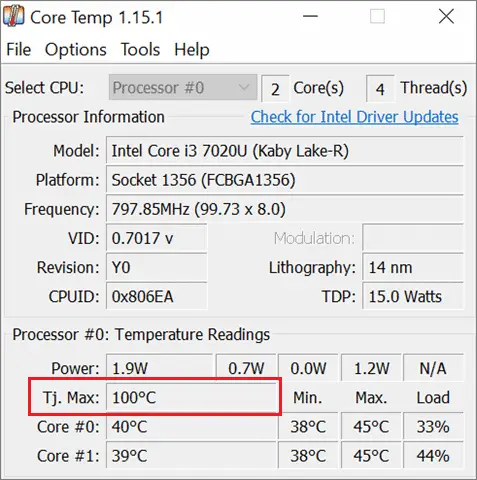
The number of temperatures shown depends upon the number of cores your processor has. For example, PC having an octa-core processor will show 4 different temperatures, that is, one for each core. In our case, it is a dual-core processor, and the temperature shown is classified as a safe CPU temp.
To find out the maximum temperature your processor can handle search for Tj. Max variable. This variable shows the max temperature. It shows the reading in Celsius, but you can change it via settings.
The procedure to change the settings is mentioned in the latter part of the article.
How to Customize Core Temp Settings
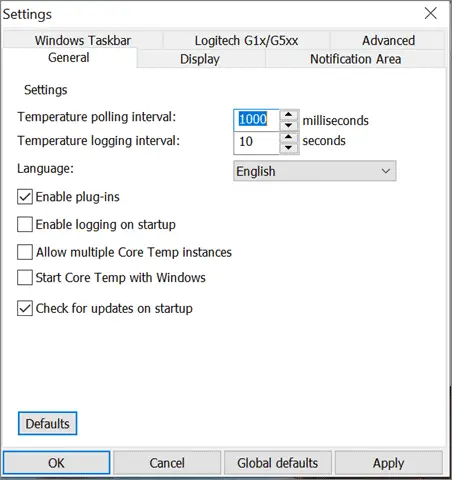
You can customize the other settings as per your requirements. Let’s see what customization options are available with Core Temp. Open Core Temp application, click on Options, and then click on Settings.
When the settings window opens, navigate to General settings. The General settings allow you to change the Temperature polling interval and Temperature logging interval. If you wish to start the Core Temp app when you log in to Windows, you need to check on the checkbox next to Start Core Temp with Windows. If you need to check CPU temperature very often, then you can keep Start Core Temp with Windows disabled.
Click on Apply to save the changes made.
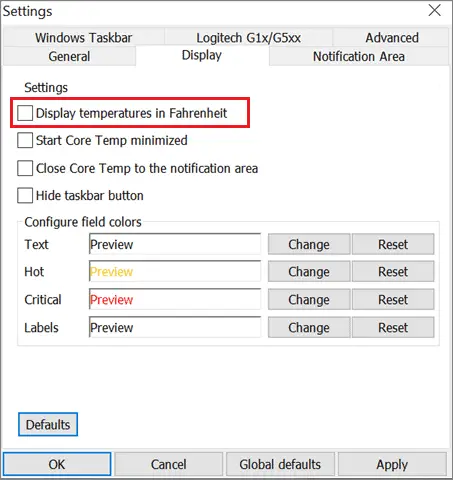
Next, navigate to Display. You can change the temperature display from Celsius to Fahrenheit, by clicking on the checkbox next to Display temperature in Fahrenheit. You can also change the text and field colors via Display settings.
The other main settings include Notification Area. You can change the look of how the number looks in the system tray using this section of the settings.
Core Temp’s Overheat Protection
Core Temp also offers a feature called overheat protection to protect the system when the CPU temperature goes close to the max temperature. To use this feature, go to Options and click on Overheat protection.
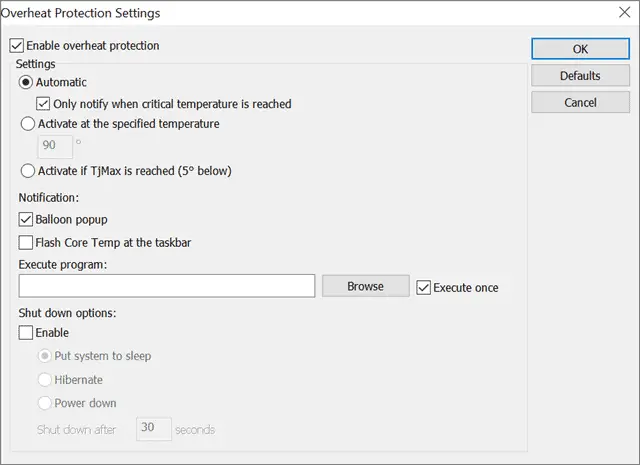
To make any changes, Enable overheat protection first. You can select the appropriate option when you wish to get notified about critical temperature. You can also enable Shut down options when a particular temperature reaches. This can protect your laptop and monitor CPU temperature in Windows 10
2. Open Hardware Monitor
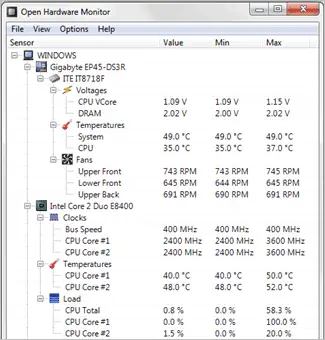
If you wish to monitor many other attributes along with CPU temperature in Windows 10, then you can opt for Open Hardware Monitor. It is a free open source software. It is used to monitor fan speeds, voltages, load and clock speeds of a computer along with CPU temperature.
Open Hardware Monitor can also monitor hard drive temperature using sensors. It displays the readings in the system tray, just like Core Temp.
It can run on 32 and 64 bit Microsoft Windows XP/Vista/7/8/8.1/10 and also on x86 Linux operating systems. A zip file and a complete installation setup are available for download at its official site.
Download Open Hardware Monitor
3. HWMonitor Pro
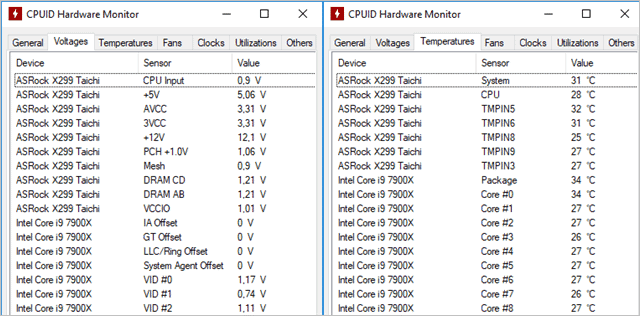
HWMonitor Pro offers more features than the applications mentioned above, but this comes with a price. The license cost for HWMonitor Pro starts from USD 21.98.
HWMonitor Pro monitors CPU temperature, voltages, and fan speed. It also offers a remote monitoring feature, which allows you to monitor the sensors of one or several distant PCs or Android devices.
HWMonitor Pro generates the graph to save monitoring data in a bitmap file. It has an easy to use interface. You can download the Zip file or setup file and then purchase the license.
Purchase License for HWMonitor Pro
What is the Good Temperature for CPU?
The idle or good temperature of the CPU depends upon the processor. Some processors may heat up rapidly, while some may not. However, the temperature should not exceed 100 °C.
Whenever the temperature exceeds the maximum temperature, the PC performance starts degrading. The degraded performance is because the CPU tries to cool itself by restricting its capabilities; this is known as thermal throttling.
The frequency drops when the processor enters thermal throttling. You can see the frequency drop in the Core Temp app next to the Frequency variable. The below image shows the max temperature for the processor and frequency readings in the Core Temp app.
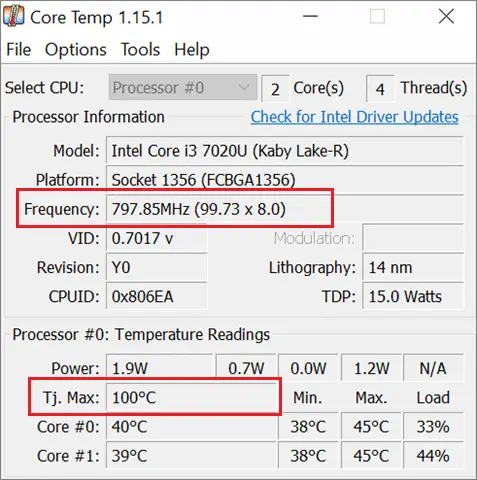
The maximum temperature here is 100 °C, however, to maintain a good CPU performance, the temperature should not cross 75 °C. The temperature rises when you use heavy software and games on your PC. Hence, one should be careful while using demanding software and applications for CPU temperature in Windows 10.
How to Manage High CPU Temperature?
If you are continuously experiencing high-temperature readings on CPU temperature monitoring apps, then you need to find a permanent solution. It is essential to maintain good CPU temp to avoid the processor from entering thermal throttling.
There are some of the prevention methods and solutions to maintain CPU temperature in a specific range. Some solutions need technical expertise. You can go through all the options and try the one which you feel can work for you to maintain CPU temperature in Windows 10.
1. Have a better Airflow
One of the simplest and main solutions to maintain a good temperature for CPU is to increase the airflow. You need to adjust the airflow, such that it keeps the system cool. The proper placement of exhaust fan and intake fan can help you get the best airflow.
You should avoid placing the fans such that more air goes out of the system, and less air enters the system. This can even result in the burning of the system. Some correct changes in the position of the fan can help you maintain safe CPU temp.
2. Remove Dust
The accumulation of dust on fans can make fans work a bit slower, resulting in high CPU temperature in Windows 10. Hence, you need to keep the fans and heatsink clean. Keeping other internal parts clean can also help you maintain the temperature within the normal range.
You can use compressed air to remove the dust accumulated on hard to reach areas. The air can be used from a distance of 6 inches. Be cautious when you do the cleaning, remove the laptop and CPU from all the power supply, and shut it down.
Avoid touching any electrical part directly while cleaning the internal parts. You can clean the fans, heatsinks, and other internal parts frequently to avoid CPU temperature from rising.
3. Virus
Sometimes, the virus can also cause heating problems in the system. The virus in your system can consume the most CPU power and heat it. There are many antiviruses in the market to detect and remove the virus from your system.
A regular scan for viruses and malware can keep your system safe and processor cool. If you don’t wish to install any third-party antivirus, then you can use Windows Defender, an inbuilt antivirus for Windows 10.
You can check out the detailed guide on how to use Windows Defender as a backup protection software
4. Run the Power Troubleshooter
You can also try running power troubleshooter and check if it solves the issue of high CPU temperature in Windows 10.
Press Windows key + I to open Settings and then click on Update & Security.
Now, from the left panel, click on Troubleshoot. Click on Power, under Find and fix other problems and then click on Run the troubleshooter.
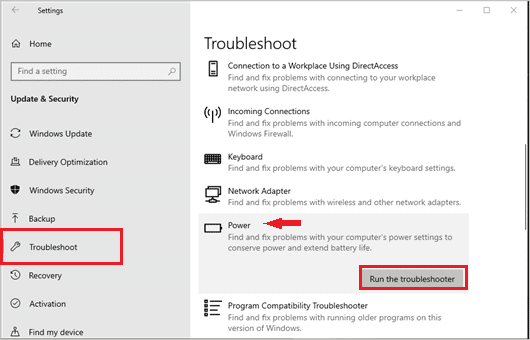
Follow the wizard to complete the troubleshooting process.
5. Apply Thermal Paste
Thermal paste or thermal grease is used to fill the microscopic gap between the processor and heatsink. Lack of this thermal paste can also make the processor heat up quickly. Hence, it is important to apply thermal paste if you face a high CPU temperature in Windows 10 frequently.
All you need to do is remove the heatsink, apply the thermal paste, and place it back on the CPU. You can check for the results after a few days. The CPU temperature will remain in range after applying thermal paste.
6. Correctly Place Heatsink
An improperly placed heatsink can also cause a high CPU temperature in Windows 10. You can check if the heatsink is placed correctly. If it is not, you can remove it from the CPU and again place it in the proper position. The heatsink is important when it comes to keeping the processor cool.
7. Location of the System
A poorly ventilated location can also cause a high CPU temperature issue. If the above solutions did not solve the issue, then you can try relocating your system. Proper ventilation can help your processors and system components to remain cool.
8. Disable Overclocking
Overclocking is increasing the CPU’s capability to perform the task. However, when the CPU works more than its capability, it gradually increases the temperature. However, if you have a good heatsink, CPU coolers, and fans, then it should not cause any issues.
If you do not have proper coolers and heatsinks, you need to disable overclocking to check it was causing an issue of the high CPU temperature in Windows 10.
9. Manage Cables and Wires
To have good airflow, you need to manage the cables properly. A poorly placed cable can obstruct airflow, resulting in heated processors.
10. Undervolt processor
If you observe overvoltage supply in the reading of applications like HWMonitor Pro and Open Hardware Monitor, then you need to undervolt your processor. Undervolting does not affect the system or CPU performance by any means.
Undervolting processor is reducing the excess voltage given to the CPU. However, you need to do this only if you have technical expertise; otherwise, your system can crash down.
Conclusion
A frequent check on CPU temperature is required to keep your CPU’s health in check. You can do so with the temperature monitor mentioned above for Windows 10. If you observe high temperatures very often, you need to take immediate action. Sometimes, the high temperature can cause major issues with your laptop or system.
You need to invest in good CPU coolers and fans if you wish to overclock your PC. The article also covers the list of solutions to follow if you face a high CPU temperature in Windows 10 system.
Related: 12 Best CPU Coolers To Buy in 2020 (Both Air and Liquid Cooled)


