A presentation generally serves the purpose of helping a speaker in explaining his ideas to the audience. Google Slides is one of the most widely used for making presentations for multiple reasons. It is essential to maintain your audience’s interest with an attractive and appealing Google Slides presentation. That is why it is vital to know how to add animations on Google Slides.
Added to that, users can add transitions to their slides to keep the audience engaged. You can also insert audios or print Google Slides with notes to make sure you have the attendees’ full attention during a presentation. Animations and transitions are also vital as they decide the audience’s eye flow and help them look in the right direction.
How To Add Animations On Google Slides And Make Them Visually Attractive
Animation is an excellent way to capture the audience’s interest to a certain point in the presentation. Coupled with that, the transitions help in switching between Google Slides with style. Overall, they have a pleasing effect on the human eye. On that note, let’s have a look at how to animate in Google Slides and make them visually appealing.
How To Add Animations On Google Slides For Text Or Images
Adding animations to text and images is one of the ways to enhance your presentation. However, you need to select the Google Slides animation you want carefully, making sure that they don’t seem off-the-mark to the audience.
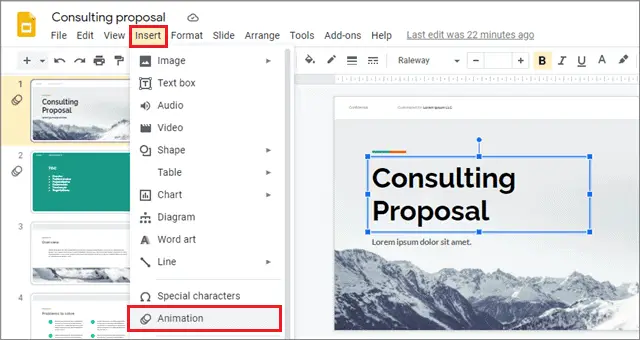
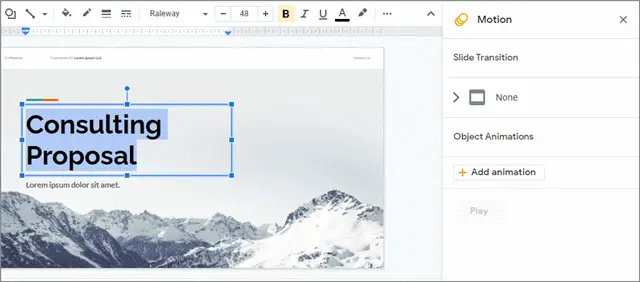
First and foremost, open a Google Slides presentation and select the text box or image on the slide you want to animate. Next, click on the Insert tab and select the Animation option.
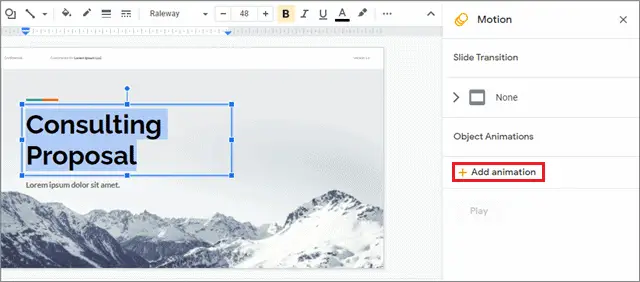
A Google Slides animation panel appears on the right side of the screen. Click on the Add animation option at the bottom of the panel.
Now, you will see a bunch of preferences to select for animating the selected text or image. The first option is to choose the type of animation on Google Slides; here, we have chosen the Fade In animation.
Then, you have to determine when the animation will work. You can choose the animation execution on a click or go for other options. We have selected the After previous option, which will execute an animation after the previous Google slide has stopped.
Next, you can drag the slider below to adjust the speed of the animations. Select the Play button below to preview the animation.
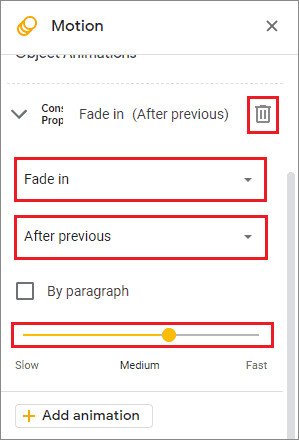
You can also add multiple animations in Google Slides according to your preferences, or delete them by clicking on the bin option, as shown in the figure above. So, this is the fundamental way to learn how to add animations on Google Slides.
How To Add Animations To A Bulleted List
Bulleted lists often chalk out the salient features or essential points in a Google Slides presentation. It’s always a good practice to animate text in a bulleted list; animated bullet lists mean each point in the list will appear one at a time.
First, select the bullet list and open the animations panel on the right side, as you did in the first method.
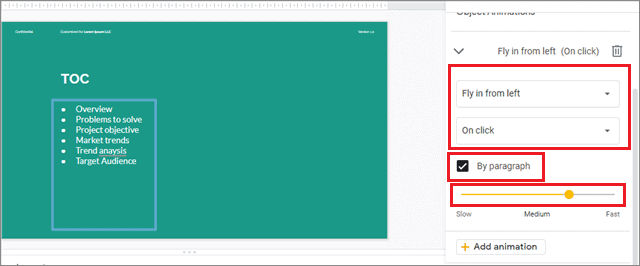
Now, add and select the type of animation you are going to use for the list. Here, we have chosen Fly in from the left. Next, you have to decide how the animation will be executed. It’s better to select the On a click option for bullet lists; you can explain a point in the list and move on to the next with a click.
Then, check the By paragraph checkbox to ensure that the points will appear one at a click. Adjust the speed of the animation using the drag and drop slider. Click on the Play button at the bottom to get a preview of how the animation works.
How To Add Google Slides Transitions
Transitions are crucial for maintaining the eye flow of the audience and giving them the correct direction. Adding changes is one of the best ways to add customizations to your Google Slides presentation and enhance it.
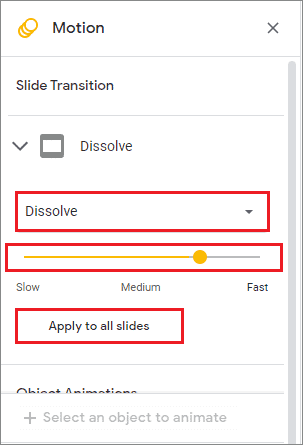
To add transitions, you have to open the animations pane as we did in the previous two methods.
Under the Slide transition section, select the transition you want to add as per your choice. Here, we have chosen the Dissolve transition. You can also click on the Apply to all slides option if you want the change transition for every Google slide.
Adjust the speed of the transition; it’s a good practice to have the speed between medium to fast for the best rate.
To delete a transition, select No transition instead of the transition you have selected. That’s the primary way to add Google Docs transitions to a slide in a presentation.
All About How To Use Animations And Transitions
Now that we have learned all the essential benefits of having transitions and animations in a Google Slides presentation, it is crucial to know how they should be used correctly. Mind you, applying transitions and animations to every element in the slide can also deter the audience’s concentration and make them lose their interest in the main subject.
1. Don’t Overuse It
That’s the most vital tip to stand by during editing the visual aspects of a presentation. Apply animations to a limited degree; you need not use it for every picture or text there is in a slide. Using animations for highlighted or essential text or images is the best way to ensure their limited use.
2. Use Simple Animations And Transitions
Whenever you add animation, make sure it is as simplistic as possible. For example, Google Slides animations that fade in and out or dissolve are the best choice since they aren’t too complex or take too much time to present a slide. Also, make sure the animation’s speed and transition are appropriate; it shouldn’t be too fast or slow in delivering a slide or an object on the slide.
3. Use Automated Animations (wherever possible!)
Animations in Google Slides can be activated through click or scheduled to act after a specific time period. Using automated animations shows that you are well prepared with your Google Slides presentation and also helps you keep constant eye contact with the audience. You can also apply animations using mouse clicks, but that often tends to break the presentation flow after every slide.
Conclusion
Transitions and animations serve a vital purpose in any Google Slides presentation. While the animation decides the audience’s eye flow and helps them point out where to look, a transition allows users to add different customizations while switching slides during presentations.
Users can animate the pictures in their presentations and customize how the slides should appear on the screen using different animations. Apart from that, you can also choose to animate bullet points and text on a slide. Hence, we need to know how to add animations on Google Slides to make our presentation enchanting enough to keep the audience engaged.
While animations and transitions usage remains a personal choice and preference, it is crucial to know that these customizations should be simplistic. If they are not, a user risks losing the concentration and the interest of his audience in the presentation.


