Users often come across several issues while operating programs on Windows 10. There are many reasons why a particular game or software won’t open quickly. One of the reasons why this happens is because the xinput1_3. dll is missing in Windows 10.
Errors related to the xinput1_3.dll files indicate a problem with Microsoft DirectX. The particular DLL(Dynamic Link Library) file also contains essential procedures and driver functions used by the Windows operating system. It is shared by several applications and works as a Microsoft common controller API. So, if the xinput1_3.dll file experiences any errors, any application linked to it will stop working.
What To Do When Xinput1_3. dll Is Missing In Windows 10
The Xinput1_3.dll file is present in the DirectX 9 folder, and is not a built-in feature of Windows 10 operating system. Hence, we need to install the Microsoft DirectX application separately to ensure all the software and games have the required association with the DLL files to ensure their smooth functioning. The file issue usually occurs whenever any program fails to trace this file in the DirectX folder.
On that note, let’s check out what to do when Xinput1_3. dll is missing in Windows 10.
1. Update Windows 10 OS
If your xinput1_3. dll is missing in Windows 10, it might be due to the missing Windows system updates. You need to make sure that your Windows 10 PC has the latest updates installed to ensure all your applications run smoothly.
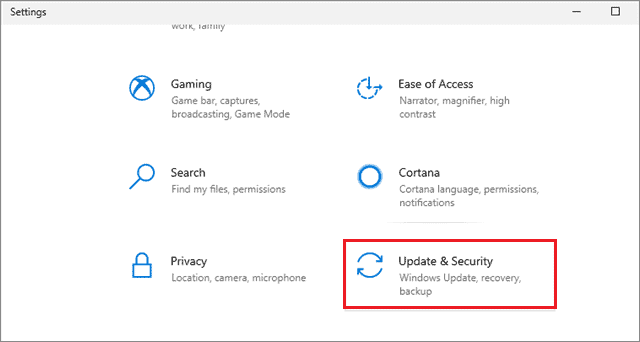
To update the version of Windows OS, open the Settings app using the Win key + I keyboard shortcut. Then, select the Update & Security tab.
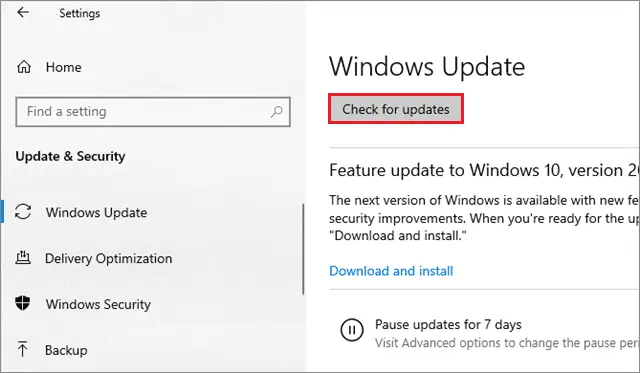
On the right pane, click the Check for Updates option to see if Microsoft has released any new updates. If they have, the updates will be installed automatically.
Keeping your Windows PC updated is an important part of computer maintenance, as outdated systems can cause issues in many applications.
2. Restart your Computer
Restarting your computer is one of the most basic solutions to go for if your xinput1_3. dll is missing in Windows 10. Make sure you use this solution before executing the complex ones like reinstalling the game or software.
Sometimes, there are temporary glitches with the xinput1_3.dll file, which can cause several programs to crash. This basic solution tends to solve and fix those glitches many times.
3. Reinstall the Game or Software
The xinput1_3.dll file causes many programs to crash and obstructs their processes. If you ever come across a program that shuts down to this file, you can try uninstalling it and then reinstalling it. Reinstalling the program has reportedly worked for many users in this case.
For uninstalling the software or game, you can use CCleaner or any other alternative to ensure the program is completely removed from your PC. The reason why we recommend using an uninstaller is that it ensures that all the registry entries of the program are also deleted. Then check if Xinput1_3. dll is missing in Windows 10 or not.
4. Install DirectX for the Problematic Program
Every program that requires Microsoft DirectX also has an executable file of the same in its installation disc. You can try installing that DirectX program and then check if the xinput1_3.dll file is missing in Windows 10.
You just need to find and install the program from the installation directory and check if that solves the dll error.
To begin with, after you have downloaded the DirectX files from Microsoft’s official website, go to the download location and launch it.
You need to accept the Terms and Conditions of the program before starting the installation. In the next window, select a location where you want to install the files by clicking on Browse. Click on Ok after you have selected the location for installation.
Next, select Ok to begin the installation process.
Enter the Microsoft DirectX folder and run the executable named DXSETUP.exe. Follow the installation guidelines till the end of the installation and click the Finish button after you are done with it.
Now, open the software that was facing the xinput. dll error and confirm if it works properly.
5. Update your DirectX Program to Fix xinput1_3. dll Is Missing
Users need to be sure that they are using the latest DirectX version. Outdated versions of the program can sometimes cause the xinput1_3.dll to go missing in Windows 10. To be sure you don’t run into the dll error because of an outdated DirectX, you can install the latest version from Microsoft’s official website.
If you are using DirectX 10/11/12, updating the Windows OS is the only way to update DirectX. There’s no separate file available for them as they are built in the Windows operating system.
6. Reinstall DirectX
As we have already discussed earlier, the xinput1_3.dll file is a part of the DirectX program installed on your computer. If this file is missing in your PC, you can try reinstalling the DirectX file from the game’s installation directory.
To get an updated version of DirectX, you can download it from Microsoft’s original website. Some users have also recommended using the DirectX Runtime package from June 2010 to solve the issue.
7. Scan your Windows 10 PC for Malware or Viruses
The presence of harmful viruses or malware can also damage the xinput1_3.dll files and cause the dll not found error. Hence, it is necessary to run a thorough check using an antivirus software and delete such viruses and malware.
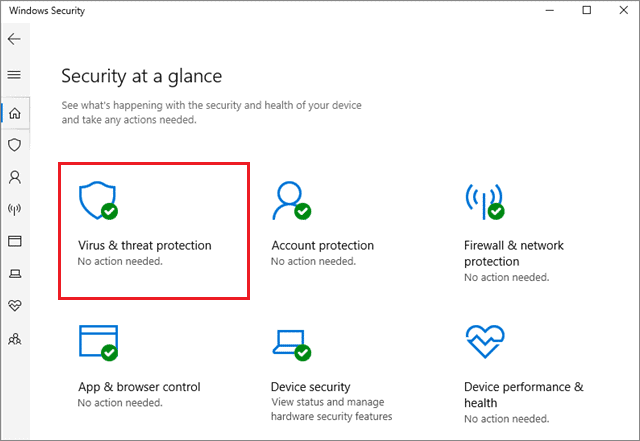
You can either use the antivirus software of your choice or opt to eradicate the viruses through Windows Security. To run a scan using the Windows Security, first, open it from the Start menu and click on Virus & threat protection.
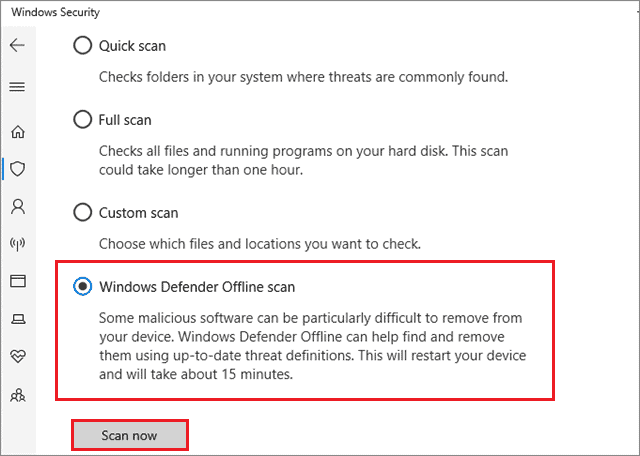
Then, select the Advanced section and click on Windows Defender Offline scan. Next, click on Scan Now to start scanning for malware and viruses on your Windows 10 PC.
Once you have detected and cleaned all the viruses, make sure you try the game after relaunching the system and see if the xinput1_3. dll is missing in Windows 10 or not.
8. Update the Video and Game Controller Drivers
Many users have reported that updating their video drivers has helped them fix the xinput1_3. dll is missing in Windows 10 issue. Sometimes, older versions of the graphics card don’t have all the required dll files. Hence, updating drivers is necessary to install the dll files and ensure the smooth functioning of several software and games.
To update a driver, you need to open the Device Manager from the Start menu. Then, find the Sound, video, and game controllers’ option in the list and update every driver underneath it. You can also check out the complete guide on how to update the video drivers.
9. Perform SFC and DISM Scans
The SFC scan is used to fix corrupted system files that are causing errors. By performing the scan, you can detect corrupt system files and replace them with new ones. If your xinput1_3. dll file is missing in Windows 10, you can perform an SFC scan.
After the scan has been executed you will get messages like “Windows Resource Protection found corrupt files and successfully repaired them” or “Windows Resource Protection found corrupt files but was unable to fix some of them” if there are any errors in your system files.
The steps to execute a DISM scan are similar to what you did in the SFC scan. You need to run the following command in the Command Prompt. Make sure you open the Command Prompt in the administrator mode.
DISM /Online /Cleanup-Image /RestoreHealth
The scan will take some time to complete, so make sure you don’t interrupt it. If performing these scans doesn’t work out, you can try downloading the xinput1_3.dll manually and placing it into your system files.
10. Download the Xinput1_3.dll File
If your xinput1_3. dll is missing in Windows 10, you can download it manually and try running the program. But, before you do so, make sure you have restarted your computer. If the xinput file hasn’t been created even after following these steps.
You can download the Xinput1_3.dll file by searching for it on Google. There are many websites from where the file can be downloaded, but you need to make sure the file isn’t infected with any virus.
The reason is because you need to copy the xinput file in the Windows system directory. If the directory is corrupted due to this file, it could harm the stability of your computer. As a workaround, you can try copying this file from your friend’s Windows 10 PC into your computer.
11. Re-register the Xinput1_3.dll File
You can also try re-registering the existing xinput1_3.dll file to solve the dll error.
To start with, open the Command Prompt window from the Cortana search bar. Make sure you select the Run it as administrator option before launching it.
Type the following commands in the Command Prompt window and press the Enter key to run the processes.
regsvr32 -u xinput1_3.dll
regsvr32 xinput1_3.dll
Once the processes are complete, restart your Windows 10 PC and then try launching the concerned program to see if your xinput1_3. dll is missing in Windows 10. If yes, then you can move on to the next solution.
12. Move Xinput1_3.dll from Windows Directory
Sometimes moving the xinput1_3.dll file from the Windows directory can also solve the issue. However, this move is generally not advised as any changes made to the system files can affect the stability of your Windows 10 PC.
Note: Since moving the files from directories is a bad practice, make sure you create a System Restore point to roll back to the previous settings if any issues occur.
To begin with, navigate to the following path and find the xinput1_3.dll file.
C:\Windows\System32
After you find the file, move it to the desktop.
Next, navigate to the following directory and move the xinput1_3.dll file in it to this directory
C:\Windows\SysWOW64
Once the move is completed, try running the concerned program to see if it works well. If you don’t have the dll file in the system32 folder, you can move on to the next solution.
13. Provide The File Manually
We have already discussed how you can download the xinput1_3.dll file. Once you have downloaded it, you can manually paste it to the system directories as shown below.
Press Win key+R keyboard shortcut to open the Run window and type %windir%/System32 to open the System32 folder.
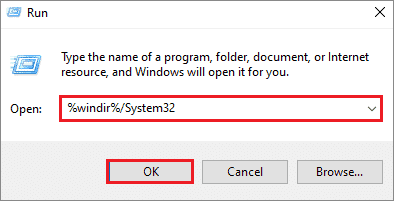
Then, type %windir%/SysWow64 in the Run command window for 64-bit systems and click on Ok. This will open the SysWOW64 folder in which you need to copy the dll file.
Paste the xinput1_3.dll file in both System32 and SysWow64 folders. Now, try launching the program or software and confirm if the issue still exists.
14. Perform System Restore
In case you make changes to a file configuration in your system files, you might face issues regarding the xinput1_3.dll files. By performing a system restore, you can roll back to the previous settings.
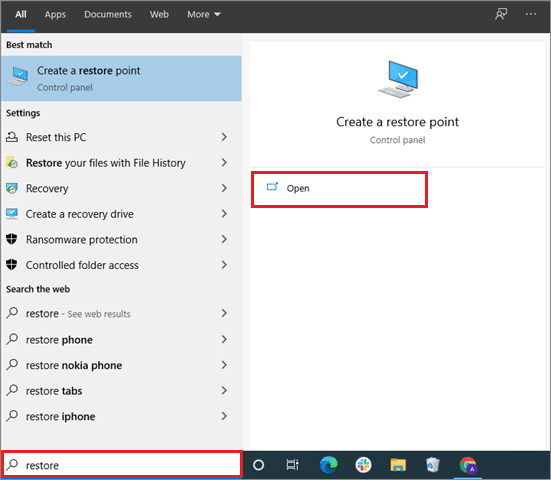
Type ‘restore’ in the Cortana search bar and click on Create a restore point. Doing this will open the System Properties window.
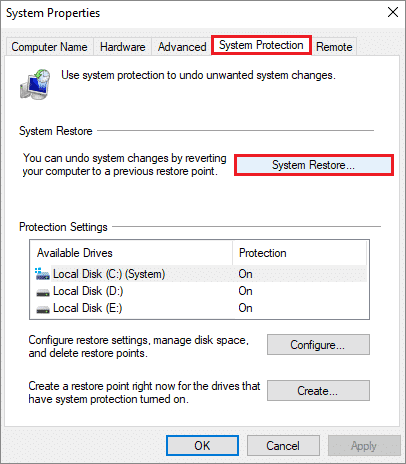
Select the System Protection tab, and click on System Restore.
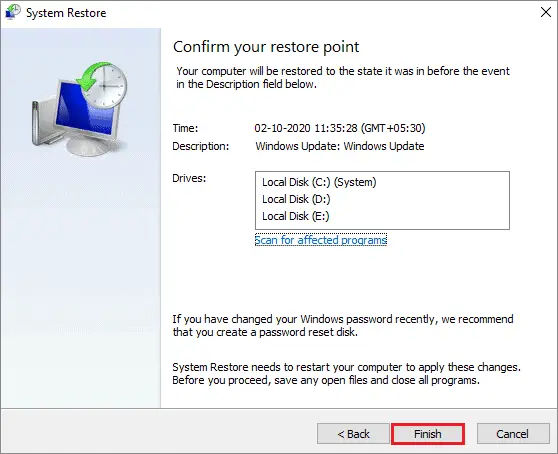
You will see the restore points saved in the system. Choose any restore point of your choice and click on Next.
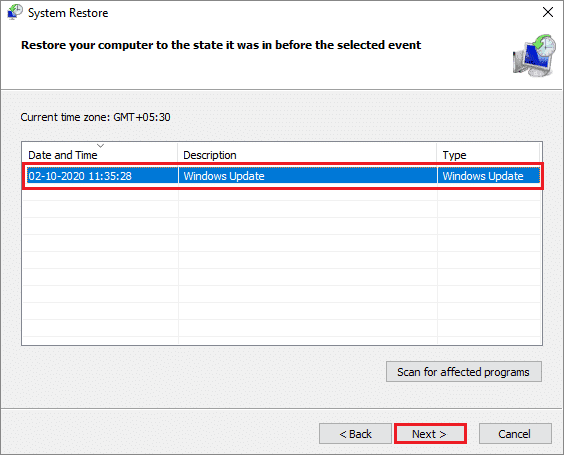
Then, click on Finish in the next window to launch the system restore process.
Make sure you have made all the necessary pre-arrangements and saved a backup of all the necessary files before going ahead with this step. The system restore procedure is a complex process, and hence it should be reserved as the last solution.
Conclusion
The xinput1_3.dll file is an important component of the DirectX program package, and works as a Microsoft common controller API. It is used for all graphics related applications such as high-end games or video editors. The absence of this file causes many software and games to crash.
We have mentioned a mix of solutions ranging from easy to difficult for solving the xinput1_3. dll is missing in Windows 10. Before moving on to the complex solutions, always ensure that you have the latest version of DirectX and Windows 10 installed on your PC.
Most of the time, users can also fix this problem by downloading the dll file from a third-party website. If you are going to emulate the same, make sure you scan the downloaded file for any sort of virus that could affect your computer. Make no mistake, this file had to be pasted in your System32 folder, so you need to be extra careful while using this solution.


