Windows’s remote desktop feature allows you to access another computer from anywhere over the network through your personal computer. It is provided by Microsoft in Windows 10 as well as all the previous versions of Windows. All you need is a good internet connection to use this feature. However, sometimes users land up in a situation where the Windows 10 remote desktop is not working correctly. You cannot access a remote PC if the remote desktop connection is causing issues.
People often address the remote desktop connection as RDP (Remote Desktop Protocol). Well, you may experience RDP issues due to various reasons. Some of the reasons include incorrect firewall settings, disabled remote desktop connections, network-related issues, and glitches in the system. You can quickly fix these issues by tweaking the Windows 10 system.
Solutions to Fix Windows 10 Remote Desktop Not Working Issue
The solutions mentioned below can help you connect to a remote desktop again by fixing the RDP not working issue. Make sure you log in through an admin account or have administrator credentials before moving on to solutions, as some solutions may require admin rights.
1. Check Internet Connectivity
As mentioned above, you need a good internet connection to establish a remote desktop connection between two systems. And therefore, you need to check whether your internet connection is stable or not.
If your internet is not stable, you need to get that fixed with your internet service provider (ISP).
However, If your internet is working correctly but you cannot remote access the PC, you need to check out the solutions mentioned below.
2. Enable Remote Desktop
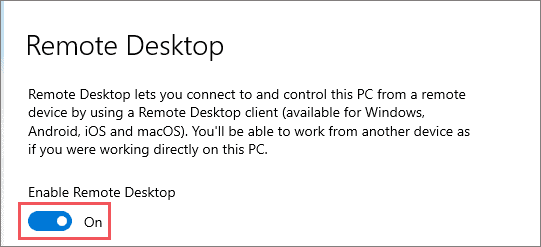
If you are using the remote desktop feature for the first time, make sure you have enabled it via system settings, as it is disabled by default. Sometimes, even some unwanted changes can disable it.
Step 1: Launch the Settings app from the Start menu and go to the System section.
Step 2: In the System Settings, go to Remote Desktop from the window’s left frame. Now, toggle the switch below Enable Remote Desktop, such that it is enabled.
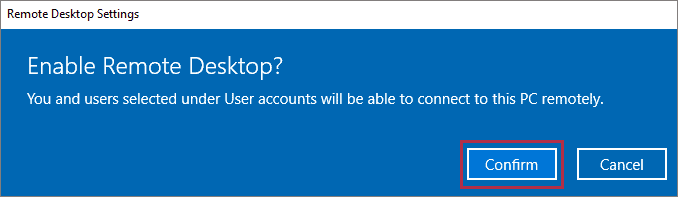
Step 3: When asked for confirmation about enabling remote desktop, click on the Confirm button.
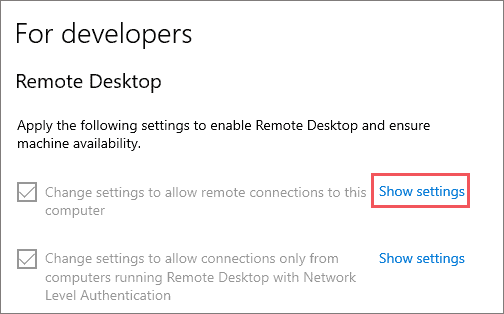
Now, you need to allow remote assistance and connections to your computer.
Step 4: Again, open the Settings app and go to the Update & Security section.
Step 5: From the left panel, go to the ‘For developers’ option and then search for the Remote Desktop section in the right frame.
In the Remote Desktop settings, click on the Show settings link next to ‘Change settings to allow remote connections to this computer.’
Step 6: When the System Properties dialog box opens, go to the Remote tab. And then check the box next to ‘Allow Remote Assistance connections to this computer.’
Also, select ‘Allow remote connections to this computer’ and check the checkbox next to ‘Allow connections only from computers running Remote Desktop with Network Level Authentication.’
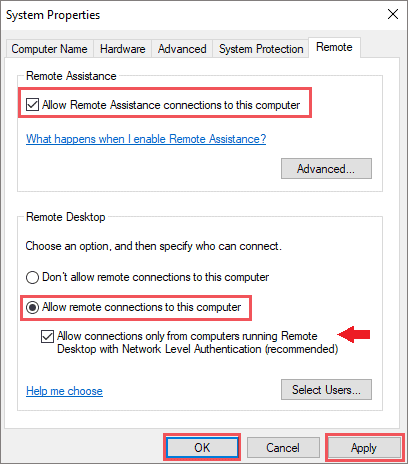
Step 7: Click on Apply and then OK to save the changes you made.
After making the changes, check if Windows 10 Remote Desktop not working issue is fixed or not. If the remote desktop can’t find the computer, you may need to check some other solutions from the list.
3. Turn Off Custom Scaling on Windows 10
Many Windows 10 users use custom scaling to display apps and programs in a specific size. The custom scaling can cause issues while using the RDP in Windows 10. You can turn off custom scaling to fix the remote desktop not working issue.
Open the Settings app and go to System settings. In the System Settings, scroll down to the Scale and layout section and check if you see the link to turn off custom scaling. Click on the ‘Turn off custom scaling and sign out’ link to disable custom scaling on your system.
Note: Make sure you save all the work before clicking on that link, as you will be signed out, and all the programs will be closed as well.
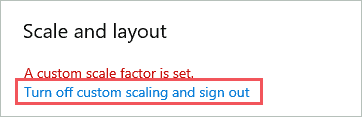
If you don’t find ‘A custom scale factor is set’ in the Scale and layout section, it means there is no custom scaling enabled on your system.
4. Allow Remote Desktop through Firewall Settings
The firewall can sometimes block the remote desktop connection if it is not enabled in the settings. If you are using some third-party firewall or antivirus software, use its manual to know how remote desktop connection is enabled. To know how to enable remote desktop connection in Windows Defender Firewall, follow these steps.
Step 1: Search for Windows Defender Firewall in the start menu and open the same from the search result.
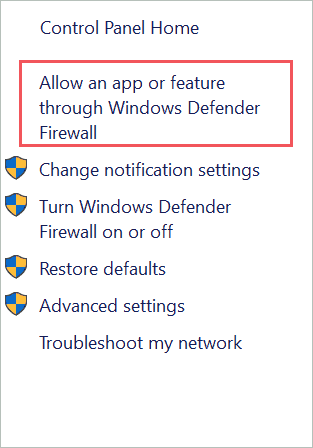
Step 2: Click on Allow an app or feature through Windows Defender Firewall.
Step 3: On the next screen, click on the Change settings button. You may need to add administrator credentials to make changes in the firewall settings.

Step 4: Check the checkbox next to Remote Desktop for the Private tab. Click OK to save the changes.
You can now check if the Windows 10 Remote Desktop not working issue is fixed or not. If you still cannot connect to a remote machine, you may need to tweak in the network settings.
5. Disable IPv6 in Network Settings
Sometimes, there can be issues connecting to the server when using IPv6. If this is why a remote desktop is not working on your PC, you can disable IPv6 and force the Windows system to use IPv4.
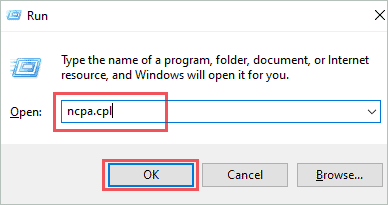
Step 1: Press Windows key + R to open Run. Next, type ncpa.cpl in the Run and click OK.
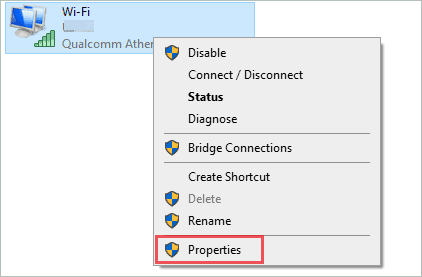
Step 2: Right-click on the network adapter for which you want to disable IPv6 and click on Properties.
Step 3: When the Properties window opens, uncheck the box next to ‘Internet Protocol Version 6 (TCP/IPv6).’
Click on OK to save the changed settings.

After making the above changes, restart your PC. You can then try connecting to the remote desktop. If your Windows 10 remote desktop is not working, you may need to dig deeper into the network settings.
6. Change Network Profile to Private
If your network profile is public, it can cause hindrance while connecting with a remote desktop. The remote desktop can’t find the computer in such scenarios. To fix this, you can change the network profile from public to private.
Click on the network icon on the taskbar and then click on Properties of your connected network.
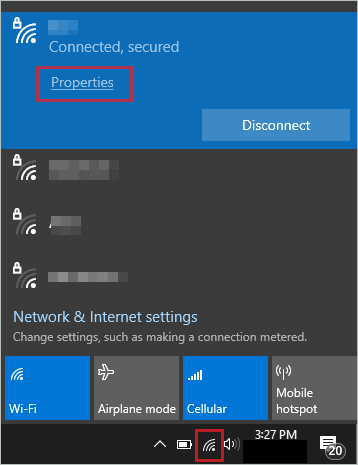
When the network settings open, under the Network profile, click on Private to change the network to private.
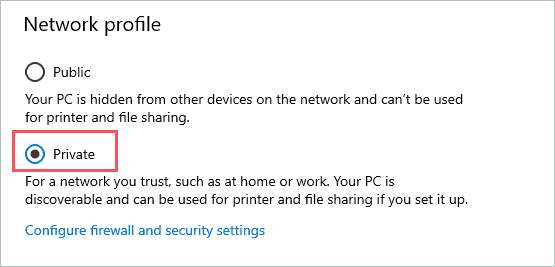
If you are not logged in via the admin account, you will have to enter credentials to make this change to your network. You can now check if you got rid of the Windows 10 remote desktop not working issue.
7. Modify Registry
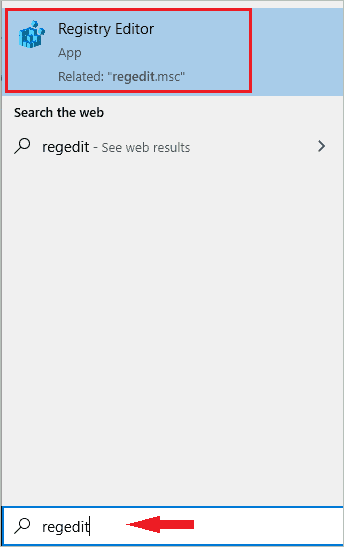
You can modify the registry to fix the Windows 10 remote desktop not working error. As the registry stores crucial information about apps and settings, it is recommended to back up the registry before making any changes.
Type regedit in the start menu and open Registry Editor from there.
In the registry editor, go to the following path.
HKEY_CURRENT_USER\Software\Microsoft\Terminal Server Client
When you reach the Terminal Server Client folder, right-click on the empty space in the right panel and go to New ➜ DWORD (32-bit) Value.
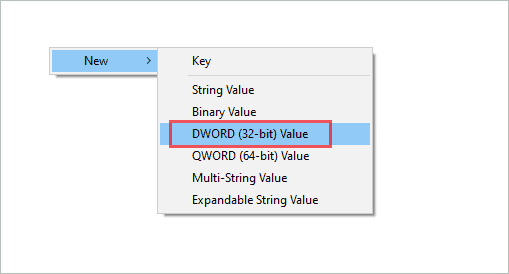
Name the new DWORD as RDGClientTransport. To give it RDGClientTransport Value, double-click on it and assign 1 to the Value data parameter. Click OK to save changes.
Check if the issue is fixed after making changes in the registry.
8. Delete your Remote Desktop Connection Credentials
You may get annoyed when the remote desktop credentials did not work in Windows 10. In such cases, you can delete the credentials and then try connecting to the remote machine. It is easy to remove remote desktop credentials from your system.
Type remote desktop in the start menu and open Remote Desktop Connection from the search result. When the Remote Desktop Connection opens, select the remote computer IP or name.
If the computer has any credentials saved, you will see an option to edit or delete the credentials. Click on the Delete link. You may need to confirm the delete action when prompted by Windows 10.
After you delete the credentials, try establishing the connection again with the remote computer by entering the credentials and check if you can do it successfully or not.
9. Check for DNS issues
You can check if there are any DNS issues which are causing the Windows 10 remote desktop not working problem for you. To know about the DNS issue, you need to perform a small test using the nslookup command.
Search for the command prompt in the start menu and open it. In the command prompt, type nslookup and press the Enter key.

Note down the address that comes up after executing the nslookup command. Now, execute the nslookup command with two different hostnames separately. Both the hostname should show the same address which you got after executing the nslookup command without hostname.

If you get different addresses, check with your ISP (internet service provider) about the DNS issue and get it fixed. After fixing the DNS, you may be able to connect to the remote desktop.
10. Check RDP Services
You may experience Windows 10 remote desktop not working issues if the RDP services are not running properly.
Search for Services in the start menu and open the app via search results. In the Services app, search for the following services and make sure their Status is showing Running.
Remote Desktop Services
Remote Desktop Services UserMode Port Redirector

If any of the services are not running, right-click on it, and select Start from the context menu. These services should be running on both the computers; the local one as well as the remote one.
After starting the mentioned services manually, check if you can connect to the remote machine through the local one. If there are still errors while establishing the remote connection, you may need to check if the RDP port is enabled or not.
11. Check Port Number 3389 in the Registry
If the RDP listener is not configured correctly to listen on port 3389, you may not be able to remote access the computer through the local PC. You can check if the port is configured correctly or not in the registry editor.
Open the Registry Editor and go to the below-mentioned path.
HKEY_LOCAL_MACHINE\SYSTEM\CurrentControlSet\Control\Terminal Server\WinStations\RDP-Tcp
Once you reach the listener, which is RDP-Tcp, search for a registry value named PortNumber.
When you find PortNumber, check if the Data column has value 3389.

You can also check the PortNumber data by double-clicking on it. The Value data column will be in hexagonal format by default; you can change it to decimal by selecting Decimal as Base.
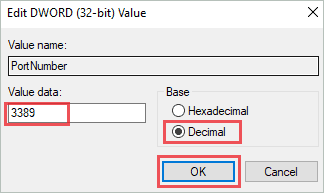
When clicked on Decimal, the Value data should show 3389. If you see some other value, change it to 3389. After you make the appropriate change, go to Remote Desktop Services, as mentioned in solution number 10.
Restart Remote Desktop Services and Remote Desktop Services UserMode Port Redirector services. You restart the services by right-clicking on them and selecting Restart from the context menu.
After restarting the services, check if the Windows 10 remote desktop not working issue is fixed.
12. Check for other Applications using Port Number 3389
You may not be able to connect remotely if some other application is listening on port number 3389. Well, to check for this, you can execute some commands in the PowerShell terminal.
Press Windows key + X and open Windows PowerShell (Admin) from the quick access menu. When the PowerShell terminal opens, execute the following command there.
cmd /c ‘netstat -ano | find “3389”‘

Check if you can see any entry for TCP 3389 with the status as listening. If you cannot see any such entries, move on to the next solution.
However, if you find the entry as mentioned above, execute the below command to find out which application is using that port.
cmd /c ‘tasklist /svc | find “<pid listening on 3389>”‘
Now, check for the PID number that was listening on port 3389 in the output of the above command. You can then look for the task/application associated with it.
After finding the application, if it is not that important, you can disable or uninstall it. If the application is essential for your daily tasks, you can configure it to use another port.
After you configure the application to listen on another port, the remote desktop not connecting issue will be fixed.
13. Add Remote Desktop’s IP address to the Hosts File
Adding the remote computer’s IP address and server name to the host file available in the local machine worked for many users. You will need to log in from the administrator account to try out this solution. The host file is a system file and therefore requires admin privileges to edit it.
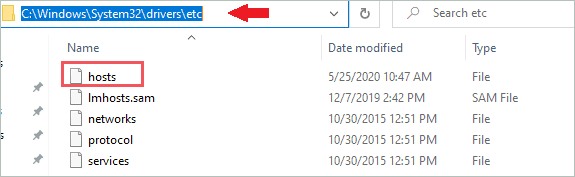
After logging in from the admin account, head to C:\Windows\System32\drivers\etc location from the File Explorer.
In the etc. folder, search for the ‘hosts’ file and open it as Notepad. Now, add the IP address of the remote desktop at the bottom of that file. If there is the server name available, add that as well with the IP address. Save the hosts file after adding the IP address.
You can now check if the remote desktop can find the computer you wish to log in remotely. If the remote desktop can’t connect to the remote computer even after making changes in the hosts’ file, you can check the remote desktop’s RDP protocol.
14. Check if RDP Protocol is enabled on Remote Desktop
You can check the status of RDP by using the network registry feature in the Registry Editor. If this protocol is not enabled, your remote desktop can’t connect to the remote computer.
Step 1: Open Registry Editor through the Start menu, as mentioned above.
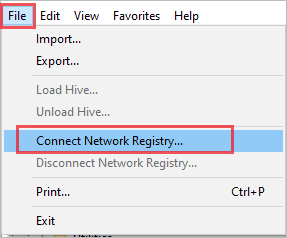
Step 2: Go to File in the registry editor’s menu bar and click on Connect Network Registry.
Step 3: When the Select Computer window opens, enter the computer’s name in the text box below ‘Enter the object name to select.’ Click on the Check Names button, followed by OK.
Step 4: When you are done with the above process, go to HKEY_LOCAL_MACHINE\SYSTEM\CurrentControlSet\Control\Terminal Server
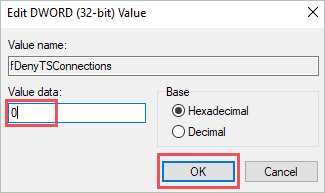
Now, search for fDenyTSConnections.
Step 5: Double-click on fDenyTSConnections and check if it has 0 as the Value data.
If the Value data is 1, change it to 0 to enable RDP protocol. Click on OK to close the dialog box and also save the changes you made.
Once done, close the registry and check if Windows 10 remote desktop not working issue is resolved or not.
15. Opt for Third-Party Software
If none of the above solutions fixed Windows remote desktop connection, you could opt for third-party software to connect to any remote computer. Many different options are available to connect to a remote computer through the local machine.
The most popular software used by many for remote connection is TeamViewer. You can use it for free for private and non-commercial purposes. The pricing of this software for commercial purposes starts from 49 USD/month for one user. You can also get a trial before making the purchase. It is easy to use and establish a remote connection to any computer.
Conclusion
We often need to connect to a remote computer for work or other purposes. And therefore, a fully functional remote desktop connection is a must on your Windows PC. Sometimes, the remote desktop may not function properly because of some issues, and you may not be able to connect to the remote computer.
The above list of solutions can help you fix the Windows 10 remote desktop not working issue in a convenient way. You may need a bit of technical expertise to fix a remote desktop on Windows 10, but a step-by-step explanation will guide you to fix it quickly.


