The thumbnail feature in Windows makes it easy to recognize images and videos as it shows the preview of them in a reduced size. People tend to rely upon thumbnails instead of generic Windows icons to simplify their tasks. Sometimes, the thumbnails database can get corrupted or damaged, which in turn can lead to thumbnails not showing in Windows 10.
You can’t see picture thumbnails in Windows 10 if it is disabled in File Explorer settings. The Windows setting is the most crucial applications for those who wish to configure the OS. So, it will be an issue when Windows 10 settings won’t open properly. You may also see an incorrect or broken thumbnail view because of a damaged thumbnail cache. Well, many other reasons can cause issues while displaying thumbnails in the folder.
How To Fix Thumbnails Not Showing In Windows 10
You need a thumbnail preview to see your image or video without putting extra effort into opening it. The reduced size version of the image, known as thumbnails, will make it easy to classify the images without putting an extra effort into remembering it.
Well, you can miss all these advantages if thumbnails are not showing on your Windows computer. There is no need to panic about your missing thumbnails, as we have got you covered with a list of solutions.
1. Enable Thumbnails from File Explorer Options
Make sure the thumbnails are not disabled in File Explorer settings. If the thumbnails are not enabled in File Explorer, you may see the default icon for that particular file type.
To enable thumbnails, open File Explorer, by searching for it in the search menu. You can directly launch it from the taskbar if the File Explorer is pinned there. Next, go to File from the menu bar and then click on the Change folder and search options. It can also be ‘Options’ or ‘File Explorer Options’ for some users based on the Windows version you are currently using.
Alternatively, you can type file explorer options in the search bar and open File Explorer Options from there.

When the File Explorer Options window opens, navigate to the View tab and uncheck the box next to ‘Always show icons, never thumbnails’ seen under Files and Folders.
Click on Apply and OK.
You can now relaunch the File Explorer and check if you can see the thumbnail images in the folders.
2. Clear the Thumbnail Cache
As mentioned above, the corrupted and damaged cache can cause issues while displaying thumbnails. You can clear the cache so that Windows can rebuild it. There are two ways of clearing thumbnail cache in Windows 10, one is to use the Disk Cleanup app, and another is by using the command prompt terminal. You can use any of the ways, depending on your technical expertise and comfort.
Using Disk Cleanup Application
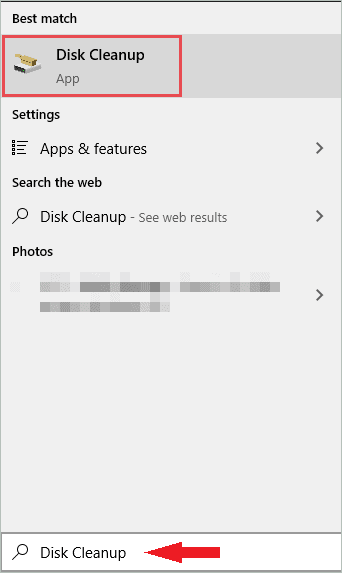
Open the Disk Cleanup app by searching for it in the Start menu.
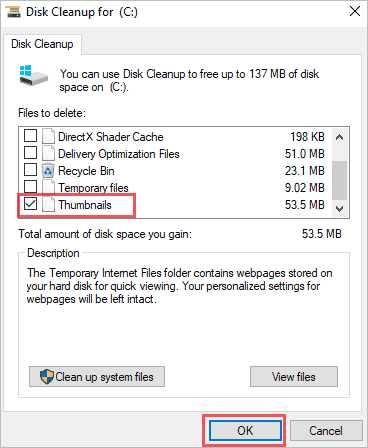
In the case of multiple drives, select the drive where Windows 10 is installed from the drop-down list. When the Disk Cleanup window appears, uncheck all other boxes except for Thumbnails and click OK to delete thumbnails cache.
You can now close the Disk Cleanup window and relaunch File Explorer.
Using Command Prompt Terminal
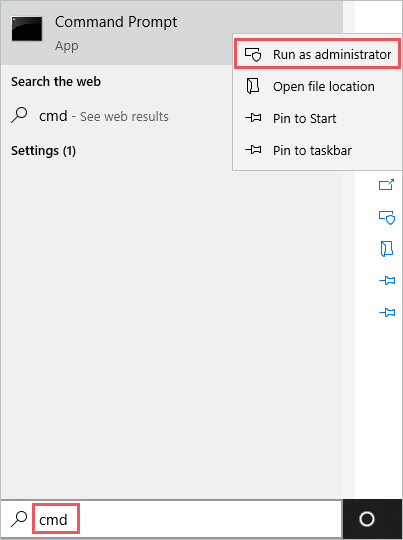
Search cmd in the search menu, right-click on the Command Prompt seen in the search result and click on Run as administrator.
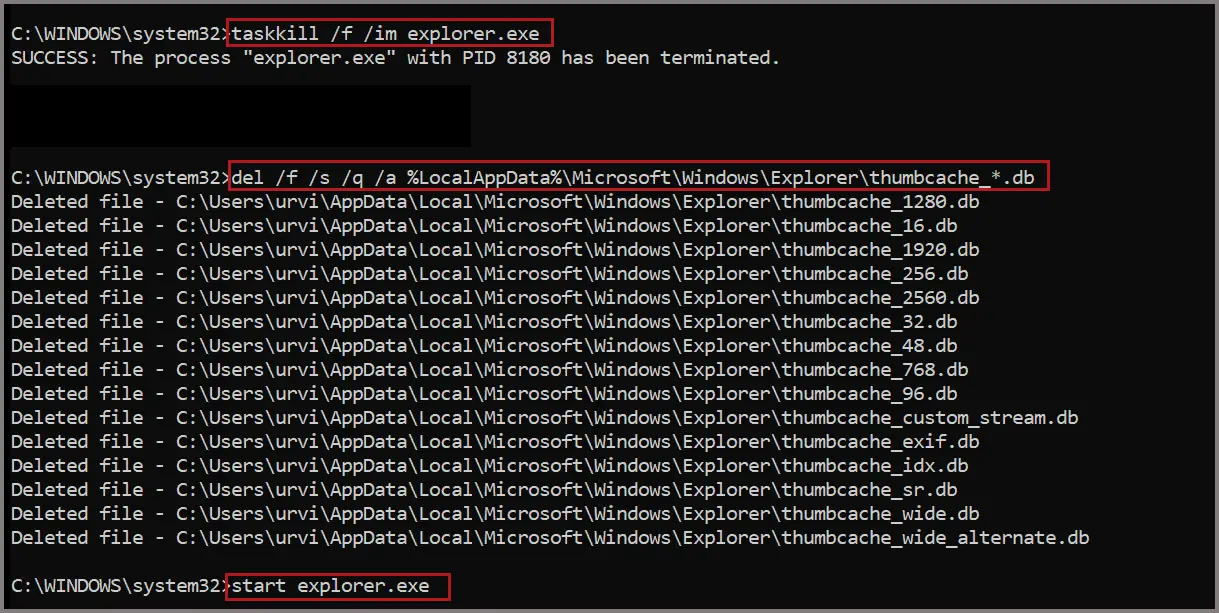
In the command prompt terminal, type taskkill /f /im explorer.exe command and press Enter. Your background may go blank after this command, but don’t panic; it will get back to normal after finishing the entire process.
Next, execute the below-given command.
del /f /s /q /a %LocalAppData%\Microsoft\Windows\Explorer\thumbcache_*.dbLastly, type in start explorer.exe and hit Enter to execute the command.
Check if the thumbnails not showing in Windows 10 are fixed after clearing the thumbnails cache or not.
3. Make Sufficient Space in the System Drive
You can experience thumbnail issues if there is not enough space on the drive where Windows 10 is installed. To check if your system drive has sufficient space or not, open File Explorer and go to This PC from the left side.
Check if your system drive has enough free space. In most of the cases, it is the C drive.

If your system drive is full, you may need to free up disk space to fix missing thumbnails. However, if there is sufficient space available on your system drive, the issue may be with something else.
4. Check for Malware and Virus
If any malware or virus is residing in your system, you may experience missing thumbnails. The virus can repeatedly corrupt thumbnails, even if you rebuild the cache, causing thumbnails not showing in Windows 10 error for many users.
You can use the Windows Security app to scan for malware and viruses on your computer. If you don’t find anything in the scan, you can opt for the best malware removal software available in the market. If the virus was an issue, removing it will fix the thumbnail for you.
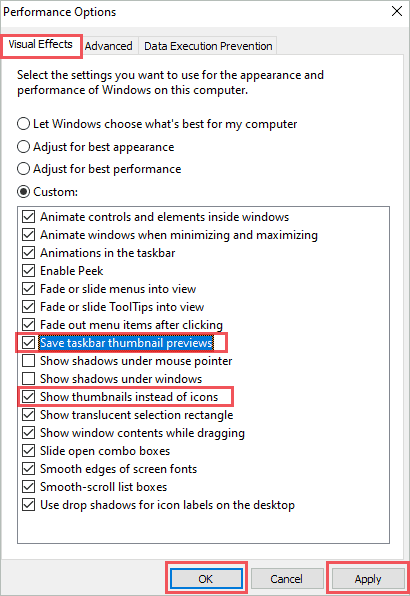
5. Modify Visual Effects Settings in Performance Options
You can conveniently fix the thumbnails not showing issue in Windows 10 by modifying the visual effects settings. If the thumbnails are disabled here, you may not be able to see them in your folder. You need to disable icons and enable thumbnails in the advanced settings.
Step 1: Launch Control Panel by searching for it in the search menu.
Step 2: In the Control Panel, search for advanced system settings in the search box. And then, click on View advanced system settings link under System.

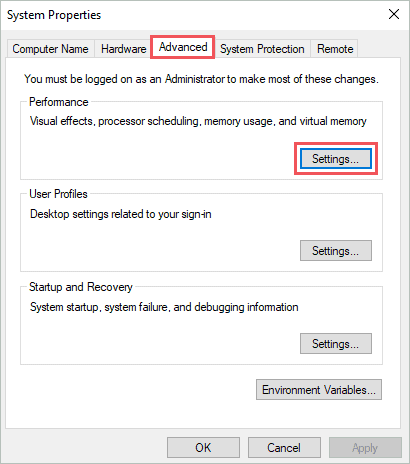
Step 3: When the System Properties dialog box opens, go to the Advanced tab. Click on the Settings button under the Performance section.
Step 4: Next, go to the Visual Effects tab and tick the checkbox next to ‘Save taskbar thumbnails preview’ and ‘Show thumbnails instead of icons.’ Click on Apply, followed by OK.
Close the File Explorer window and again open it after making the said changes. It may have solved the thumbnails not showing in the Windows 10 issue for you.
6. Select Thumbnail Previews Supported Option in View
There are many options available under View in Windows 10. It is necessary to select an alternative that supports thumbnail previews to view the thumbnail for images and videos.
Open File Explorer from the menu bar, click on View and select anyone from below mentioned option for Layout.
Extra large icons
Large icons
Medium icons
Tiles
Content
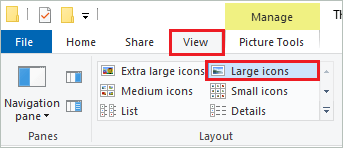
If you select anything except the above-given options, you won’t see thumbnails in the folder. After making the change, relaunch the File Explorer and check if the thumbnails not showing in Windows 10 is resolved.
7. Restore File Explorer Settings To Fix Thumbnails Not Showing In Windows 10
You can fix the missing thumbnails by restoring the File Explorer settings to defaults. If there are any issues because of improper settings, restoring it will fix the problem.
Open File Explorer and go to the File ➜ Change folder and search options. When the Folder Options open, go to the General tab and click on the Restore Default button. If asked for confirmation, click on Yes.
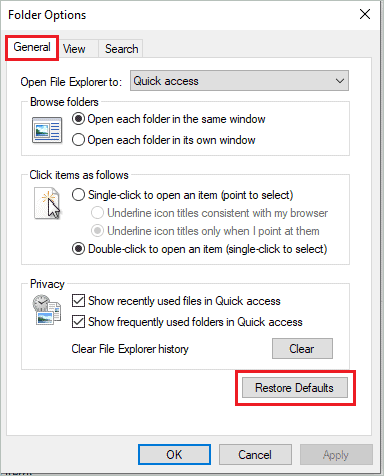
Similarly, go to the View tab and click on the Restore Default button there as well.

Once the default settings are restored, check if you can see thumbnails properly for images and videos in File Explorer. If you are still experiencing thumbnails not showing in Windows 10, check out some other solutions below.
8. Enable Thumbnails through Windows Registry
The registry stores the crucial settings in Windows 10. And therefore, one of the ways to enable thumbnails in File Explorer is to use registry settings. You need access to the administrator account to make the below-mentioned changes.
Step 1: Press Windows key + R to open Run and type regedit there. Click OK to open the registry editor.
Step 2: When the registry editor opens, navigate to the following path.
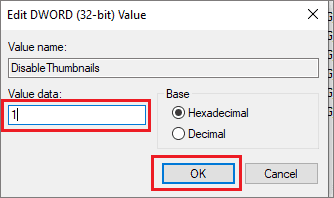
HKEY_LOCAL_MACHINE\SOFTWARE\Microsoft\Windows\CurrentVersion\Policies\ExplorerStep 3: When you reach the mentioned path, right-click on the empty space and go to New ➜ DWORD (32-bit) Value. You can name this DWORD as DisableThumbnails.
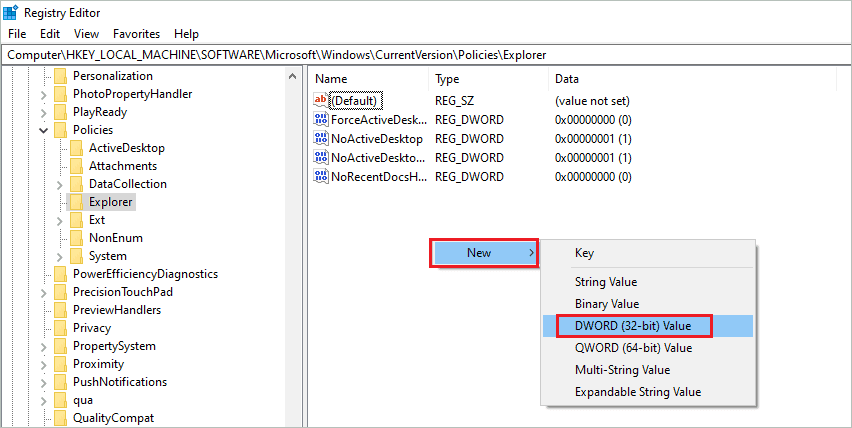
Step 4: Double-click on DisableThumbnails DWORD and keep its value data to 1. The Value data is set to 1 to disable any DWORD. Click OK.
After making the changes in the registry, close the registry editor and open File Explorer. You may have thumbnails not showing in Windows 10 fixed with this.
9. Run SFC Scan
The System File Checker (SFC) utility in Windows is used to scan your PCs for corrupt and damaged system files. This utility also fixes the damaged files in most cases.
Search for cmd in the search menu, right-click on the command prompt and click on Run as administrator.
In the command prompt terminal, type sfc /scannow and hit Enter. You can check out the guide on sfc /scannow to get more information about this utility.
10. Use DISM Utility
If SFC didn’t help in fixing thumbnails not showing in Windows 10, you can execute the DISM command and use that utility. It will scan and resolve issues in virtual hard disk errors along with the Windows 10 image.
Open the command prompt with administrator privileges and type in the following command one by one. Hit Enter after the execution of every command is finished.
Dism /Online /Cleanup-Image /CheckHealthDism /Online /Cleanup-Image /ScanHealthDism /Online /Cleanup-Image /RestoreHealthYou can now open File Explorer and see if thumbnail previews are visible or not.
11. Remove Software that is Causing Issues
If you started experiencing thumbnails not showing in Windows 10 after installing software, the problem might be with the new software. Sometimes, the software which is not compatible with Windows 10 can cause such issues.
Even though some software is compatible with Windows 10, it can conflict with the system files on your computer. In such situations, you can remove the recently installed application. You could experience similar issues if you updated the existing software.
Make sure you don’t have any problematic software installed on your computer.
12. Restore Defaults for a Single Folder
Sometimes, the thumbnails are not visible only in one folder. Well, it can be an issue with the settings of that particular folder. You can restore default settings for such folders in Windows 10.
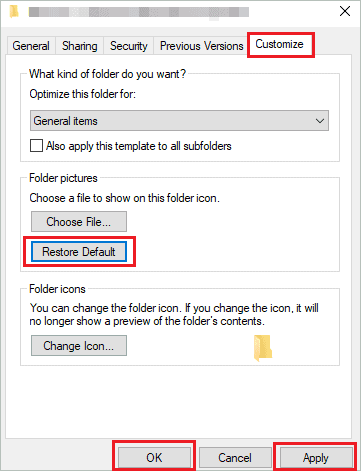
Right-click on the folder that is having issues with the thumbnails and click on Properties from the context menu.

When the Properties window opens, click on the Customize tab and then click on the Restore Default button. Click on Apply, followed by OK to restore the settings.
Close the affected folder if it is open. And then, relaunch File Explorer to check if thumbnails are showing in the problematic folder. If thumbnails are not showing in Windows 10, you may need to tweak in Group Policy.
13. Make Changes in Group Policy
Modifying the group policies can help you fix the thumbnails not showing in Windows 10 error. It is easy for Windows 10 Professional and Enterprise versions to open and access group policy. You need to perform extra steps to access the local group policy editor in the Windows 10 Home version.
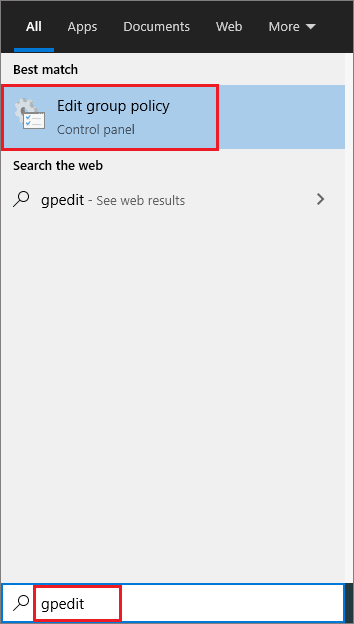
Type gpedit in the search menu and open the Edit group policy from the search result.
When the Local Group Policy Editor opens, navigate to User Configuration ➜ Administrative
Templates ➜ Start Menu and Taskbar from the left panel.
In the Start Menu and Taskbar folder, search for ‘Turn off taskbar thumbnails policy’ in the right frame of the Window. Once found, double-click on it.
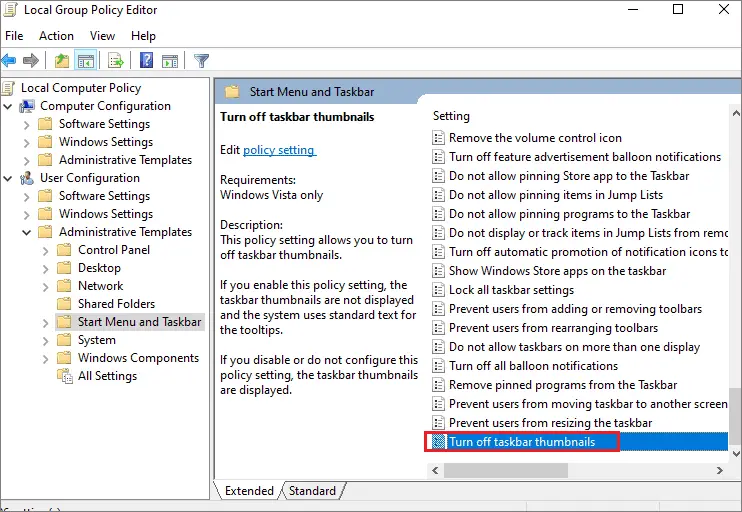
Select Disabled in the ‘Turn off taskbar thumbnails’ and then click on Apply and OK to save the recent changes.

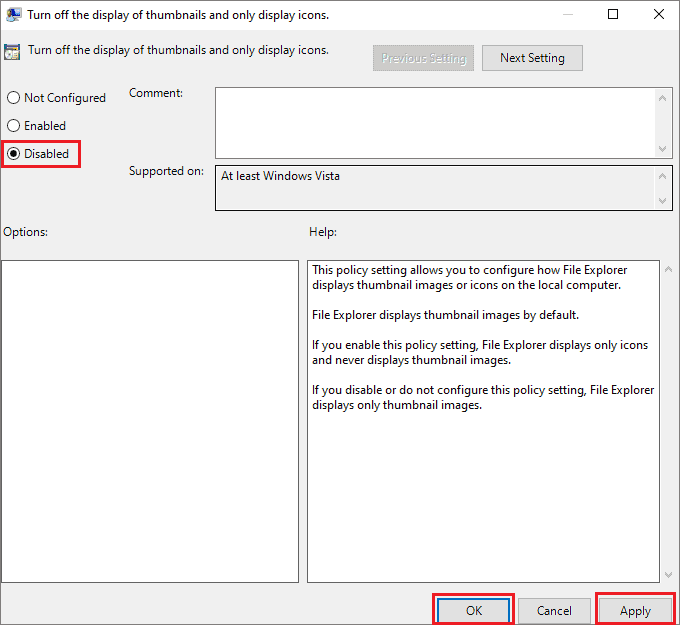
Now, navigate to User Configuration ➜ Administrative Templates ➜ Windows components ➜ File Explorer and double-click on ‘Turn off the display of thumbnails and only display icons.’
Here, again select the Disabled option and click on Apply, followed by OK.
Close the local group policy editor and restart your Windows 10 PC. You can now open the File Explorer and check if you can view thumbnail previews for images and videos.
14. Create a New User Account
The final resort to fix Windows 10 thumbnails not showing is to create a new user account. You can add a new Microsoft or local account to your PC and set it up exactly the same as your current one. Well, this has fixed the issue for many Windows users.
Adding an account in Windows 10 is easy and requires only a few steps to complete the entire process. You can do it conveniently by opening the Settings app through the Start menu and going to Accounts settings.
In case you have any doubts while adding a new account, you can refer to the guide on managing user accounts in Windows 10 to know in detail about adding local, and Microsoft accounts.
Fixes for Thumbnails Not Showing in iTunes Store on Windows
If you cannot see thumbnails only in the iTunes store app, the issue may be because of conflict between the app and Windows scaling. There are two ways to fix thumbnails not showing in iTunes.
1. Switch Windows Scaling back to 100%
If you have changed Windows scaling to a number that is more than 100%, change it back to 100%. It is the most simple fix for thumbnails not showing in the iTunes store app.
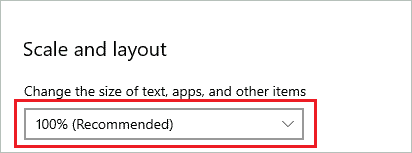
Press Windows key + I to open the Settings app and go to System settings. Next, navigate to Display from the left side of the window and then go to the Scale and layout section.
Click on the drop-down menu below the ‘Change the size of text, apps, and other items’ and select 100%.
Restart your computer after making the said changes. Now, open iTunes apps and check if thumbnails are visible or not.
2. Change the Compatibility Settings of iTunes Store App
If you are not in favor of changing the Windows scaling settings, you can change the compatibility settings of the iTunes store app.
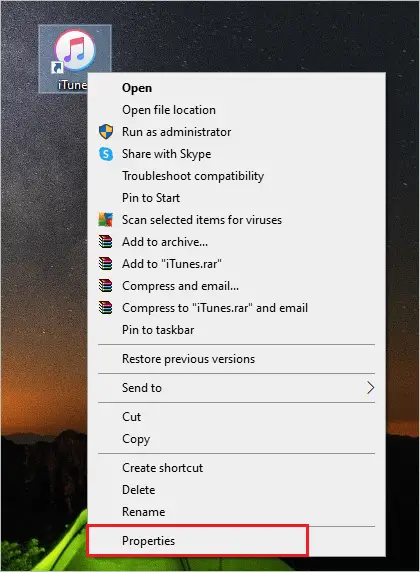
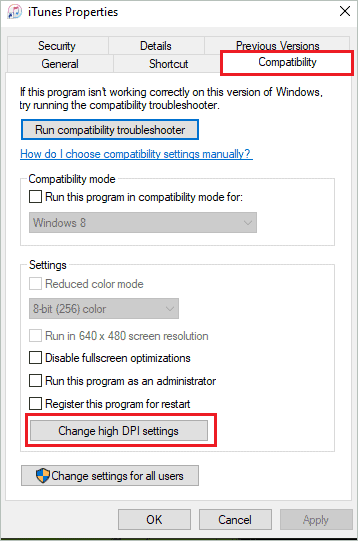
Step 1: Right-click on the iTunes app and click on Properties.
Step 2: In the iTunes Properties dialog box, go to the Compatibility tab and click on Change high DPI settings button.
Step 3: Under the High DPI scaling override section, check the box next to Override high DPI scaling behavior.
Step 4: For Scaling performed by option, select System. Click OK to save the current settings.
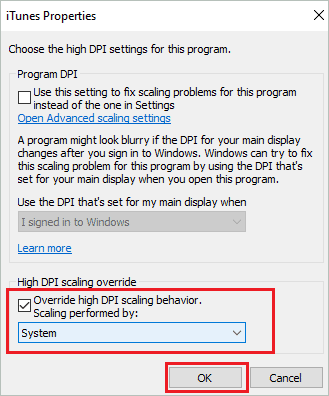
Relaunch the iTunes app and check if thumbnails not showing in Windows 10 problem is fixed with this settings change.
Conclusion
The thumbnails are essentials for the people who are used to recognizing images and videos using it. The thumbnails not showing in Windows 10 is not a very common issue but can be easily fixed with some workarounds. Most probably, you may experience such issues because of the damaged and corrupt thumbnail cache. And in such scenarios, you may see a default icon for the file type.
With the above list of solutions, one can easily fix any issue with the thumbnail previews in Windows 10. If you can’t see picture thumbnails in the iTunes app in Windows 10, the above guide will let you fix that as well. You can get the thumbnails back to Windows folders by following the instructions and solutions given in the above guide.
(Article Updated on 13th January 2021)


