Windows 10 allows you to connect and access the PCs connected to the local network at your home or workplace. Sometimes when a new computer is connected to the network or the entire network is configured again, you may experience issues with network PCs. Many Windows users complain about the computer not showing up on network after these scenarios.
The reason for such issues is a reconfigured network or a new PC, a buggy Windows update, plus issues with network settings and adapters. You can conveniently fix network computers not showing issues. In addition, you can make some small changes and solve the network credentials in Windows 10 error.
Solutions For Computer Is Not Showing Up On The Network
The causes and issues are easy to fix by tweaking Windows 10 settings. You can find various Windows 10 articles on technorms.com. You need to have administrator access, and you are good to start with the given solutions.
1. Restart Your Computer
Restarting the PC can be a fix for many issues in Windows 10. If there are some applications or temporary glitch causing the computer to not show up on the network, restarting the PC will fix it.
Click on the Windows logo and then on the Power button. Lastly, click on Restart.
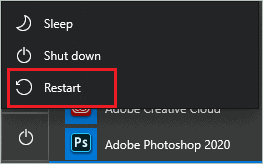
You can head to File Explorer after the restart and check if the computer shows up in the Network.
2. Update Windows 10
As mentioned above, a buggy update can ruin your experience of using a Windows system. However, Microsoft rolls out updates to fix all the bugs and issues in the previous version. If the computer is not showing up on the network because of issues in updates, you can check if there are any new updates available for your computer.
Press Windows key + I to open the Settings app and go to Update & Security. Now, click on Windows Update from the left panel and then click on Check for updates.
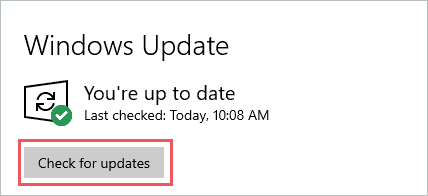
If there are any updates, there will be a link to download and install them. Once done, restart the PC and check if you can see computers on your home network.
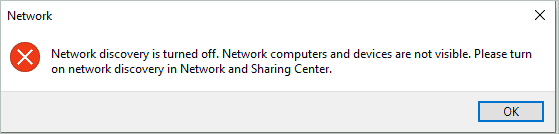
3. Turn on Network Discovery and Sharing on your Computer
If the network and sharing are disabled on your PC, you won’t see any computer in the network. You can enable it by going through the steps given below.
Step 1: Open File Explorer and go to Network from the left panel. You will see an error popping up, click on OK and ignore it.
Step 2: Click on the visible message on the top of the Network section and then click on Turn on network discovery and file sharing.
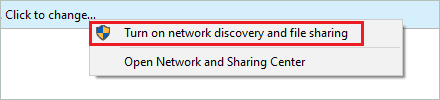
Step 3: A popup will ask you to confirm; if you wish to turn on network discovery, click on Yes.
Now, open the Network again, and you will see all the computers and other smart devices in the network.
4. Make Appropriate Changes in Advanced Sharing Settings
If the above settings also didn’t turn on network discovery for your PC, you can manually do it using the Settings app in Windows 10.
Step 1: Open the Settings app from the Start menu and go to the Network & Internet section.
Step 2: Click on Network and Sharing Center under Advanced network settings.

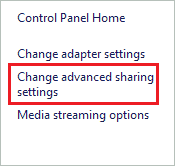
Step 3: When the control panel window opens, click on Change advanced sharing settings on the left side.
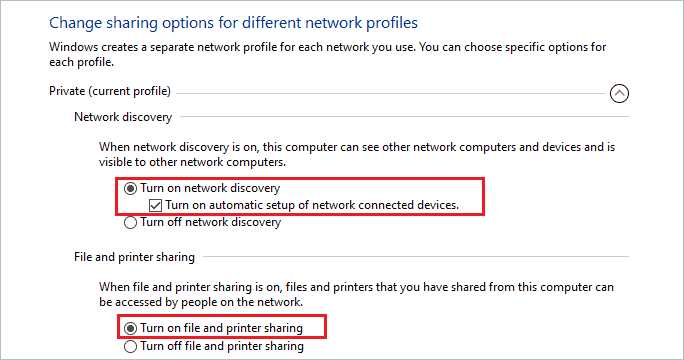
Step 4: Now, under Private (current profile), select ‘Turn on network discovery’ and check on the checkbox stating ‘Turn on automatic setup of network-connected devices.’
Also, select the ‘Turn on file and printer sharing’ option.
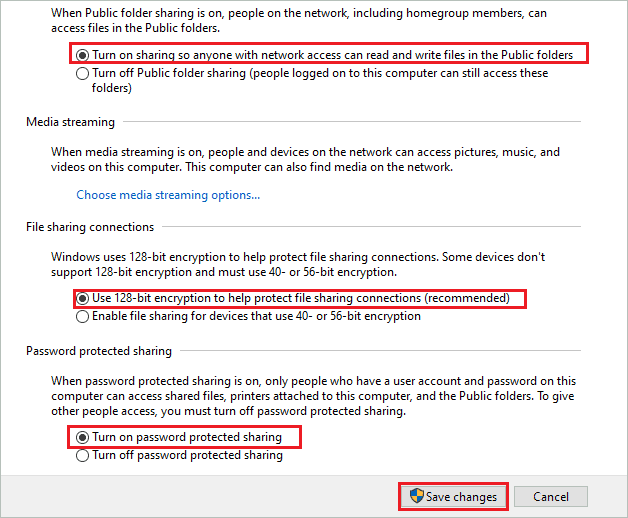
Step 5: You now need to expand the All Networks section and select ‘Turn on sharing so anyone with network access can read and write files in the Public folders.’
Select the ‘Use 128-bit encryption…’ option, and lastly, Turn on password protected sharing to avoid unauthorized access to the shared folders and files.
If you have an old PC with an older operating system version, select ‘Enable file sharing for devices that use 40 or 56-bit encryption’ under File sharing connections.
And if you trust all the PCs in the network, you can turn off password protected sharing.
Step 6: Click on Save changes to save all the changes you recently made and close all the windows that were open. You may need to enter administrator credentials to make the changes if you are not logged in using an admin account.
Now, open Network in File Explorer and check if the PC you were looking for shows up there.
5. Reset Winsock, Renew IP, and Flush DNS
If there are issues in network-related settings, you can experience the computer not showing up on the network even after enabling network discovery and sharing. You can execute some commands to reset Winsock, renew IP, and flush DNS on your PC.
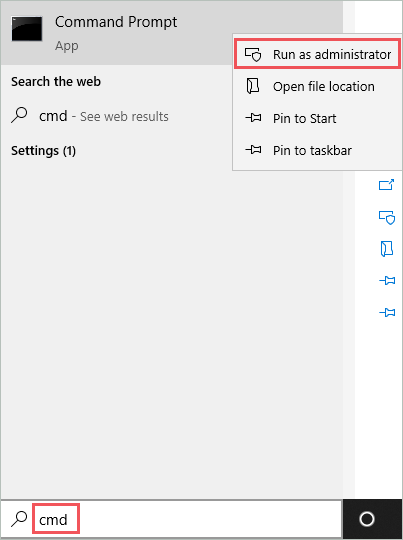
Type cmd in the start menu and right-click on the Command Prompt. Select Run as administrator from the context menu.
In the terminal window, type the below-given command one by one and hit Enter after each command.
netsh winsock resetnetsh int ip resetipconfig /releaseipconfig /renewipconfig /flushdns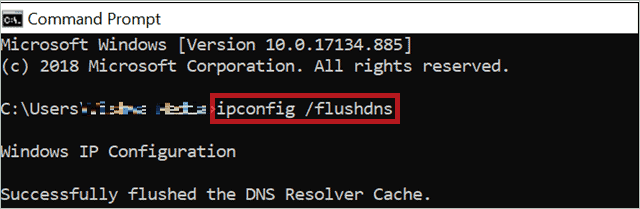
After all the commands are executed, restart the PC and check if you can see all the computers in the network.
6. Update Network Adapter Driver
The outdated drivers are the root cause of many network related issues, including the computer not showing up on the network. You can update network drivers in the Device Manager.
Press Windows key + X and click on Device Manager to open it. Now, expand Network adapters and right-click on the driver. Click on Update driver.
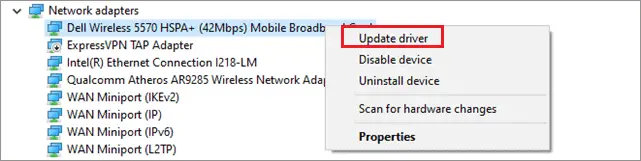
You can refer to our guide on device drivers in Windows 10 for help while updating drivers. Once the drivers are updated, you will see the PC in the Network section of File Explorer.
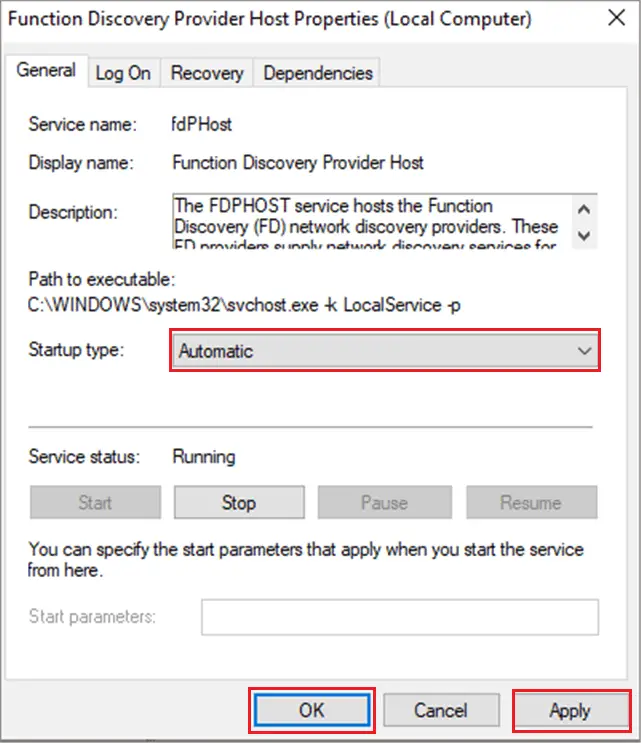
7. Make Changes in the Specific Services
You need to make changes in the below-mentioned services to fix the computer not showing up on the network issue. Make sure you log in using an administrator account to make the changes to the said services.
Step 1: Press Windows key + R to open Run and type services.msc there. Press Enter to open the Services app.
Step 2: In the Services app, find Function Discovery Provider Host service and double-click on it to open its Properties.
Step 3: Navigate to the General tab and change the Startup type to Automatic. Click on Apply and OK.
Step 4: Similarly, open the Function Discovery Resource Publication properties window and change its Startup type to Automatic (Delayed Start). Click on Apply and OK to save it.
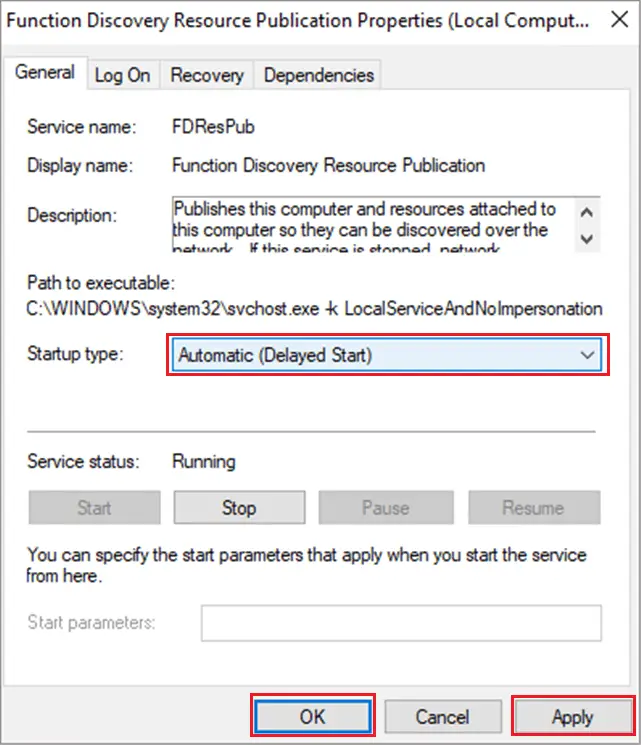
Once done, reboot the PC and check if the Network shows the PCs without any inconvenience.
8. Enable Network Discovery Traffic
You can enable network discovery traffic via command prompt terminal or PowerShell window in Windows 10 to see the network computers on your PC.
Open the command prompt with administrator privileges and execute the below command.
netsh advfirewall firewall set rule group="Network Discovery" new enable=YesIf you are more comfortable with PowerShell, you can follow the below instructions to enable network discovery traffic.
Press Windows key + X and click on Windows PowerShell (Admin) to open it. In the terminal, type in the below command and hit Enter.
Get-NetFirewallRule -DisplayGroup "Network Discovery" -Enabled True -Action Allow -Direction InboundOnce done, you can reboot your PC and check if the computer not showing up on network error is fixed.
9. Allow Network Discovery Protocol
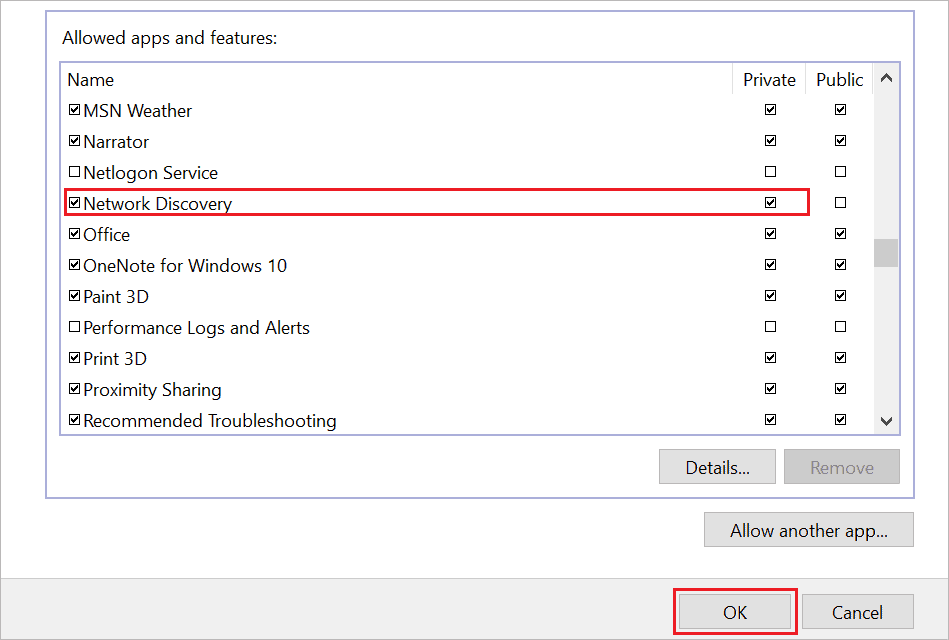
To see the computer available in the network, you need to allow Network Discovery in Windows Firewall, at least for the Private network. You need to make changes in firewall settings, so if you are using any third-party antivirus, connect with support to allow network discovery protocol. The below steps are with respect to Windows Security in Windows 10.
Step 1: Launch the Settings app and go to Update & Security.
Step 2: Go to Windows Security from the left frame and then click on Firewall & network protection.
Step 3: Now, click on ‘Allow an app through firewall.’
Step 4: When the Control Panel window opens, click Change settings button there. You may now be able to enable and disable features through the firewall.
Step 5: Check the checkbox next to the Network Discovery and under the Private option, as shown in the screenshot below.
Click OK to save the change.
Restart the PC now and try connecting to the computer seen in the home network.
10. Access the Network Computer via IP Address
You can try accessing the computer in your network using its IP address. To find the IP address of the network computer, open Command Prompt there and execute the ipconfig /all command there.
The IPv4 or IPv6 address is the IP address of your computer. Now, open File Explorer on your personal computer and type the IP address after two slashes in the address bar there. For example, \\192.168.1.19.

You may now see the network computer in your File Explorer. This is not a permanent way to access the network computer, but you can get your work done temporarily until you find the right fix.
11. Turn On SMB 1.0/CIFS File Sharing Support
The SMB 1.0/CIFS File Sharing Support feature must be enabled if the computer is not showing up on the network. You can do so conveniently from the control panel.
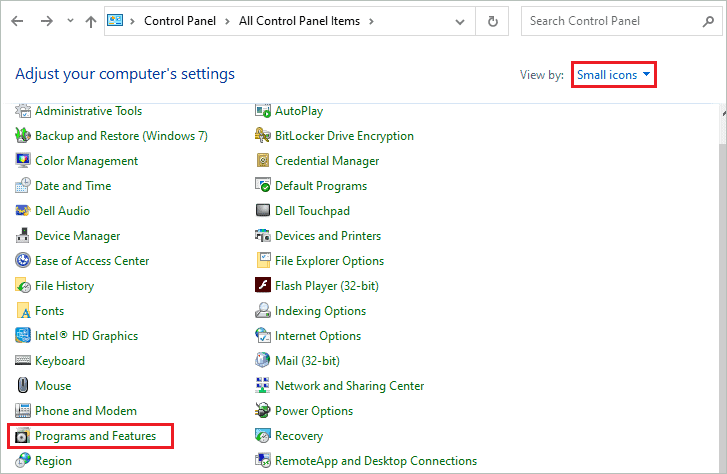
Open the control panel by searching for it in the Start menu and click on Program and Features. Make sure you have selected Small icons for View by option to see Programs and Features option.
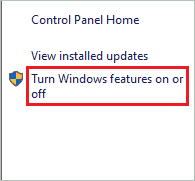
In the Program Features window, click on Turn Windows Features on or off.
Now, search for SMB 1.0/CIFS File Sharing Support and check the checkbox next to it. Also, expand SMB 1.0 and check if all the checkboxes under it are ticked.
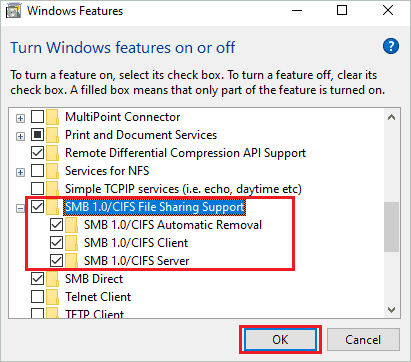
Click on OK to save it and reboot your computer. You can now go to File Explorer and check if you can see all the PCs in the Network section.
12. Check Local Network Configuration
If there are issues in local network settings, you won’t be able to see computers and devices in the Network. You can check if the network is working properly or not by using the ping command in PowerShell.
You can open the PowerShell terminal and execute the ping command followed by the hostname or IP address of the local computer. For example, ping www.google.com or ping 192.168.1.19.
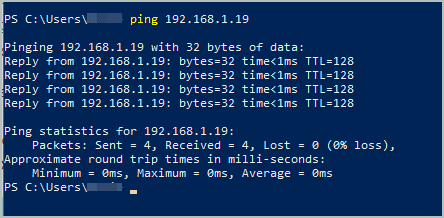
If there is a response for the ping command, it means the network configuration is correct, and something else is wrong. However, if you cannot get a response, check the network settings by following the below steps.
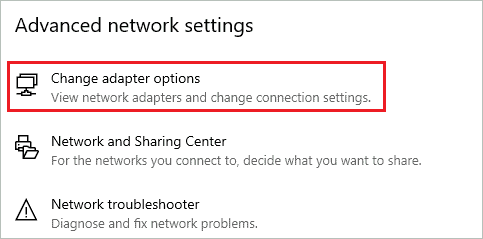
Step 1: Open Settings and go to Network & Internet.
Step 2: Click on Change adapter options under Advanced network settings.
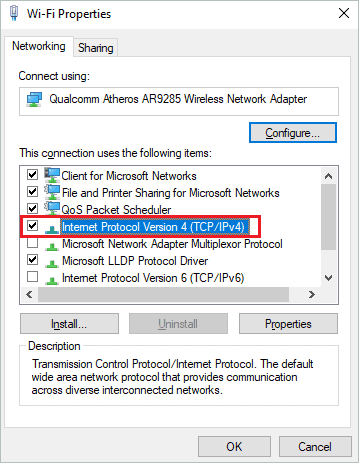
Step 3: Right-click on the connected network and select Properties.
Step 4: In the Properties dialog box, double-click on Internet Protocol Version 4 (TCP/IPv4). If you use IPv6, then click on Internet Protocol Version 4 (TCP/IPv4).
Step 5: Now, make sure ‘Obtain an IP address automatically’ and ‘Obtain DNS server address automatically’ is selected.
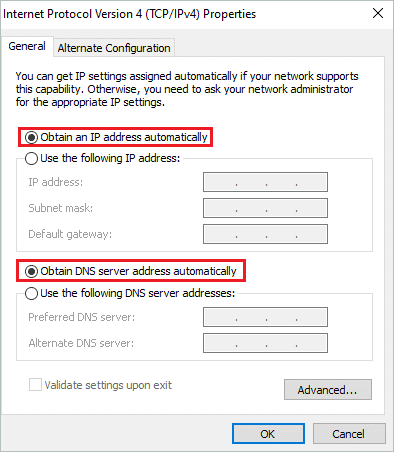
Alternatively, you can also Google DNS Server by selecting ‘Use the following DNS server addresses’ and adding the below-given address.
Preferred DNS server: 8.8.8.8Alternative DNS server: 8.8.4.4Once done, save it and check if you can connect to the network computer without any issues.
13. Run Network Adapter Troubleshooter
If the network adapter persists even after updating the drivers, you can run the troubleshooter to let Windows fix the issues for you.
Open Settings and go to Update & Security ➜ Troubleshoot. And then click on Additional troubleshooters.
Now, find the Network Adapter and click on it. Lastly, click on the Run the troubleshooter button.
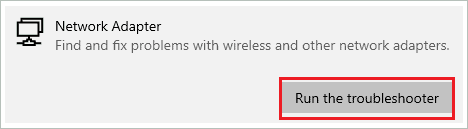
Wait till Windows find and fix all the issues for you.
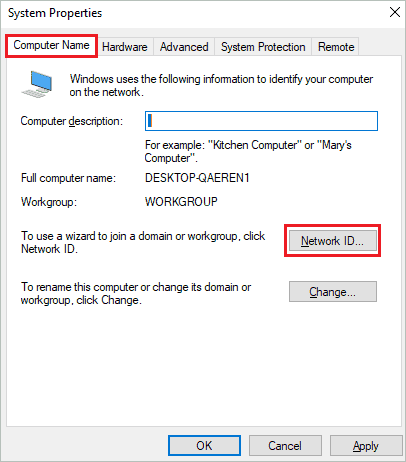
14. Make Correct Workgroup Settings
If the workgroup settings are wrong or you have added your PC to some wrong workgroup, you won’t be able to see computers in the network.
Press Windows key + R to open Run and type sysdm.cpl SystemProperties there. Press Enter to open System Properties.
Go to the Computer Name tab and click on the Network ID.
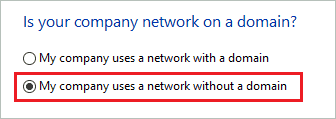
On the window that pops up, select the option saying ‘This computer is part of a business network: I use it to connect to another computer at work’ and click on Next.
Then select ‘My company uses a network without a domain’ and click on Next.
Add Workgroup name in the text box next to Workgroup and then click on Next to continue with the process.
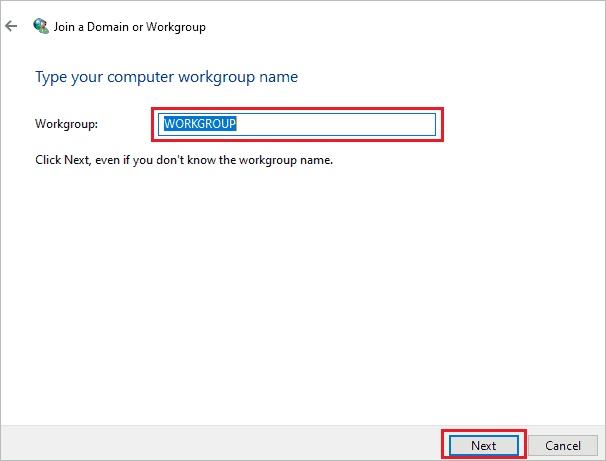
You will need to reboot the PC when you are done and check if the computer not showing up on network issues is fixed with this.
15. Delete the Trigger for FDResPub
Deleting trigger for Function Discovery Resource Publication service to fix the network computer not showing up issues.
Open the command prompt with administrator privileges and execute the below command.
sc triggerinfo FDResPub deleteRestart your computer and check if the computer shows up in the network in File Explorer.
16. Restart the FDResPub Service
You can try restarting the Function Discovery Resource Publication Service with the following steps to fix computer not showing up on network.
Step 1: Press the Windows key + R to open Run and type services.msc there. Press Enter to open the Services app.

Step 2: In the Services app, find Function Discovery Resource Publication Service. Right-click on it and select “Restart.”

17. Disable Fast Startup
Disabling fast startup may not work for everyone. But as it has worked for some users to fix computer not showing up on network, you may as well try it.
Step 1: Open Settings and go to System.

Step 2: Select Power & sleep in the left menu, and on the right, select Additional power settings under Related settings.

Step 3: In the Power Options window, select “Choose what the power buttons do” in the left menu.

Step 4: In the next window that opens, click “Change settings that are currently unavailable.”

Step 5: Uncheck the option “Turn on fast startup” to disable the fast startup of Windows 10.
18. Perform a Network Reset
If nothing from the above works, you can reset the network to fix computer not showing up on network and the issues with network computers. Network reset will set the network settings to default and also reinstall network adapters. Network-related software like VPN will be removed. So, make sure you have the backup of the networking software on your computer.
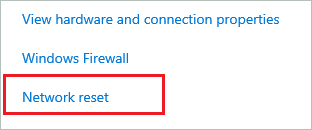
To perform a network reset, launch the Settings app and go to the Network & Internet section. Now, click on Network reset link.
On the next window, click on the Reset now button. If asked for confirmation, click on yes to proceed with the reset.
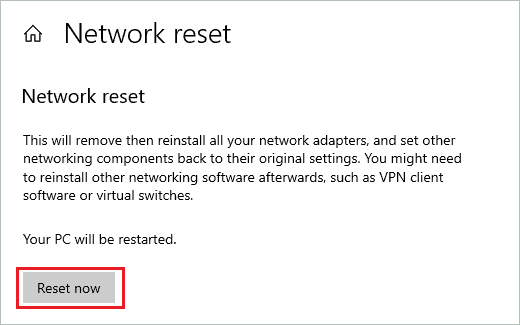
Once done, you may need to reboot your device.
19. Enable Remote Desktop in Windows 10 Pro
The last one on the list is a dedicated method solely for Windows 10 Professional Editions to resolve computer not showing up on network.
Step 1: Type “Remote desktop settings” in the search bar and open Remote Desktop settings when it comes up.

Step 2: On the right panel, you will see an option named “Enable Remote Desktop.” Toggle the switch on to enable Remote Desktop on your PC.
Restart your PC.
Conclusion
Accessing computers makes it easy to work in a shared network environment. Most of the time, you just need to enable network discovery to see the computer in the network. However, sometimes unwanted glitches can cause the computer not showing up on network. In such scenarios, you need to fix the network and security settings.
The above guide can help you do so simply and conveniently. You will require some technical expertise to perform some fixes, but a restart or Windows troubleshooter will fix it for you if it is a temporary glitch. The solution that will work depends on why it has caused the network computer not to show up.
(Article Updated on 13th March 2023)


