Running multiple operating systems on a computer is something all tech enthusiasts enjoy doing. You can do this by installing the operating system to a separate hard disk partition or as a virtual machine. Installing an operating system as a virtual machine is more advantageous because you don’t have to constantly restart your computer to access the other OS.
However, in order to create a virtual machine, your processor must support virtualization. Fortunately, there are many tools that enable you to check if your CPU or processor supports hardware virtualization. Even if you don’t want to carry out those extra steps of downloading a new tool on your PC, you can still use some in-built options in Windows 10 to know about your CPU’s compatibility with virtualization technology.
To utilize and make the best of your CPU virtualization feature, first of all, you have to make sure if your processor supports virtualization or not. But even before that, first, you have to check which processor you are currently using.
This article contains many side queries related to virtualization technology and resolves most of your issues while gaining access to CPU virtualization. Let’s go step by step right from knowing what processor you have, to enable virtualization on your PC. Unfortunately, we can’t help you if your processor has no hardware support for virtualization technology.
How to Find Out What Processor I Have?
Before checking your CPU’s compatibility to virtualization technology check which processor resides on your system. There are two easy ways to find out what processor you have on your computer.
1. Using This PC option
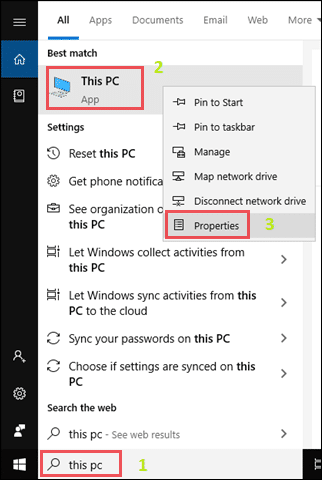
Go to This PC either from the Windows search section or File Explorer. Click on the Windows icon and type This PC, now right-click on it. To know the details of your PC and see which processor do you have, click on Properties.
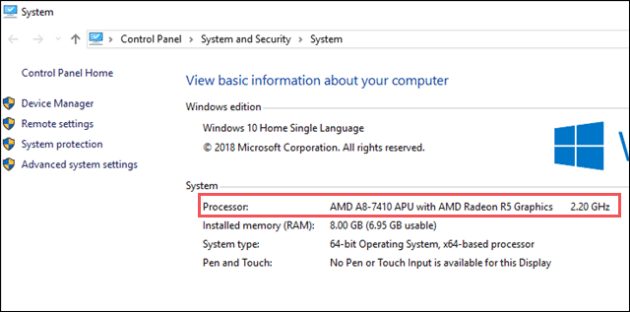
Under the System section, you can see your processor with its detailed name. As you can see in the image below, this computer has an AMD processor.
2. Using Task Manager
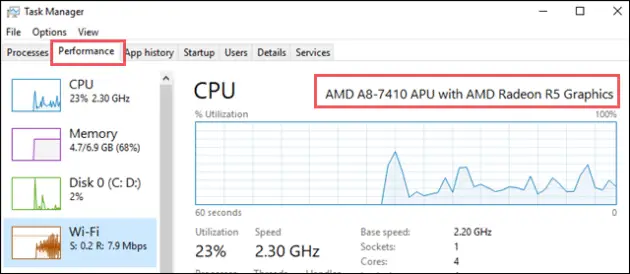
Another way to check which processor do you have is Task Manager. Open Task Manager using CTRL + SHIFT + ESC. Go to the Performance tab and you can see your processor’s name right there with other details.
Now that you know what processor do you have on your PC, let’s move to the next section of this article to check if your processor supports virtualization technology or not.
How to Check if Your CPU Supports Virtualization Technology?
Before jumping to the straightforward, processor-specific tools to check CPU virtualization of your PC, why don’t we first utilize the built-in options that Windows 10 already has?
The very first and quicker way to check CPU virtualization support on your PC is from Task Manager. The second way is using Command Prompt, and then comes the dedicated utility tools for Intel and AMD processors. Details below.
1. Use Task Manager to Check CPU Virtualization
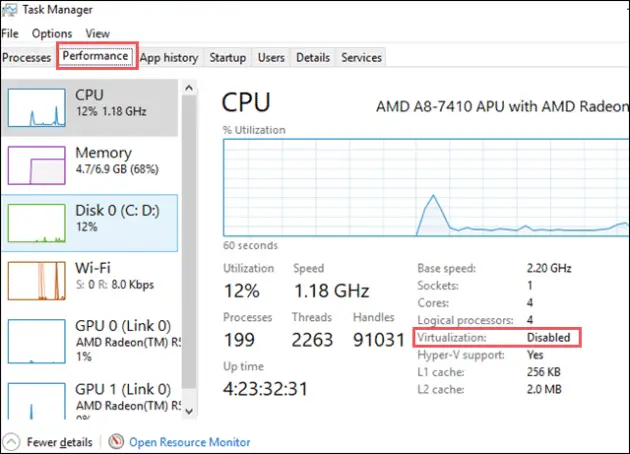
To check if you have virtualization technology support on your processor, open Task Manager using CTRL + SHIFT + ESC. Now, if your processor supports virtualization, you will find it mentioned where other details are shown.
If you have virtualization already turned ON on your PC, you will see Enabled mentioned or else Disabled. And if your processor doesn’t support virtualization technology, you will not see Virtualization and Hyper-V mentioned anywhere at all.
Well, in our case it is Disabled, and we will explore how to enable virtualization on your CPU later in the article.
Note: Those who cannot figure out what is Hyper-V, here is a quick note for you. Formerly known as Windows Server Virtualization, Microsoft Hyper-V is a native hypervisor that can create virtual machines on Windows running x86-64 system. Know more about Hyper-V on its official site.
2: Use Command Prompt to Check Your Processor’s Compatibility With Virtualization Technology
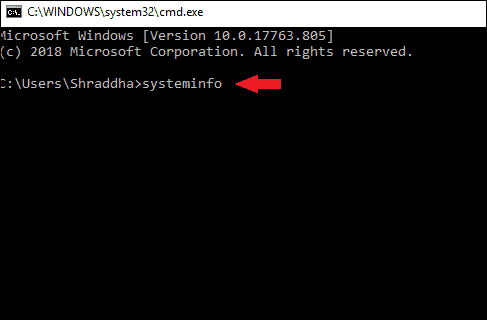
Open Command Prompt. Use Windows Key + R to open run box, type cmd and hit Enter. Now in the Command Prompt, type systeminfo command and Enter. This command will display all the details of your system including Virtualization support.
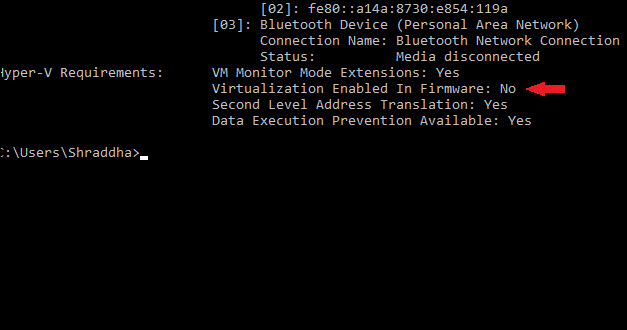
If your processor supports Virtualization technology, you see a whole section of Hyper-V Requirements with its status. If Virtualization is turned OFF on your system, you will see a NO for Virtualization Enabled In Firmware option.
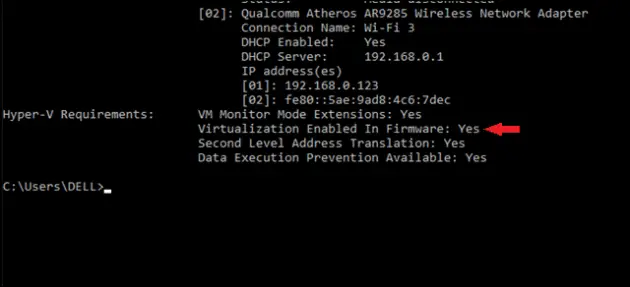
If virtualization is enabled, you can see a YES against Virtualization Enabled in Firmware.
3. Use Free Tools to Check for CPU Virtualization Support
Intel and AMD are two of the most prominent PC processor providers in the world. Both of them provide tools for you to check if your processor has virtualization support. In order for this to work, your processor must match the tool.
For example, if you have an AMD processor, you need to download the AMD Virtualization Compatibility tool. Intel processor users can download the Intel Processor Identification Utility here.
AMD Virtualization Compatibility Tool
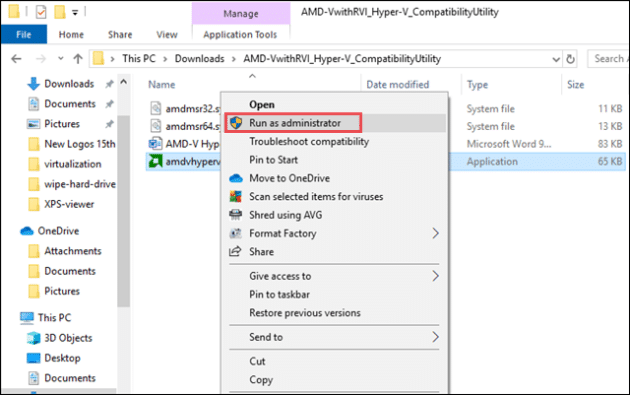
Let’s get started with the AMD Virtualization compatibility tool and later on we will check the Intel Processor Identification Utility. When you download the AMD Virtualization Compatibility tool, it comes in a ZIP format that you have to extract and run the .exe file as an administrator.
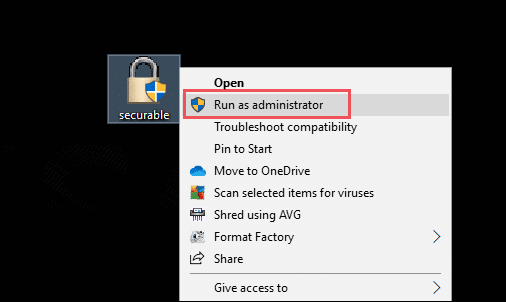
It is not an installable tool but an executable. It does not need proper installation, and you have to open the extracted zip file and simply run the application with admin privileges like shown in the following image.
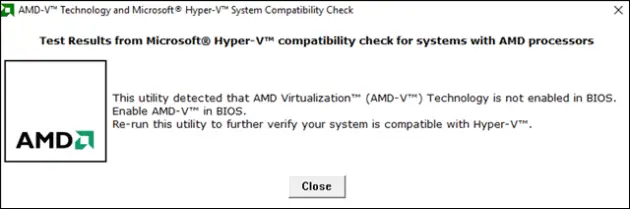
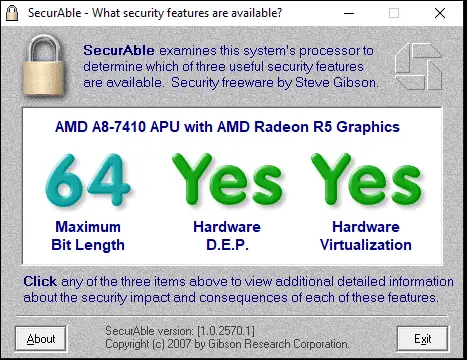
After you run the application file, it will give you the current state of virtualization on your processor. As shown in the following image, this AMD processor supports virtualization but currently, it is disabled. We can enable it by going into the BIOS settings that we will see later in the article. Once you enable the virtualization, re-run this utility to know whether it supports Hyper-V or not.
Intel Processor Identification Utility
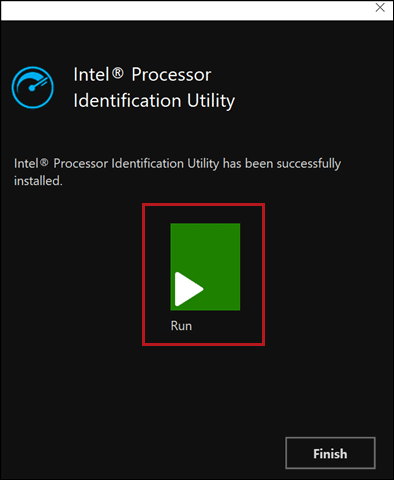
Once you download and install the Intel Processor Identification utility, you will see a window that asks you if you want to run the tool or not. Click on Run.
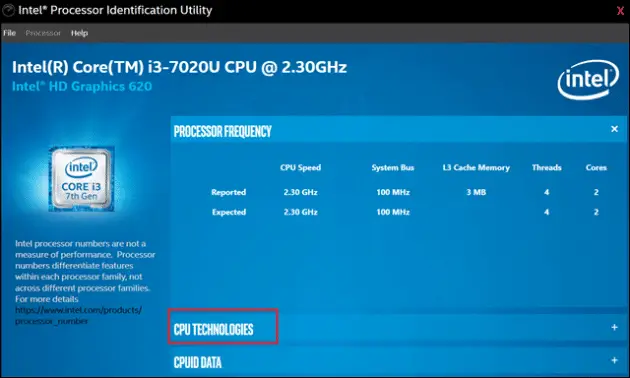
This is the main window of the Intel Processor Identification utility. To check if your PC supports virtualization, click the CPU Technologies option.
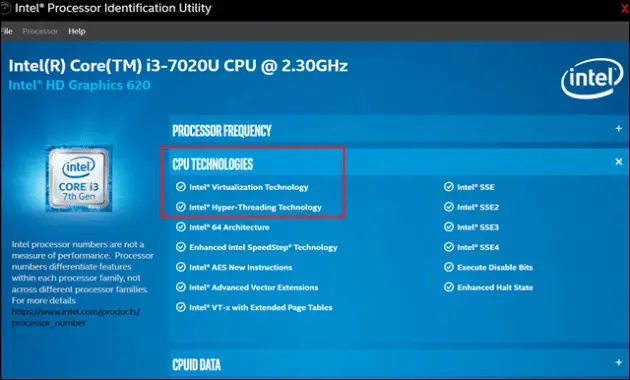
Search for the Intel Virtualization Technology section to determine if your processor supports virtualization.
Use Securable to Check for CPU Virtualization Support
Securable is a very easy way to check if your processor has virtualization support because it requires no installation. All you have to do is run the executable (.exe) file. Right-click the file you have downloaded, and select “Run as administrator.”
It will then show you if your processor supports virtualization.
Hardware-Assisted Virtualization (HAV) Detection Tool
Only for Windows Vista, Windows 7 and not for Windows 8 and Windows 10
If you have specific versions of Windows Vista, Windows XP or Windows 7 OS, this tool is for you to check if your processor supports HAV and if this setting is enabled. Before downloading this tool first check the system requirements on its official source. In order to take advantage of features such as Windows XP Mode, your processor must support virtualization.
Microsoft provides users the Hardware-Assisted Virtualization Detection Tool to help users determine if their processor supports virtualization. We tried running this tool on Windows 10 and we got the output as seen in the following image.
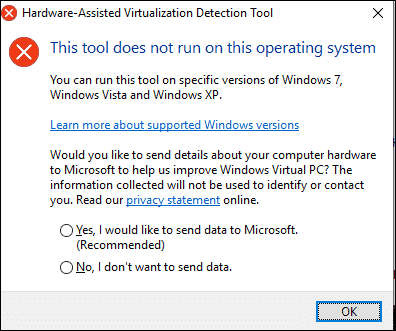
Like securable, this program requires no installation. All you have to do is double-click the executable file, and it will tell whether or not your processor supports virtualization.
If your processor does not support virtualization, you might want to get a new CPU. You can check processor performance and ratings on CPUboss while making a decision on which CPU to get.
How do I Enable Virtualization on my CPU?
Each laptop differs in the way of entering the BIOS settings. Although the available options in the BIOS are quite similar for every laptop, process and function keys may differ a bit. In our example, we have used an HP laptop to show you how to enable virtualization on your CPU. We will also brief you on the process of enabling virtualization on different laptop models including Acer, Asus, Dell, Lenovo.
Below are the steps to enable virtualization on your laptop:
Turn ON or Reboot your computer.
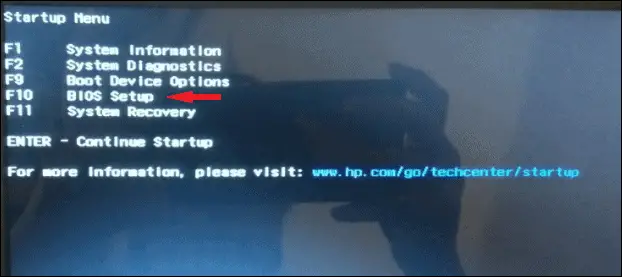
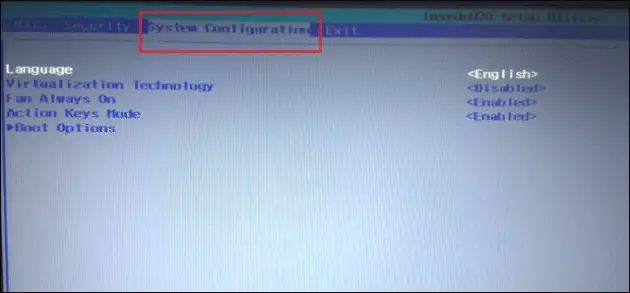
On startup, before you see the Windows logo or anything on the screen, repeatedly press ESC key until you see a screen like shown in the following image. To enter the BIOS settings, press F10.
Now, use the right arrow key of your laptop keypad to move to the System Configuration tab.
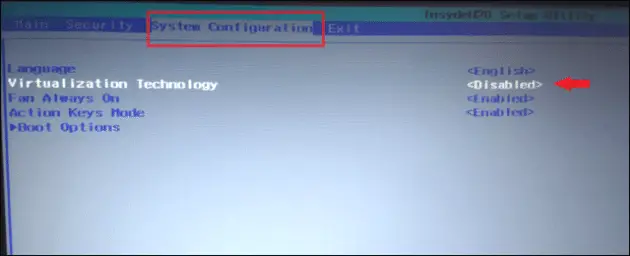
Select Virtualization Technology using the arrow key and hit the Enter key.
Now using the arrows keys only select Enabled and again hit Enter. Now press the F10 key and it will ask you if you want to save and exit. Select and Yes and press Enter.
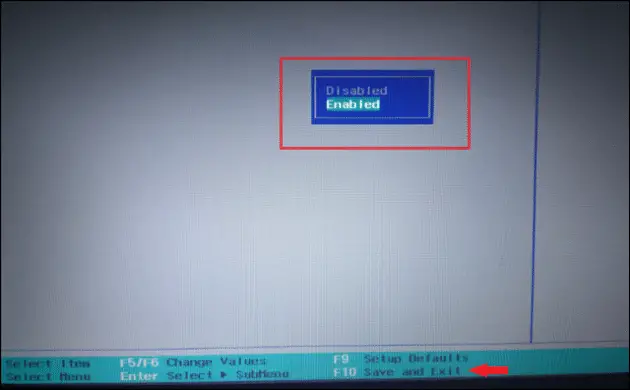
Finally, Reboot your computer.
Well, once you know how to enter the BIOS settings, it’s easy to enable virtualization in any laptop since the steps are almost similar. Only the key to enter the BIOS mode differs.
Listed below are some common keys that will help you get into the BIOS settings on different models of laptops. If these keys do not work for you, please check your laptop’s manufacturer website for help.
Acer: F2 or Delete
Asus: F2 or Delete or Insert key and sometimes F10 also works
DELL: F2 or F1 or Delete or F12 or F3
HP: F10 or ESC or F1 or F2 or F6 or F11
Lenovo: F1 or F2
You can refer to our guide to enable or disable secure boot for steps to enter BIOS on Asus machines.
Wrapping Up
In some cases, virtualization is disabled by default BIOS settings. If you know your CPU model supports virtualization, you need to enable it from your BIOS settings. If your processor does not support virtualization at all, you can try buying a new processor or new computer.
The computer in which tests were performed doesn’t support virtualization. Yet, it is still able to run Windows XP Mode and live CDs with independent operating systems.
You can always try using basic virtual machines such as live CDs, Windows XP Mode, etc. However, you will need virtualization for more robust systems such as Windows 7 and 8.
(Article Updated on 16th November 2019)
See Also:
- The Definitive Guide to Installing Windows 8 on VirtualBox
- How To Install Windows 8 in a Parallels Virtual Machine [Mac]
- Run Android Apps on Your Windows PC with BlueStacks App Player


