Booting time is defined as the time required for a computer to be ready for use once the power is turned on. Windows 10 may be the most used operating system globally. However, it still has a long way to become the perfect OS, given the multiple numbers of issues it encounters. The Windows 10 slow boot issue is one such problem that upsets many people.
There are various reasons why the Windows 10 computer takes a long time to startup properly. Sometimes, this issue may arise due to third-party applications or if your system is affected by a deadly virus. The specifications of a Windows 10 PC also play a crucial role in determining a PC’s boot process time.
15 Solutions To Fix Windows 10 Slow Boot Issue
There are a bunch of practical solutions to try out if you are experiencing slow start issues. Let’s get into these solutions and determine how to resolve the Windows 10 slow boot issue.
1. Use the Windows 10 Startup Manager
If you have any error problems with the booting, you can use the Windows 10 Startup Manager to resolve them.
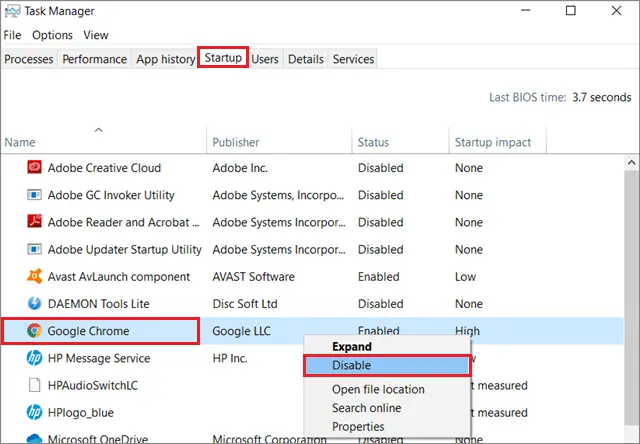
To begin with, right-click on the taskbar and select Task Manager from the context menu that appears. You can also use the Ctrl+Alt+Esc keyboard shortcut to open the Task Manager.
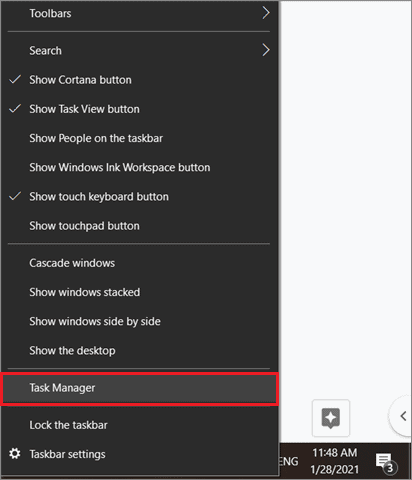
Next, click on More Details and select the Startup tab. In this tab, you will see all the programs that start immediately after your Windows 10 computer boots.
These programs have either a low, medium, or high impact on your boot operation. You can choose to disable the programs with a high impact. Now, right-click on any startup program with a high impact and select Disable from the drop-down menu.
You can start the service manually as and when you wish. Check if the Windows 10 slow boot times issue is resolved after following this method.
2. Tweak the BIOS Settings
If the Windows 10 slow startup issue occurs, you can make certain changes in the BIOS of your PC and check if that results in a positive output.
Press the BIOS key as specified in the Windows 10 PC manual during the startup process. You can then disable the option that allows the BIOS to check DVD drives or network locations every time your PC starts. Doing so will reduce the boot time.
You can also disable the USB Storage Function used to boot a PC from a USB drive. Make sure you check the motherboard manual to see how to tweak these settings. If you are ready to spend cash, consider buying a Solid State Drive(SSD) to enhance your overall Windows 10 computer speed.
If the above solutions don’t work, you can try changing the boot order in BIOS. Firstly, you need to enter the BIOS screen by pressing the key specified in your computer manual.
Then, use the arrow keys to navigate to the BOOT tab. This tab reveals the order in which the devices start booting once the PC starts.
You need to change the boot sequence priority and assign the top priority to the hard drive. To do that, move the hard drive option to the first position and check if the startup procedure shows any improvement.
3. Disable Fast Startup
Sometimes, the Fast Startup feature can also cause the Windows 10 boot time issue. So, you can disable Fast Startup and check if that resolves the issue.
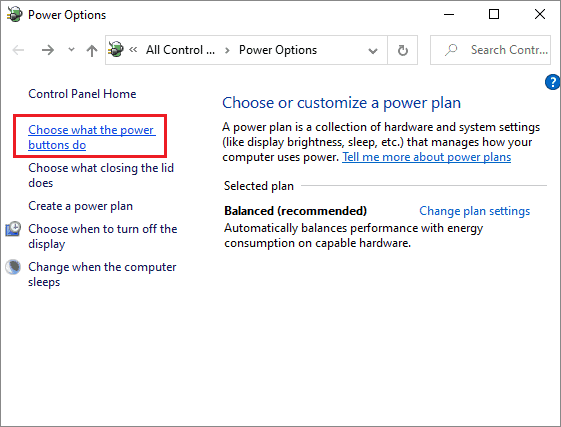
Open the Start menu and enter Control Panel in the search bar on the desktop. Once you open the panel, select Power Options.
Then, click on ‘Choose what the Power buttons can do’ in the left pane. Now, click on Change plan settings.
Then, click on ‘Change settings that are currently unavailable.’
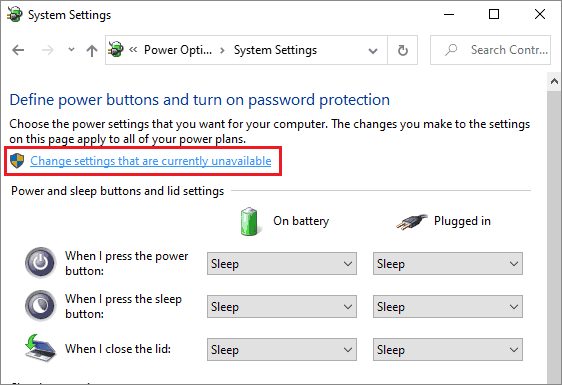
Uncheck Turn on Fast Startup(Recommended), and click Save changes.
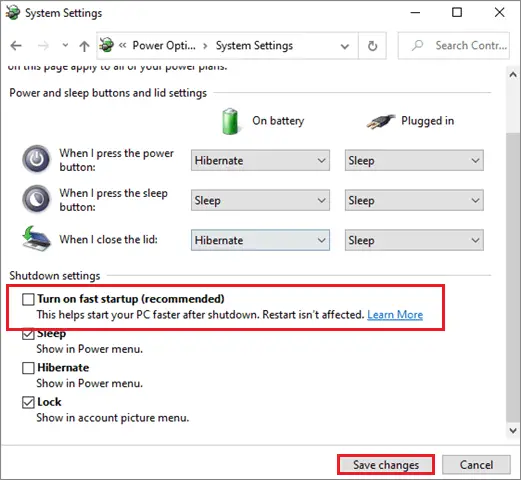
The boot failure or slow boot problems should be resolved now.
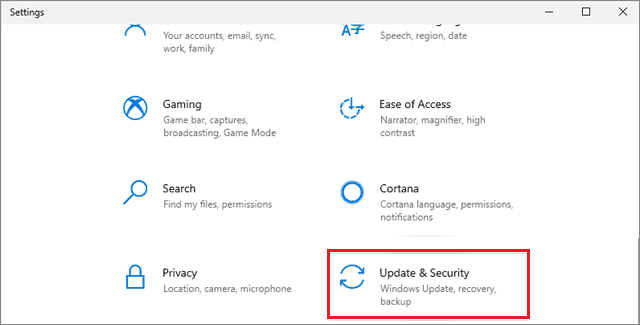
4. Update Windows 10
The absence of new updates can also be the reason why there is a slow boot in Windows 10. By installing updates, you can access new features that enhance your computer.
Press the Win key + I keyboard shortcut and open the Settings app. Choose Update & Security from the available list of alternatives.
Then, click on the Check for Updates to see if any new features are available. You can click Download if any new update is detected.
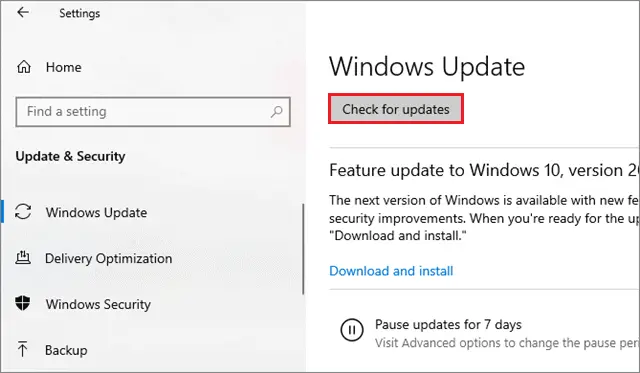
Restart your computer after installing the new update and check if the slow boot issue is fixed.
5. Update the Drivers
Updating drivers on a timely basis is a crucial part of maintaining a laptop’s wear and tear. The Windows 10 slow boot issue can occur if the drivers are outdated. You need to update the graphics card driver to resolve the slow start problem. You can check the guide to update the driver in Windows 10 for multiple Windows 10 problems.
6. Update BIOS
If you have encountered the Windows 10 slow startup issue, you may need to update your BIOS to eliminate the problem. Before you update the BIOS version, read your motherboard manual for detailed instructions to avoid causing severe damage to your laptop. Some people have reported that you need to replace the entire BIOS chip to fix the Windows 10 slow boot issue. Since that is an advanced procedure, make sure you consult an expert for the same.
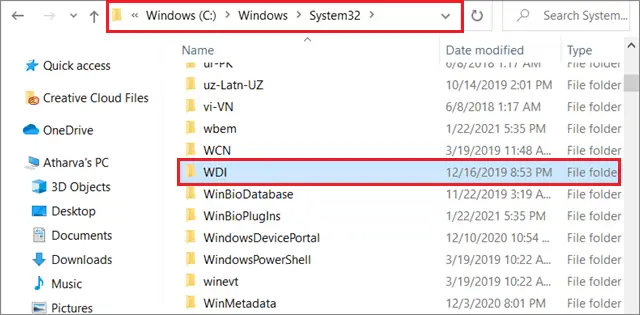
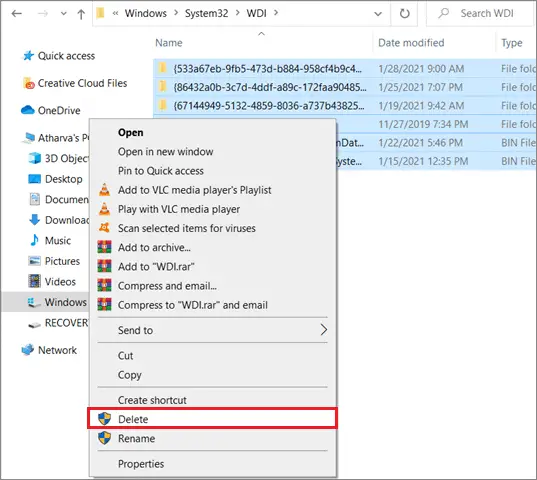
7. Delete All Files From WDI Registry
Deleting files from the WDI registry has solved the slow boot issues for many Windows 10 operators. You need to access this registry using File Explorer.
To start with, type File Explorer in the Cortana search box and open it. Then, navigate to the given path.
C:/Windows/System32/Select the WDI folder to open the directory.
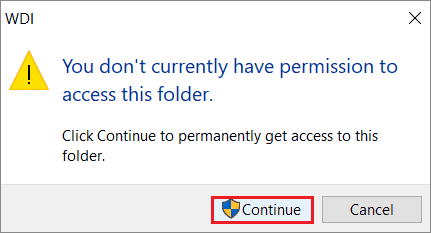
If you witness a security prompt, click Continue for confirmation.
Now, select all the files in the directory, right-click on them, and choose Delete from the context menu.
After this step, reboot your computer and check if there is any level of improvement in the Windows 10 boot time issue.
8. Install Intel Rapid Store Technology Driver
An outdated version of the Install Intel Rapid Store Technology driver can also be the reason why you might encounter slow boot in Windows 10 machines. To resolve this problem, you need to download and install the latest versions of this driver and eliminate the slow start problem on your Windows 10 PC.
9. Run Malware Scan
Viruses and malware threats are among the most crucial reasons for slowing down computer speed and can be the main reason for Windows 10 slow boot issue. You can use a malware removal tool or antivirus software to perform a virus scan and delete all the corrupted system files to fix slow startup Windows problems. Once the scan is complete, check if the issue is resolved.
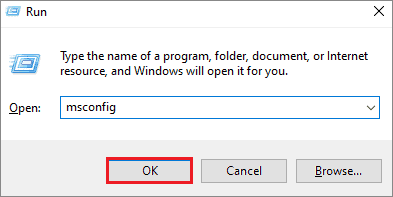
10. Perform A Clean Boot
The clean boot helps users identify problems with the background processes. It uses only essential files and folders required to run a computer.
Open the Run window and enter msconfig and click on OK. The System Configuration window will open on the screen after this step.
Go to the Services tab and select the Hide all Microsoft devices box. Then, choose Disable all.
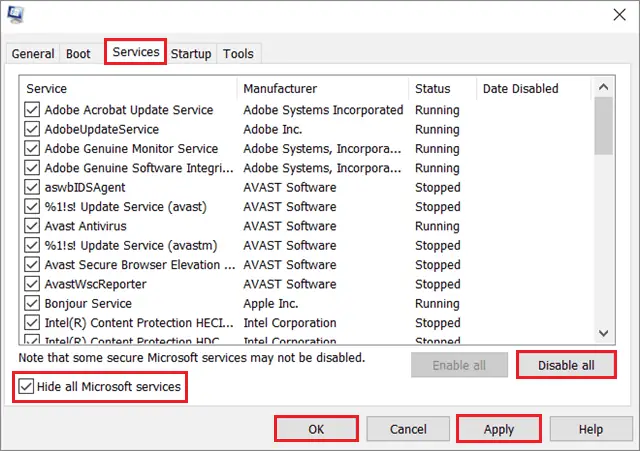
Open the Startup tab and click on Open Task Manager.

Now, right-click on all the tasks that have a high impact and disable them.

Then, click on Ok in the System Configuration window and restart your computer. Now, check if the Windows 10 slow boot issue is fixed.
11. Set Virtual Memory
If the computer RAM is burdened with too much load, you can use the virtual memory RAM, also known as the page file, to improve the start process speed. The page file is a hidden system file on every Windows 10 PC. The main objective is to increase the allocated volume of the virtual memory RAM to fix the Windows 10 boot time issue.
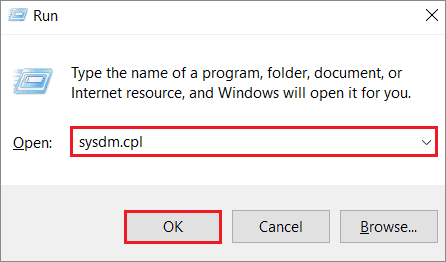
First, press the Win key + R shortcut to open the Run window; type sysdm.cpl in the search bar and click on OK.
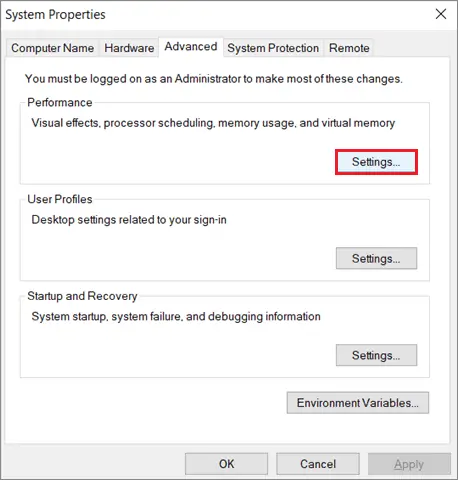
Once the System Properties window opens, select the Advanced tab and click on Settings in the Performance section.
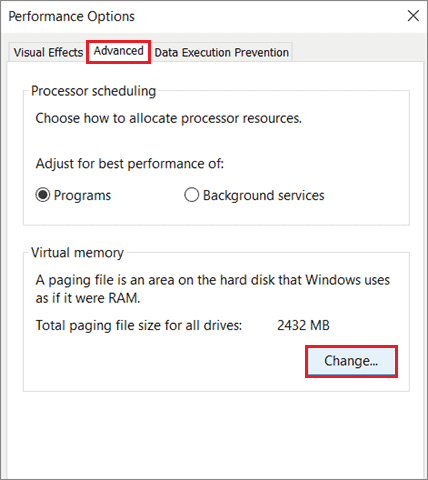
In the Performance Options dialog box, go to the Advanced tab and click Change under the Virtual Memory section.
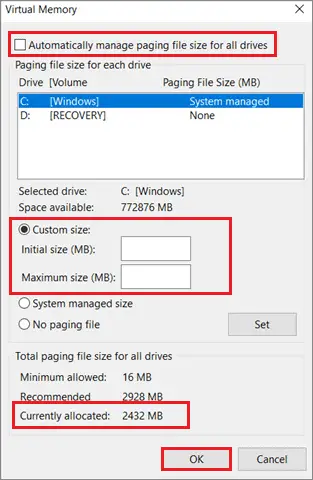
In the next window, deselect the ‘Automatically manage paging file size for all drivers’ checkbox. Then, select Custom size and enter the RAM size in the Initial size and Maximum size fields.
In the Initial field, always enter a higher figure than the Currently Allocated size given in the same window. The Maximum value should be three times larger than your actual RAM size.
Then, click on OK and reboot the computer to see if the Windows 10 slow boot issue has been fixed.
12. Disable AMD Power Saver
If your computer has an AMD Graphics Card, you can disable the power-saving feature that turns off the graphics card.
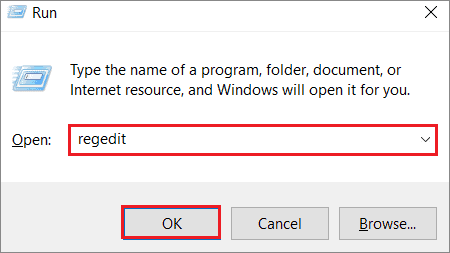
First and foremost, open the Run command window using the Win key + R shortcut. Then, enter regedit to open the registry editor.
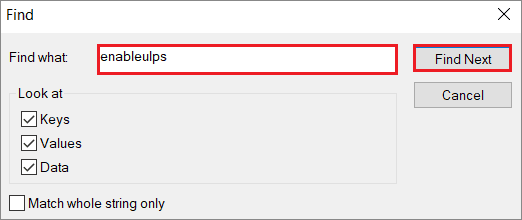
Click on the Edit tab and select Find from the context menu. You can also open the Find window using the Ctrl + F shortcut.

Enter enableulps in the search box and click on Find Next.
Once you find the file in the right pane, double-click on it and change the value data from 1 to 0.
After you have followed all these simple steps, check if the Windows 10 slow boot issue still exists.
13. Run Startup Repair
Using the Windows Startup Repair process can help you solve the Windows 10 slow boot error. It is a recovery tool to solve problems that restrict Windows from booting successfully.
First, turn off your Windows 10 PC. Then, press the power button and hold it until the Windows 10 computer shuts down automatically; this will take about 5 seconds.
Next, you will see the Windows logo with ‘Preparing Automatic Repair’ below. This action will diagnose your PC for any errors or problems.
When the Automatic Repair window opens, select Advanced Options. Click on Troubleshoot in the Recovery window.
Again choose Advanced Options. Then, select Startup Settings. Doing this will automatically repair your Windows 10 computer. Restart your computer to see if this Startup Repair operation mitigates the boot time successfully.
14. Defragment Computer Hard Drive
If you face the Windows slow boot issue, you can try defragging your PC to speed up the startup procedure. You need to carry out disk defragmentation when there is too much fragmentation of content on your computer; doing so improves the disk drive performance.
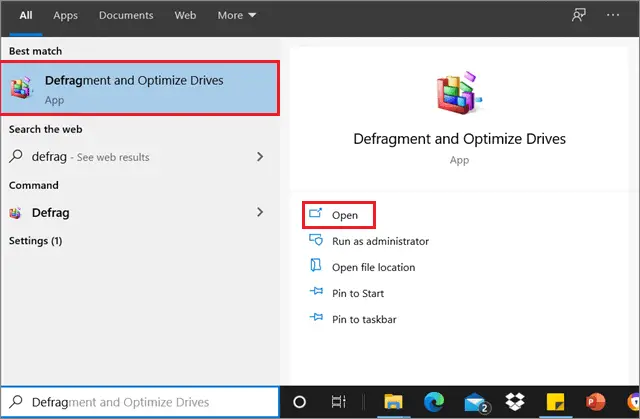
Type Defrag in the Cortana search bar and select Defragment and Optimize Drives from the results.
Then, select the hard disk drive you wish to optimize in the Optimize Drives dialog box. Select Optimize to start with the defragmentation.
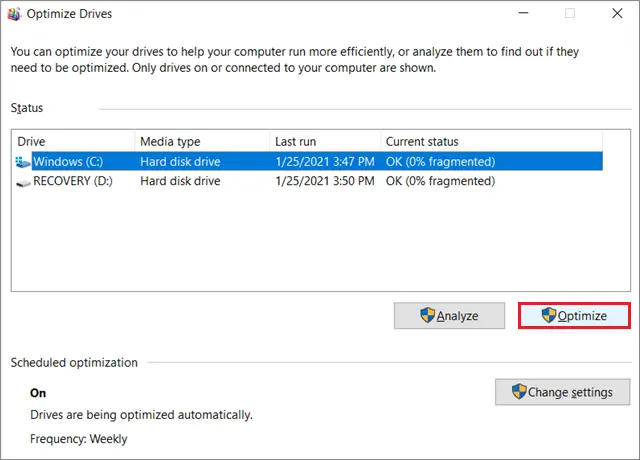
Click on Close after you have defragmented all the required drives.
15. Reset Microsoft Windows 10
The last alternative method to resolve the booting issue is to reset your system. You have to reinstall Windows 10 while keeping your files safe. To start with the reset and installation procedure, open the Start menu, and click on Power. Now, press and hold the Shift key and simultaneously click on Restart.
In the next window, you will get three options. Click on Reset this PC.
Next, you need to choose between ‘Remove everything’ or ‘Keep my files’ depending on whether you wish to delete all the files or keep them. If you want to restore the default settings, you can go with ‘Keep my files.’
In the next window, Windows will warn you that you won’t be able to switch back to the previous versions. Click on Next to continue.
Then, Click on Reset, and select Continue in the next window to start the Reset procedure. Check if the Windows 10 slow boot issue is fixed.
Conclusion
Slow boot times are dreaded by Windows users worldwide, as they increase the loss of variable time and turn off your mood to work at times. A slow startup time is just another process that guarantees your frustration and might even turn off your mood to work properly.
If you have encountered the Windows 10 slow boot issue far often, you can follow the trusted methods mentioned above to eradicate the problem. We recommend you try out all the solutions in the given chronological order. However, if you are still stuck, you can consult a PC expert.


