You can read and write on the normal, mini, and micro SD card using your computer and smartphone. Sometimes, when the SD card is write protected, you can copy, delete or edit any files to it. Write protection is essential when you want to protect your SD card from accidental erases and file deletion. However, you need to remove write protection from SD Card to add new data or format it.
There are different reasons to experience the ‘The disk is write protected’ error message. It can be because of a locked SD card, bad sectors or physical damage, encrypted by a virus residing on your computer, and space issues.
What Does Write Protected SD Card Do?
When the SD card is write protected, you can only read and view its files. The other functions like formatting, deleting, and editing files become impossible. And the only way to make any changes to the SD card is to disable write protection.
At times, people enable write protection of the SD card to prevent accidental deletion of important data. However, the write protect attribute can also be enabled by mistake, virus, or third-party software.
How To Remove Write Protection From SD Card In Windows 10
There are different ways to remove write protection from SD Card in Windows 10. The way you pick up depends on the reason the SD card is write protected. If you did it on purpose, it is easy to get rid of write protection, but if viruses or bad sectors are causing the SD card to be write protected, it might take some time to fix it.
You can use an external memory card reader to plug an SD card into your computer. If you have an inbuilt SD card reader, just plug your card into that reader.
1. Toggle the Lock Switch
The SD card comes with a write protect switch on it. If the switch is on, you won’t be able to overwrite the SD card. Instead, you can simply toggle the switch and check if you can make changes to the SD card.

If you are not sure which way the switch needs to be shifted, you can check on the manufacturer’s website. You can try by pushing it towards the opposite side first.
2. Use Diskpart Utility via Terminal Window
You can use the diskpart option to remove write protection from SD Card. It is using Command Prompt terminal window and clearing attributes. Follow the simple steps given below to get rid of write protection.
The below steps can be applied to USB devices as well; in case you are experiencing the write protection issue in a USB device, follow these steps. Make sure you connect your SD card to your computer before beginning the process.
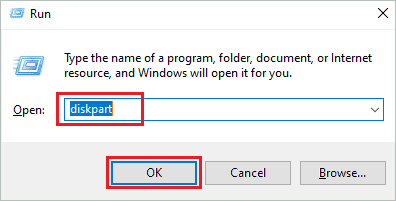
Step 1: Press Windows key + R to open Run and type diskpart there. Press Enter or click OK to open Diskpart.
If you are not logged in from the administrator profile, you may be prompted to enter administrator credentials. Enter them to open the Diskpart.
Step 2: In the Command Prompt window, type the list disk command and press Enter.
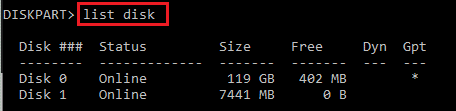
You will see all the disk drives present on your computer.
Step 3: Now, select the disk which is representing the SD card. You need to type select disk disk_number command to select the disk and press Enter.
Here, disk_number is the SD card number. In our case, it is select disk 1.
Step 4: Once you see ‘Disk 1 is now selected disk.’ You need to clear the attributes by executing the below command.
attributes disk clear readonly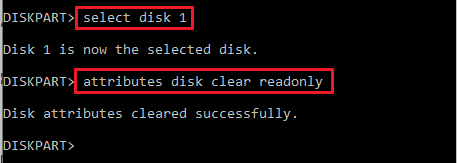
You will see Disk attributes cleared successfully. Type exit and press Enter to exit the Diskpart utility.
Now, you can format and delete contents from your SD card or USB drive. It is the simplest way to get rid of write protection.
3. Make Changes in File Properties
If you cannot access any specific folder or file from the SD card storage, you can clear the read-only attribute for that file/folder.
Right-click on the file/folder that is not getting deleted or modified and select Properties from the context menu.
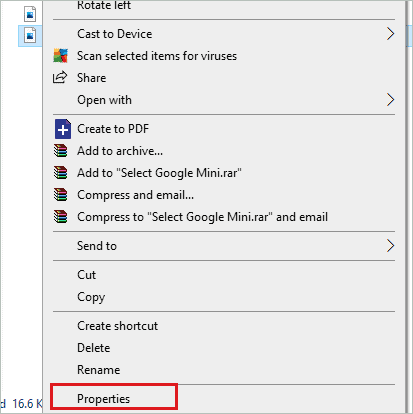
Go to the General tab and uncheck the checkbox next to the Read-only option under Attributes. Then, click on Apply and OK.
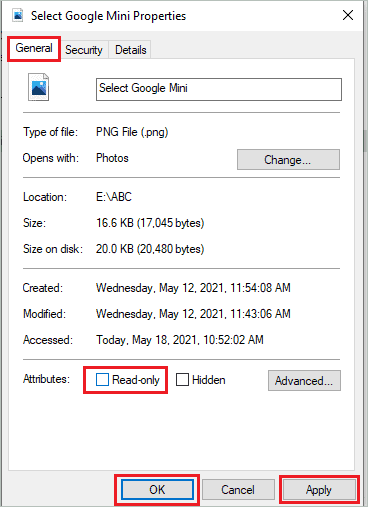
You can now check if you can make changes to the file/folder previously giving issues.
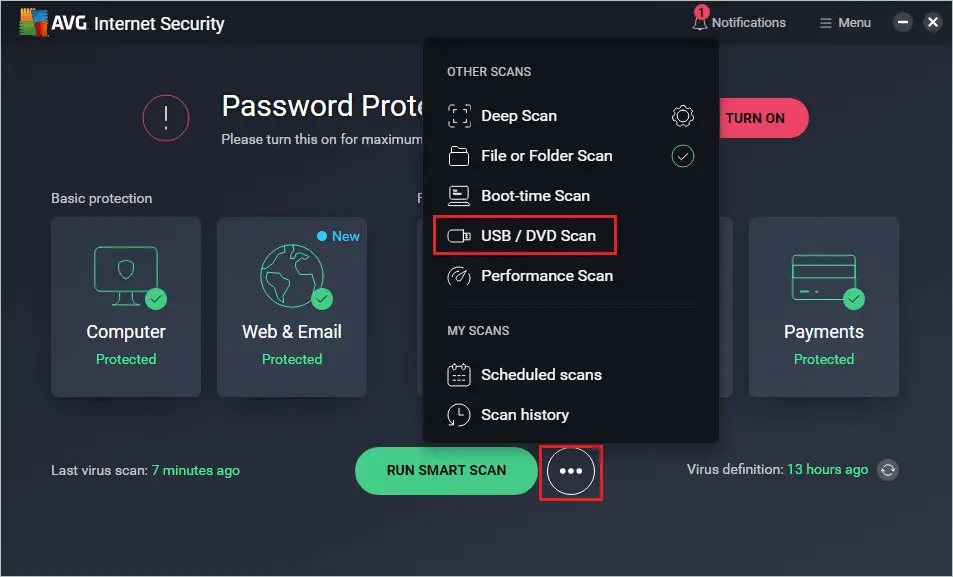
4. Check for Viruses
As mentioned above, viruses can prevent you from making changes to the SD cards. However, you can scan for viruses and malware on your SD card and take appropriate action accordingly. To perform the scan and get rid of the virus, you can use any antivirus software from trusted sources.
We have used AVG Internet Security to scan the SD card. Open AVG Internet Security and click on the three dots next to Run Smart Scan.
If there are no malware or viruses on your computer, you will see a ‘No malware found message’ on your screen.
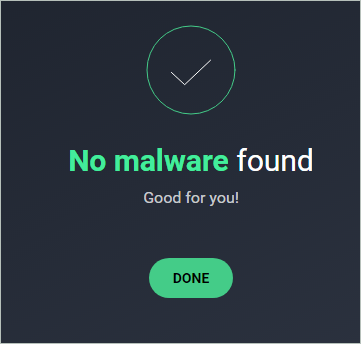
If you find any malware on your computer, take appropriate action quickly.
5. Execute chkdsk Command
It becomes impossible to write on the SD card with a bad sector. However, you can use the Windows chkdsk command to scan and fix the bad sector in the SD card.
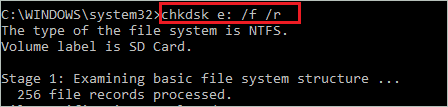
Press Windows key + S and type cmd in the Start menu. Click on Run as administrator for Command Prompt.
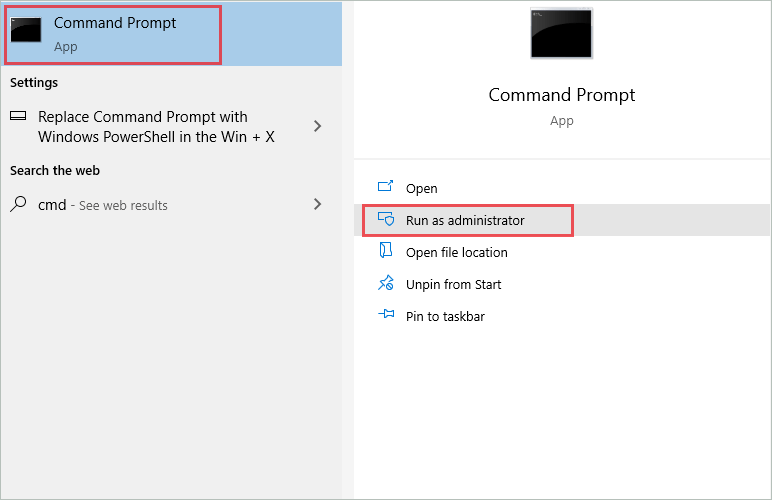
Now, in the Command Prompt terminal, type the below command and press Enter.
chkdsk e: /f /rHere, e is the drive letter taken by SD card/USB flash drive; it may differ in your case. You can check for the drive letter in File Explorer’s This PC section.
Wait till the command is executed. Once the execution is completed, scroll down to the end of the output and check.
If the output says ‘Windows has scanned the file system and found no problems,’ it means that there are no bad sectors on your SD card.
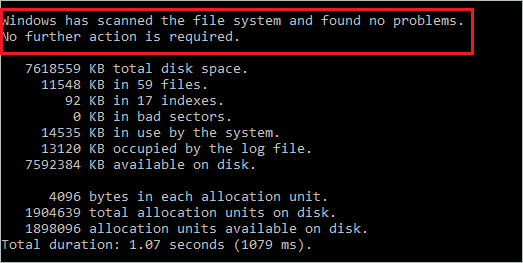
If you have any other output, take the necessary action to fix your SD card. In some cases, you may need to discard the current SD card and purchase a new one. But, again, it depends on how bad the issue is.
After fixing the bad sector, hopefully, the write protected error will vanish.
6. Use Windows Registry Editor
You can use the Registry Editor to remove write protection from SD Card. Before making any changes to the registry, we recommend backing it up to be restored if something goes wrong.
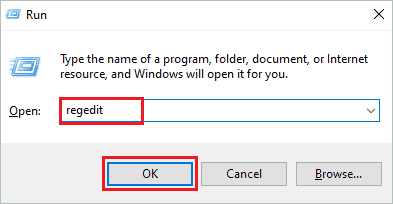
Step 1: Press Windows key + R to open Run and type regedit. Click OK to open the Registry Editor.
Step 2: Navigate to the following in the Registry Editor.
HKEY_LOCAL_MACHINE\SYSTEM\CurrentControlSet\Control\StorageDevicePoliciesIf you don’t find the StorageDevicePolicies folder in Control, right-click on the Control folder in the left pane and select New ➜ Key.
Name the new key as StorageDevicePolicies.

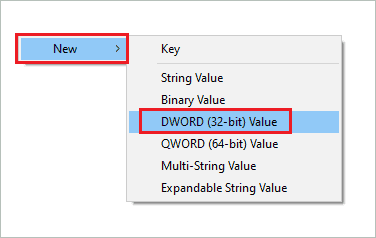
Step 3: Now, you have StorageDevicePolicies, so go there and right-click on the empty space in the right frame. Click on New and then DWORD (32-bit) Value.
Name the DWORD as WriteProtect.
Step 4: Double-click on the newly created WriteProtect DWORD and change its Value data to 0.
Step 5: Click OK to save the changes.
Close the Registry Editor and restart your PC for changes to take effect. You can now try writing into the SD card from a Windows computer to check if you can do it without issues.
7. Use Local Group Policy Editor
Windows 10 Professional and Enterprise users can use Local Group Policy Editor to remove write protection from SD Card. However, if you are a Home user, you need to find other ways to access Local Group Policy Editor in Windows 10 or opt for another way to disable write protection.
Search for gpedit.msc in the Start menu’s search bar and open Edit group policy from the search results.

In the Group Policy Editor, go to Computer Configuration ➜ Administrative Template ➜ System ➜ Removable Storage Access.
In the Removable Storage Access, search for Removable Disks: Deny write access and double-click on it.
Select Disabled and click on Apply to disable Removable Disks: Deny write access policy.
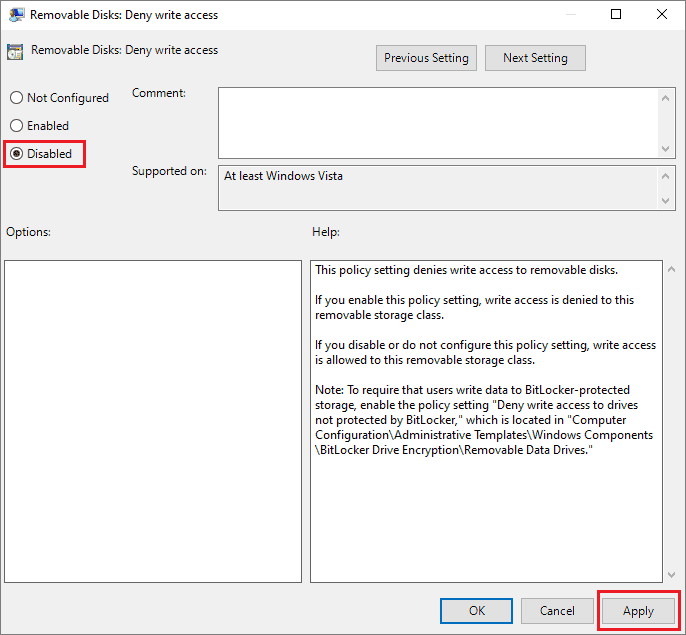
Now close the Group Policy Editor window and reboot your PC. You will be able to write changes to the SD card after the restart.
8. Check for Space
The write protection may happen because of insufficient space on the SD card/pen drive. You will be prevented from adding any new files because of not enough space. You can check if there is any space available on your SD card.
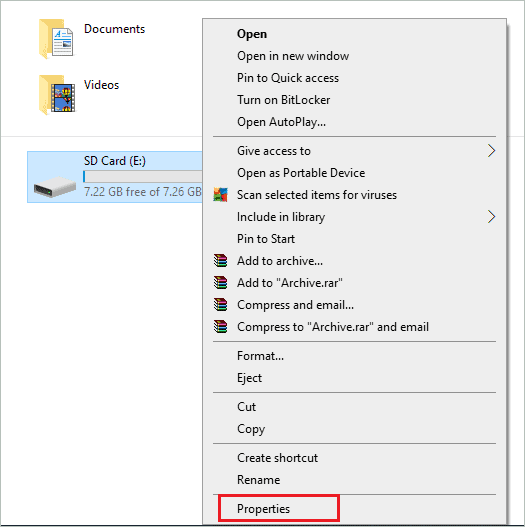
Press Windows key + E to open the File Explorer window and go to This PC.
In This PC, right-click on the SD card and select Properties from the context menu.
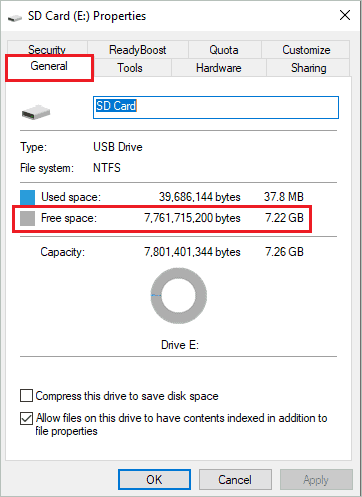
In the Properties window, navigate to the General tab and check the numbers next to Free space.
If there is no free space available, you need to delete some files/folders from your SD card to create space. However, if you cannot delete SD card contents, you can try formatting it by referring to the below section.
9. Format SD Card
The last option to remove write protection from SD Card is to format it. You can format the SD card using Command Prompt terminal or Disk Management window; the choice of format tool is yours. However, the formatting will remove all the files from it.
So, if you have some critical documents, you will lose them, post formatting. Of course, you can format the SD card in any file system, as per your requirement. But, in the case of a corrupted SD card, even formatting won’t help fix the write protection error.
Conclusion
You can remove write protection from SD card for Windows 8 PCs as well by using the ways mentioned above. It becomes essential to get rid of write protection to make any changes to the SD memory card. At times, removing write protection is just a cakewalk, as all you need to do is push the SD card lock in the opposite direction. However, if it is not human-induced write protected, you may need to perform many different ways to disable write protection.
If none of the above ways help you remove write protection from SD Card, you may need to throw out the old one and buy a new SD card for yourself. This may happen in case of a corrupted or physically damaged SD card. The write protection caused by physical damage cannot be fixed in any way.


