Windows 10 has icons for every application, software, file, and folder on your computer. These are the default Windows icons that help users recognize applications or associated programs. However, if you don’t want to use default icons, you can customize them if you know how to change icons on Windows 10 and get your desired icon.
When it comes to customizing the desktop background, Windows operating system gives many options and ways to do it. If you know how to change desktop icons, you can customize and add a personal touch to your computer’s icon. When it comes to the desktop icon size, be it small icons, medium icon, or large icons, you can easily change the icon size in Windows 10.
How to Change Icons on Windows 10
You can change icons on Windows 10 using the inbuilt option or download a blank icon from trusted platforms to customize them. So let’s begin with the process and give a personalized touch to the Windows 10 Desktop, taskbar, and File Explorer icons.
1. Change Icons Using Inbuilt Option
It is straightforward to change the app icon from the built-in Windows icons. Follow the below-mentioned steps below to know how to change icons on Windows 10 computer.
Step 1: The icon you need to change should be present on the Desktop to be changed easily. So, to do so, go to the software location and right-click on it.
Select Send to ➜ Desktop (create shortcut) from the context menu.
This will give you a shortcut icon on the Desktop.
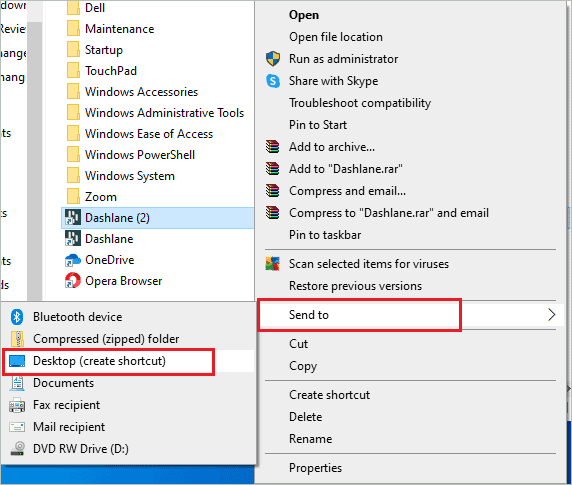
If you already have the app whose icon you need to change on the Desktop, you can skip this step.
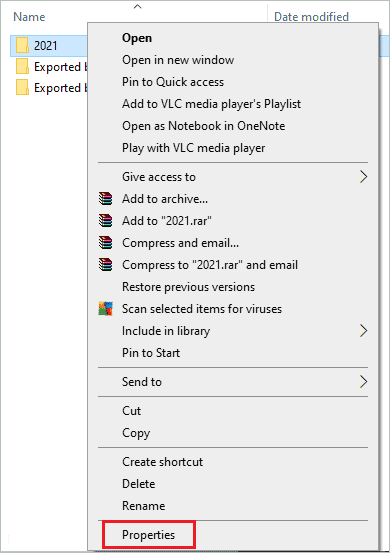
Step 2: Now, right-click on the app/software and select Properties from the contextual menu.
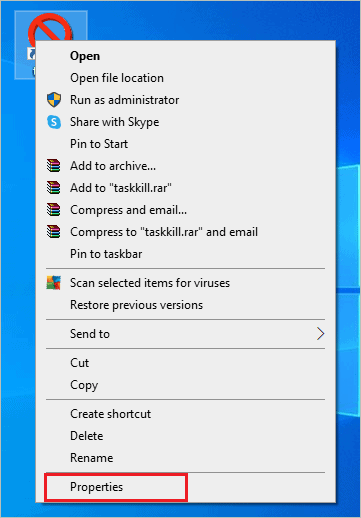
Step 3: In the Properties window, go to the Shortcut tab and click on the Change Icon.
Step 4: You will see the Change Icon dialog box, select the icon you want, and click the OK button.
Step 5: On the Properties window, click on Apply and OK to save the new icon for that application.
You now know how to change icons on Windows 10 desktop using system icons.
2. Change Program Icons Using Personalized Icons
If you don’t want an inbuilt option for icons, you can use your personalized custom icon. You can download them on websites like Flaticon or findicons. And if you know how to create icons, you can make and use them for apps on Windows 10.
If you have a png image, you need to convert it to ico format to use as icons. You can use CONVERTICO to convert images to ico form. Once you get the icons in ico form, make sure you remember their location for future reference.
Now, right-click on the app and select Properties. In the Properties dialog box, click on Change Icon… in the Shortcut tab.
When the Change Icon window appears, click on the Browse button to select a program icon.
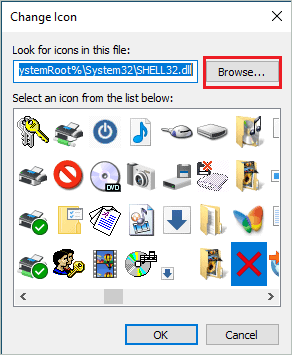
Next, you need to navigate to the path where you saved the ico file. Once you reach the path, select the icon.
You will then see the icon in the Change Icon window. Choose it and click on OK.
On the Properties window, click on Apply and OK. You will see your personalized icons on the application.
The process of changing icons from inbuilt options and the personalized option is similar. However, in a personalized way, there are few extra steps involved.
3. Use Settings App
You can change This PC icon, Recycle Bin icon, and your user profile icon using the Settings app.
Step 1: Press Windows key + I to open the Settings app and go to the Personalization section.
Step 2: Go to the Themes section from the left-hand pane of the Personalization settings.
Step 3: Now, under Related Settings, click on Desktop icon settings.
Step 4: When the Desktop icon settings window appears on your screen, select the icon you wish to change and then click on the Change Icon button.
Step 5: Select the icon and click on OK. If you want to opt for a personalized icon, click on Browse and select the personalized icon.
Step 6: On the Desktop Icon Settings window, click on Apply and OK.
You can change the icon easily using this way as well.
How to Change Icons on Windows 10 Taskbar?
Windows 10 allows you to change the icons on the taskbar as well. For example, you can add funky, simple, and personalized icons on the taskbar to represent different applications.
Press the Shift key and right-click on the app whose icon you want to change. Make sure the application is not opened when you do this.
Select Properties from the context menu. If the application/software is open, you won’t see Properties in the context menu.
In the Properties window, navigate to the Shortcut tab and then click on the Change Icon… button.
You will see the Change Icon dialog box, select the icon you want and click on OK. Then, on the Properties window, click on Apply, followed by OK.
The icon will be changed on your taskbar.
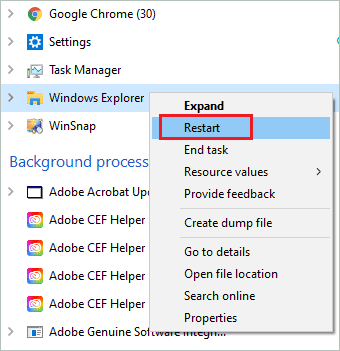
If the taskbar icon is not updated after applying the changes, you may need to follow the below instructions.
Press Ctrl + Shift + Esc simultaneously to open Task Manager. In the Task Manager, make sure you are in the Processes tab and then right-click on Windows Explorer. Select Restart from the context menu.
If you don’t find Windows Explorer in the Task Manager window, press Windows key + E. This will launch Windows File Explorer on your computer and show the Windows Explorer process in Task Manager.
You will see the updated icon post this. If you wish to change all the icons on the taskbar, change them first and then restart Windows Explorer from the taskbar.
How to Change Folder Icons on Windows 10?
If you are bored with a yellow default folder icon, you can give it a little twist by using a different icon. The process of doing so is similar to the steps mentioned above.
Open the File Explorer and go to the folder whose icon you wish to change. Right-click on the folder and select Properties from the context menu.
In the Properties dialog box, go to the Customize tab and click on the Change Icon button.
Now, select the icon and click on OK. If you want to change the icon to a personalized one, click on the Browse button and choose your icon.
Click on Apply and OK in the Properties window to save the changes. You will now have an exciting icon on the selected folder.
How to Change Icons for Specific File Types in Windows 10?
You already know how to change icons on Windows 10 for one software or folder. However, you can also change the icons of all the files belonging to a specific type of file. To do so, you will need a third-party software called FileTypesMan.
Download FileTypesMan and then extract the zip folder that is downloaded. Open the folder after it is unzipped and double-click on the FileTypesMan.exe file to run the application.
In the FileTypesMan window, you can search for the required file type by scrolling down. If you feel scrolling is time-consuming, you can press Ctrl + F key to open the find box and search in that box for the required file.
Once you find the required file type, double-click on it to open the Edit File Type window.
Now, click on the 3-dots button next to the Default Icon path.
Select the icon you want for the file type from the icon list and click on OK. In this software also, you can choose a personalized icon by clicking on the Browse button.
Ensure you check the notice in the Edit File Type window to see which file type icons will be affected.
Once the default icon is changed, you will see all the files with that file type icons changed. In our case, it was WinRAR files.
Use Registry Editor to Change Icon of All Folder
You can use Registry Editor to change the icons of all the folders present in your File Explorer. Well, this way of changing icons does not work for everyone, so proceed with caution. We tried this on Windows 10 21H1 version, and it worked for us, but again it may vary from system to system.
Before you proceed this way, we recommend you back up the registry so that it can be restored if something goes wrong.
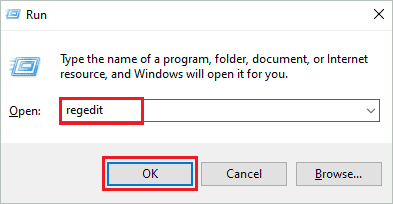
Step 1: Press Windows key + R and type regedit there. Click OK or press Enter to open the Registry Editor.
Alternatively, you can search for the Registry Editor in the Start menu as well.
Step 2: In the Registry Editor, go to the below-given path.
HKEY_LOCAL_MACHINE\SOFTWARE\Microsoft\Windows\CurrentVersion\ExplorerStep 3: Now, right-click on the Explorer in the left pane and go to New ➜ Key. Name this new key as Shell Icons.
Step 4: Click on the Shell Icons and then right-click on the empty space in the right pane. Navigate to New ➜ Expandable String Value and name it as 3.
Create one more Expandable String Value and name it 4.
Step 5: Double-click on 3 and change the value data to the icon file location. Make sure you put the path in double quotes.
“C:\Users\Urvi\Downloads\Myicon.ico”Step 6: Do the same for 4 as well.
Step 7: Exit the Registry Editor and relaunch the File Explorer to see the change.
If the change is not reflected in the Windows File Explorer, you need to restart the Windows Explorer process in Task Manager.
Refer to the ‘How to Change Icons on Windows 10 Taskbar?’ section above for help in restarting the Windows Explorer process.
How to Reset the Changed Icon?
Windows gives you an option to restore the icon to the original icon. Well, this applies to folder icons and icons that are changed via the Settings app.
In the case of folder icons, right-click on the folder and select Properties. Next, go to the Customize tab and click on Change Icons.
Click on the Restore Defaults button; it will restore the default icon for your folder.
If you have changed any icon via the Settings app, you can restore that as well.
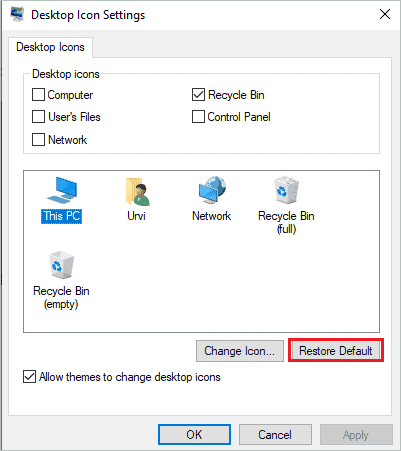
Go to Settings app ➜ Personalization ➜ Themes and click on Desktop icon settings.
When the Desktop icon settings dialog box appears, select the icon whose default icon you wish to restore and click on Restore Default.
Now, you know how to change icons on Windows 10 and learn how to restore them to the default one.
Conclusion
Windows 10 OS provides many customizable options so that users can configure your system as per your wish and requirements. You can hide the taskbar, turn off sticky keys, and play with icons as well. Be it resizing icons, hiding them, or changing them, Windows 10 allows it all.
You can either opt for the OS-provided option when changing them or go for a personalized icon of your choice. Once you know how to change icons on Windows 10, you can do it for software, folders, files from specific file types, and Windows 10 built-in applications.


