You can attend webinars, meetings, video conferences, and presentations from any corner of the world with Microsoft Teams. Microsoft introduces many new features in Teams to make it more reliable and convenient. However, users complained about the Microsoft Teams camera not working.
The camera icon in Teams was greyed out, or it was not responding. This can prevent you from attending meetings and webinars with a video camera on. You can resolve this issue efficiently by modifying and checking Teams as well as Windows settings.
If you have started using some other application to connect with your friends, colleagues, and family, you can uninstall Teams permanently from your Windows 10 computer.
18 Solutions To Fix Microsoft Teams Camera Not Working
It is easy to fix the Microsoft Teams camera on your Windows 10 device. All you need to do is tweak the settings in Teams and Windows. Then, you can follow the instructions given below to make correct changes to your PC/Teams and make the camera work again.
1. Allow Teams Desktop Application to Access the Camera
If the Microsoft Teams camera is not working because of permissions issues, you need to make changes and give camera access to the app. Follow the simple steps given below to modify the permissions.
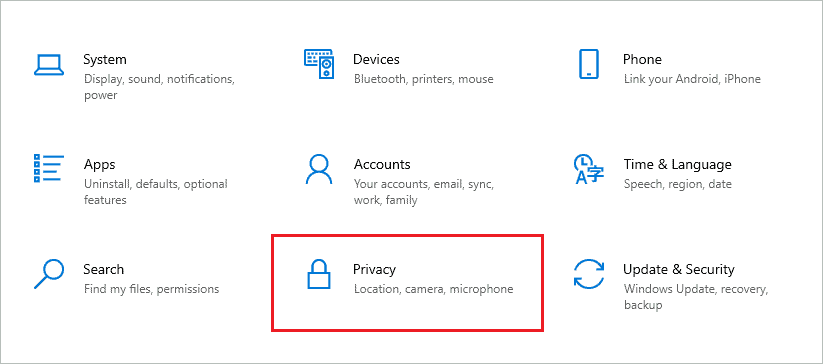
Step 1: Press Windows key + I to open the “Settings” app and go to “Privacy.”
Step 2: In Privacy settings, go to Camera from the left panel and toggle the switch below ‘Allow apps to access your camera’ such that it is turned on.
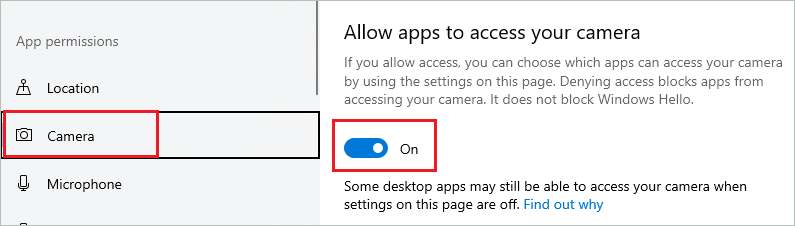
Step 3: Now, scroll down and toggle the switch below ‘Allow desktop apps to access your camera’ to turn it on.

You can now relaunch Teams and check if you can use the camera without any issues or errors. If these settings are already made on your computer, the problem might be something else, and you may need to try the other solutions.
2. Close Other Programs and Applications
If you have other applications and software using the camera like Zoom, Google Meet, and Skype, you can close it for some time. However, there are chances of other applications interfering with the camera usage. You can end the task for such apps via Task Manager.
Press Ctrl + Shift + Esc keys together to open “Task Manager.” Now, make sure you are in the “Processes” tab and then right-click on the apps that are using the camera. Finally, select “End task” from the context menu.
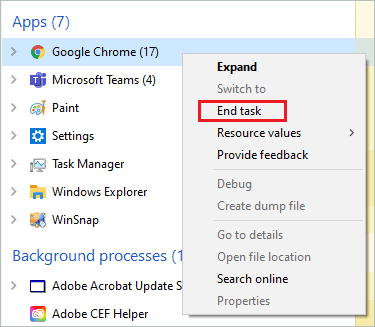
Repeat this for all the apps/software that may be using the camera. Make sure you don’t kill Teams in the process. Once all the apps are closed, check if the Microsoft Teams camera not working issue is resolved or not.
3. Allow Camera through Antivirus
Some third-party antivirus software can block the app’s access to the camera. This can protect you from cybercrime, but it can prevent you from using a camera on your computer.
You can put Microsoft Teams in a safe app list to allow camera access to it. This feature won’t be available in all the antivirus tools, so you can check the official website and make changes accordingly.
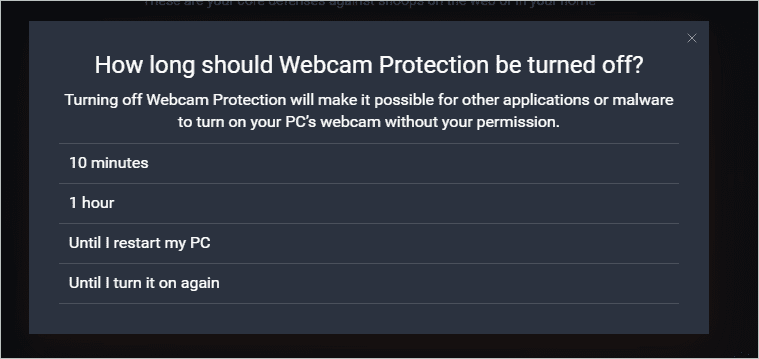
In the case of AVG Internet Security, you can go to “Privacy.”

Now, toggle the switch below “Webcam Protection,” such that it should be turned off. You will see a pop-up asking how much time you wish to turn off the camera.
We recommend doing it for only 10 minutes, as it can risk your privacy.
Now, check if you can access the webcam in Teams. If the camera is working with webcam protection off, you can contact the support team and let them know about the issue.
There might be similar settings in other antivirus software as well. So, make sure you refer to the user guide to make the right changes so protection and security are not compromised.
4. Update Windows Operating System
If the problem with the Teams camera is universal, Microsoft may release an update to resolve the issue. In addition, you can update your computer with new updates available.
Open the “Settings” app and go to “Update & Security.”
Next, go to “Windows Update” from the left panel and click on the “Check for updates” button.
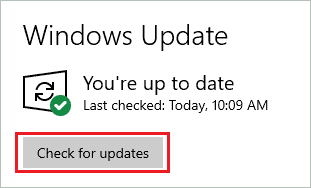
If there are any new updates available for your computer, download and install them. Of course, you will need a stable Internet connection to do so.
Once the PC is updated, launch Microsoft Teams and check if you can use the camera without issues.
5. Select the Right Camera in Teams App
In the case of multiple cameras on the computer, you need to select the right one in the Teams app. For example, if you have an integrated webcam that is not working and you wish to use an external webcam, you need to select it in the Teams app.
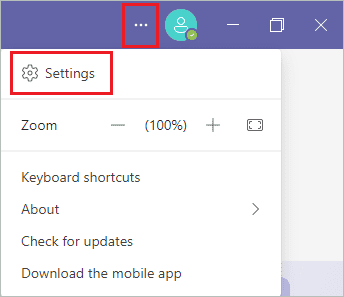
Open the Microsoft Teams app and click on the “3-dots” in the upper right corner of the window. Next, select “Settings” from the menu.
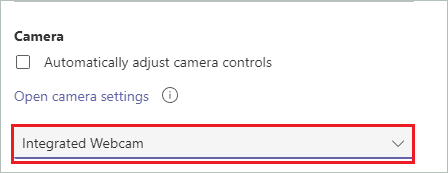
In the Settings, go to Devices from the left pane and scroll down to the Camera section. Lastly, select the camera you wish to use with the Teams app from the drop-down menu.
You can now get on the call again and check if you can use the camera without any issues. This will probably resolve the Microsoft Teams camera not working issue in case of multiple cameras.
6. Unplug and Replug Webcam
This solution is only applicable to Microsoft Teams users who use the external web camera. If you have a camera integrated into your monitor, you can move on to the next solution.
Firstly, unplug the camera from the cable and shut down your PC. Now, wait for some time and turn on your computer.
You can now plug the webcam again and check if the Microsoft Teams camera not working issue is resolved or not.
7. Disconnect Other Hardware Devices
Sometimes, other hardware devices on your computer can interfere with the webcam as well as Microsoft Team. You can disconnect the devices temporarily and check if it helps to resolve the issue with the camera.
If the webcam starts working after unplugging other hardware peripherals, you can plug them one by one to find the culprit.
In most cases, incompatible devices with the PC can cause issues with other hardware devices. Also, duplicate devices can cause trouble on PCs. So, make sure you purchase genuine and compatible peripherals for your Windows computer.
8. Update Teams App
It is essential to keep the apps updated to avoid unwanted trouble with them. For example, if you have any new updates for Microsoft Teams, you can update it to avoid camera problems on call.
Click on the “3-dots” in the upper right corner of the Teams window and then click on “Check for updates.”
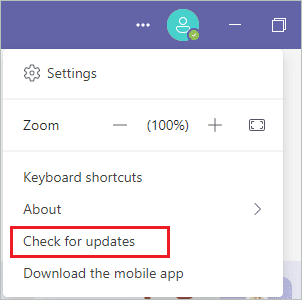
The updates will be checked and installed automatically in the background without hampering your work. Once the updates are installed, reconnect the video call and check if you can use the camera without any issues or errors.
9. Run Hardware and Devices Troubleshooter
You can run the Windows Hardware and Devices troubleshooter to check if there are any problems with the webcam. Unfortunately, from Windows version 1809, the Hardware and Devices troubleshooter is not available in the Settings app. However, you can follow the below steps to run the troubleshooter via Run.
Press Windows key + R to open the “Run” window and type “msdt.exe -id DeviceDiagnostic” in the textbox there.
Press the “Enter” key to open the Hardware and Devices troubleshooter.

Next, click on the “Advanced” link in the troubleshooter window and check the checkbox next to ‘Apply repairs automatically.’
Click on the “Next” button to start the troubleshooting.

Windows will show you the issue with the hardware devices connected to your computer, including webcams.
10. Reinstall Microsoft Teams App
If Microsoft Teams Camera is still not working, you can simply uninstall the desktop app and then reinstall it on your computer. Sometimes, the application files can get corrupted, resulting in unwanted issues with the app.
Go to Settings app ➜ Apps and search for “Teams” there. Next, click on “Microsoft Teams” and then click on the “Uninstall” button.
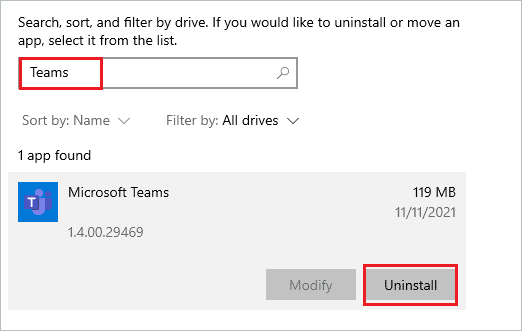
Once the app is uninstalled, you can download it again from the Microsoft website and install it on your computer. After the app is installed again, check if the webcam is working properly or not.
11. Update the Camera Driver
The outdated drivers of the camera can also cause the Microsoft Teams camera not to work properly. You can update the device drivers for the webcam manually via Device Manager. If you don’t wish to update drivers manually, you can use an automatic driver updater like Driver Booster to do it for you.
However, while updating the webcam driver manually, make sure you download a stable and compatible version of the driver software. Once the drivers are updated, you can video call using Teams without any webcam issues.
12. Allow Media Access in Teams
You need to allow media access to apps by altering app permission settings. This helped in resolving the Microsoft Teams camera not working issue in Windows 10 in the case of many users.
Launch the Teams app on your PC and go to Settings. Now, from the left tab, click on the App permissions tab in Teams and toggle the switch next to Media (Camera, microphone, speakers), such that it is enabled.
You can relaunch the app and check if the webcam is working without any issues or not.
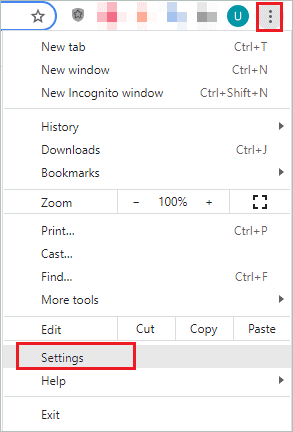
13. Allow Camera through Web Browser
If you are using Microsoft Teams on a web browser, you need to allow webcam access to that browser as well. You may experience a webcam not working problem if webcam access is disabled for the browser. A simple change in browser settings can help you resolve it.
The steps mentioned below are for the Google Chrome browser. However, you may find similar settings on all browsers.
Step 1: Launch the Google Chrome browser and click on the “3-dots” in the top-right corner of the browser window. Click on “Settings” from the menu.
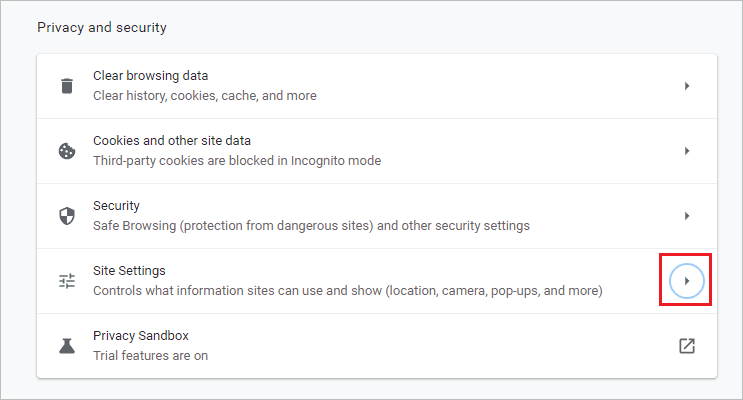
Step 2: From the left panel of the Chrome Settings, click on “Privacy and security.”
Step 3: Click on the arrow next to “Site Settings” to open it.
Step 4: Scroll down to the “Permissions” section and click on “Camera.”
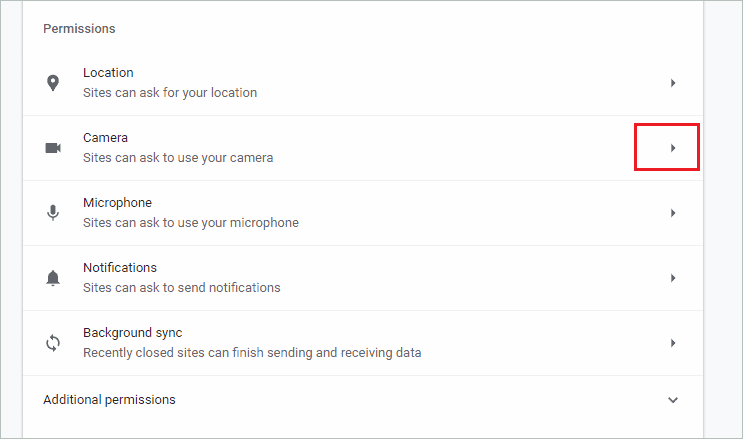
Step 5: Now, select the camera you want to use for web apps in the drop-down menu in case of multiple webcams.
Step 6: Select the ‘Sites can ask to use your camera’ option to allow the Microsoft Teams web app to access the camera on video calls.
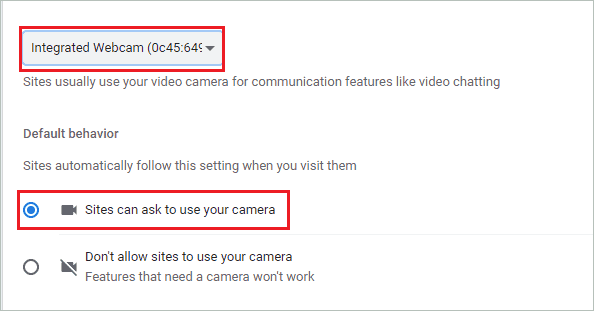
You need to allow whenever a site asks to use your webcam manually. This will enable you to use the camera only on the sites you trust.
You can now open Microsoft Teams again in the browser and try the video call feature.
14. Delete Microsoft Teams Cache
Microsoft Teams stores cache for faster launch and processing within the desktop app. If this cache gets corrupted, you can end up with Teams camera not working issue. You can delete this cache to resolve the webcam problem.
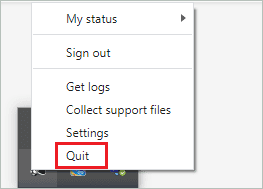
Step 1: In the taskbar, right-click on the Teams icon. In most scenarios, you will find it in the system tray. Next, select “Quit” from the popped-up context menu.
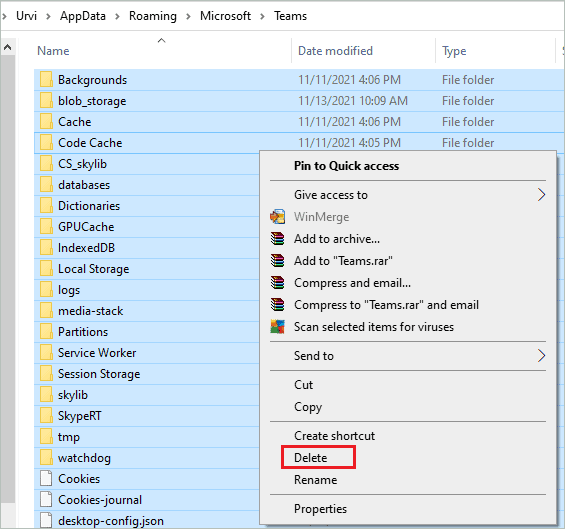
Step 2: Once the app is closed, open the “Run” window and type “%appdata%\Microsoft\Teams” there. Press “Enter” to open the Teams cache folder.

Step 3: Select all the files and folders in the Teams folder in the File Explorer window. You can use Ctrl + A shortcut to select all at once.
Step 4: Right-click on the selected files and select “Delete” from the context menu.
Once the cache is deleted, relaunch the app and check if the Microsoft Teams camera not working issue is resolved or not.
15. Enable Camera Driver via Device Manager
If the camera device driver is disabled, you won’t be able to use it on your computer. However, you can enable it manually via Device Manager.
However, if the camera driver is already enabled, you can disable it and then re-enable it to resolve temporary glitches in the drivers. Usually, Windows enables drivers as soon as the device is connected to the system, but sometimes the OS may fail to do so. In such cases, you may need to enable the device drivers for a particular device manually.
16. Re-register Camera using Windows PowerShell
You can re-register the camera app using Windows PowerShell. If there are any issues in the camera app that is preventing its access in Microsoft Teams, reregistration can help you resolve them.
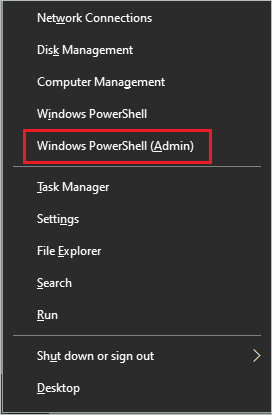
Press Windows key + X to open a quick link menu and click on “Windows PowerShell (Admin)” to open it.
In the PowerShell window, type the below command and press the “Enter” key to execute it.
Get-AppxPackage -allusers Microsoft.WindowsCamera | Foreach {Add-AppxPackage -DisableDevelopmentMode -Register “$($_.InstallLocation)\AppXManifest.xml”}Once the command is executed, reboot the PC and check if the Microsoft Teams camera is not working issue is resolved.
17. Reinstall Camera Drivers
If still, you are experiencing issues with the camera in the Microsoft Teams app, you can uninstall and reinstall the driver. This will resolve the issues with the camera driver causing trouble. You can uninstall and reinstall the driver easily from Device Manager.
Once the driver is reinstalled, all the issues with the camera will be resolved, including problems with Teams.
18. Check Camera Hardware
If nothing from the above helped you resolve the Microsoft Teams camera not working issue, you need to check hardware issue and damage in the web camera. Also, if you have an external camera attached via cable, make sure you check the cable as well.
In the case of a built-in camera, you need to dismantle everything and check for damages. If you don’t have expertise with hardware, we recommend getting the camera checked by an expert in the field.
Conclusion
Microsoft Teams has made connecting to people in any corner of the world pretty easy and convenient. You can get in touch with colleagues, friends, and family with one call. However, if the webcam doesn’t work with the Teams app, it can limit its functionality of video calls. Microsoft Teams camera not working issue is experienced by many users.
You need to make a few changes in your PC’s settings and the Teams app to use the web camera without any issues or errors. The above list of solutions can help you with instructions and steps to perform the changes in the settings.
FAQs
Why is video not working in Microsoft Teams?
The video in Teams might not be working because of camera permission issues. You need to allow camera access to desktop apps. If you are using Teams in the browser, you have to allow camera access to the web browser as well.
Why is my camera on Teams black?
The camera on Teams can be black because of hardware damages, permission issues, outdated camera drivers, and interference of other apps and devices on your computer.
How to fix Microsoft Teams camera not working issue?
You can allow camera access to desktop apps and web browsers, close other apps using the camera, disconnect other hardware peripherals, reinstall, update, and enable camera drivers, check hardware issues, modify Teams app settings, and re-register camera app via PowerShell.


