Key Takeaways
- When you have a device driver on your Windows 10/Windows 11 PC that works abnormally, you must uninstall it and reinstall it to make it function properly.
- The built-in utilities of Windows let you uninstall drivers easily.
- To reinstall drivers, you can either restart your system or perform the process manually.
Whenever we install a problematic driver and don’t have the option to roll it back to the previous version, we can only uninstall it. If you know how to uninstall drivers in Windows 10/Windows 11 correctly, you can also get rid of unused and old driver from your computer. Many bugs are resolved by uninstalling the drivers first and then reinstalling them.
So, if you know how to reinstall drivers, you can resolve major and minor issues related to device drivers. Windows computers cannot function without device drivers; therefore, it is important to manage them correctly.
How to Uninstall Drivers in Windows 10/Windows 11
You can uninstall device drivers using the Settings app as well as the Device Manager. This can be useful when you are stuck with a bad driver update and need to remove it. If the driver package is not available in the Settings app, you can then use Device Manager. We recommend trying uninstallation using the Settings app first and then move on to Device Manager.
1. Use Control Panel To Uninstall Drivers
You can look at all the installed applications and drivers from the Control Panel window. So, this is a place where you can also uninstall drivers. You can use this option to learn how to uninstall drivers in Windows 10/Windows 11. The option works well for Windows 10. But for Windows 11, opting for the methods listed below is better.
Step 1: Type “control panel” in the search bar and open the option when it comes up.

Step 2: Select “Programs” in the Control Panel window.

Step 3: Select “Uninstall a program” under Programs and Features.

Step 4: Find the driver you want to uninstall and right-click on it. Select “Uninstall.” Click “Yes” in the UAC window, and the driver on Windows will be removed.

2. Use Settings App to Uninstall Drivers
If the driver packages are available in the Settings app, you can only perform uninstallation directly via the Settings window. Initially, the Control Panel was used to remove the device driver, but now you can do so via the Settings app.
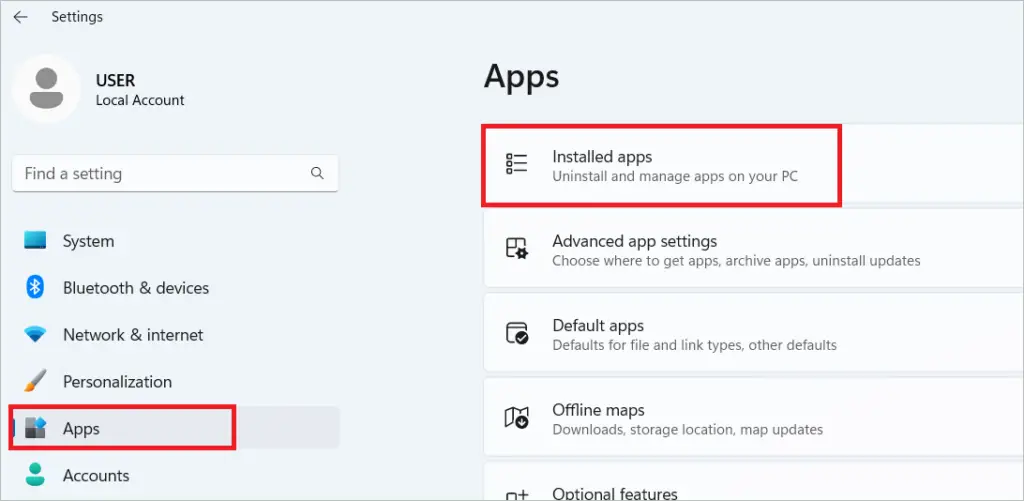
Step 1: Press the Windows key + I to open the Settings app and go to the Apps section.
You can also open the Settings app from the Start menu by clicking on the gear icon there.

Step 2: Search for the driver you want to uninstall in the search bar in the App Settings window. If you are not sure about the driver’s name, simply searching ‘driver’ can also work.
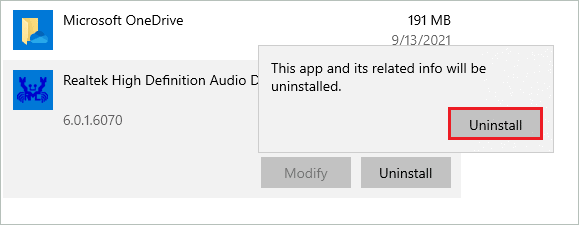
Step 3: When the driver you wish to uninstall shows up, click on it and click on the Uninstall button.

Step 4: A popup window will say, ‘This app and its related info will be uninstalled.’ Click on the Uninstall button on the popup as well to remove the driver package from your computer.
You may need to reboot your computer after uninstalling the drivers. Well, the reboot depends on which driver you have uninstalled. Now, you know how to uninstall drivers in Windows 10/Windows 11 via the Settings app.
However, if you don’t find the driver you want to uninstall in the Settings app, you can uninstall them via Device Manager.
Note: If you have a Windows 11 machine, open Settings and navigate to Apps > Installed apps to locate the driver.
3. Use Device Manager to Uninstall Drivers
Windows users should know how to uninstall drivers in Windows 10/Windows 11 via Windows Device Manager. However, as not all the driver packages are found in the Settings app, some uninstallation needs to be done via Device Manager.
Step 1: Press the Windows key + X to open the quick link menu and click on Device Manager to open it.

Step 2: In the Device Manager window, click on View from the menu bar and select Show hidden devices from the menu option. This will show all the hidden device drivers in Device Manager.

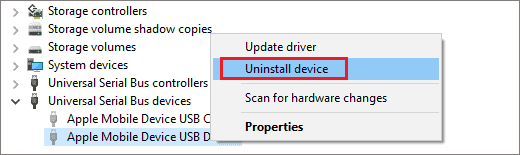
Step 3: Now, expand the section which has the driver which you want to uninstall.
Step 4: Right-click on the device driver and select Uninstall device from the context menu.
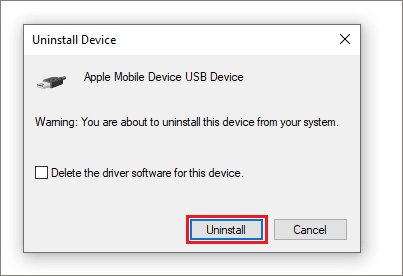
Step 5: In the confirmation box, click on Uninstall button to remove the device driver from your PC. If you want to remove Windows driver software as well, you can check the checkbox next to ‘Delete the driver software for this device.’
Your device may work even after uninstalling the driver. However, the device will no longer function once the PC is restarted unless the drivers are reinstalled.
4. Use The Command Prompt To Uninstall Drivers
If you are fine using the command line interface to get things done on your Windows PC, you can use Command Prompt to uninstall a driver. You can do the task using text commands in the Command Prompt window.
Step 1: Type “cmd” in the search bar and open Command Prompt by selecting “Run as administrator.”

Step 2: Execute the following command in the Command Prompt window to list all the drivers.
Dism /online /Get-Drivers /all /Format:Table
Step 3: Locate the driver you want to uninstall and note its name in the Published Name column.
Step 4: Run the following command to uninstall the driver. Replace the [Published Name] with the name you noted before.
pnputil /delete-driver [Published Name] /uninstall /force
The command will remove the desired driver from Windows.
5. Use Autoruns To Uninstall Drivers
The Autoruns utility lets you view the applications currently running on your Windows computer. You can use it to perform various functions. So, check the steps to know how to uninstall drivers in Windows 10/Windows 11 using Autoruns.
Step 1: Open the Microsoft Autoruns page. Download the utility by clicking the “Download Autoruns and Autorunsc” link.

Step 2: Extract the zip file and double-click Autoruns64.exe.

Step 3: Click “Run” in the prompt that appears.

Step 4: Select the Drivers tab in the Autoruns window. Right-click on the driver you want to uninstall and select “Delete.”
Click “Yes” in the prompt, and the driver will be deleted from the Windows device.

Fix: Device Drivers Get Installed Again After Uninstalling Them
If you didn’t remove driver software while uninstalling the device driver, Windows could install them again. Unfortunately, this is quite common and experienced by many Windows users. You can disable automatic driver updates in Windows 10/Windows 11.
When you disable automatic driver updates, the operating system will be prevented from installing drivers independently. You may need to install the drivers manually in case of missing drivers, but drivers won’t get installed on their own.
If you don’t wish to disable automatic drivers update, you can check the checkbox ‘Delete the driver software for this device’ while uninstalling the driver via Device Manager. Once the driver software is deleted, Windows will no longer be able to install drivers automatically.
How to Reinstall Drivers In Windows 10/Windows 11?
Wish to reinstall device drivers? You can do so using different ways. But, of course, the way you choose also depends on how you uninstalled the driver in the first place.
1. Restart your Computer
The simplest way to reinstall the drivers is to restart the computer. This will work only if you have not removed driver software from your computer. If you want to reinstall the driver for an external hardware device, make sure it is plugged into the PC during the restart.
Click on the Windows logo on the taskbar and then click on the Power icon. Lastly, click on the Restart option to reboot the computer.
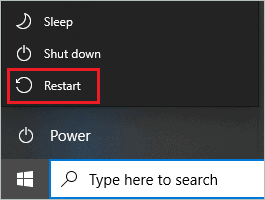
After the reboot, check if the device driver is reinstalled or not. In most cases, Windows will automatically reinstall the device driver using generic drivers.
2. Scan for Hardware Changes
If you don’t wish to reboot your computer or reboot didn’t help you reinstall the drivers, you can use the ‘Scan for hardware changes’ option in the Device Manager.
Open Device Manager and click “Action” from the menu bar. Next, select “Scan for hardware changes” from the menu.
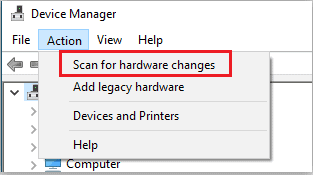
The Windows will scan for driver software of the uninstalled device driver and reinstall it for you.
3. Install the Device Driver Software Manually
If you deleted the device driver software while uninstalling it, you need to install it again manually. This can be useful when you want to reinstall a previous version of device drivers. It is easy to install drivers manually. The steps are the same as you would take to update drivers manually via Device Manager.
You can also use this way of reinstalling drivers if you have disabled automatic driver update on your Windows 10 computer. Then, once you install the device driver software again, it is ready to use on your PC.
Conclusion
You can get rid of faulty, old, and unnecessary drivers that you no longer use on your computer by uninstalling them. If you know how to uninstall drivers in Windows 10/Windows 11, it puts an end to many driver issues. It is easy to uninstall the device drivers in Windows 10/ Windows 11. You can do it using different methods.
However, if the uninstalled device drivers are installed repeatedly on your PC by Windows OS, you must either remove related device driver software or disable automatic driver updates. You can also reinstall the drivers if the need arises. The reinstallation way depends on how you uninstalled the current drivers.
FAQs
How do I completely uninstall a driver?
You can use Device Manager to uninstall the driver completely. You need to right-click on the device driver you want to uninstall and select Uninstall device from the context menu. Also, select – Delete the driver software for this device in the confirmation dialog box to completely uninstall a driver.
What happens when you uninstall a driver?
When you uninstall a driver, you will no longer be able to use the device associated with it. For example, if you uninstall mouse drivers from your PC, your mouse will no longer function.
How do I uninstall unwanted drivers in Windows 10/11?
You can uninstall unwanted drivers in Windows 10 via the Settings app, Device Manager, Control Panel, Command Prompt and Autoruns.
How do I uninstall drivers that won’t uninstall?
Many Windows users complain about drivers getting reinstalled on their own after uninstallation. Therefore, you can delete the driver software for such device drivers and also disable automatic driver updates on your PC.
(Updated on 28th June 2023)


