Key Takeaways:
- You can achieve better performance and speed in Windows 11 by tweaking its settings.
- Changing the power plan to high performance is one of the ways to achieve better performance.
- You can also disable startup and background apps.
The new Microsoft Windows 11 is all about better performance and speed. With this operating system, you can enjoy a better gaming experience and work environment. There are few Windows 11 settings for performance improvement, which anyone can apply for better usability and speed.
The default settings just work fine, but if the settings are configured for optimal performance, you can yield better results. You can also change Windows 11 settings for gaming. So let’s explore performance-based settings for Windows PC.
Best Windows 11 Settings for Performance Improvement
The change in settings may differ from user to user. We have listed some best settings changes that can help you achieve better results when it comes to performance and speed. You can check out all the settings change once and then perform the ones you want.
1. Modify Performance Options
You can change the performance settings and adjust it to the best performance. Follow the steps below to do so correctly.
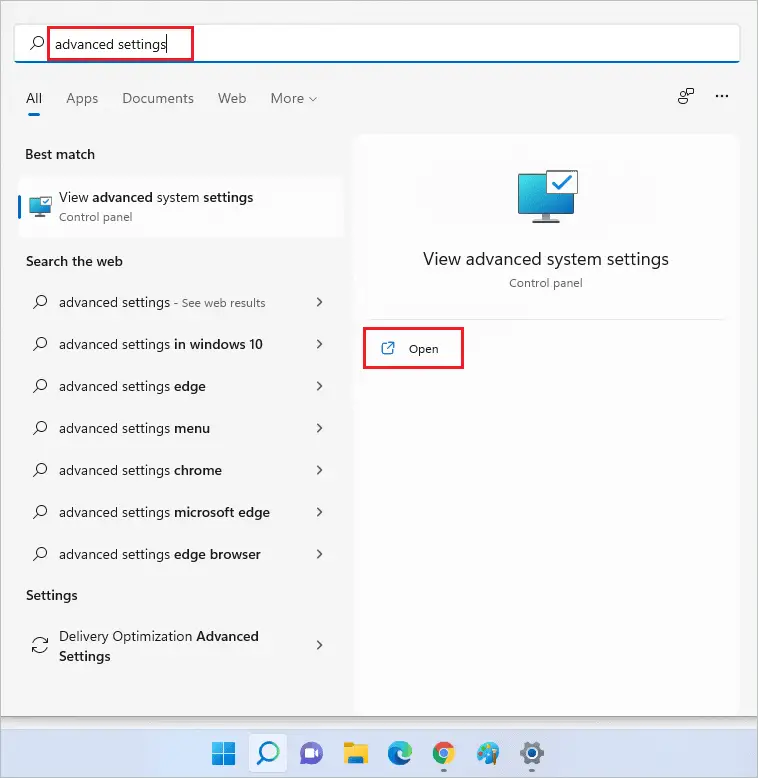
Step 1: Press the Windows icon key and search for “advanced settings” in the Start menu’s search bar. Then, open “View advanced system settings” from the search results.
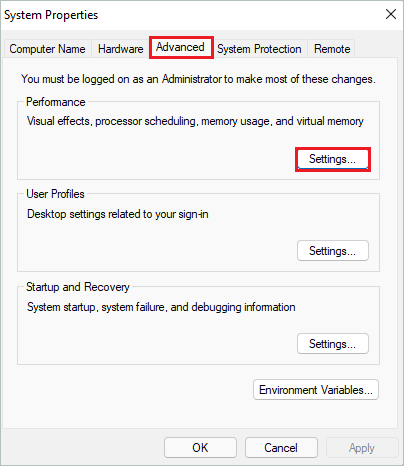
Step 2: Click on the “Advanced” tab and then click on the “Settings” button in the “Performance” section.
Step 3: Select “Adjust for best performance” in the Visual Effects tab and click on “Apply” followed by “OK.”
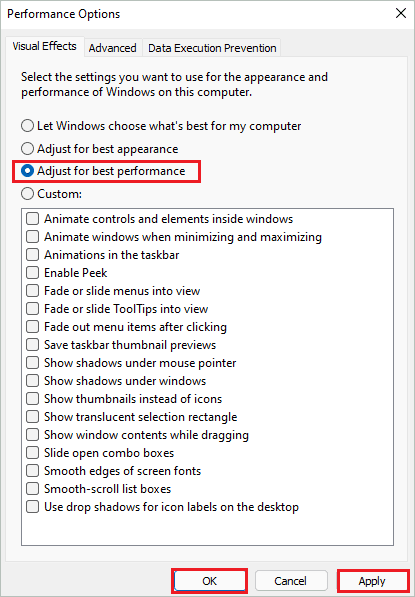
Step 5: Click “OK” on the System Properties dialog box.
Now, you will have the best performance with respect to visual effects and appearance on your computer.
2. Enable Storage Sense
Windows 11 offers to manage your temporary files, junk, and cloud data for you. These Windows 11 settings for performance can remove the bloatware from your PC. Although storage Sense is disabled by default, you can enable it via Windows 11 Settings app.
Step 1: Press Windows key + I to launch the “Settings app” and go to the “System” section from the left bar.
Step 2: Click on the “Storage” section.

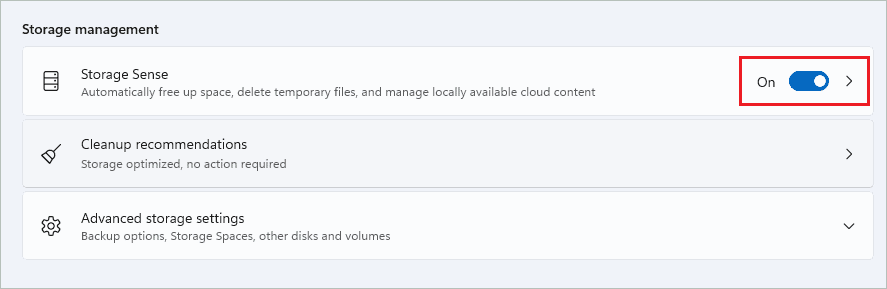
Step 3: Turn on the toggle switch next to “Storage Sense” under Storage management.
Once done, close the Settings app and enjoy Windows 11.
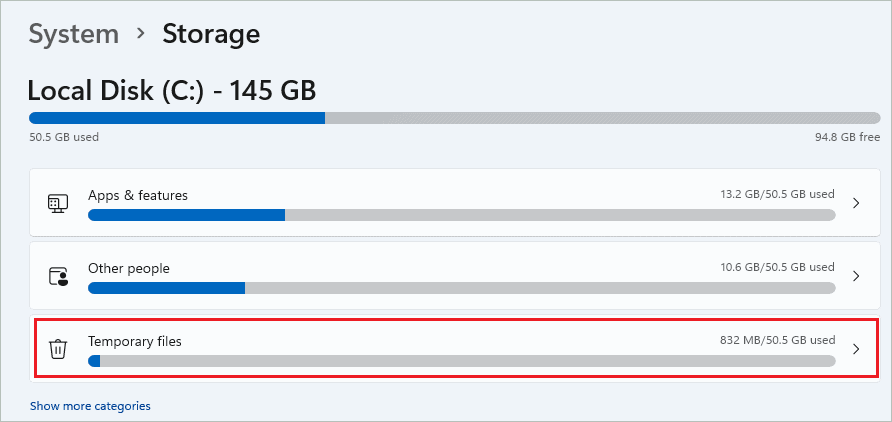
3. Delete Temporary Files
The temporary files can eat up a lot of storage, especially in the system drive. If the system drive is full, it can slow down your PC. You can delete older updates, download files, temporary Internet files, thumbnails, cache, and other temporary files from your computer.
Open the Windows Settings app and go to System ➜ Storage. Click on the “Temporary Files.”
If you have not opened Storage settings in a while, it may take some time to calculate the storage usage.
Now, check the checkboxes next to the files you wish to delete permanently from your PC. Once all the files are selected, click on “Remove files.”
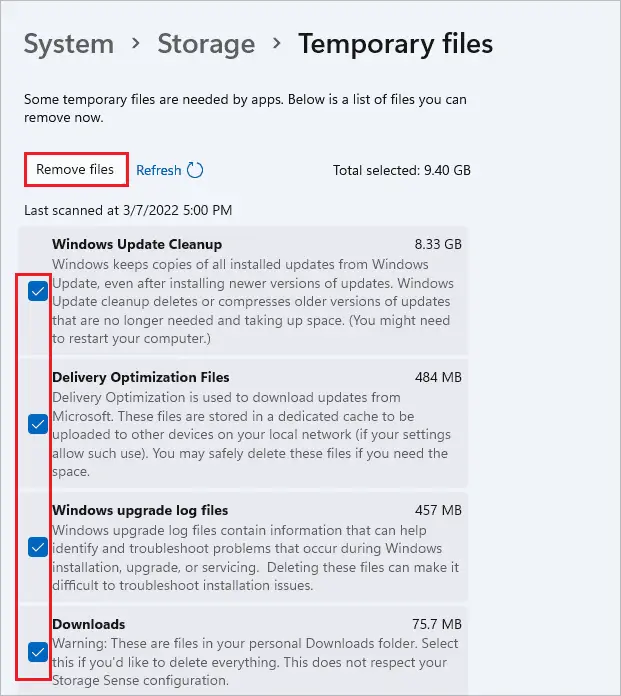
Warning: Deleting Downloads can remove the contents from the Downloads folder, so make sure you check the content before deleting it.
You will now have more storage space on your PC.
After applying these Windows 11 settings for performance, reboot your computer.
4. Disable Startup Apps
The unwanted startup apps can start as soon as the PC is turned on, thus slowing down other apps and processes. There can be a Windows performance issue because of it. You can disable the unnecessary startup programs.
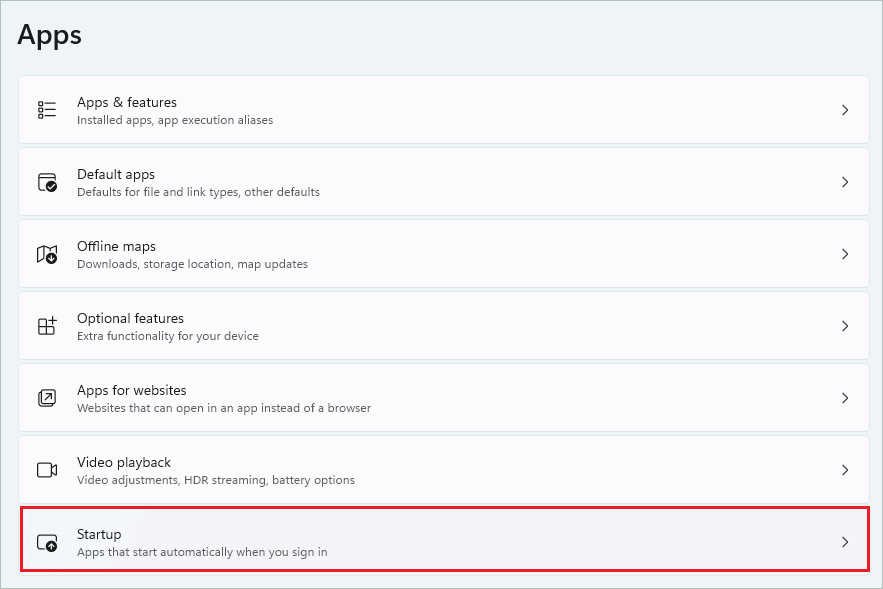
Launch the Settings app and go to “Apps.” Next, click on the “Startup” section in App settings.
Now, toggle the switch next to the app you don’t want to run at Startup, such that it is turned off.
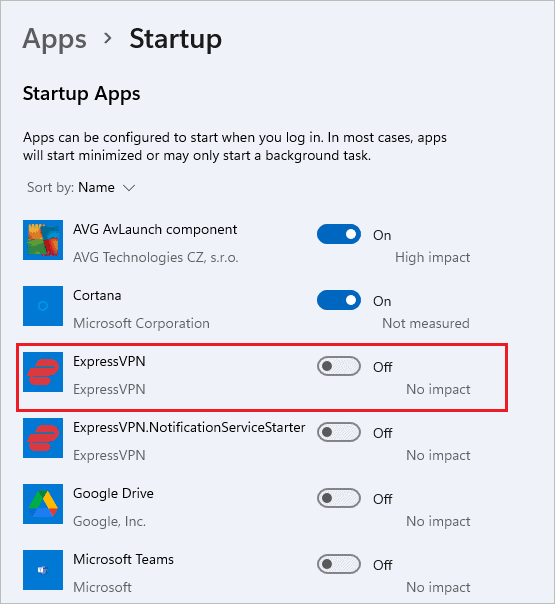
Once all the required startup programs are disabled, you can restart the computer and check if it helps in performance enhancements.
5. Disable Game Mode
The Game Mode is specifically designed for games. If you have this mode enabled, it can affect your system performance. Even if you play games on your Windows 11 computer, make sure you disable the Game Mode once you are done. You can enable Game Mode again while playing games.
To disable Game Mode, go to Settings app ➜ Gaming ➜ Game Mode and toggle the switch next to it to turn this mode off.

If you never play games, you can keep it disabled permanently.
6. Disable Background Apps
Some apps can run in the background, taking up system memory and processor. If you don’t need any specific app, you can stop its background processes from running. This will save additional system resources utilization.
Launch the Settings app and go to Apps ➜ Apps & features. Next, click on the three-dot icon next to the app you don’t wish to run in the background.
Select “Advanced options” from the menu.
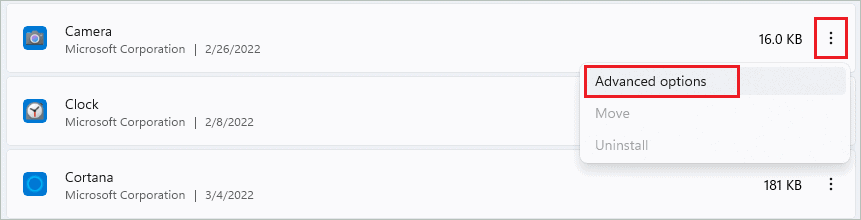
Now, under “Background apps permission,” set the “Let this app run in background” to “Never” from the drop-down menu.

The app will stop running in the background from now onwards, thus improving the performance of Windows 11 computers.
7. Install Recent Windows Updates for your PC
It is essential to keep your PC updated for better performance and speed. The latest security patches, bugs fixes, and new features come along with Windows 11 updates. You can download and install updates from the Windows 11 Settings app.
Go to Settings app ➜ Windows Updates and click on the “Check for updates” button.
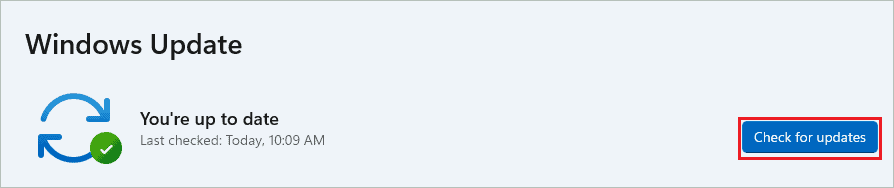
If there are any updates, they will be downloaded and installed on your computer. Then, you just need to reboot your computer once.
Repeat the above steps once in a while to keep your computer updated.
8. Disable Unwanted Notifications
Some notifications can disturb you while working or playing games. You can simply disable unwanted notifications like suggestions and tips. It is also possible to turn off notifications from apps you don’t use.
Navigate to the Settings app ➜ System ➜ Notifications and scroll down to the end of Notifications settings.
Uncheck the checkboxes next to “Offer suggestions on how I can set up my device” and “Get tips and suggestions when I use Windows” to disable suggestions and tips on your PC.

In the above list of apps, you can turn off the switch for apps you don’t wish to receive any notifications.
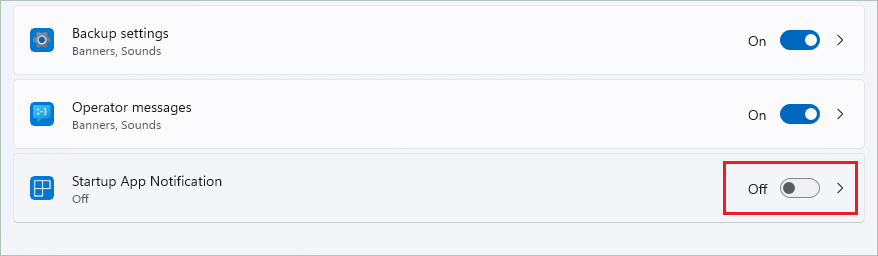
Now, you can enjoy movie games and work at peace without annoying notifications. These Windows 11 settings for performance can help you stay away from annoying notifications.
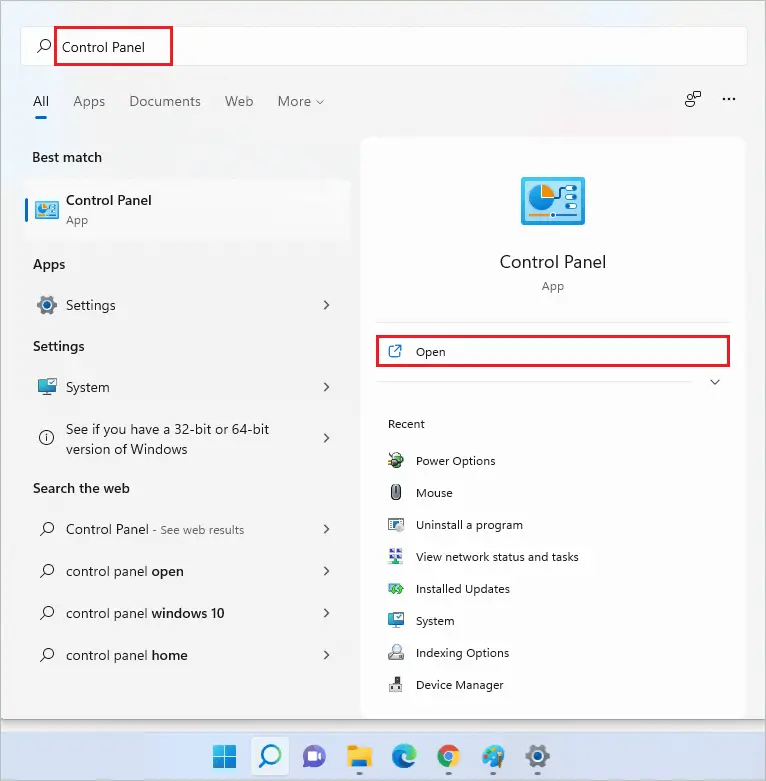
9. Change Power Plan Settings
You can set the power plan to high performance for a better experience. These Windows 11 settings for performance need to be done from the Control Panel.
Step 1: Press the Windows key and search for the “Control Panel” in the search bar. Then, open the same from the search results.
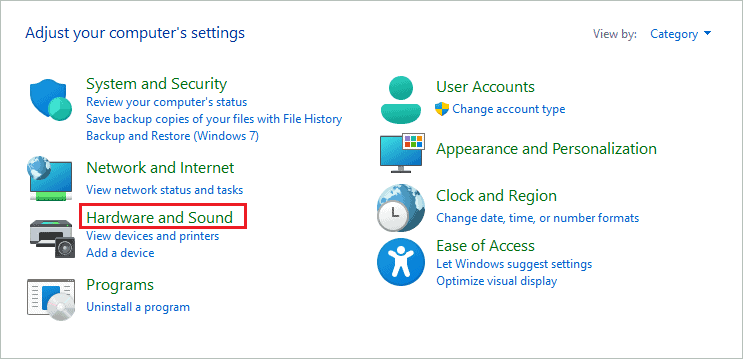
Step 2: In the Control Panel window, open “Hardware and Sound.”
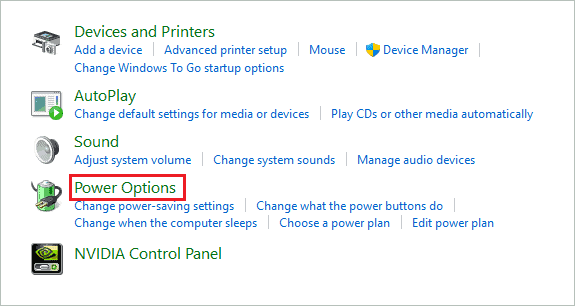
Step 3: Next, click on “Power Options.”
Step 4: In the next window, select “High performance.”
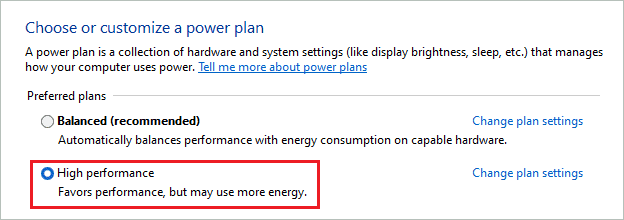
After selecting the high performance power plan, reboot your computer to reflect the changes.
10. Disable Virtualization-based Security
Virtualization based security (VBS) helps you protect your memory from malware and attacks. However, many users reported a dip in performance when this Windows 11 feature was enabled, especially while gaming. You can disable VBS on your computer to increase PC performance.
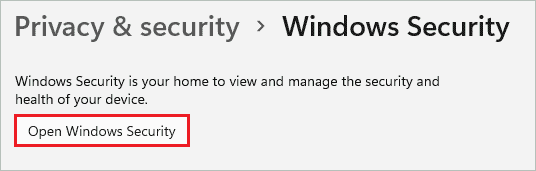
Go to Settings app ➜ Privacy & security ➜ Windows Security and click on the “Open Windows Security” button.
In the Windows Security window, go to “Device security” from the left panel and click on the “Core isolation details” link.
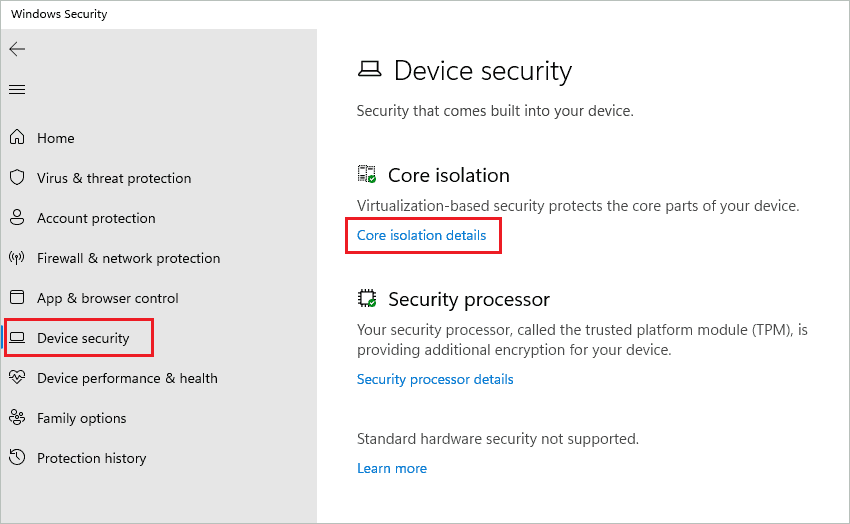
You can also search for “Core isolation” in the Start menu’s search bar to open it directly.
Toggle the switch below “Memory integrity” to turn it off.
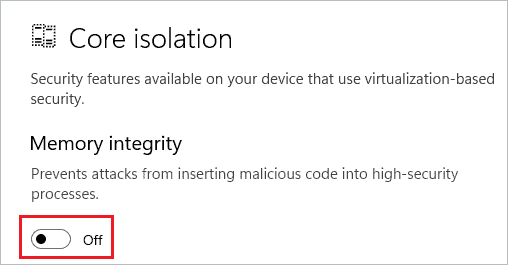
Once done, reboot your computer and check if these Windows 11 settings for performance helped or not.
11. Disable Advertisements
Windows 11 settings for performance do not include turning off ads, but they can improve your overall experience with the PC. However, if there are unwanted ads everywhere, it can annoy and hamper the overall productivity of your work.
Go to Privacy & security ➜ General in the Settings app and then disable all the options by toggling the switch.
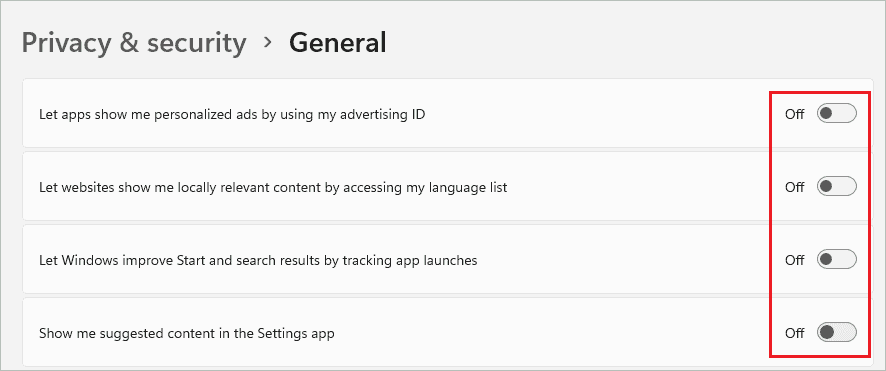
This will disable personalized ads, relevant content on websites, tracking app launches, and suggested content in the Settings app.
12. Disable Transparency and Animation Effects
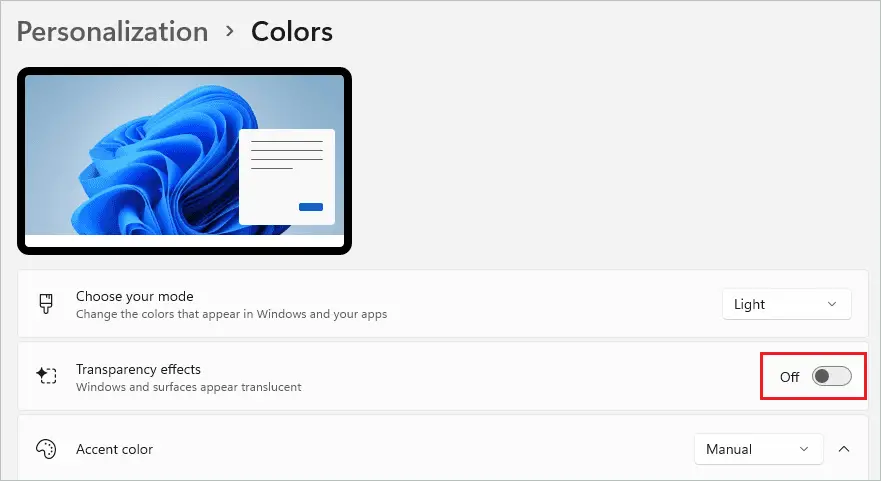
If you don’t have a dedicated GPU, it is best to disable transparency effects and animation on your computer. These Windows 11 settings for performance can help you reduce the load from the graphics processor.
Open Settings app and go to Personalization ➜ Colors. Now, turn off the switch next to “Transparency effects.”
Next, go to Accessibility ➜ Visual effects. Then toggle the switch next to “Transparency effects” and “Animation effects” to turn it off.
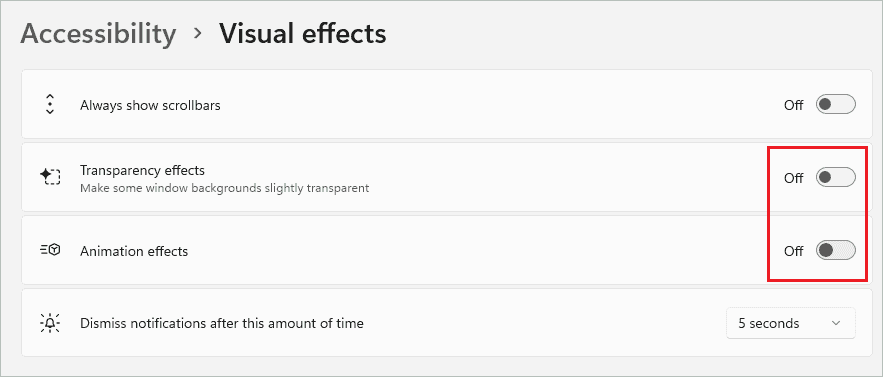
You can reboot your PC once the changes are made.
Tips for Better Performance in Windows 11
Along with the above Windows 11 settings for performance, you can check out the tips given below.
- Remove unwanted apps and bloatware
- Perform frequent checks for malware and viruses
- Defrag your hard disk
- Launch only the apps you need
- Use a trusted antivirus program
- Keep device drivers updated
- Make sure the system drive (C drive) has enough disk space
- Use apps only from trusted sources.
The tips can help you use your computer better without compromising speed and performance.
Conclusion
However sound the new operating system is, we cannot compromise on performance. You can make a few changes in Windows 11 settings for performance improvements. If you are fine with the default settings, you can use them as it is.
However, if you feel the performance of your Windows 11 computer is not up to the mark, you can try the settings change mentioned in the guide above. The tips can also help you work better with your Windows 11 computer. You can also turn off the Xbox Game Bar if you don’t use it. The other unwanted app can either be disabled or completely removed.
FAQs
Does Windows 11 have better performance?
Yes, Windows 11 has better performance. You can also configure it for a better gaming experience.
How do I optimize Windows 11 for best performance?
You can modify performance options, delete temporary files, enable storage sense, disable startup apps and game mode, install recent updates, turn off ads and background apps, and change power plan settings for the best performance of Windows 11.
What should I disable in Windows 11?
You can disable startup apps, background apps, VBS, ads, unwanted notifications, game mode, visual effects, and transparency effects in Windows 11.


