Key Takeaways
- Google shared drives are storage locations for files within Google Drive, where files related to an organization or an organizational unit can be stored.
- The files in the shared drives are owned by the organization, not by any individual member.
- Once a shared drive is created, you can add members and assign them access levels for the drive content.
If you are working with a team, having access to Google Shared drives (known as Team Drive before) can be beneficial in storing all the data related to the team at a single location. A Shared drive is an organizational structure for files similar to the My Drive in Google Drive. The difference is that the Shared drive files are owned by the organization or an organizational unit.
You can create a file either in the shared drive or the My Drive folder, but it cannot belong to both simultaneously. Even when the person who created a file leaves the team, the file is retained in the shared drive. It can be accessed by anyone within the team, irrespective of the location and type of device. But the administrator account has to enable the shared drives option in the Admin console’s Sharing settings. Remember that when you add Google Drive movies to your drive, they can be found under My Drive, not shared drives.
How To Set Up And Create Google Shared Drives
To set up Google Shared drives, you must log in to your Google Workspace account, which is part of your work or school. In addition, your organization must support the feature so that you can create one and share files. Read on to find out how you can create a shared drive, add members, give them access and remove them if required.
How To Create A Shared Drive
Creating a shared drive can be as simple as hitting the New button. Once it is created, you can add files and folders for your colleagues to access. When you create a drive, you have the Manager role. Here is how to create a shared Google drive.
Open Google Drive and select “Shared drives” in the left panel. Next, click the “Create a shared drive” button. To create a second drive, click “New” in the upper left corner.
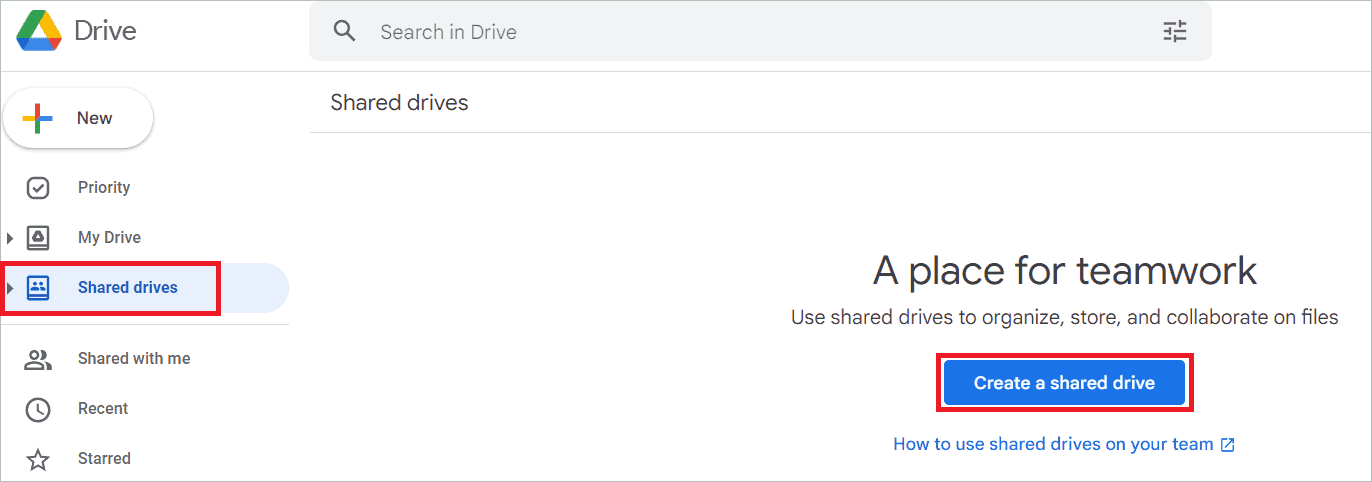
Give the drive name and click “Create.”
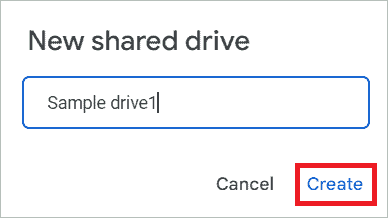
The drive has been created successfully.
How To Add Members To The Shared Drive
Google Shared drives can be handy for having all the organization files in one place. But only when you add members with sufficient access can they open and edit them. To add a member’s email address, the person should have a Google account. By default, an added member is a Content manager. But you can change it to suit your needs.
So, here is how you can add members to the drive.
Open Google Drive and select “Shared drives” in the left panel. Double-click on the drive to which you want to add members.

Click “Manage members” on the top right.

Caption: Click Manage members
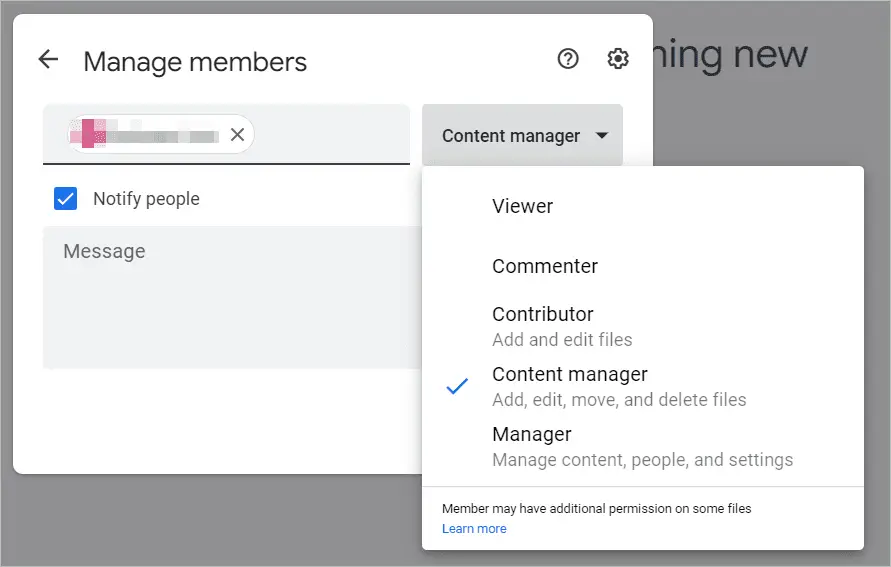
You will be able to add members in the next window. Add email addresses, names, or a Google Group. You can change the access level at this stage by clicking the drop-down button and selecting an option.
Click the “Send” button.
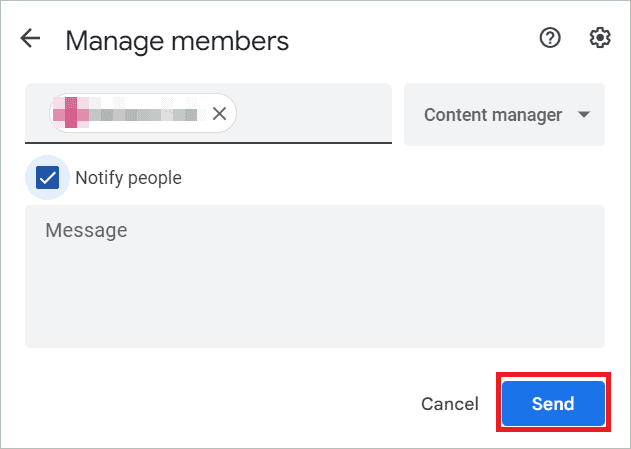
You have now successfully added members.
How To Change Member Access Level
You can change the access level of added members either at the time of adding them or later. Here we will see how to change the access level at a later point.
Open Google Drive and select “Shared drives” in the left panel. Double-click on the drive where you want to change the level of access.
Click “Manage members” on the top right.

In the next window, make the required changes in the access level of different users, and click “Done.”
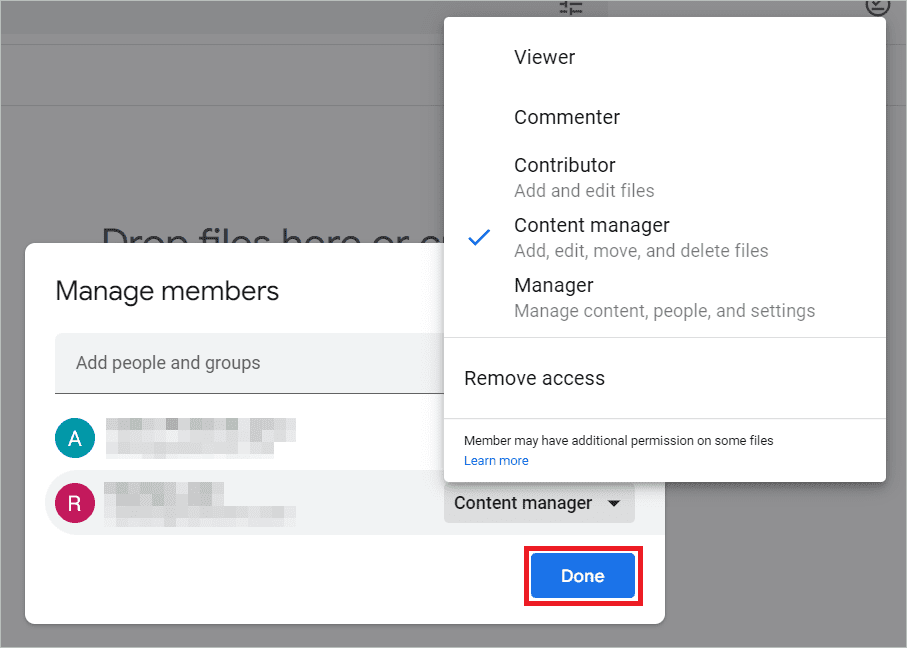
The level of access is now changed to the chosen one.
Remove Members from Shared Drives
For some reason, you may want to remove members from Google Shared drives. However, even if you remove a member from the drive, they may still be able to open or edit the file content. This is possible if the files have been shared with all the company employees through a group or link. Let us see how to remove members from shared drives.
Open Google Drive and select “Shared drives” on the left menu. Double-click on the drive from which you want to remove members.
Click “Manage members” on the top right.
Locate the member and click on the drop-down menu beside them. Next, click “Remove access” and then “Done.”

The member has been successfully removed now.
Key Features To Understand Google Shared Drives
When discussing Google Shared drives, it is essential to understand the key features, how to use them in the best way and how they are different from My Drive. Then can you give access to files, decide granular permissions for drive content, and perform many other actions to use the feature optimally. Note that the Manager of the drive has complete administrative control. Let us now dig deeper into the topic.
Comparison of My Drive and Shared Drives
If you are unclear about what distinguishes Google Shared drives from My Drive, keep reading. We have compared both with respect to certain aspects. The similarity is that when you enable Google Drive offline, you can access both drives. The differences between My Drive and Shared Drives are listed below –
1. Owner of files and folders
Shared drive: The team owns the files and folders.
My Drive: The owner of My Drive owns them.
2. Adding files
Shared drive: Any member with the contributor role or above can add files.
My Drive: The owner of My Drive can add files.
3. File syncing to the computer
Shared drive: File syncing can be done using Google Drive for desktop.
My Drive: File syncing can be done using Google Drive for desktop.
4. Moving files and folders
Shared drive: People having Contributor access or higher can push files from My Drive to Google Shared drives. But your permission role should be a Content manager or higher to move files and folders within the shared drives. If your role is Manager, you can move them between shared drives or out of them. Transferring folders from My Drive to a Google shared drive requires permission from the administrator.
My Drive: You can move files and folders inside My Drive.
5. Files in the Trash folder
Shared drive: There are separate Trash folders for different Google Shared drives. Files and folders remain in Trash for 30 days before getting deleted. People with Content manager roles or above can only move files to Trash. However, if you are a Manager, you can delete the Trash files forever before 30 days.
My Drive: Files and folders remain in Trash for 30 days before they are deleted. You can delete them by selecting Delete Forever.
6. File and folder sharing
Shared drive: Every shared drive member can see and access files in the shared drive level.
My Drive: According to members’ access privileges for individual files, they can see different files in a folder.
7. Restoring files
Shared drive: People with Contributor access or higher can restore files.
My Drive: The file owner can restore a file.
Salient Features of Google Shared Drives
1. Files/folders remain intact after a member leaves
As already mentioned, the files in Google Shared drives belong to the team. Therefore, when a person who has added or created files leaves the team, the files remain intact. This is true even if the administrator has deleted their account.
2. Flexible file sharing
You can give secure access to file contents and folders in the shared drives by adding a group or an individual user as a member. Another way is when the members share files/folders with non-members.
All the added members can see the whole content of the shared drive. Besides a user, you can also add a group as a member. Later, when a new user is added to the group, they are added automatically to the shared drives the group is a member of. This task is carried out by Google Groups. All the members have levels of access to decide what kind of access they have on the files and the Google Shared drives.
Another kind of sharing is the sharing of files/folders with non-members. The shared drive members can share files/folders with an external person if permitted. They can see only what is intended to be seen, not the entire active space.
3. External users can edit/create/upload a file
If your organization permits, external persons can work on the files they have access to in the shared drive. For this, the person must have a Google account. They can edit/create/upload a file to a shared drive created by a member. But the file will remain the property of the organization.
4. Shared Drive syncing
The shared drive content can be synced with your desktop using the Drive for desktop app. The app is the desktop client that backs up your Google Drive data on your local storage.
The Best Practices For Google Shared Drives
1. Store common files in Shared Drives
You can limit the Google Shared drives content to files that are commonly used across your organization/team, like project progress reports and task assignment sheets. This makes it the perfect collaboration space. You can create shared drives to store common files for a project or event. You can also have shared drives to store company-wide files, sensitive files, or templates.
Files pertaining to only you (like one-on-one meeting notes) can be kept safe in My Drive. This way, personal files are kept private, and the team content does not face data loss.
So, if a person leaves the team, you can still have the files secure in the shared drive. You can assign the Viewer, Contributor or Commenter role to people if you fear they might delete files from the shared drive.
2. Each Shared Drive must have a Purpose
Create a shared drive for a specific purpose, like storing the relevant documents of a particular project. If there are many projects, many Google Shared drives can be set up. For a project that is yet to be completed, you can give Contributor or Content manager roles to members so that they have the necessary permissions to update files.
For completed projects, commenter or viewer access is sufficient. In addition, you can also give project status (like Archive) with the drive’s name.
Sometimes, too many members and too much data can become overwhelming. In that case, it is best to create more shared drives to bring clarity to the data stored. Likewise, when there are a variety of projects handled by individual teams and cross-functional ones, you can make more shared drives to keep all the data.
For example, one or more shared drives can save data required by each functional team, while one shared drive can have the data shared between multiple cross-functional teams.
3. Use Google Groups as Members
Adding groups as members should be preferred over adding individuals as the membership becomes easily manageable with Google Groups. The benefit is that when you add a new user to a group, they will have automatic access to the files in the Google Shared drives, like the existing members.
In addition, adding individual members means that you can add only 600 members to the drive. On the contrary, you can add a maximum of 100 groups, making the number of users 50,000.
4. Content Sharing Norms
You can add those people to the shared drive who need to access all the files and folders. They can be managed by deciding the access levels wisely. Collaborators can be given the Manager or Content manager role.
Your collaborators can also access non-Google files from Google Drive for desktop. In that case, they might need Content Manager access. If you have internal and external collaborators for a project, it is better to create two separate shared drives for them. This makes it easier to give different access permissions.
If you want to allow someone access to one file or folder in a shared drive, it is advisable not to make them a member; instead, give them access to just the particular item. Note that only Managers have permission to share folders in Google Shared drives.
5. Better Organize Shared Drive Folders
Access management is given priority when shared drives are created. So each user’s level of access must be the right fit for every folder in the central space. If it is not possible, you may consider reorganizing the folders.
6. Use Naming Conventions
Introducing naming conventions for files and folders in shared drives will eliminate confusion and naming conflicts. When each member understands it, they can name the files appropriately, making it easy for another person to find them.
For example, drives shared internally and externally can be prefixed with [Internal] and [External], respectively. In addition, projects being worked upon can be prefixed with [In Progress], and the completed ones can be prefixed with [Archive].
Final Thoughts
Google Drive, the cloud-based file storage service, provides a free storage space of 15 GB. The Google Shared drives feature that comes with it is excellent if you are working for an organization with different teams. It is possible to create shared drive in Google drive, each fulfilling a specific purpose. When you create a Google shared drive, you’ll be the drive manager with complete control over it by default.
While adding members to the shared space, keep a watch on who has what access level and ownership. Giving only the required access permission to each member, team members, or group is important so that the company documents are not tampered with or lost due to carelessness.


