Privacy is quickly becoming the rarest of commodities on the internet. Between advertisers, Google, your Internet Service Provider (ISP) and the NSA, doing anything secret online is almost impossible.
Almost- but not completely. There are a few steps you can take to make your movements much harder to track online, nearly impossible if you take some basic precautions. They all involve suffering some inconveniences, but that’s the price of security.
It’s also worth remembering that there is no 100 percent guarantee of security in anything. Any sufficiently powerful third-party can probably track you if you catch their interest. Bear in mind that no setup is perfect.
That said, you can at least make them work to track you. Here’s how.
Step One: Installing The OS
Here’s the sad, sad truth: You can’t trust Windows or OS X. They are closed-source products made by large corporations who can be forced to put in back doors for third-party snooping. Researchers have found NSA backdoor built into Windows and OS X as far back as 1999. That’s where Tails comes in.

The only sort-of secure operating system is Tails, the OS that Edward Snowden uses. Tails is a community-developed, open-source OS built around security. It doesn’t even need a partition – you install it to a flash drive and live boot from it.
That way, there aren’t any incriminating files stored on the PC used for live booting. If you want to keep files on the drive, throw them in the encrypted partition.
Before downloading Tails, it’s worth taking a look at the OS’s extensive documentation. This isn’t a product for newbies.
To try Tails, download the ISO from the website. Be sure to follow all the listed instructions about verifying the ISO to make sure it was not compromised during the download.
Installing Tails is as simple as writing the ISO to a flash drive… which actually isn’t all that simple. We’ll first look at how to install Tails on Mac and then explain the process for Windows.
Installing Tails OS on Mac
To do it on Mac, open up Terminal and enter:
diskutil list
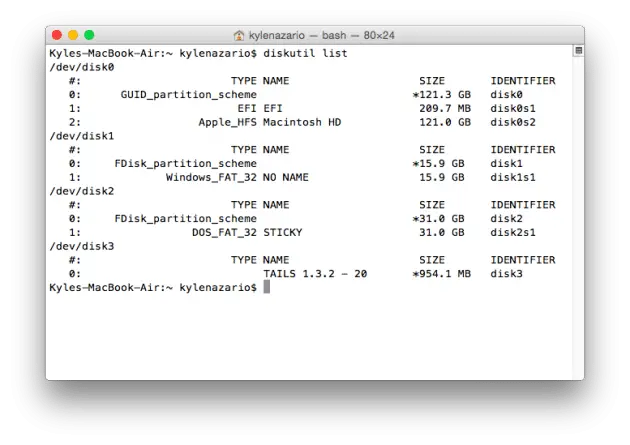
This will give a list and identifier for every hard disk connected to your machine. For example, it listed my hard drive, SD card, USB stick and virtual hard disk (the mounted Tails ISO) when I entered the command.
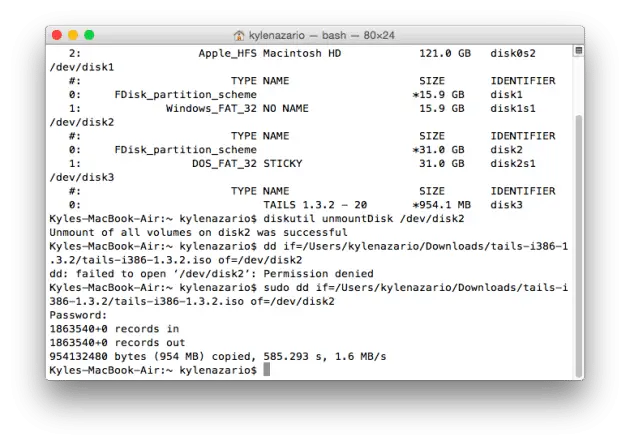
Now enter:
diskutil unmountDisk [USB identifier]
Next, we’ll write the Tails ISO to the removable media. Enter the following. For [tails], drag the Tails ISO from Finder into the Terminal window. For [device], put the identifier you got from diskutil list command above.
sudo dd if=[tails] of=[device]
That should take some time to finish, so don’t worry if it looks like it’s not working. Give it time to finish.
Installing Tails OS on Windows
On Windows, the process is even easier with a neat program called Pen Drive Linux. To use that, download the program from its website.
Select Tails as the distro you want to install and point the program to where you have the ISO stored on your hard drive. Select your removable drive for step 3, though be careful to pick the right one. After that, it’s as easy as pressing create.
Booting Tails
To boot tails, you have to select the right drive.
For Mac
On OS X, this is as easy as holding down the left Option key when the computer is booting. After that, use the arrow keys and enter to pick the hard disk with the USB icon. Funnily, mine was labeled as Windows.

For PC
Getting into Tails on a PC might be harder. A PC’s BIOS determines which device it goes to when booting up. Your PC may be programmed to use DVDs or USB sticks first when booting. If so, you’ll reboot right into Tails with the stick plugged in.
If not, you’ll have to go into the BIOS settings and rearrange the device boot order. This can be done by holding down F1, F2, F10 or Escape when booting. Google your PC model to see which key it uses. Then in the Boot sequence select the USB drive to boot Tails.
The program will start up by itself. If everything goes right and the Debian base code plays nicely with your hardware, everything should work.
This being Linux, Tails did not work with my MacBook Air’s wireless card. Fixing that requires some tinkering, so your mileage may vary.
Step Two: Using The Web Browser
The next thing keeping you safe is Tails’s copy of The Onion Router, better known as TOR. While not completely secure, TOR is the best option available for privacy-minded users.
When you connect to TOR, data coming and going from your PC is routed through a network of anonymizers. By the time it comes out the other side, it is (theoretically) anonymous.
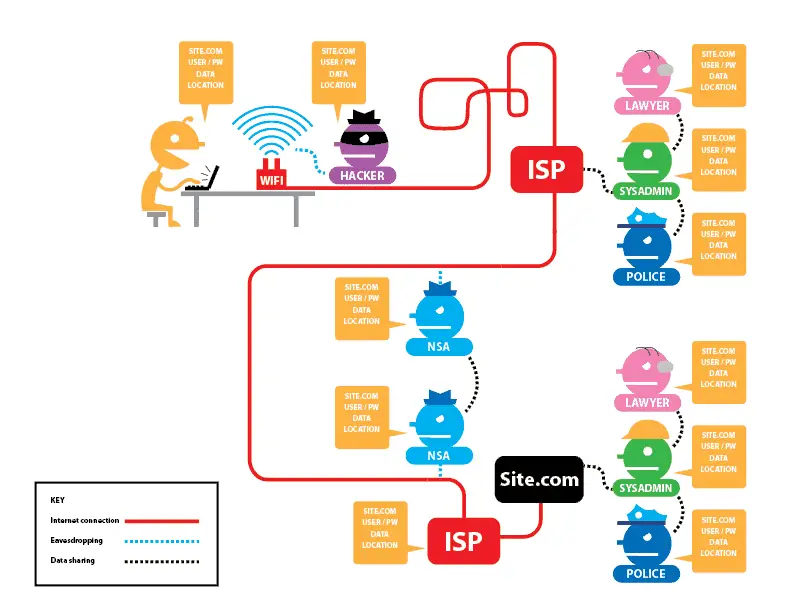
(thanks, EFF!)
There are two major caveats to TOR. First, it does not disguise your data once it leaves the anonymizing network. Snoopers can see everything you do, they just can’t tell it’s you.
Two, TOR relies on the user keeping up good habits. For example, if you log onto your Gmail from TOR, anyone watching now knows your identity.
Tail developers recommend you reboot between sessions to disguise yourself. For example, if you have to post to an account you’d rather not associate with yourself and need to move around some Bitcoin, post on the account, reboot, then move the Bitcoin.
While total security is impossible, TOR and Tails are both great options for keeping yourself secure online. TOR keeps your traffic anonymous, and Tails erases any trail from the computer you use.
Remember also, though, that privacy demands good habits. Use long, varied passwords for your accounts. Don’t do anything that could personally identify you.
Above all, good luck. Online privacy is a rapidly vanishing commodity in our age, and carving out even a semblance of it is difficult. Hopefully, TOR and Tails will help you do that.
Further Reading: Send Encrypted and Secure Text and MMS Messages on Android with TextSecure


