Adaptive brightness in Windows 10 can be a bit annoying to some users. Depending on the circumstances it can be both useful or distracting.
Microsoft first introduced this feature in Windows 8, and in Windows 10 adaptive brightness appears to be buggier than its earlier version. If you’re using a touchscreen device or laptop, you may notice that adaptive brightness often has a mind of its own and really messes with the desktop display brightness.
Let’s look at how to enable or disable adaptive brightness in Windows 10, along with some of the reasons you might want to leave it enabled even through the annoyances. Enabled adaptive brightness can be helpful when the brightness slider is not working on your device.
What is Adaptive Brightness in Windows 10?
Similar to how your phone adjusts the screen’s brightness depending on the light it perceives, adaptive brightness in Windows 10 works the same way. This helps save your screen from being lit brightly all the time, along with saving battery life when you’re not plugged into the wall.
Why Enable or Disable Adaptive Brightness in Windows 10?
Enabling adaptive brightness in Windows 10 gives you what your Windows believes is the best level of brightness for your computer when using it based on the current lighting conditions. If you’re running on battery, it’ll help save battery life by reducing screen brightness which is one of the biggest battery drainers when using a computer.
Disabling adaptive brightness in Windows 10 gives you complete control over what brightness your screen sits at when in use. If your computer is unable to adjust the brightness properly, reasons might range from video drivers getting in the way of what brightness level is enabled or your use of multiple monitors.
Having total control over the brightness of your PC is essential to getting the best brightness level for your eyes.
Enable/Disable Adaptive Brightness in Windows 10
By default, adaptive brightness will be turned on when you buy a Windows 10 laptop or upgrade to Windows 10. If you’ve updated to the Windows 10 Anniversary Update, some users have reported that this feature has been turned back on to coincide with the Battery Saver feature.
You’d need to dive into the system hardware settings to make changes as needed.
Open the “Control Panel” by using Cortana or the Win-X Menu.

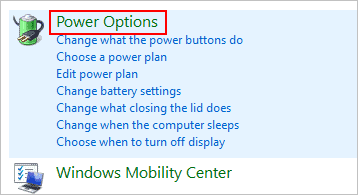
Search for “Power Options” and click on it when the results come back.
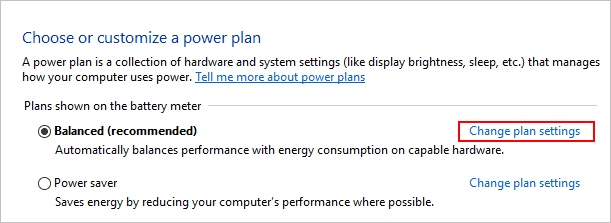
Click on “Change plan settings” next to your current power plan. If you switch between power plans for different functionality, you’ll need to perform these steps for each power plan on your computer.
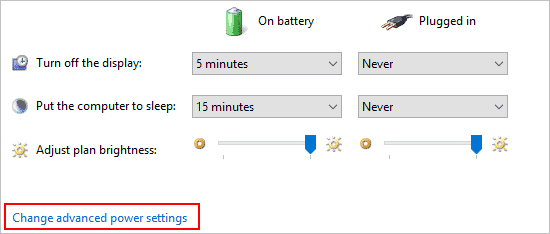
Now, click on “Change advanced power settings.”
Scroll down and click on “Display” and open the options for “Enable adaptive brightness.”
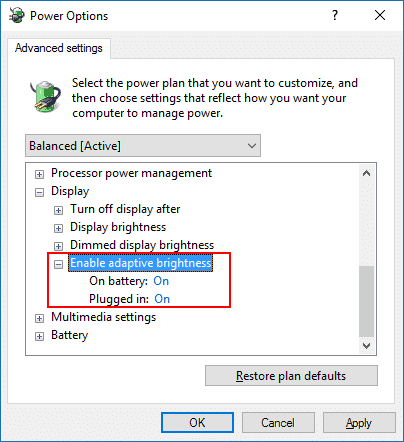
You’ll want to turn it the off position for both On battery and Plugged in options.
Make sure to click “Apply,” then “OK” to save your settings.
At any point you want to enable adaptive brightness in the future, simply follow the above steps and change the off option to on.
Troubleshooting Issues With Adaptive Brightness in Windows 10
Depending on the type of device or computer you have, the above steps may not actually disable adaptive brightness in Windows 10. If you notice it’s still adapting, you’ll need to turn off the Sensor Monitoring Service in Windows 10.
Open the Run command by using the shortcut “Win+R.”

Type in the following command:
services.msc
Click “OK.” The Services window will open up.
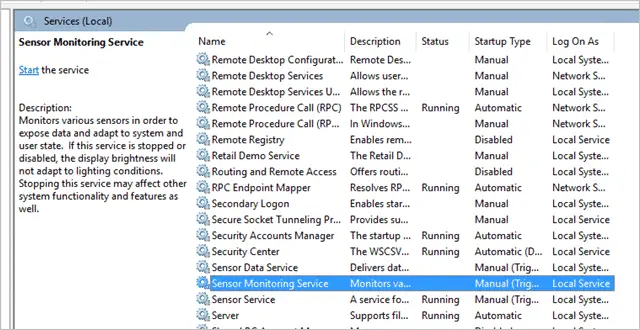
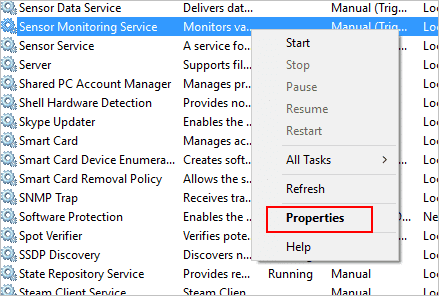
Now, you’ll want to look for the Sensor Monitoring Service in the list of services. Right-click on it and click “Stop” if it’s still running. Once you click Stop, then click “Properties.”
Under Startup type, click “Disabled.”
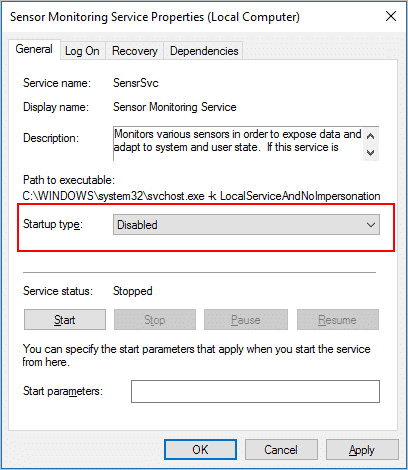
Then, click “Apply” and “OK.”
This should stop adaptive brightness from functioning even if disabling it did not. If you want to enable adaptive brightness in the future, simply follow the above steps and enable the Sensor Monitoring Service to run at startup.
Conclusion
Adaptive brightness is a great feature on smaller screens, like mobile phones and phablets. Depending on how you use your PC and where you use it, it may not be as adaptive as you’d like.
Enabling or disabling adaptive brightness is easy to do and can help eliminate the added eye strain and frustration of Windows 10 choosing when to dim and brighten your screen for you.


