The ability to take screenshots on Windows 10 is useful to convey ideas quickly and act as an immediate guide or proof if the need arises. Screenshots are easy enough to take on your phone but taking screenshots on Windows is not so straightforward.
You can always use the Print Screen button on Windows, but there are several other ways. In this article, you’ll learn how to take screenshots on Windows 10 in various ways to get the exact screenshot you need.
Sometimes, when trying to screen capture on Windows 10, you’d like to click and share the entire screen or just a specific window or edit the image or save it at a particular location on your PC automatically. Perhaps you only want to take a screenshot of a specific portion of the screen or you might want to take a screenshot during gaming etc.
There are many simple ways for you to get a Windows 10 screen capture, and we have provided solutions for every possible scenario you may encounter.
See More: How to Easily Install Google Web Fonts in Windows 10
How To Take a Screenshot in Windows 10
We’d recommend that users should know how to screenshot on Windows 10 using the keyboard shortcuts, as it is very convenient and it leverages built-in functionality in Windows. For those who prefer to use tools to get things done, there is also the option to use the snipping tool or third-party software that excels at taking screenshots in Windows.
We look at each of the approaches below.
Use Keyboard Shortcuts To Take A Windows 10 Screenshot
This section explains the various ways in which the Print Screen key on your keyboard can be used to get different screenshots on a Windows 10 system.
| Keyboard Shortcut | What It Does |
|---|---|
| Ctrl + PrintScreen | Take a screenshot of your entire screen and keep it on the clipboard |
| Alt + PrintScreen | Take a screenshot of your active windows and keep it on the clipboard |
| Windows Key + PrintScreen | Take a screenshot of your entire screen and autosave it to the screenshots folder |
| Windows Key + Alt + PrintScreen | Take a screenshot of your active Window and autosave it (Game Bar Feature) |
| Windows Key + Shift + S | Get a cursor to select a partial area on your screen for the screenshot; copied to the clipboard |
Note: ‘Print Screen’ can be denoted by PrtScn, PrntScrn, PrtSc or any similar combination of letters on your keyboard.
1. Print Screen or Ctrl + Print Screen

Using the Print Screen key is the simplest, most straightforward, and most well-known method of taking a screenshot on a Windows computer.
It is universal and works on all versions of Windows, not just Windows 10. On your keyboard press, the ‘PrtScn’ key present on the top row alone or press the ‘Ctrl’ key followed by the ‘PrtScn’ key.
What does it do exactly?
The shortcut Ctrl + Print Screen saves a copy of your screen on the clipboard. You can view the saved screenshot in ‘Paint’ or any other image editor after you paste it from the clipboard.
You can then edit the image or save it to your computer.
2. Alt + Print Screen
This keyboard shortcut is used when you want to take a screenshot of just the active window on your computer and not the entire screen.
Open the window that you want to capture and press the ‘Alt’ key and the ‘PrtScn’ simultaneously.
What does it do exactly?
Alt + Print Screen takes a screenshot of the active windows that will be saved to the clipboard like in the earlier method. You can then open MS Paint or any other image editor to view it. Edit and save the screenshot as required.
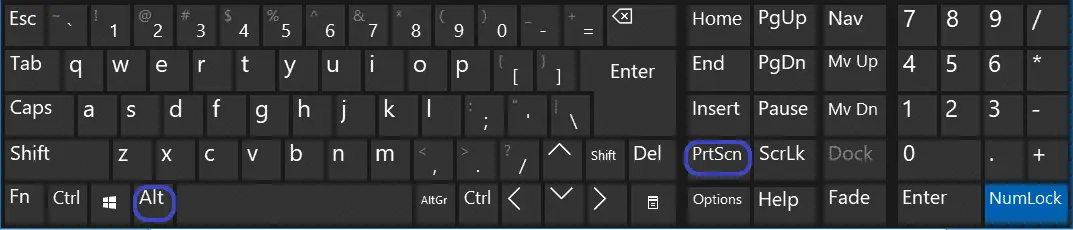
3. Windows + Print screen (AutoSave Screenshot)

Use this shortcut to take a screenshot of your entire screen and automatically save it without having to open MS Paint to view it.
What does it do exactly?
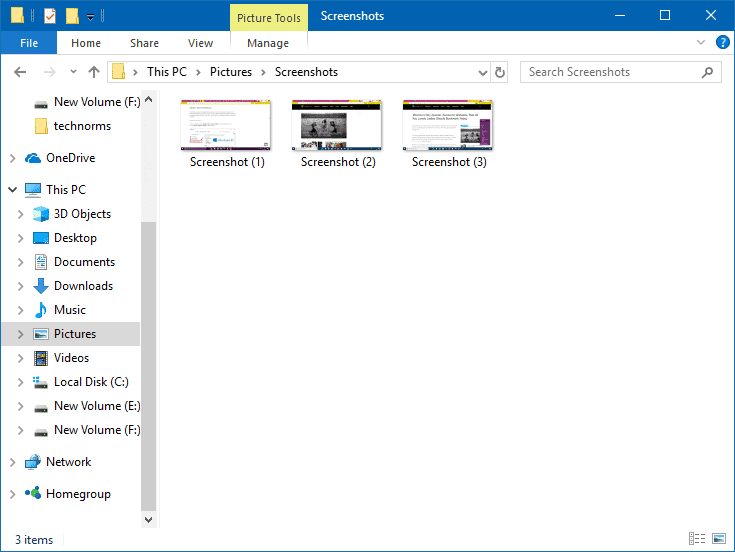
When you press the Windows key + Print Screen combination, a screenshot of your entire screen is taken. Windows 10 automatically saves your screenshot as an image in the Screenshots folder in the Pictures library.
Press Windows + ‘PrtScn’ and then navigate to Windows 10 File Explorer > Pictures > Screenshots to view your screenshot.
Note: On keyboards that have an Fn (Function) key, the PrtScn key may perform other functions too, or the PrtScn might itself be a secondary function of a key that can only be used along with the Fn key. In such cases, the shortcuts become longer as they now include the Fn key as well.
4. Fn + Print Screen
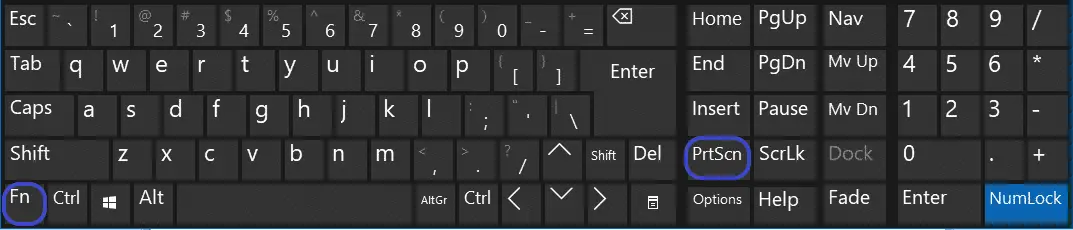
If you use a laptop or a tablet or if your keyboard has a Function key, and Print Screen is the secondary function of a key, you can use these shortcuts to take a screenshot of your screen.
What does it do exactly?
Hit Fn + Print Screen, and your screenshot will be copied on the clipboard. It is similar to hitting ‘PrtScn’ on a regular keyboard to take a screenshot.
Paste your screenshot in Paint and edit or save it according to your requirements.
5. Fn + Windows + Print screen

What does it do exactly?
The shortcut Fn + Windows + Print Screen will save your screenshot automatically.
The screenshot will be saved in the Pictures folder in the Screenshots folder.

6. Fn + Alt + Print screen

What does it do exactly?
This shortcut, Fn + Alt + Print Screen, is similar to the one outlined above. It takes a screenshot of the active window and copies it to the clipboard.
You will have to paste it in Paint to save it to your computer and then share it.
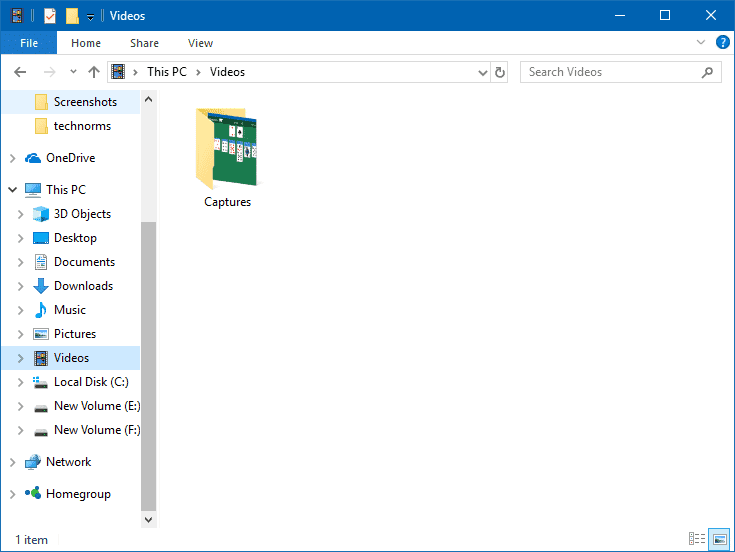
7. Windows + Alt + Print Screen (For Gamers)

In the Windows 10 Creators Update, a nifty feature called Game Bar has been introduced especially for gamers.
The Game Bar lets you take screenshots of your active game window. One can share this with your friends anytime.
To take a screenshot of your game, press Windows + Alt + PrtScn at the same time, and a screenshot will be saved automatically in the screenshots folder in your Video library.
Listed above are all possible uses of the Print Screen button in Windows 10, along with the role that an Fn key may play, but there is one more nifty shortcut that you can use to take a screenshot of a specific area on the screen.
8. Windows + Shift + S (Windows 10 Partial Screenshot)

This is a very interesting function that is present only in Windows 10. If you want to take a screenshot of only a portion of the screen and not the entire screen, use this shortcut.
What does it do exactly?
Press Windows + Shift + S ley combination, and the screen dims, and you will see a cursor on the screen. Just drag the cursor over the portion of the screen that you want to take a screenshot of.
Release the cursor when you are sure that you have covered the area that you need. Your screenshot will be copied to the clipboard. Paste it in Paint to view and edit.
Now that you have seen multiple ways to take a screenshot on Windows 10 machines using keyboard shortcuts, let us look at the ways to take a screenshot on Microsoft Surface, as it may not have an external keyboard.
9. Windows logo + Volume down (Microsoft Surface)
Windows Surface users can use Windows logo + Volume Down hardware buttons combination and take a screenshot of the entire screen. Simply hold down the Windows logo touch button on the bottom of your screen and the volume down button on the side simultaneously.
The screenshots on Windows 10 Surface device will be automatically saved in the Pictures folder inside the Screenshots folder of your device.
10. Fn + Spacebar (Microsoft Surface Only)

Windows has some more Surface-specific shortcuts to take screenshots that work only on Surface and Surface Pro. This is because these devices do not have a PrtScn key.
Press Fn + Spacebar key combination to take a screenshot and copy it to the clipboard.
This works like the PrtScn key, and you will have to paste to another application to use it.
11. Fn + Alt + Spacebar (Microsoft Surface)
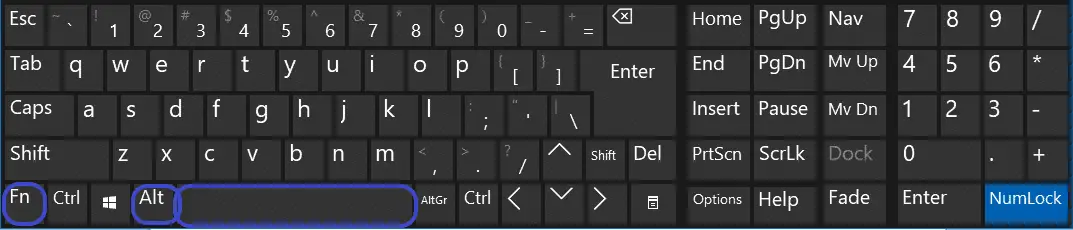
You might be seeing a pattern emerge regarding how these key combinations are set up. This shortcut for Windows Surface users saves the screenshot of the active window to the clipboard, just like when you press Alt + PrtScn together.
On your Surface device, press Fn + Alt + Spacebar to take a screenshot of your active window, and paste in another application to edit and save the screenshot.
Use The Snipping Tool For Taking Windows 10 Screenshots
The Snipping Tool app is an inbuilt app that’s been around since Windows Vista, and survived the iterations to be the inbuilt tool take a screenshot in Windows 10 as well.
Search for Snipping Tool in the Start Menu search box to launch the app.
You can also find it under Start > All programs > Windows Accessories > Snipping Tool.
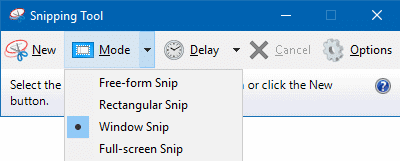
To use the app, open it and click on New. You can choose between a free-form snip, a Window snip, a rectangular snip, or a full-screen snip.
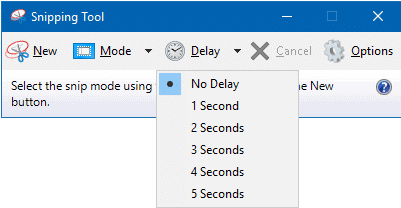
You can also set a delay in taking the screenshot, which is helpful if you need to highlight something before taking the screenshot.
Look into the settings and configure it to quickly take screenshots in Windows 10 that meet your needs without requiring any external software. Once you take a screenshot, you can edit and save it.
This is a simple and extremely functional app. If you like to use this one regularly – you can always pin this app to the taskbar for quick and easy access.
Use 3rd Party Software – WinSnap
There are a variety of tools in the market to help you take screenshots on Windows 10.
As a third-party software, WinSnap tool is popular for its lightweight and easy-to-use features. Furthermore, WinSnap is easy to configure per your requirements.
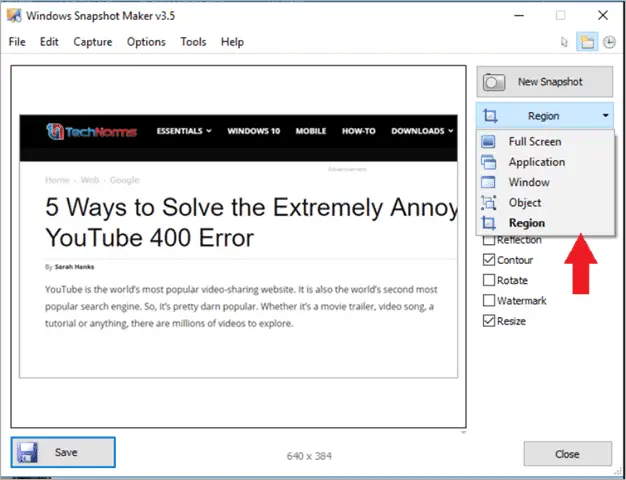
The UI of the tool is simple with minimal design and useful options. You can choose from Shadow, Reflection, Contour, and many more options. One can even have Watermark on your screenshots.
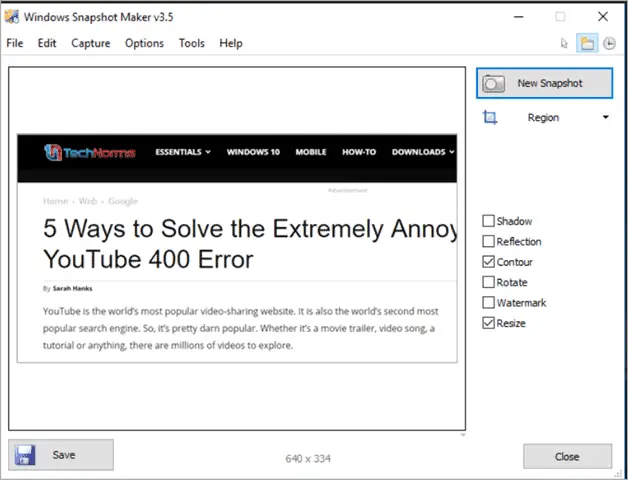
WinSnap tool allows choosing whatever part of the screen you want. One can take the screenshot of Full Screen, the current Application, Window, or a particular region.
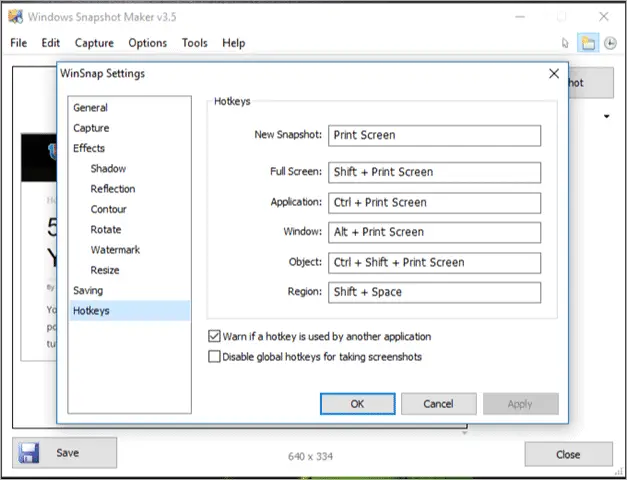
To make it most easy to use, the tool even has some Hotkeys that are customizable. This means that you can choose the hotkey you want for a particular action.
Going into the settings, you can even set the size of the image you need. Once you set the required size, it will take the same measurement for the further screenshots.
I’d recommend the WinSnap Screenshot tool for Windows 10 as a must-have tool if you need to take screenshots often. You can download Winsnap here.
There you have it! I hope any curiosity you had about how to take screenshots on Windows 10 is sated. Learn the keyboard shortcuts listed here or configure Winsnap once to forget all worries about taking excellent screenshots on Windows 10 devices.
(Article updated on 8th December 2019)
Further Reading: How to Enable or Disable Adaptive Brightness in Windows 10


