The Notes on your mobile phone comes handy to make a checklist or jot down something important, like someone’s address or study and research notes. If you prepare a to-do checklist in the Notes App on your iPhone and wish to access the same on your Mac, then you need to sync notes from iPhone to Mac. Before beginning with how to Sync Notes from iPhone to Mac, it is important to know where notes are currently stored.
As the method you can use to sync the notes depends on how the notes are currently stored. Well, once notes are synced between your Mac and iPhone, you can access notes saved on your Mac from your iPhone.
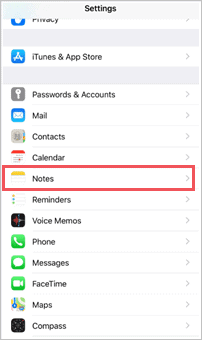
Where are the Notes Currently Saved on your iPhone?
Let’s look at how this is done.
Open Notes and click on the yellow arrow in the top left corner of your screen.
You can see different folders like iCloud, On My iPhone and Gmail account if your Notes are saved in each of these folders. You can follow the methods listed below, depending on which folders you see in the Notes App.
For example, if you see Notes under the iCloud folder, then you need to sync it with your Apple ID on your Mac, and if you have synced your Gmail account for notes, then you need the same Gmail account on your Mac to access the Notes.
How to Sync Notes from iPhone to Mac using iCloud?
Wondering how to Sync Notes from iPhone to Mac? The easiest way to sync it is by using iCloud. All you need is the same iCloud account on your iPhone and Mac. If you have never used iCloud before for syncing Notes and you can only see On My iPhone folder in your Notes App, then you need to enable iCloud sync for Notes first.
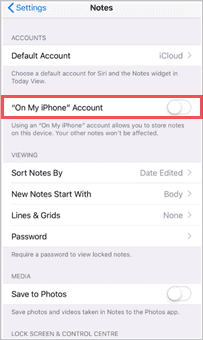
Stop Saving Notes Locally
To stop saving your Notes on your iPhone locally, go to Settings and click on Notes.
Under the Notes settings, toggle the switch next to “On My iPhone” Account to the left, to stop saving the Notes on your iPhone.
Start Syncing Notes using iCloud
Once you stop the local sync, you can enable iCloud sync. It is not necessary to stop saving Notes locally to have it on your iCloud. Still, it is recommended to do so to avoid confusion where a specific note is saved.
Go to Settings, and click on your Apple ID.
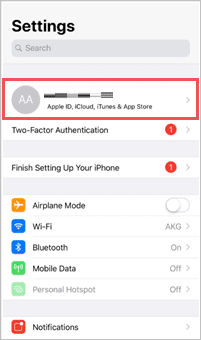
Click on iCloud, and enable the switch next to Notes under Apps Using iCloud.
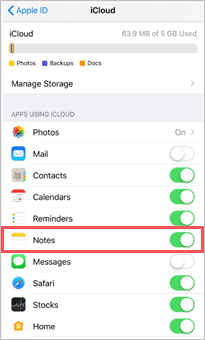
You can now see the iCloud folder under the Notes app. To access the notes on your Mac, you need to make specific settings change on your Mac system.
Sync Notes on your Mac
The next thing you need to sync your Notes is to add an iCloud account to your Mac. To do that, go to System Preferences and click on iCloud.
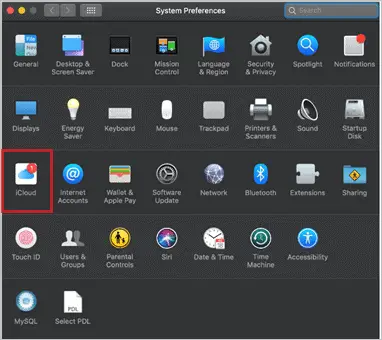
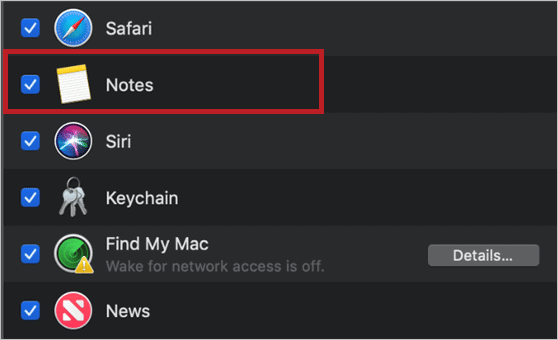
Enter your credentials when asked for and click on Sign in. Next, click on the checkbox next to Notes.
Now, you have all your Notes from iPhone synced to the Mac. The above process can also answer your question “how to sync notes from Mac to iPhone,” as the same steps are followed to get your data from Mac to iPhone.
How to Sync Notes from iPhone to Mac using AirDrop?
iCloud is the best way to sync all your data, including your notes. However, if you are not a fan of iCloud or don’t want to use Apple ID to sync notes, then you can use AirDrop to do it. In the case of AirDrop, you need to transfer each note explicitly, which is again a tiresome procedure to do if you have a large number of them.
To use AirDrop, you need to switch on Bluetooth and WiFi on both the devices, that is, on Mac and iPhone.
Note: Both the devices should be in a range of 30 feet from each other.
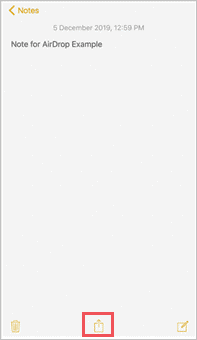
Go to Notes and click on the share button on your screen.
Select the destination Mac system, and then Accept the transfer on your Mac.
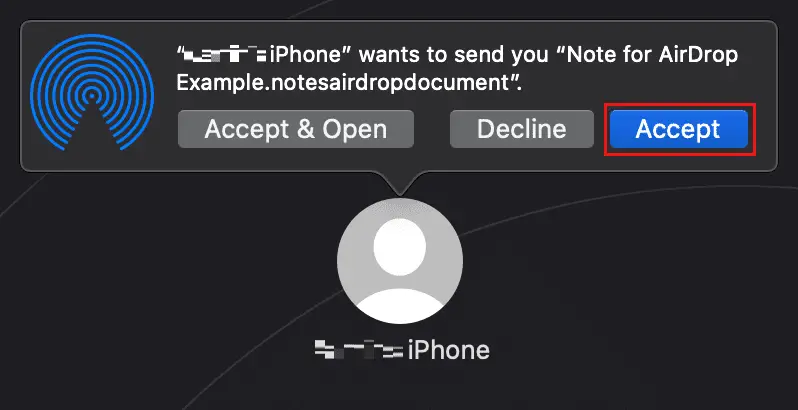
You will now see the shared Notes on your Mac system. The sync or transfer of Notes via AirDrop is something we don’t recommend, especially if the Notes are in bulk.
However, it is a feasible option if you wish to have a single note on your Mac without signing in to the iCloud account.
Note: If you are not able to transfer notes using AirDrop and AirDrop is not working, then you can check the list of solutions mentioned in our article of Fix for AirDrop not working.
How to Sync Notes from iPhone to Mac with Google Account?
The sync between your iPhone and Mac using Gmail can only be one way; that is, the notes you create on your iPhone are accessible via your Gmail account and not the other way round.
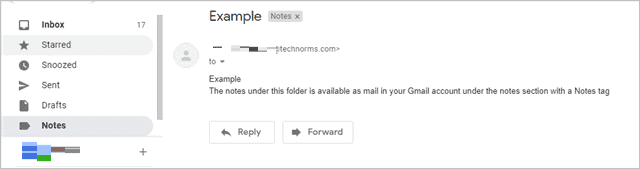
The Notes added under the Gmail folder are available as a mail under the Notes section with a Notes tag.
To sync notes from iPhone to your Gmail account, follow the steps mentioned below.
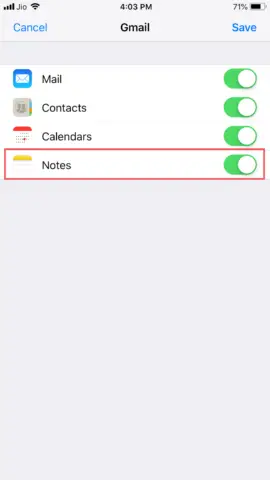
Go to Settings ➜ Passwords & Accounts, and click on Gmail. Toggle the switch next to Notes to enable the Notes syncing.
If you don’t have a Gmail account on your iPhone, then you need to add it. Click on the Add Account to add your Gmail account and then repeat the above step.
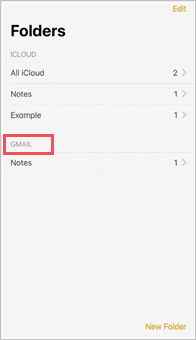
After you make the said changes, go to Notes App again. You will see a new folder named Gmail.
Add a new note in the Gmail folder, and then check if you can see the same in the Notes section of your Gmail account.
Limitation of Syncing Notes
- One cannot sync notes via Outlook account.
- You cannot move notes synced from your Gmail account to your iCloud account and vice versa.
How to Sync Notes from iPhone to Mac using a Third-party Software?
If you wish to use third-party software to Sync Notes from iPhone to Mac, then you have an option available. You do need an iCloud account to import Notes, but after importing it once, you can access it offline.
We recommend the third-party software called AnyTrans for sync operation. AnyTrans can help you with other functions as well, like Backup, Phone Switcher, iCloud Manager, and Phone mirroring.
With this multipurpose tool, you can export all your Notes in .csv, .txt, or .html format and save it on your Mac. You just need to sign in to your iCloud account using your Apple ID, and then only you can export notes to your Mac. If you wish to use this software, you can read our review on AnyTrans.
Conclusion
Now, you very well know how to sync notes from iPhone to Mac. You can have all your notes synced between your iPhone and Mac. As mentioned above, the way you choose depends on the location your notes are stored. One of the easiest ways is to sync via iCloud, but for this, your notes should be stored on your iCloud account.
If you have an Outlook account, you will not be able to access your iPhone notes on Mac. So, if you have an Outlook account, you need to change it to an iCloud account for syncing notes in the future.
Also, check:


