The blue screen displaying Bad_Pool_Header may seem like an end of the Windows system, but it is not. The error code associated with this pool error is 0x00000019. You get a bad pool header in Windows 10 when the pool header gets corrupted. Some minor fixes can help you get rid of a corrupted pool header. Well, before getting into the fixes, it is important to know the details about the error.
What is a Bad Pool Header in Windows 10?
The problem in memory allocation results in bad pool header. The Windows system fails to allocate memory to the Windows API (Application Program Interface). This results in a Blue Screen of Death (BSOD) showing a pool error message. Your PC may show a bad pool header error due to many reasons.
Some of which includes:
- Newly plugged hardware
- Newly installed software
- Corrupt drivers
- Bad sectors on the hard drive
- Third-party antivirus
- Corrupt or damaged system files
The reason depends on your Windows system. You can check out the different solutions mentioned below to fix the bad pool header in Windows 10.
Top 18 ways You can Fix Bad Pool Header in Windows 10
Some users may be able to login to Windows normally, while the others may not be able to do so. We have listed three different scenarios to help you with a bad pool header error in Windows 10.
You can refer to the scenario you are facing. If you can log in to Windows, then you can try all the solutions listed below.
Scenario 1: Permanently Stuck on Blue Screen
When your system is stuck on the Blue screen, and you are not able to do anything on your system, then you can try out the solutions mentioned below for bad pool header in Windows 10. You can check out the solution mentioned below if your power button is not responding as well.
1. Unplug the External Devices
The external device connected to the system can cause issues with Windows memory management. It would be best if you remove all the external devices, like USB drive, external hard drive, webcams, CD, or flash drives. Once you unplug all the devices, restart your PC and check if the issue is resolved.
2. Remove Recently added Hardware
If you have recently added a new hardware component to your PC, then you need to remove it temporarily. The component can be anything, a new RAM, keyboard, mouse, and hard drive. Well, you can run into bad pool header error if the components are not compatible or configured correctly.
If the issue gets resolved, then you can get the required hardware changed from the store you ordered it.
3. Clean the Dust from the RAM
Sometimes, a layer of dust on your RAM can add to your Windows-related troubles. You can remove the stick only if you have expertise in doing so. Remove the RAM sticks, clean it, and place it back. Now, check if you are able to restart your PC.
Scenario 2: Allowed to Log in to Windows
Well, some of you who are stuck on a blue screen might be amazed at this scenario. However, sometimes, you can log in to the computer and display the bad pool header in Windows 10 at random intervals. In such a scenario, you can perform a long list of solutions mentioned below.
1. Uninstall Third-Party Antivirus
The third-party antivirus can sometimes cause trouble for you in terms of memory. You can temporarily disable antivirus and check if the error disappears. And if it does, then you need to uninstall the antivirus from your PC. Restart your system after the uninstall.
If your antivirus was an issue, then you need to find an alternative for it. You can also talk to customer care executives to get your issue solved.
2. Remove Recently Installed Software
Some software can take up lots of system resources, along with the Windows memory pool. Many of us tend to install the software every now and then, which can cause issues with your system. So, if you have recently installed any new software, then you need to uninstall the software. After uninstalling the software, check if the bad pool header in Windows 10 is resolved.
3. Disable Fast Startup
When you have fast startup enabled, the kernel session gets hibernated instead of getting down. This makes it possible to start the PC in less time. However, the fast startup can cause issues with Windows memory management. Windows enables fast startup by default, so you need to disable it manually. You will need an admin account to disable fast startup.
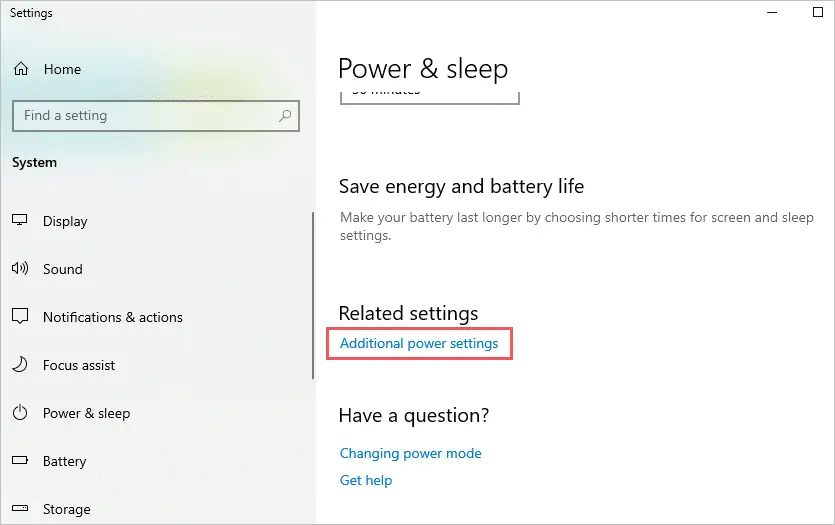
Step 1: Type power in the search menu and click on Power & sleep settings.
Step 2: Click on Additional power settings.
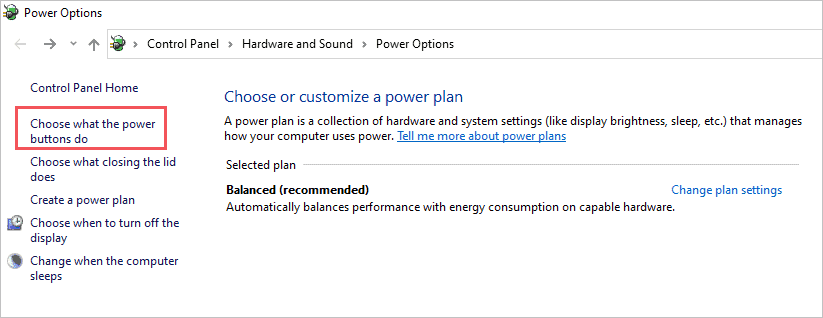
Step 3: From the left panel, click on Choose what the power buttons do.
Step 4: On the next window, uncheck the checkbox next to Turn on fast startup. Click on Save changes to reflect the made changes on your Windows 10 system.
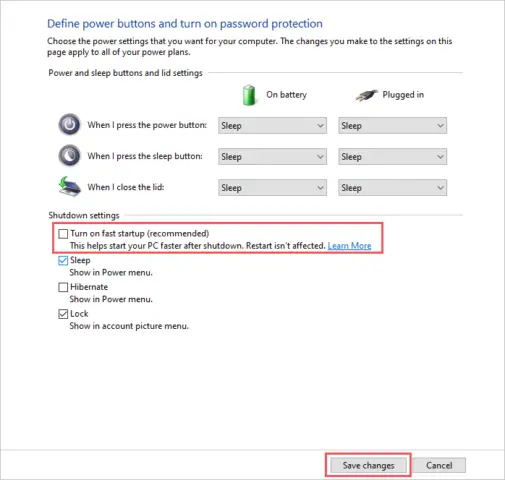
Once done, restart your PC and check if you again see BSOD with a bad pool header in Windows 10.
4. Run Memory Diagnosis
As mentioned above, the problem with memory can lead to a stop code called bad pool header. Windows Memory Diagnosis can help you check the faults in the system RAM. The diagnosis runs outside the Windows; hence you need to restart your PC. So, before you check out the steps, we recommend you to save all your work.
Step 1: Type memory diagnostic in the search menu and click on Windows Memory Diagnostic from the search result.
Step 2: When the memory diagnostic window appears on the screen, click on Restart now and check for problems.
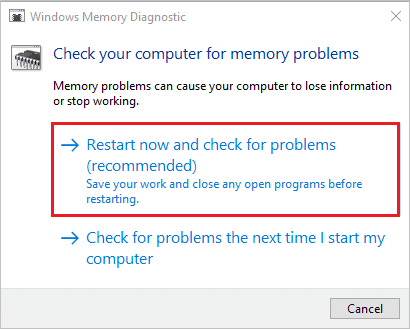
Your PC will restart and check for the problems in the RAM. It will show you the test results once your PC restarts. You can then get your RAM replaced or repaired accordingly.
5. Update Drivers
The outdated drivers can act as a hindrance to your Windows system. You can also get a bad pool header in Windows 10 because of such outdated drivers. Hence, you can update your drivers using the Windows Device Manager.
You can update drivers manually or use any driver updater to do it for you. For the detailed procedure, you can refer to our guide on device drivers.
6. Disable Indexing
Indexing can help you search faster. However, it allocates system resources for it. If Windows has issues with memory allocation, then you can turn off indexing. This will save the system resources, which includes memory.
To disable indexing, follow the steps mentioned below. You need to login to the admin account to disable indexing.
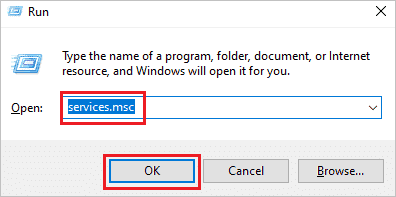
Step 1: Press Windows key + R to open Run and then type services.msc in Run. Click on OK.
Step 2: When the services open, search for Windows Search and double click on it (You can also right-click on it and select Properties from the context menu).
Step 3: Click on Stop and then select Startup type as Disabled or Manual.

Restart your PC once you disable indexing and then check if you again face a bad pool header in Windows 10.
7. Uninstall Recent Updates
Sometimes, the Windows update can cause issues with the memory. If everything was fine before the WIndows update, then either the new Windows update is not compatible with your device, or it has some bugs.
You can uninstall the recent update and check if everything gets back to normal like before.
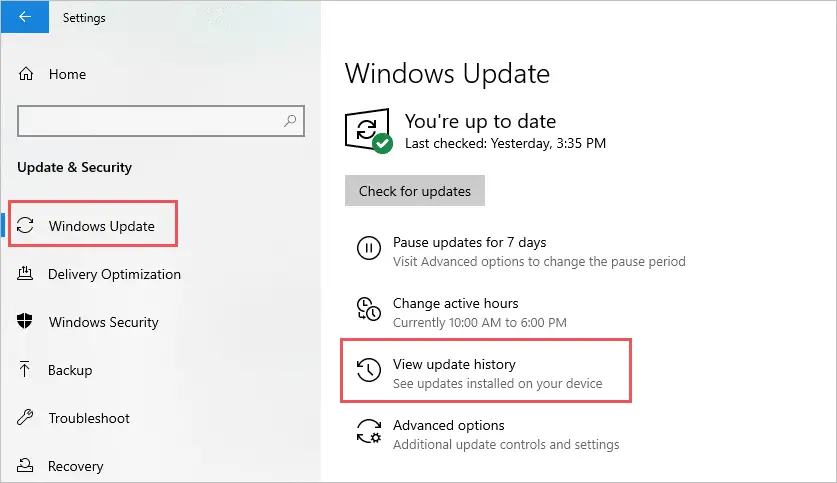
Step 1: Press Windows key + I to open Settings and click on Update & Security.
Step 2: From the left panel, click on Windows Update. In the Windows Update, click on View Update History.
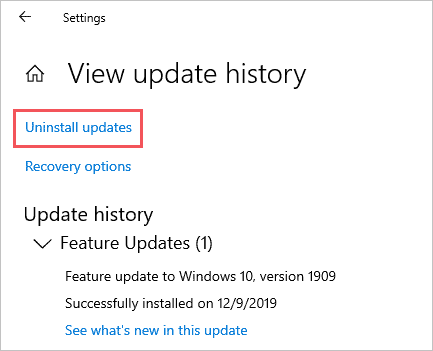
Step 3: Now, click on Uninstall updates.
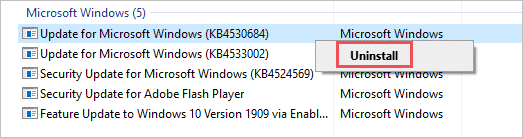
Step 4: Scroll down to Microsoft Windows. Right-click on the most recent update and select Uninstall.
Once you uninstall the update, restart your Windows PC and check if you again see a bad pool header error.
Note: Your PC will have an uninstalled update in the next upcoming update. So, you don’t need to worry about the uninstalled update.
8. Perform a Clean Boot
When you perform a clean boot, the Windows starts with only required programs and drivers. So, if the issue is with the existing software, then you can resolve it using the clean boot. To perform the clean boot, follow the steps mentioned below.
Step 1: Type system config in the start menu and click on System Configuration from the search result.
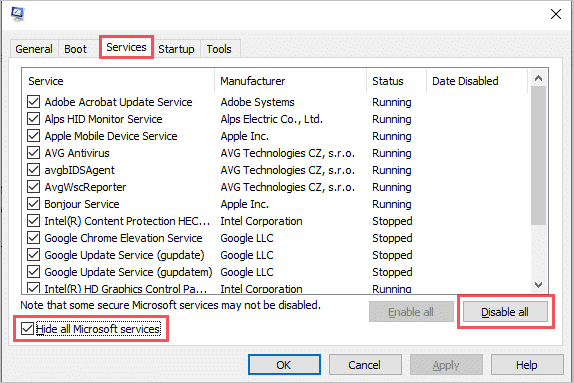
Step 2: Click on the Services tab and then enable Hide all Microsoft services by clicking on the checkbox next to it. Lastly, click on Disable all.
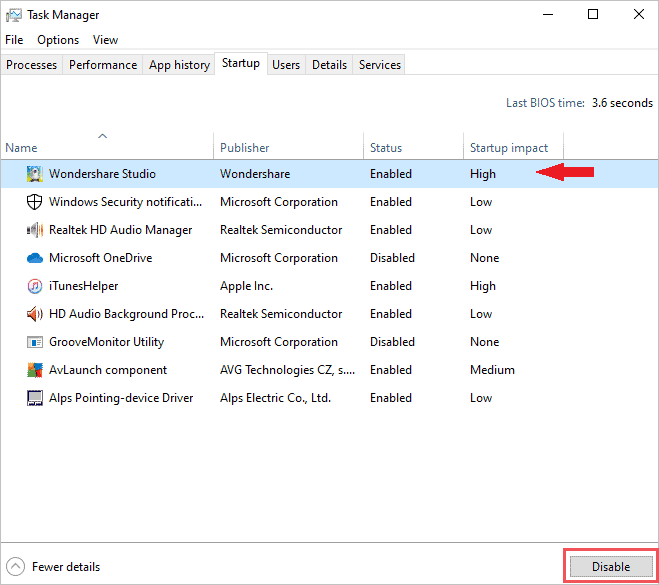
Step 3: Now navigate to the Startup tab and click on the Open Task Manager.
Step 4: Click on each of the tasks and then on Disable. You have to repeat it for every task.
Step 5: Once done, close the Task Manager and click on OK in System Configuration.
Step 6: Restart the PC once done.
Now, check if you get a Bad_Pool_Header error again. If you don’t get it, enable each service one by one and find out the culprit. You can uninstall the software causing the issue.
9. Update Windows
Well, we told you to uninstall the recent update. However, if you are still facing a bad pool header in Windows 10, then you can try updating the Windows. The new update may have fixed the bugs in the recent uninstalled version of Windows.
To Update Windows, navigate to Settings ➜ Update & Security.
From the left panel, click on Windows Update and then click on Check for updates.

Download and Install the update if available. Restart the Windows PC and then check if you experience issues of memory allocation again.
10. Disable Drivers
The drivers also consume the system resources and can sometimes add an extra load to system memory. You can disable all the drivers for once on Windows 10 and check if it fixes a bad pool header.
You can disable all the drivers from the Device Manager. To know more about disabling the driver, refer to our guide on Device Driver. If the issue is resolved after disabling the drivers, then you need to enable the drivers one by one to find the culprit.
11. Reset Your PC
If none of the above solutions works for you, then you can try resetting your PC. Windows gives you an option to reset the PC to factory settings. This deletes all your apps and software installed by you and gives you the PC which you had when you purchased it.
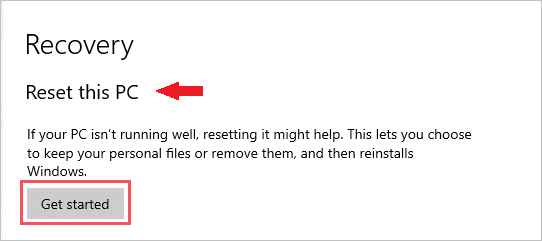
Reset PC has an option to keep your files and folder. However, it deletes apps and software. To Reset the PC, go to Settings ➜ Update & Security ➜ Recovery (from the left panel) and click on Get started under Reset this PC.
Follow the instructions on the screen to complete the factory reset. Once the reset is done, check if your PC functions normally.
Scenario 3: When the Power Button Functions
If you are able to turn off your PC, then there are some solutions you can try to fix the bad pool header in Windows 10 by entering advanced troubleshooting.
To enter repair mode, press the power button to restart your PC. When you see the start screen/manufacturer logo, press the power button again. Repeat the procedure until you see Preparing Automatic Repair on your screen.
Once you reach the repair screen, navigate to Troubleshoot ➞ Advanced options. In the Advanced Options, you can see the command prompt, where you can execute the commands mentioned below. Under the Advanced options, you can see an option of system restore, which can help you restore the system
You can also enter the safe mode from the Advanced options ➞ Startup Settings and execute the command there.
1. Execute SFC command
The system files play a crucial role in system performance. If any of the system files are corrupted or damaged, then the Windows system can experience stop code issues like bad pool header.
You can quickly check for system files, irrespective of whether you are able to login to the system or not. You can use the sfc /scannow command to check and replace the damaged system files. You can refer to our guide on the SFC command to know more about it.
2. Execute chkdsk Command
If you still face the BSOD issues frequently, then you need to check the hard drives for any bad sectors. The chkdsk command checks the hard drives for you and also fixes the bad sector issue. So, if you face a bad pool header because of bad sectors or logical errors, then chkdsk can fix it for you.
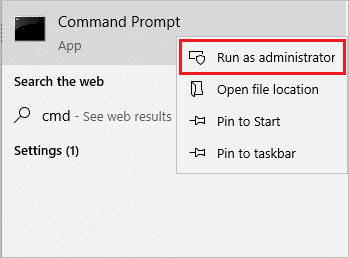
Step 1: If you are allowed to log in to the Windows type cmd in the search menu. When the search results appear, right-click on Command Prompt and choose Run as administrator.
Step 2: In the command prompt type, the below-mentioned command and press Enter.
chkdsk /r
The above command will check your hard drives for bad sectors and logical errors and also fix them for you.
3. System Restore
The restore point created by you before can come to rescue now. You can restore your system to the last working point when everything was functioning well. Go through our complete guide on System Restore to know how to do it.
If you don’t have system restore points, then you can reset your PC.
4. Perform a Clean Windows Install
The last resort to fix bad pool header in Windows 10 is to install Windows. If your laptop/PC is stuck on the blue screen and you are not able to do anything, then install Windows from bootable media.
To know the detailed steps of performing a clean boot, go through our article on how to install Windows 10.
Conclusion
The BSOD can sometimes cause serious trouble. However, if the hardware or software issue is not that critical, then minor fixes can solve the stop code problem for you. As mentioned above, the bad pool header in Windows 10 is caused by memory management issues. So, sometimes removing the external devices may work for you.
The solutions depend on the criticality of the problem. In some situations, you may end up losing data, so for such cases, you should have backups or restore points.


