The calculator is one of the most important utilities in a PC and is needed while working on datasheets and other stuff related to number-crunching. But, what if the Windows 10 calculator is not working? There are numerous ways to revive a crashed calculator.
The only thing is, it is not as simple as deleting the application and reinstalling it again, as the calculator is a built-in feature of the operating system. No single solution listed in this article can work for all; the calculator can crash for different reasons, calling for different solutions to be the answer to the problem.
Windows 10 Calculator Not Working – Solve The Problem And Get Back To Number-Crunching ASAP!
You can try out all the solutions listed in this article one after the other until you finally stumble upon one that works for you. Let’s check the top solutions and try to fix the Windows 10 calculator not working issue.
1. Reset the Calculator
Not only the calculator but if any application in Windows 10 doesn’t run correctly, always remember to reset the application.
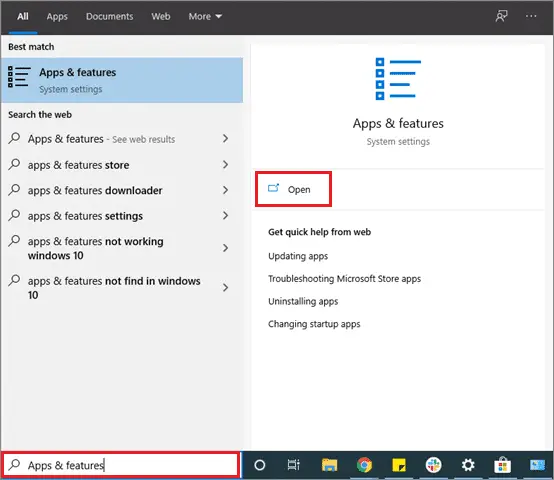
To start with, type ‘Apps & features’ in the Cortana search bar. Click on the Open option.
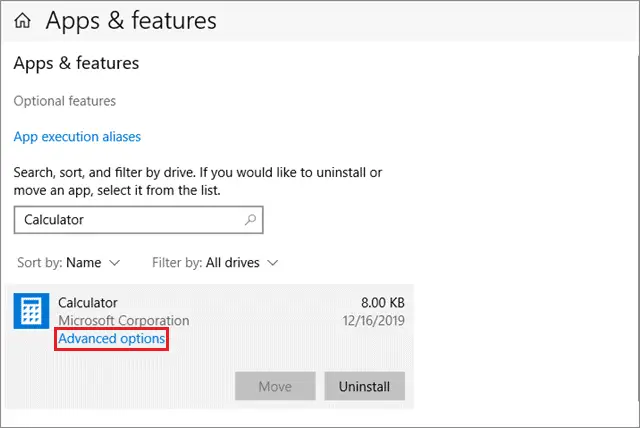
Now, search for the calculator application. Once you find it, click on the Advanced options.
In the Advanced options window, click on the Reset button.
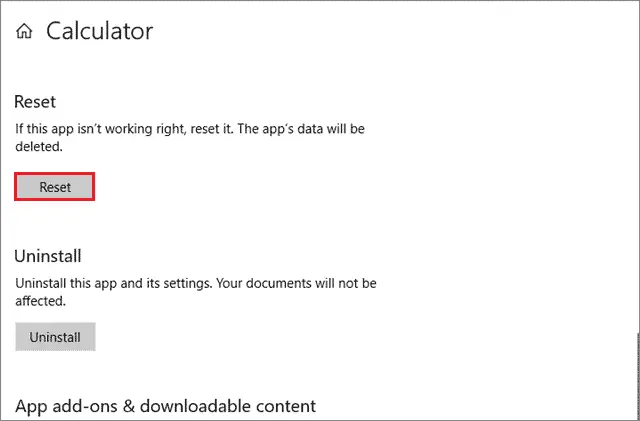
The calculator will be reset immediately. Restart it to see if it is working well. If the Windows 10 calculator is not working, go for the next solution.
2. Reinstall the Calculator
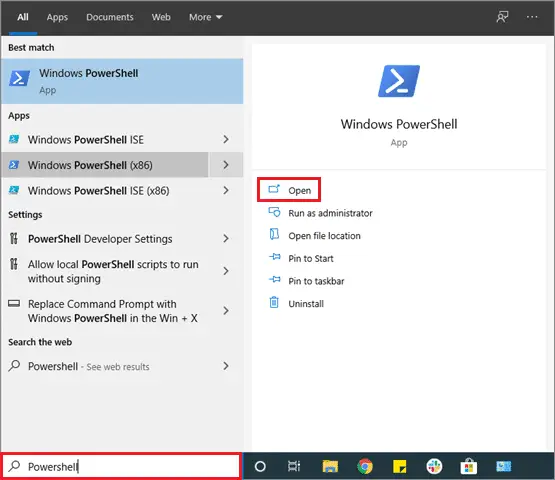
Since the calculator is an in-built tool, you will have to use the Windows Powershell to delete it and reinstall it. Type Powershell in the Cortana search bar and click on the Run as administrator option.
Then, paste the following command in the Windows Powershell and hit Enter:
Get-AppxPackage -AllUsers| Foreach {Add-AppxPackage -DisableDevelopmentMode -Register“$($_.InstallLocation)AppXManifest.xml”}
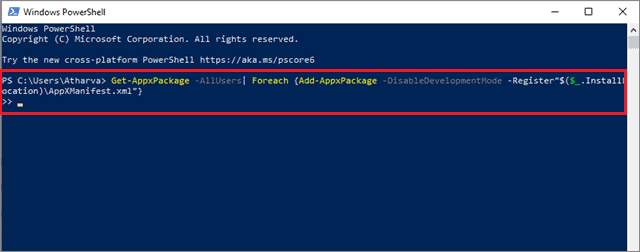
Doing this will reinstall the calculator. Now check if the ‘Windows 10 calculator not working’ problem still persists or not.
3. Update Calculator
The Windows 10 calculator also receives timely updates for improving its functionality. If your calculator isn’t updated, there’s a possibility that it won’t work well.
To start with updating your calculator, search for the Microsoft Store in the search bar, and choose the Open option in the right window pane.
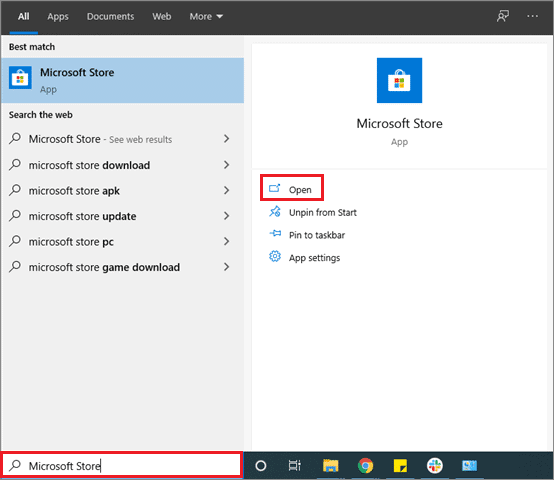
The Microsoft Store window will open up. Now, search for Calculator in the Microsoft Store search bar. You will get a list of various types of calculators in the search results.
Click on the one that says ‘Installed’ and check if there is any update for the app.

Update the calculator if it is available and then launch the application. In most cases, the updates work and you can check if the Windows 10 calculator is not working or is fine.
4. Create A New User Account
If you are using any PC for the first time and the Windows 10 calculator is not working, you might face a User Access Control restriction on your PC. To tackle it, you can create a new user ID to access the PC.
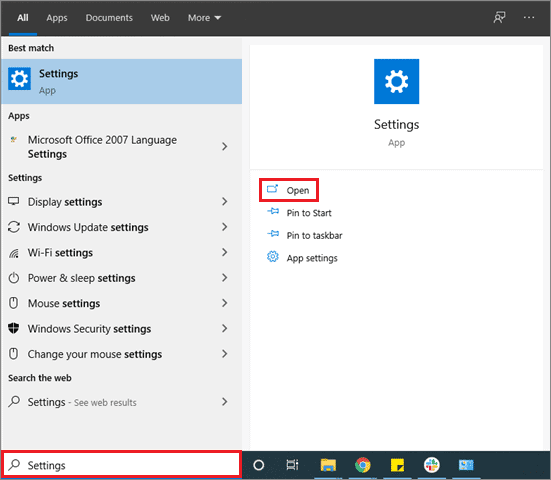
To begin with, navigate to the start search bar, type Settings, and click on the Open option in the right window pane.
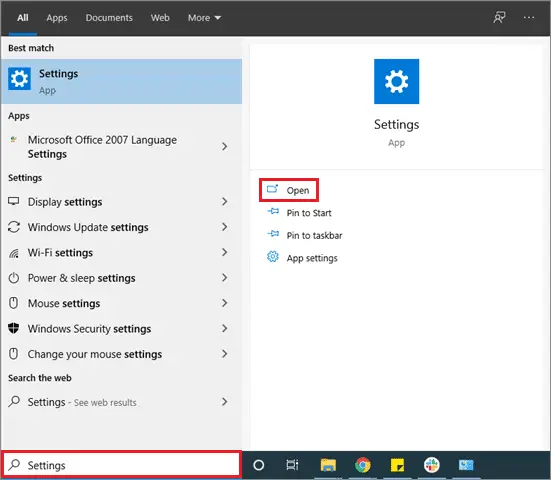
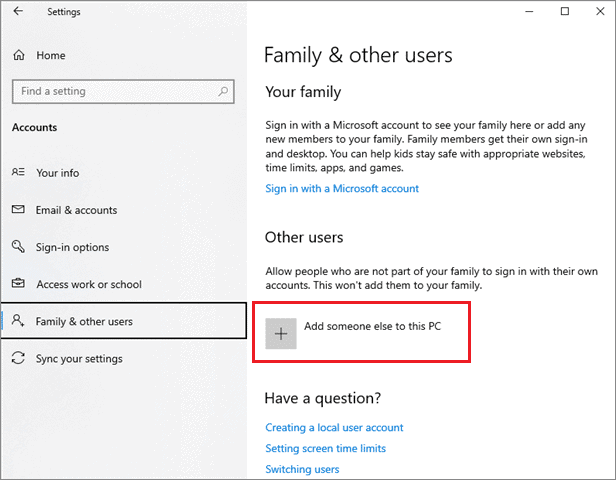
In the Settings window, click on the Accounts tab.

Doing this will open up a new window. Select Add someone else to this PC.
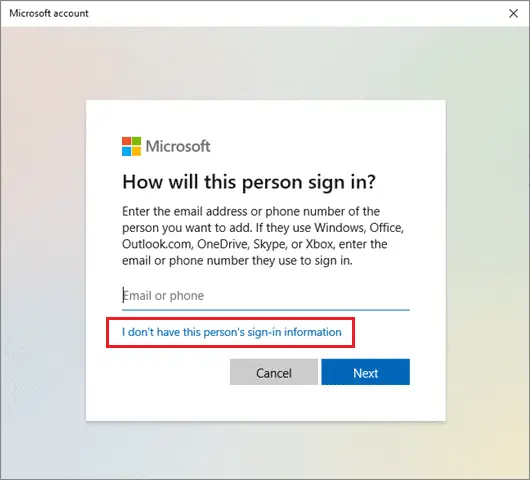
If you don’t have the person’s sign-in information, click on Next.
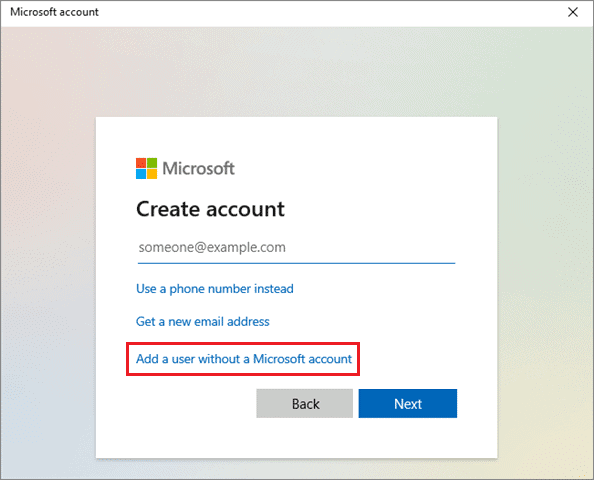
Now, select Add a user without a Microsoft account option and click on Next.
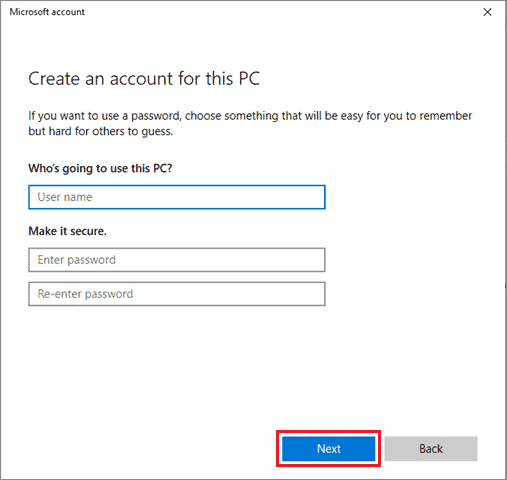
In the dialog box that appears, you will have to input your username, password, and password hint. Once you have entered all the details, click on Next.
Now that your new account has been created, you need to login and check if the Windows 10 calculator is not working or works fine. To do so, click on the Start button and select the user account option.
Logging in with a different user account should fix the problem for you. If it doesn’t, however, you can try the other solutions listed below.
5. Update Windows 10
If the Windows 10 calculator is not working, it can also be due to an old version of Windows update. To ensure that you are using an updated version of the operating system, you can execute the following steps.
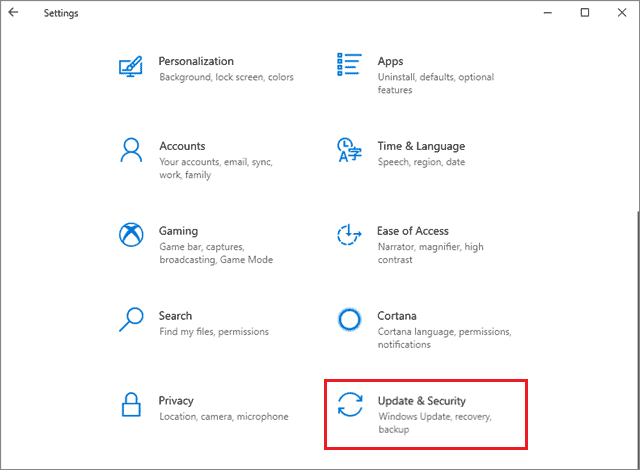
Type Settings in the Cortana search bar and click on the Open option in the right window open. You can also click on the gear icon in the Start menu to open the Settings window.
Now, click on the Update & Security option in the Settings window.
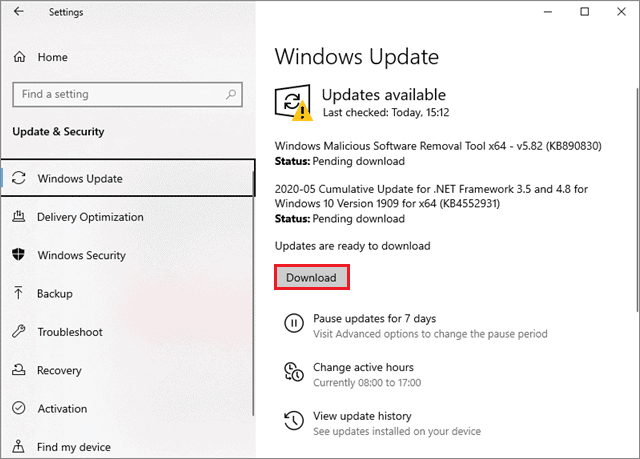
In the Updates & Security window, click on the Windows Update tab. Now, select Check For Updates button.
Your PC will then start searching for any new update related to the operating system. Follow the update wizard if you find an update pending.
After you have updated your Windows 10 PC, make sure you restart the computer so that it has enough time to adjust to the new settings. Once it restarts, open the calculator to check if the ‘Windows 10 calculator not working’ problem has been solved. If not, follow the next methods listed below.
Related: Windows Update Stuck? Here are All the Best Possible Solutions
6. Run the SFC Scan To Fix Windows 10 Calculator Not Working
The SFC scan is used to scan system files for a faulty file and delete it. Users can choose to go with this method if creating a new account doesn’t do the job for them.
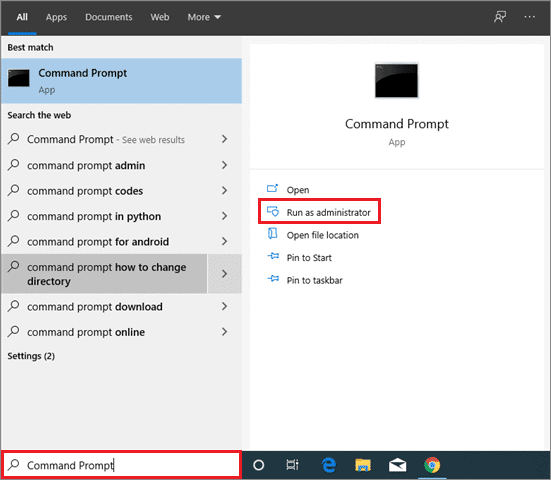
Type Command Prompt in the Cortana search bar. Next, select Run as administrator.
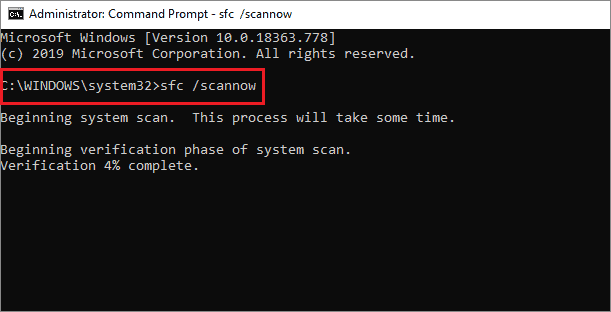
In the window that opens up, type sfc/scannow and press Enter to run the sfc scan.
Once the scan is completed, restart the computer to save the changes.
Then check if the SFC scan resolved the ‘Windows 10 calculator not working’ issue. You can also check the complete guide on sfc /scannow & how it repairs Windows files. If it doesn’t, you can try the next solution.
7. Run the DISM Scan
The SFC scan might not be able to clear some corrupt files. In such a case, users can always use the Deployment Image & Servicing Management Scan, or DISM scan, to clear the files that were left unattended by the SFC scan.
Type Command Prompt in the Cortana search bar and click on the Run as Administrator option in the right pane.
After the Command Prompt window opens up, paste the following command, and run it:
DISM /Online /Cleanup-Image /RestoreHealth
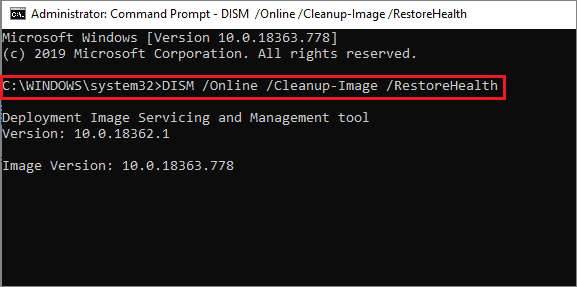
Make sure you let the scan run uninterrupted. Once it is completed, run the SFC scan again to see for any leftover errors.
Restart your PC after the processes are completed and then check if the Windows 10 calculator is not working or if the issue has been resolved.
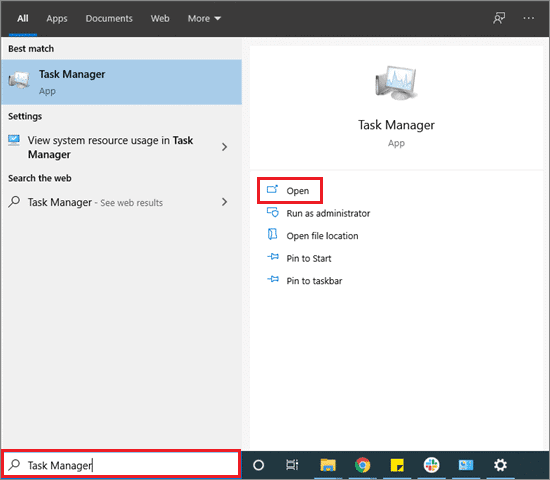
8. End the RuntimeBroker.exe Process
Now, we move on to the complex set of solutions to solve the ‘Windows 10 calculator not working’ problem. Sometimes, the background processes running in your PC might block the calculator app on your computer to function correctly. In such a case, you can solve the issue by ending the RuntimeBroker.exe process.
To start with, type Task Manager in the Cortana search bar and click on the Open option in the right window pane.
You can also open the Task Manager by pressing the combination of Ctrl+Shift+Esc keys.
You will find many processes running in the Task Manager. Search for the RuntimeBroker.exe and right-click on it. Then, from the drop-down menu that appears, click on the End process option.
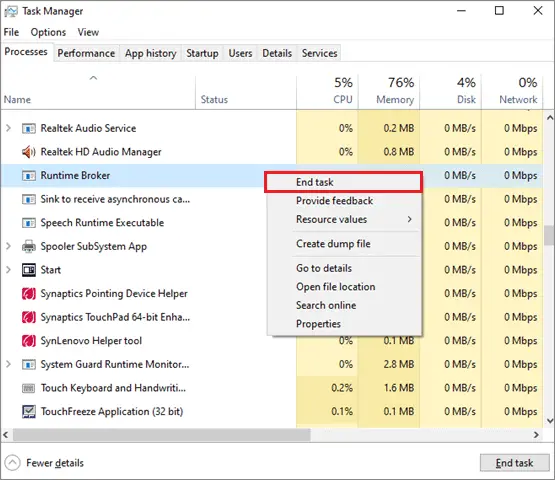
Doing so will end the RuntimeProcess on your PC. Try opening and running the calculator again following this process. If it doesn’t run, you will have to resort to the last solution i.e., performing a system restore on your PC.
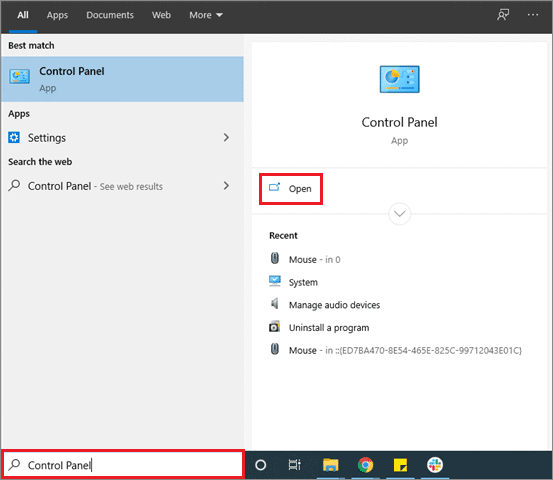
9. Perform System Restore
A System Restore point is a point to which the system rollbacks. The System Restore point is created so that the Windows can roll back to this error-free configuration if it faces a problem. You need to have a System Restore point to perform this process. It is a complex solution, but if it is executed properly, you can solve the ‘Windows 10 calculator not working’ problem.
To start with, you have to open the Control Panel. Search ‘Control Panel’ in the Cortana search bar and click on the Open option in the right window pane.
This will open the Control panel window.
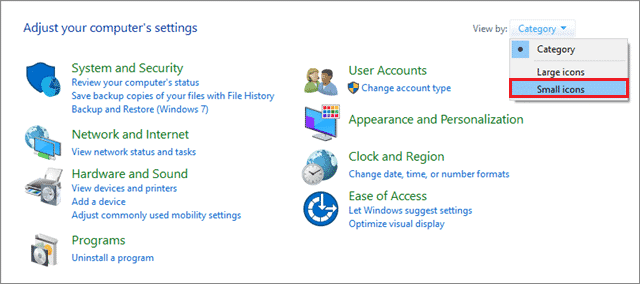
Now, adjust your view by selecting the Category tab and clicking on the Small icons option. This will change the view of the entire window.
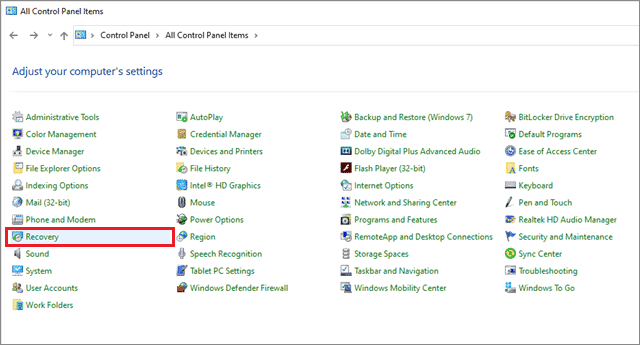
Now, find and click on the Recovery option.
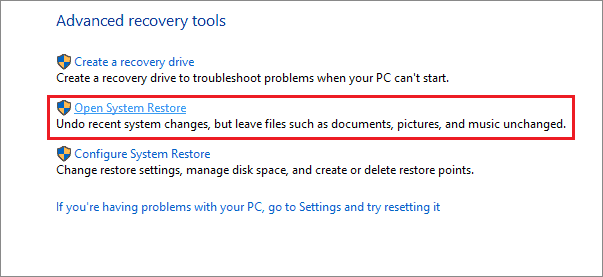
In the Recovery tab, click on ‘Open System Restore’ to undo all the recent changes that have been made to your PC. Follow the series of steps you are presented with, to open the System Restore.
The Restore System Files and Settings window will open after you have followed all the steps mentioned above. Click on the Next option in the window.

In the window that opens next, you have to find a System Restore point that was created before you faced the BSOD issue. The BSOD (Blue Screen of Death) issue compels your Windows operating system to shut down completely and stop all of its processes.

If you are not able to find old restore points, check the ‘Show more restore points’ option and click on Scan for affected programs. Then, click on the Next option and review all the settings that you have configured.
Next, click Finish to start the System Restore process.

For the new settings to take effect, make sure you restart your computer and then try to open the calculator. You can also check the complete guide on Windows 10 System Restore.
What If None of the Solutions Work?
If none of the processes mentioned above are successful in solving the ‘Windows 10 calculator not working’ problem, you can always try to install a different calculator application from the Microsoft Store. Otherwise, the best option would be to use the Google search engine as a calculator.
All you need to do is type your equations in the Google search bar in your browser, and Google will immediately deliver the required results. The calculator not working in Windows 10 is not a very pressing issue, and hence, it shouldn’t be stressed upon too much.
Conclusion
The calculator is one of the most important utilities provided by a Windows 10 PC. Users can use this application whenever they are working any math-related stuff or preparing statistical reports on their PC. However, many of us might face the Windows 10 calculator not working problem, which accounts for the solutions to fix the issue.
Since the calculator’s functionality can be affected due to various reasons, there are several types of solutions. The only way to find which method works for you is to use the trial-and-error method. This means you have to execute each method mentioned in the article to see which one works for you.
In case if none of the solutions listed above are successful in solving the problem, the users need no stress upon the issue too much. You can use a third-party application from the Microsoft Store, or the Google search engine itself for doing your calculations on the PC.


