A laptop or a PC is a multipurpose machine that has become a crucial part of our lives. Be it for data storage, listening to music, watching movies and videos, playing games, there’s hardly a thing a PC cannot do. However, many Windows users wish to have bigger screens when they are watching videos. This is where an HDMI connection port comes into use. But, what if you face the HDMI port not working issue and are stuck with a smaller screen while watching a movie?
An HDMI input port is essential hardware in any laptop or PC. It allows you to connect your PC to external devices like TVs, a video projector, etc. This connection will enable users to transmit audio and video data through the devices. It is also one of the most crucial hardware components for gamers who love having a more extensive screen experience. At times, some users also face HDMI audio not working issue. However, many Windows users face problems for several reasons with the HDMI port.
How To Fix HDMI Port Not Working Issue
Many Windows computer users are unaware that to connect two devices through HDMI, both of them must have a seal of approval to communicate with each other. This standard seal of approval is known as the HDCP. The ability to connect and communicate with other devices is known as ‘HDMI handshake.’
When your HDMI is not working on a TV screen or any other device, that means the two devices aren’t compatible to connect. It means that the other connected device does not recognize the HDCP encryption in one of the devices’ HDMI signals. There are many ways to tackle this issue. On that note, let’s have a glimpse at how you can troubleshoot the HDMI connection port failure issue.
1. Check The Hardware
Loose HDMI cable connections between devices might often cause the ‘HDMI port not working’ issue. Hence, make sure the HDMI cable is tightly connected on both ports to avoid any hardware issues. You can opt for self-locking cables to prevent the HDMI connection problems between the devices.
Windows users can also change the turn-on sequence of the devices to reset the HDMI connection. If you usually turn on your TV first after connecting the HDMI cables, skip that and turn on the secondary devices first. Sometimes, the turn-on sequence might also help you solve the PC HDMI not working issue.
If the HDMI issue still exists, try using different HDMI ports to solve the issue. First, switch to a different input with your remote on the TV and then switch back to the HDMI. If you aren’t getting the signal, change the port, and follow the same process to see if the hardware causes the HDMI cable not working problem.
2. Make Sure Your HDMI Device Is The Default Device
It is vital to know that the default device on your computer is compatible with HDMI. The HDMI output will be unavailable if your HDMI device isn’t the default device.
To begin with, right-click on the volume icon in the taskbar and choose Properties. You can also open Sound Settings from the Cortana search bar.
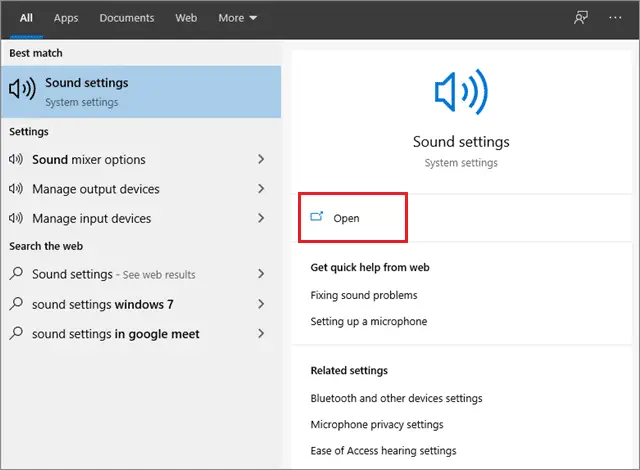
Then, select the Output device. It will be your default HDMI device.
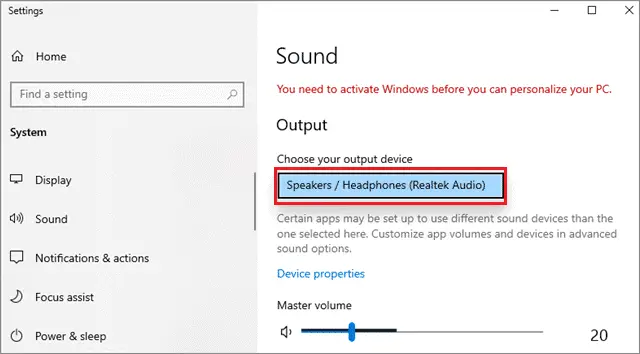
The HDMI device will immediately become your default device. Also, enable the ‘Show disconnected devices’ option is enabled. Doing this will allow your PC to show all the devices connected to it.
3. Update The Drivers
Many times, the HDMI not working issue might occur because your drivers are outdated. In such cases, you can update the graphics driver and audio drivers and then try to connect devices via HDMI port.
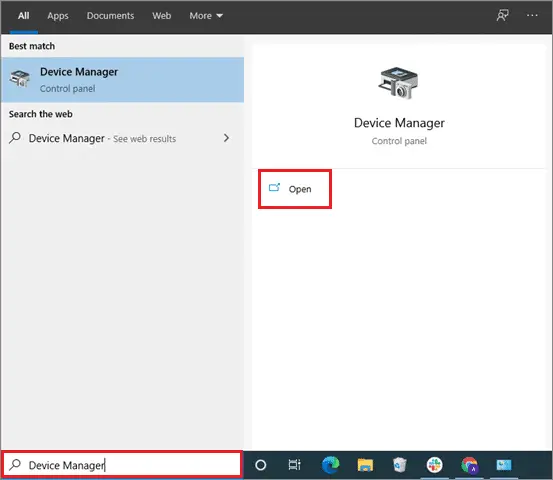
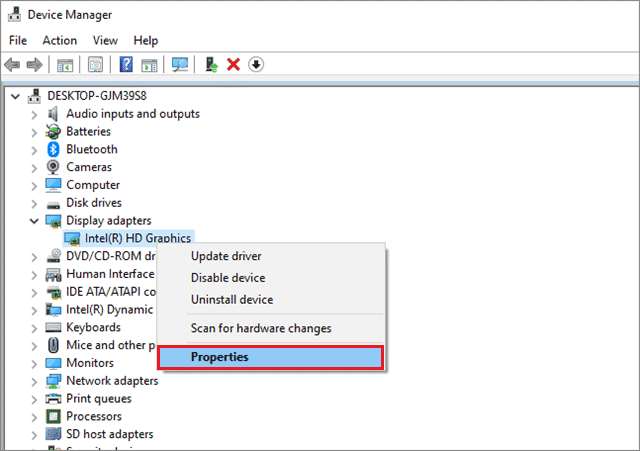
To begin with, open the Device Manager from the Cortana search bar.
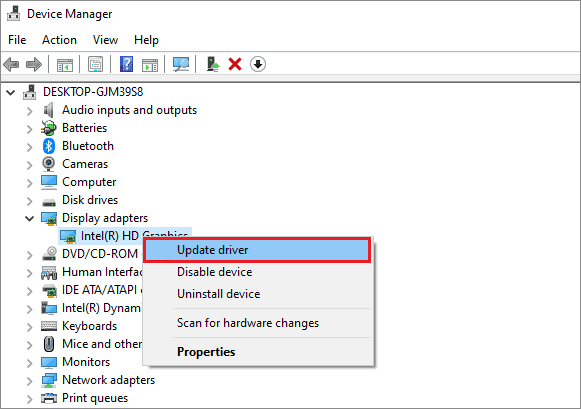
Then, under the Display Adapters option, right-click on the graphics driver and choose the Update driver option.
If you are using a laptop instead of a PC. In that case, it is always a good choice to download and install new versions of the audio or graphics driver from the manufacturer’s website, rather than updating the driver. You can also use a third-party driver software to update drivers.
4. Roll Back Drivers To Fix HDMI Port Not Working Issue
Rolling back drivers means restoring its previous version. If you encounter problems after updating your graphics card driver, you can roll back the drivers into their previous state.
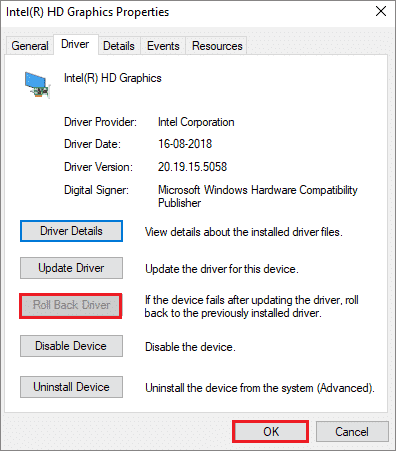
The process to roll back a driver to its previous version is similar to updating the driver, except for one small tweak. Right-click on the driver you want to roll back and choose Properties.
Then, select the Driver tab and click on the Roll Back Driver option.
After doing these steps, your drivers will return to the previous version. If this solution doesn’t solve the HDMI port not working issue, you can move on to the next.
5. Install Drivers In Compatibility Mode
Once you have downloaded new versions of the audio, video, and display drivers, make sure you run them in compatibility mode.
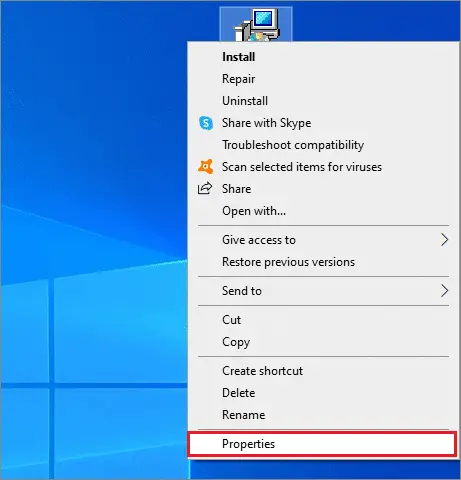
First and foremost, right-click on the installer file and click on Properties.
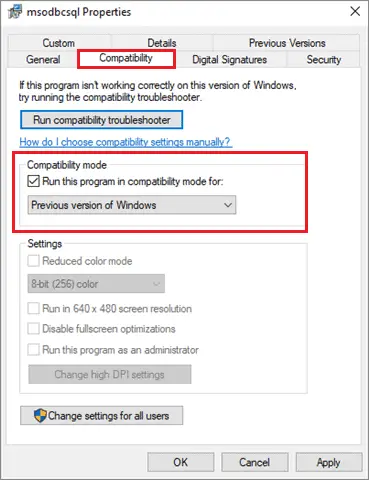
Next, click on the Compatibility tab and select the version of your operating system. Moving further, Click Apply and then Ok.
Now, you can run the setup file and install the driver. If the HDMI port still doesn’t work for TV, laptop, or computer, you can move on to the next after you execute this solution.
6. Set The Secondary Display
If you are using the HDMI port to connect to a second display device like a TV, you can use this simple trick to solve the port issue. If you have a graphic card installed in your setup, just open its Control Panel and set it.
To begin with, you have to open the Control Panel of your graphic card. Then, click on Setup Multiple Displays. If your HDMI display isn’t working, try selecting and unselecting the rest of the connections. This solution may appear a little incomplete, but it has worked for a handful of users when it comes to troubleshooting the HDMI port not working issue.
7. Clean Temporary Files And Folders
If your computer or laptop has piled up too many temporary folders and files, it may affect your system’s other functions, and the HDMI port might be one of them. To resolve this issue, you need to use the Disk Cleanup facility provided by the Windows computers.
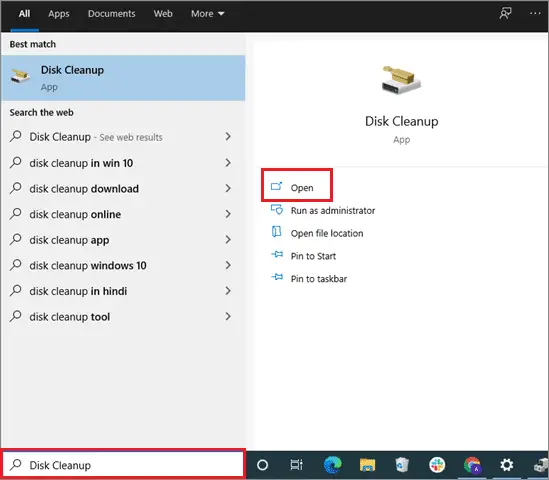
First, search ‘Disk Cleanup’ in the Start menu search bar and then click on Open.
Now, select the disk that you want to clean and select OK.
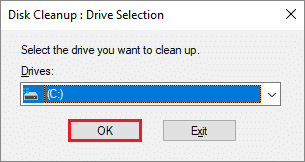
The temporary files and folders in the system will be removed after you execute these steps. Moving forward, you can try connecting the devices to see if the HDMI port not working on TV problem occurs.
Not just for making the HDMI port work, but cleaning the temporary files and folders is a process that helps massively improve the operating speed of a computer.
8. Repair The Registry
You can also fix the HDMI port issue by making some tweaks in your system’s registry. It’s a simple two-step process in which you have to scan your computer to eradicate all the corrupt files.
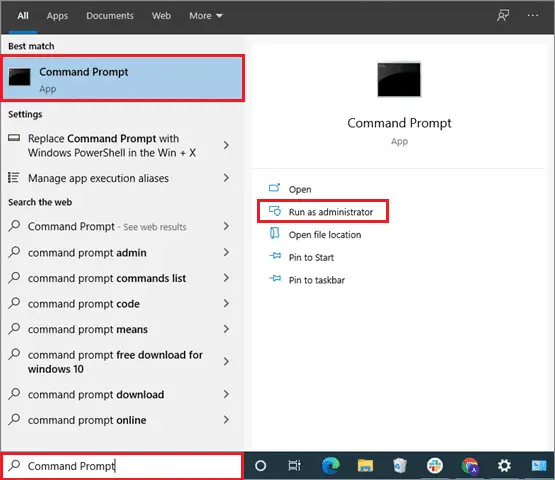
In the Cortana search bar, type Command Prompt. Next, click on Run as Administrator.
Now, enter the following command and hit the Enter key:
sfc /scannow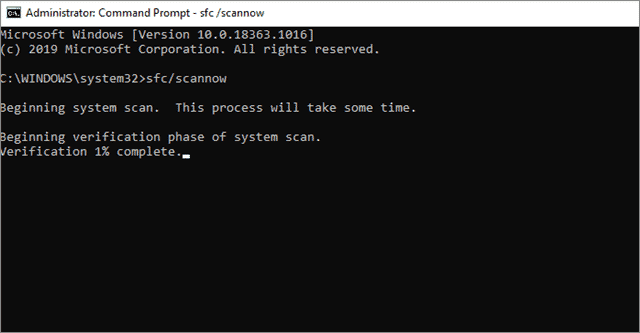
Wait for the scan to be completed and then restart your computer. All the corrupted files will reboot; check if your HDMI port starts working post this connection method and connects to your TV.
Related: Everything To Know About sfc /scannow & How It Repairs Windows Files
9. Configure Display Settings
Sometimes, using the wrong computer display settings might also cause the PC HDMI not working problem. In such cases, it is important to properly configure the display setting to make sure you get the desired result on your TV or any other screen.
To check the display settings, press Win Key + P on your keyboard. The display settings will open up, and you can change them. There are four display modes to select from:
1. PC screen only
This mode uses only the first monitor; if you have connected two monitors through HDMI, the second screen will not show results if you have selected this mode. Your TV will show you the no signal message.
2. Duplicate
This mode will help Windows users to show the same display on all the connected HDMI devices.
3. Extend
This mode will use both the monitors to display an extended desktop.
4. Second screen/projector only
This mode will allow Windows users to display the secondary screen only.
You need to experiment with each mode to see which suits your needs the best.
10. Run The Hardware And Devices Troubleshooter
If you encounter any hardware problems, you can run the Hardware and Devices Troubleshooter to know and fix the issues. Execute the following steps to run the Troubleshooter.
Note: The Hardware And Devices Troubleshooter has been removed post the Windows 10 v1809 version. Hence, if you are running Windows 10 with v1809 or its predecessors, this solution won’t work for you.
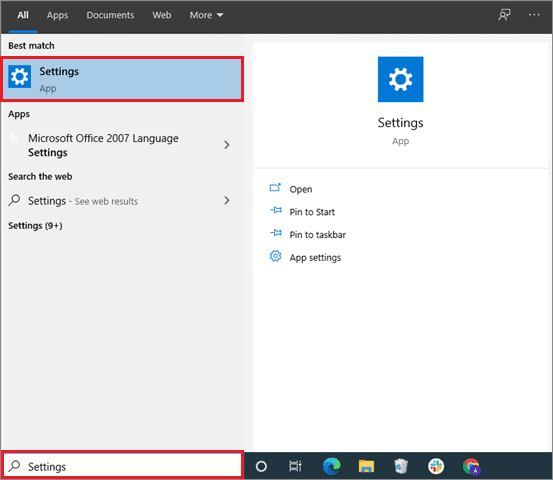
Open the Settings window from the Start menu.
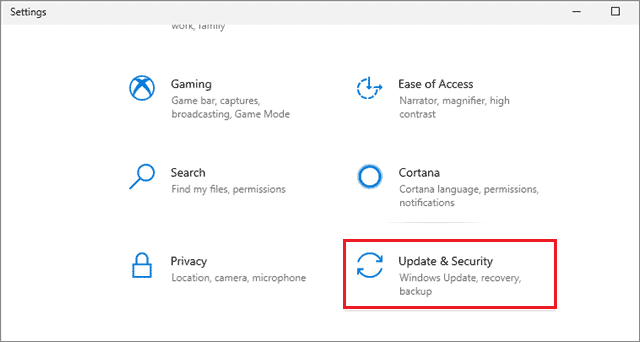
Click on Update and Security.
Next, choose the Troubleshoot option in the left pane. Click on Run the Troubleshooter.
Then, click on Next.
The troubleshooter will start running and detect problems if there are any related to the HDMI port not working. If an issue is detected, just follow the on-screen instructions to solve it.
Conclusion
High Definition Multimedia Interface, better known as HDMI, is used to transmit high-definition video and audio data between two connected devices. It can be used for many purposes, such as watching movies on a bigger screen using a PC or laptop. You can also use an HDMI connection for gaming on large screens to get a better visual experience.
The HDMI port not working issue might occur due to various reasons. When it does, always make sure you check the hardware and then move onto other solutions mentioned in this list. There is no particular solution that will work for everybody; the perfect solution can only be found using the trial-and-error method.
(Article Updated on 13th January 2021)


