You can connect to external devices like TVs, projectors, and monitors using the HDMI port available on the PC. With HDMI (High Definition Multimedia Interface), you can experience clear audio and video on the connected devices. However, some issues can cause the HDMI audio not working issue on the connected external appliance.
The HDMI audio may not work due to outdated or malfunctioning drivers. Along with driver’s issues, some other factors affecting the audio output are incorrect settings in the connected TV and damaged HDMI cable. Some software can misbehave with the PC, resulting in no sound through HDMI.
How To Fix HDMI Audio Not Working Issue
The cable, computer, and TV issues can be easily fixed with the solutions given below. You may find the list of solutions a bit long, and this is because there is no one reason to experience issues with HDMI audio.
The reason may differ according to the connected external HDMI device and the PC you are currently using, and therefore the solution may also vary.
1. Restart your PC
If any temporary issues cause the HDMI audio not to work, you can restart your PC to fix it. To restart the PC, click on the Windows icon on your screen and then on the Power button. Now, click on Restart.
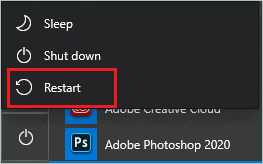
Make sure you close all the windows and save the work before restarting the system. The restart will probably fix the HDMI audio not working issue for you.
2. Connect your Laptop to Power Source
If you are using a laptop to connect to an external device via HDMI, you can plug in the laptop to a power source. Many times the HDMI drivers and services are disabled when you are using the device on battery.
3. Check for HDMI Functionality in External Peripheral
Most of the PCs have HDMI functionality, but the old TVs don’t have it. So, if you are connecting your PC to a TV, you need to confirm if your TV has an HDMI feature. You can check it on the manual that came along with the TV. If you don’t have a manual, you can check online on the manufacturer’s website by using the model number of your TV.
4. Select HDMI as Default Audio Playback Device
You need to check if the connected device is selected as the default playback device. If some other device is selected, the audio output will be directed to it and not to the connected device.
Step 1: Open Control Panel by searching for it in the Start menu.
Step 2: In the Control Panel, go to Hardware and Sound and then click on Sound settings.
Step 3: Now, navigate to the Playback tab and check if you can see a tick next to the connected device. In our case, it was a smart TV; it can differ according to the device name of the connected peripheral.
If some other device is selected, you can click on the external HDMI device and then click on the Set Default option below to set it as a default device.

Restart the computer after this and check if the HDMI audio not working is fixed post this.
5. Disconnect and Connect the HDMI Cable
If HDMI audio is not working because of some connection issues, reconnecting the HDMI cable can fix it.
Disconnect the HDMI cable from the PC as well as the TV or other external device and wait for some time. You can restart both the systems and connect the HDMI cable again. This will fix the issues in the connection between your computer and external device.
6. Use the Correct HDMI Port
Nowadays, TVs come with multiple ports, so make sure you connect the HDMI cable to the right port. If your TV has DVI/HDMI port, avoid using it; use only the HDMI port.
You need to select the HDMI slot you connected to see the video and listen to the audio. Make sure you are selecting the right slot as well.
7. Use Different HDMI Port and Cable
There can be issues with the hardware, which is causing HDMI audio not working. You can temporarily connect using another HDMI cable, even if there are no signs of damage on the cable.
Try using another HDMI port on your computer as well as the external device. The port can malfunction and not work as expected sometimes, so using a different port can help fix the trouble you are facing.
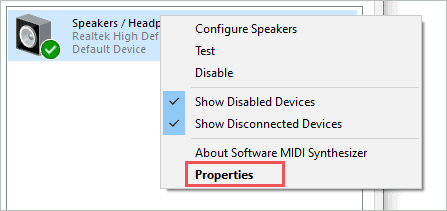
8. Disable Exclusive Mode of Speakers
If HDMI audio is not working in the connected external device, you can temporarily disable the speakers’ exclusive mode.
Step 1: Open the Control Panel window and navigate to Hardware and Sound ➜ Sound.
Step 2: In the Playback tab, right-click on the Speakers/Headphones and select Properties.
Step 3: In the Speaker Properties dialog box, go to the Advanced tab and uncheck ‘Allow the application to take exclusive control of this device’ and ‘Give exclusive mode applications priority’ under the Exclusive Mode section.
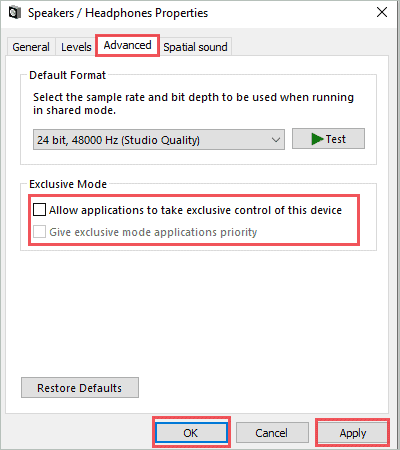
Step 4: Click on Apply, followed by OK.
Once done, restart your computer and establish the HDMI connection between the PC and the external device. Now, check if you can listen to audio from the external device.
9. Restart the Windows Audio Service
You can restart the Windows Audio service to fix the issues with HDMI audio output. Make sure you log in using administrator to restart the service, as you cannot do so using a normal account.
Step 1: Press Windows key + R to open Run and type services.msc there. Click OK to open the Services app.
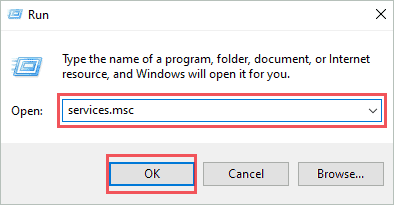
Step 2: In the Services app, find Windows Audio and right-click on it. Click on Restart from the context menu to restart the service.
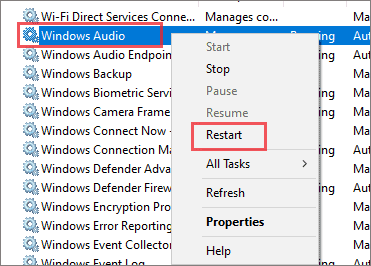
Wait for some time and then check if HDMI audio output is working without any issues.
10. Run Windows Sound Troubleshooter
You can run Windows Sound troubleshooter to find the issues with HDMI audio. To do so, right-click on the volume icon on your taskbar and then click on Troubleshoot sound problems.
Note: If you don’t find the volume/speaker icon on the taskbar, click on the up arrow ⏶ there to find it.
When asked if you want to run a quick scan, click on ‘Yes’ so that the scan can be performed and issues can be fixed if found.
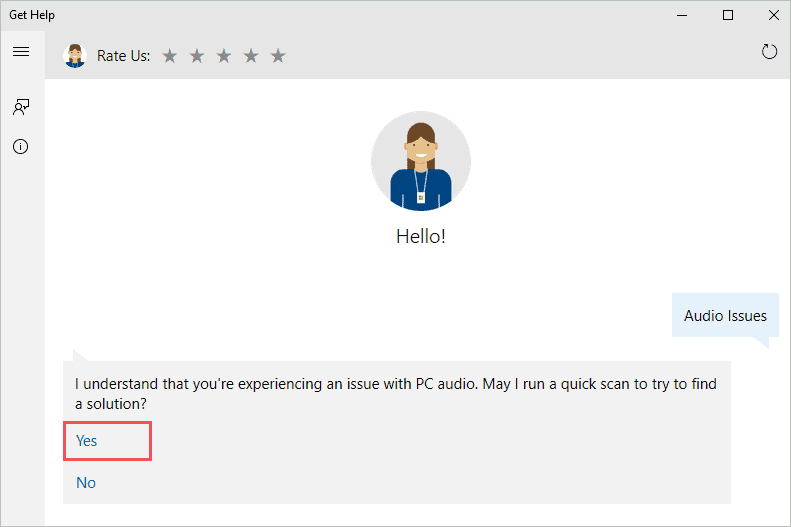
You may get rid of HDMI audio not working post this scan.
11. Update High Definition Audio Driver
The outdated drivers are the cause of many issues on your Windows 10 system. You can experience HDMI audio not working because of such outdated audio device drivers. However, you can update the High Definition Audio driver to fix it.
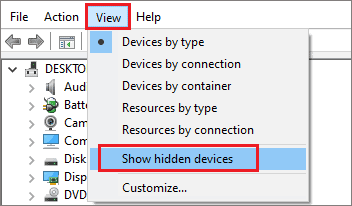
Step 1: Press Windows key + X and open Device Manager.
Step 2: Click on the View from the menu bar and then click on Show hidden devices.
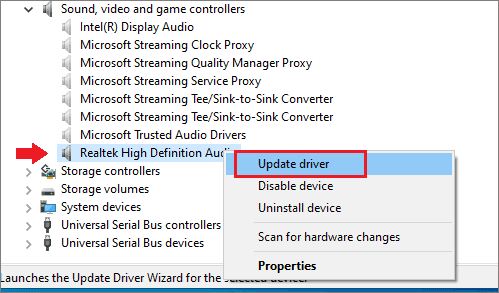
Step 3: Now, expand Sound, video and game controllers and right-click on High Definition Audio. Then, select Update Driver.
You can follow the wizard on your screen to complete the update.
You can download the stable version of the driver from the manufacturer’s website to update the driver. And once the sound driver is updated, you have to restart your computer for the change to take effect. For any assistance in updating the driver, refer to the guide on device drivers in Windows 10.
12. Enable Audio Device Controllers
If the Audio Controller is disabled, you cannot hear the audio on the connected external HDMI device. You can easily enable it from the Device Manager by following the steps below.
Step 1: Open Device Manager and go to View ➜ Show hidden devices.
Step 2: Now, expand System devices and search for the High Definition Audio Controller. Once found, right-click on it and select Properties.
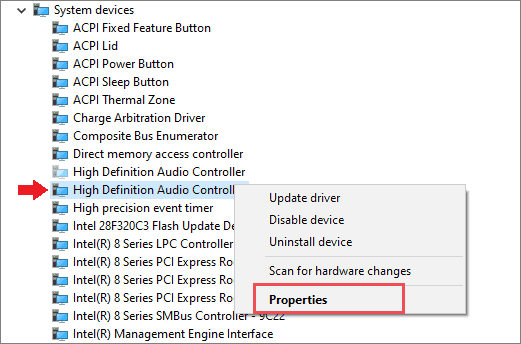
Step 3: In the Properties window, go to the Driver tab and click on Enable to enable the audio device controller.
You need to restart the computer, post enabling the driver. If you can see the Disable option there, it means the driver is already enabled.
13. Perform Graphics Card Driver Update
You can update the graphics card driver to fix the HDMI sound not working on the TV. It may sound weird, but many users fixed a similar issue by updating the display driver.
Open Device Manager and expand Display adapter. Right-click on the graphics driver and click on Update driver.
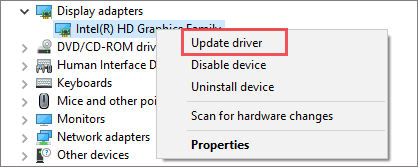
Restart the computer and check if the HDMI audio issue is fixed or not.
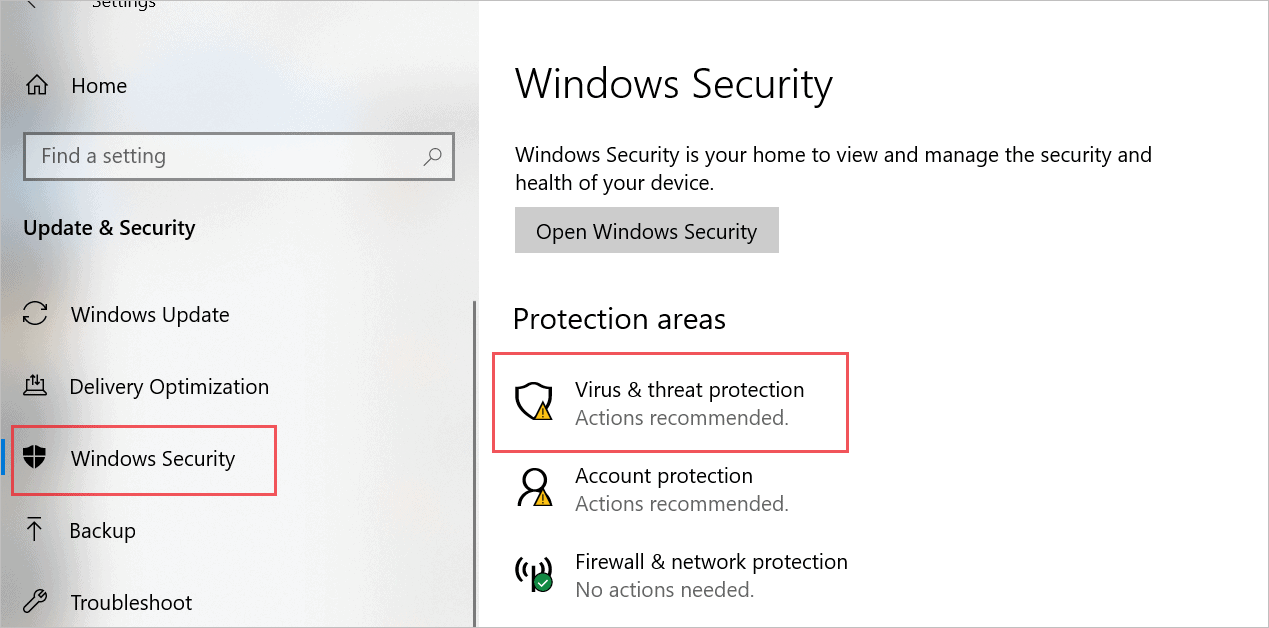
14. Scan for Malware and Virus
If there is a virus residing in your PC, you can experience trouble while playing audio on an output device like a TV. You can scan for viruses using any good third-party malware removal app or inbuilt Windows Security feature in such a scenario.
To use Windows Security, press Windows key + I to open the Settings app and go to the Update & Security section.
Now, navigate to Windows Security and click on Virus & threat protection under Protection areas.
In the Windows Security window, click on the Scan options link. You now need to select the Full Scan option so that your system can be thoroughly scanned for viruses and malware. Click on Scan now button to begin with the scan.
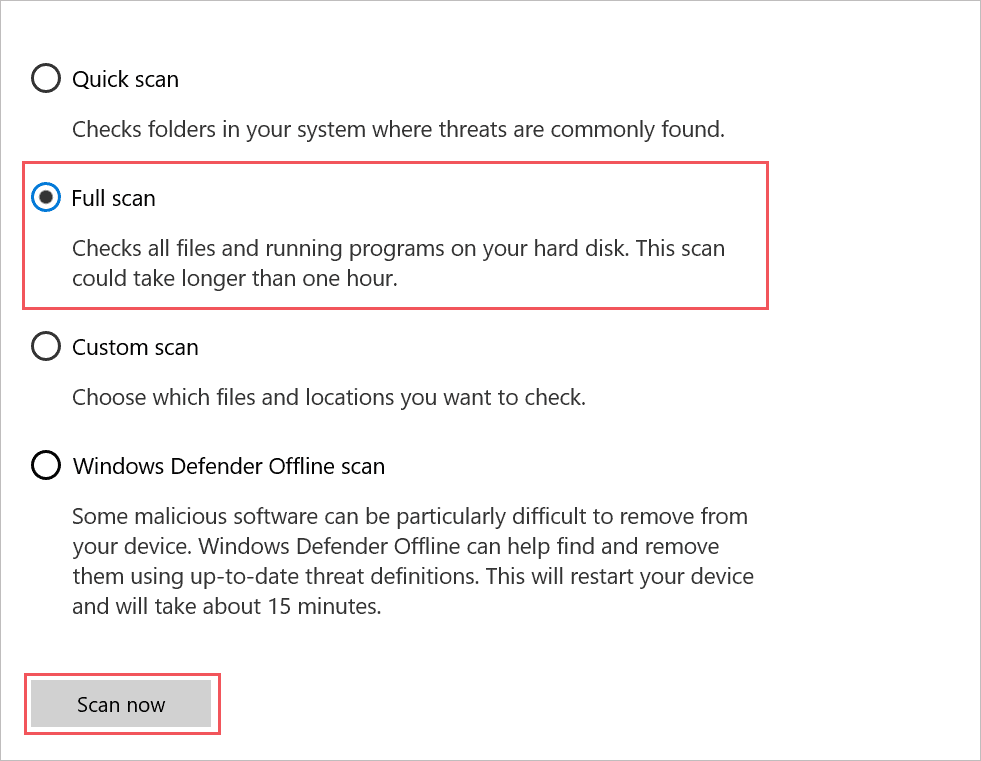
Windows will scan and remove any virus if found. You can reconnect the output device to the PC after the scan and check if you can hear the audio this time.
15. Update Windows 10
Windows 10 updates fix bugs and issues in the previous versions. If there are issues with HDMI sound because of some bugs, you can update Windows, and the problem will be resolved.
Launch the Settings app and go to Update & Security. Next, go to Windows update and click on Check for updates.
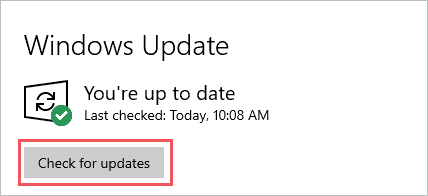
You can download and install the latest updates. Restart your computer after the update and check if the HDMI not working issue is resolved.
16. Use SFC Command
The system files play a crucial role in the smooth functioning of your Windows computer. If any of the system files are damaged or corrupted, you can experience issues with HDMI audio. Well, Windows provides SFC (System File Checker) utility to scan and fix such system files.
Type cmd in the Start menu and then right-click on the Command Prompt. Select Run as administrator from the context menu. You may need administrator credentials to launch the command prompt as administrator.
In the terminal, type sfc /scannow and press Enter.
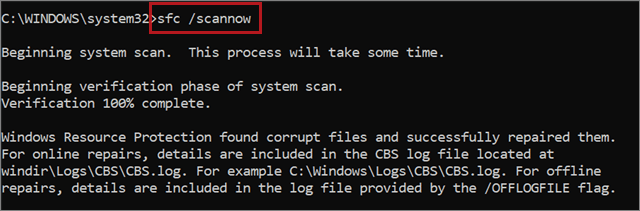
The execution may take time, do not close the command prompt window in between. Please refer to SFC guide for more details about what you can do with this utility.
17. Remove Recently Installed Application
If you have recently installed any software, it can be causing trouble with the HDMI connection. It can happen if an application is not compatible with your computer or is downloaded from some unauthorized sources. Many times the application files can conflict with system files and create issues for the users.
So, you can temporarily uninstall the application and check if HDMI audio starts working for you. If it works, you need to find a replacement for the uninstalled application.
18. Roll Back Drivers
The unstable version of the driver can cause issues with the Windows 10 system. If you recently updated drivers, then you need to roll back them to the previous stable version to fix the HDMI audio not working.
To roll back drivers, open the Device Manager and go to the recently updated driver. Now, right-click on it and click on Properties. In the driver properties window, go to the Driver tab and click on Roll Back Driver.
If that option is greyed out, it means you cannot roll back that particular driver. You might face issues with HDMI audio if you updated audio or graphics drivers with unstable versions.
We recommend using stable driver software from an authorized source for updating drivers.
19. Repair Registry
If the registries are damaged, you won’t be able to get any sound on the output devices connected via the HDMI port. You can fix the registry manually or take the help of some third-party software like Advanced SystemCare.
Advanced SystemCare can help you scan the registry for errors and also fix them with one click. You don’t need to have any technical expertise to use this tool. The tool can help you with many other system-related problems. Check out the review on Advanced SystemCare to know what it does in detail.
20. Reinstall Graphics and Audio Drivers
You can try reinstalling graphics and audio drivers to fix the HDMI audio not working issue.
To reinstall the graphics driver, open Device Manager and expand Display adapters. You can then right-click on the graphics driver and click on Uninstall device.
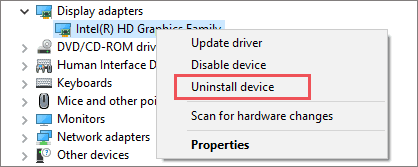
Now, restart your computer so that the driver can be installed again by Windows automatically. Similarly, expand Sound, video, and game controllers and uninstall the High Definition Audio driver.
You can either restart the PC or go to Action ➜ Scan for hardware changes to reinstall the audio driver. Once the drivers are reinstalled, you may be able to hear the sound again.
21. Run Program Compatibility Troubleshooter
Sometimes, the driver software can give you compatibility issues, thus causing HDMI audio not working. You can run a program compatibility troubleshooter to fix it. After this, the driver software will run in compatibility mode.
Launch the Settings app, and go to Update & Security ➜ Troubleshoot. Click on the Additional Troubleshooter to view the list of available troubleshooters.
Now, scroll down to find and fix other problems, and then click on Program Compatibility Troubleshooter. Click on Run the troubleshooter.
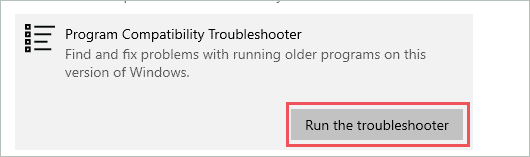
You will be asked to select the driver software; you can select it and follow the screen instructions to complete the troubleshooting.
If you don’t find the driver software in the list there, you can directly right-click on the downloaded driver software and select Properties from the context menu. Next, go to the Compatibility tab and click on Run compatibility troubleshooter.
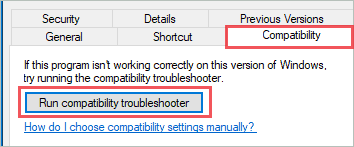
If there are compatibility issues with the downloaded driver software, the troubleshooting will fix it, and you can then enjoy the HDMI connection with audio.
22. Delete Temporary Files and Folders
The junk files can slow down your PC and can also cause issues with HDMI audio. You can clean the temporary files using Disk Cleanup in Windows 10. Search for Disk Cleanup in the Start menu’s search box and open it from the search results. If you have multiple drives, select the system drive (one which has Windows installed).
Now, select all the temporary files and folders you want to clear. We recommend clearing the recycle bin, temporary files, temporary internet files, and thumbnails.
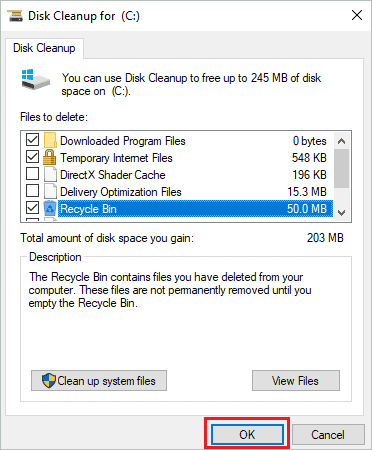
Click OK to delete all the files. Click on yes if asked for confirmation. Once the junk is deleted, you can restart the PC and check if the issue is resolved.
23. Change Audio Settings of your TV
If you are connecting your PC to the TV using the HDMI port, you can try changing the audio settings to fix the HDMI audio not working. Well, the settings may differ according to the manufacturers and model number, so you can contact support or check the manual to find the audio settings.
Now, change the Sound preset as Standard and audio coding to Automatic or HDMI. Also, turn off the Dolby sound. Once the changes are done, you can reestablish the connection between your PC and TV and check if you can listen to the audio.
24. Reset TV Settings
Sometimes, if incorrect settings are made on the TV, you can experience HDMI audio not working issue. You can reset the settings to default to get rid of unwanted audio errors while connecting to the PC via HDMI.
To reset the settings, go to Settings in your TV and navigate to System. Click on the Reset Settings option there. Again, this can vary according to the manufacturer. So, if you don’t find a reset option, refer to the manual that came along with your TV or contact support.
25. HDMI Audio not Working on Lenovo ThinkPad Yoga 12
If you are experiencing issues with HDMI audio on your Lenovo ThinkPad Yoga 12 after upgrading to Windows 10, you can manually update the audio drivers by following the steps given below.
Step 1: Open Lenovo Support Page and click on PC ➜ View PC Support.
Step 2: Enter ThinkPad Yoga 12 in the Search Product box and then click on the Downloads option from the search results.
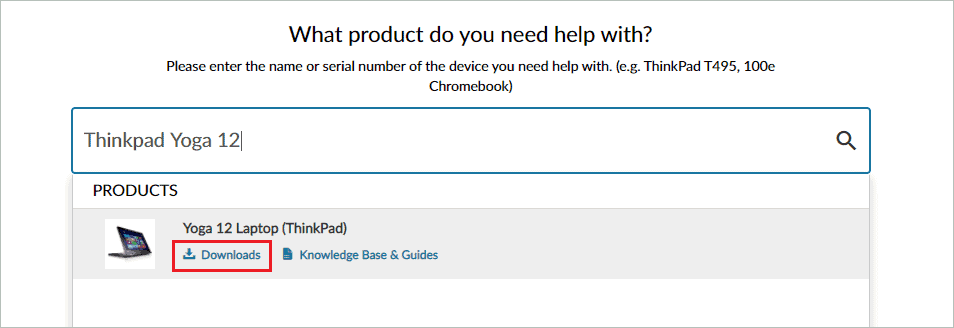
Step 3: On the next page, click on Audio and download Conexant CX22751 Audio Driver with version 8.66.23.50 or higher.
You can update the audio driver with the downloaded file and then reconnect the PC to the external peripheral using an HDMI connection. You will have the audio back post this.
26. Perform a System Restore
You can perform a system restore to bring your computer to a point where everything was working well. Whenever new software is installed, or Windows operating system is updated, a restore point is created.
Your personal files and folders won’t be deleted in this process, but the software that is installed after the restore point is created will be removed. So, make sure you have credentials and a list of the recently downloaded software. Refer to our System Restore guide to know what it is and how to perform it conveniently.
Conclusion
The HDMI port is very useful when it comes to displaying your laptop screen on a big screen like a projector and TV for enjoying a family movie or presenting something to a larger audience. However, sometimes this feature doesn’t work as expected and causes trouble while transferring audio to the connected device.
Well, this can be because of audio and HDMI drivers or some temporary issues with Windows. The solutions mentioned above will help you to fix HDMI audio not working in Windows 10 conveniently and straightforwardly. All you need to do is go through all the solutions and check which one works for you.


