The Windows 10 sleep mode is one of the best features regularly used by excessive PC users. Using the sleep mode, you can avoid shutting down your computer and yet save power just by turning off the display. Added to that, when you switch the PC back on, it resumes from where you left off. However, what if your computer won’t sleep in Windows 10?
Every Windows user, knowingly or unknowingly, requires the sleep mode feature at some point. So, if there is no sleep option in Windows 10 or if the sleeping issue occurs, we cannot turn a blind eye towards it. After all, this issue’s occurrence means you have to shut down and restart the computer whenever you are away for a brief period. And don’t worry, we have you sorted if your computer won’t shut down!
Solutions To Follow If Your Computer Won’t Sleep In Windows 10
There are ample amounts of solutions to use if you cannot put your Windows 10 computer to sleep. Users can try out these solutions on a trial-and-error basis to find which method works best for them. Let’s have a glance at these solutions and solve the issue.
1. Check the Sleep Mode Settings
It’s essential to know the circumstances that can block the sleep mode. If you are installing a program in the background, the Windows 10 PC won’t go in sleep mode. Hence, it is important to check the Power Options to know if they are set in the right manner.
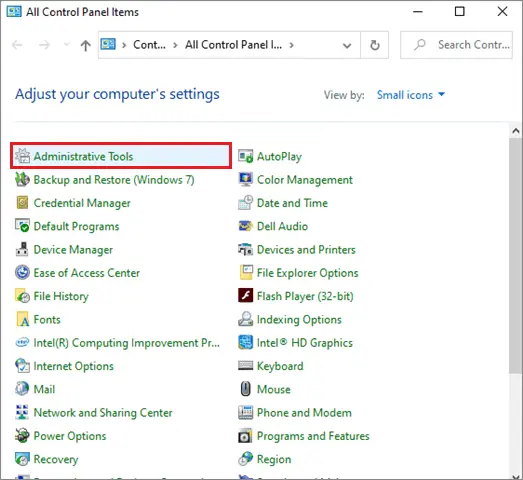
Go to the Start menu and open the Control Panel.

Next, go to Power Options.

Select Choose when to turn off the display from the left pane.

Now, set the timing for putting the computer to sleep.

This is the first and the most basic method to execute if your Windows 10 computer won’t sleep.
2. Update Windows 10
An outdated operating system can cause many issues in the smooth running of a computer. In fact, when Windows time is wrong, updating the system might help. Similarly, if your PC lacks a significant update that is ready to be installed, your computer won’t sleep in Windows 10, not to mention that it will also invite a dozen other problems.
Updating the Windows operating system is a simple process. Open the Settings window from the Start menu and click on Update & Security.

Then, click on the Check for updates option in the right pane. If there are any updates available, Windows will start them automatically.
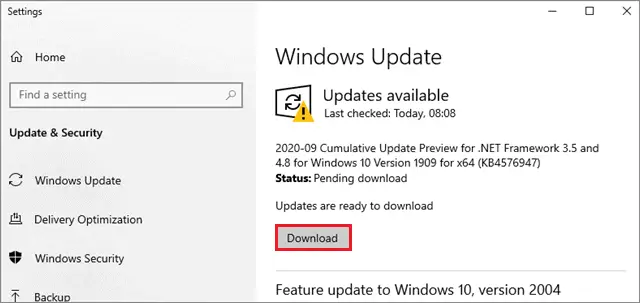
Once the update completes, check if the sleep mode works on your PC.
3. Remove Peripheral Devices
Externally connected hardware can also be a reason why your computer won’t go to sleep. By removing them, you can check if it solves the issue.
Essential components like the keyboard and mouse don’t usually cause problems. However, if you have connected a webcam, printer, scanner, or an external DVD drive, you can disconnect them to see if sleep mode starts working.
Sometimes, it so happens that the devices you connect to your PC aren’t compatible with the Windows 10 operating system. Manufacturers of some devices like gaming consoles release updates late, so such devices can also cause an issue with the sleep mode. Hence, it is also a must to make sure that the connected devices are compatible with your system.
4. Check the Battery
If your computer won’t sleep in Windows 10, you can try checking the battery to ensure there’s nothing wrong with it. Shut down your PC and remove the battery. Re-insert it after some time and see if it delivers the required solution.
Sometimes, your computer might retain the RAM or cache even after you restart the PC. Hence checking the battery to reset the PC is an important basic solution to apply if the sleep mode doesn’t work.
5. Close the Browsers using Task Manager
Internet browsers are known to exchange data with websites even when they are not in use. That’s precisely why you get notifications from websites like Skype, Whatsapp.web, or Yahoo, even when you are not working on a browser. The continuous incoming of notifications can also cause your PC to not transition into sleep mode.
The best way to tackle this problem is to close all the browsers through the Task Manager and then check if the sleep mode works. If it does work, it means that these website notifications are the cause of your problem. After you have diagnosed which website is causing the problem, avoid keeping it open or deny it the permissions to send notifications via your browsers.
6. Disable Cortana Voice Search
The Cortana voice search is your personal AI assistant that helps the users in performing small tasks like playing music, playing videos, opening files, etc. It also helps the users by guiding them on PC usage and giving them appropriate suggestions.
The voice command ‘Hey Cortana’ is said to cause problems often with the sleep mode. Due to a technical bug in the Windows OS, the PC stays awake to listen to this command when the voice search is on.
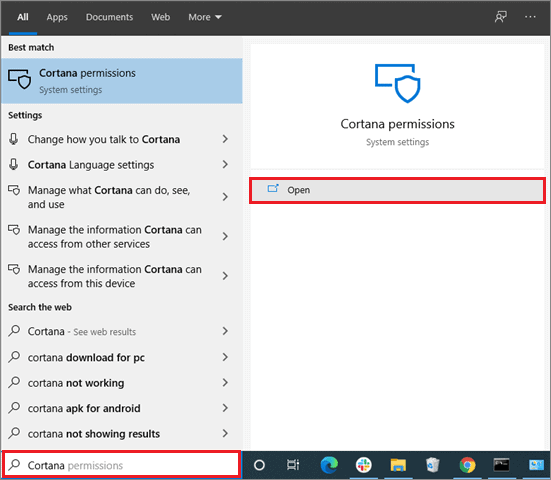
To disable Cortana, type ‘Cortana’ in the Start menu. Then, click on Cortana and search settings.
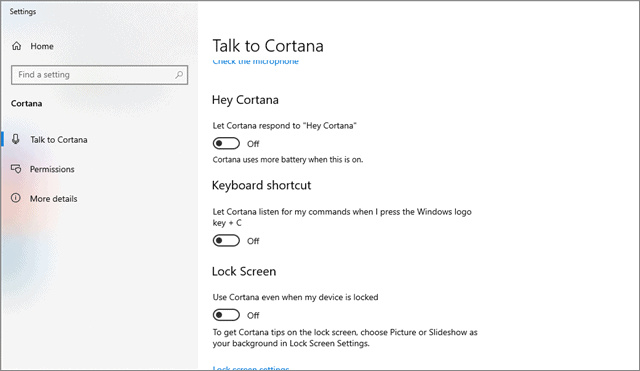
Next, uncheck all the options to turn off Cortana in the Talk to Cortana section.
Restart the computer and check if this solves the sleep mode issue.
7. Close Microsoft Edge
Sometimes, when you are using a browser, Microsoft Edge keeps running in the background. This prevents the computer from sleeping. To fix this issue, you need to stop Microsoft Edge completely using the Task Manager.
To begin with, open the Task Manager window using the Ctrl+Alt+Del key combination.
Then, click on the Processes tab, locate the Microsoft Edge process, right-click on it, and select End Task.
Once you complete this step, check if it has solved the sleep mode issue.
8. Close the Steam Application
If you play games on Steam, the application could also cause issues with the sleep mode. The reason is Steam runs some background processes even after you quit playing the games. These processes might lead your PC to think that you require the screen to be on, which is why the computer won’t go to sleep.
Make sure you try closing Steam through the Task Manager. The process is similar to what we did while closing the Utorrent application.
Some users have also reported that moving the Steam files out of the desktop helps in eradicating the issue. You can try moving Steam into the Library mode if you want it to co-exist with the sleep mode settings.
9. Close Utorrent
If you are using Utorrent, the application could cause issues with the sleep mode settings. The reason is Utorrent continues downloads even when you close the application. To stop the Utorrent from interfering with the sleep mode settings, we need to close it from the app tray and the Task Manager.
To begin with, open the Device Manager using the Ctrl+Alt+Del key combination. Then, click on the Processes tab, locate and right-click on the Utorrent process, and select End task.
Next, click on the Startup tab and select Utorrent. Click Disable on the Task Manager to stop the process. After you finish this task, check if your computer won’t go to sleep in Windows 10.
10. Check your Device Drivers
Having outdated drivers can cause issues with sleep mode settings. If you wish to avoid that, make sure the chipset, audio, video, and BIOS drivers are updated.
A straightforward way to update all the drivers is to install the latest Windows 10 update. You can also update the drivers manually using the Device Manager. Check the brief guide on how to update the drivers in Windows 10 for your reference.
11. Change Advanced Power Options
When you are playing a multimedia app on your computer, the system won’t go to sleep. We can change the Power plan settings to fix this issue.
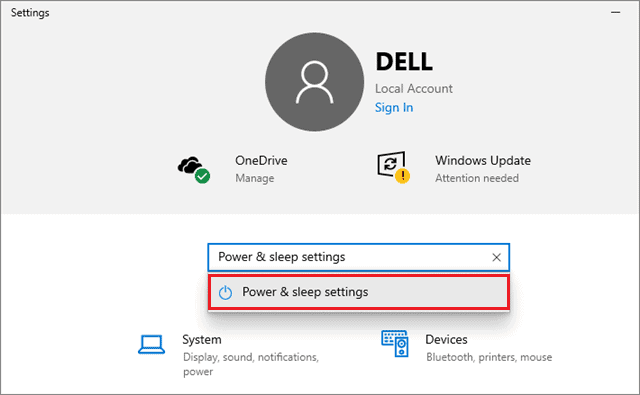
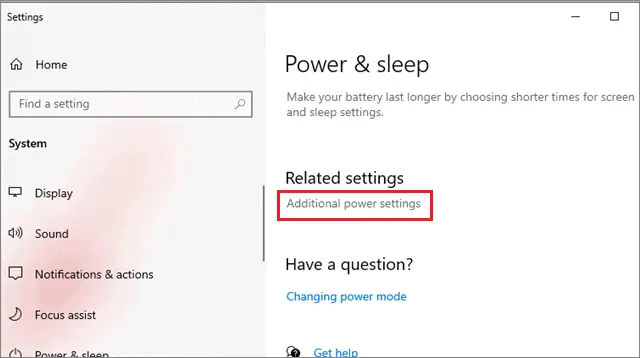
To begin with, open the Settings menu using the Windows key + I. Then, click on Power Options and select Power & Sleep settings to open it.
Now, scroll down in the right pane and click on Additional Power Settings under the Related settings section.
Next, you need to select the Power Plan of your choice. Then, click Change plan settings next to it.

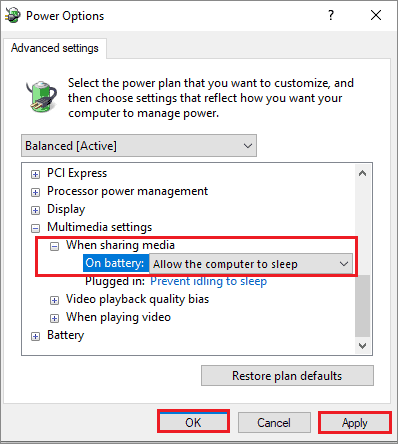
Then, click on Change advanced power settings.

In the Power Options dialog box, click on Multimedia settings, select When sharing media, and set the battery option to ‘Allow the computer to sleep.’
You can also click on the Restore plan default settings to fix the issue.
12. Disable the Hybrid Mode
The hybrid mode is a mixture of hibernation and sleep mode. If the hybrid mode is enabled, it can cause the Windows 10 not sleeping issue.
To close the hybrid mode, open the Power options as we did in the previous method. Then, expand the ‘Sleep’ option and then expand the ‘Allow hybrid mode.’ Turn the ‘On battery’ off.
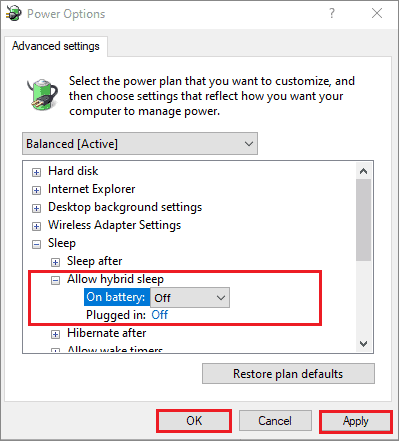
Once you are done with the changes, click Ok and restart the PC to check if the solution has delivered the required results.
13. Change Device Wake-up Settings
One of the most common reasons why your computer won’t sleep in Windows 10 is because of your mouse sensitivity. If the mouse sensitivity is high, the slightest of touches could cause the computer screen to wake up. To prevent this condition, you can do the following.
Open the Device Manager from the Cortana search bar. Click on Mice and other pointing devices, right-click on your mouse, and select Properties.
Now, select the Power Management tab. Uncheck the ‘Allow the device to wake the computer’ option. Choose Ok to confirm your changes. Some PCs don’t support the wake-up feature, and hence, you won’t see the Power Management tab.
14. Disable Fast Startup
Windows 10 has introduced a new feature called Fast Startup that allows users to start a PC faster after being shut down. This feature also helps Windows users save an image of loaded drivers and kernels in C:hiberfil.sys file. When you restart the PC, these drivers and kernels resume their processes from the hiberfil.sys file.
However, some old PCs might not have this functionality, causing sleep mode issues. Hence, you need to disable the Fast Startup to avoid the issue.
Open the Control Panel window through the Start menu. Then, select Power & sleep in the left pane and choose Additional power settings under the Related settings in the right panel. Now, click on Choose what power buttons can do from the left panel.

Next, select Change settings that are currently unavailable.
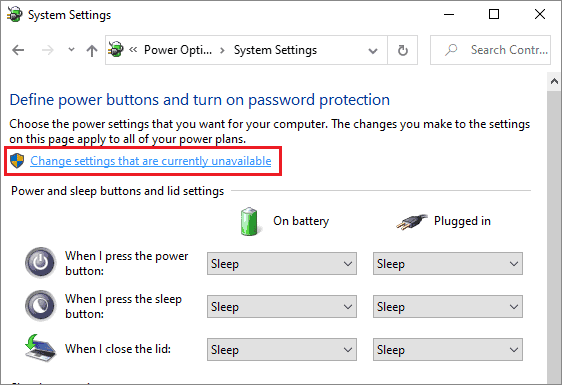
Uncheck the Turn on fast startup option and click on Save changes to confirm them.
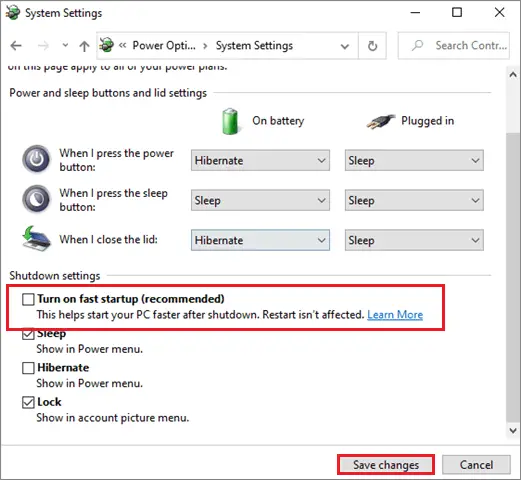
This method could affect your startup and shut down speed, but it solves the issue it is meant to. If you don’t get satisfactory or expected results after executing this method, try the next one.
15. Remove third-party Windows 10 Themes
Sometimes, many third-party themes on a Windows 10 PC can cause the ‘computer won’t go to sleep’ issue. To prevent this problem, you can switch back to the default theme if you are using a third-party theme.
Open the Settings window from the Start menu and select the Personalization option.

In the left pane, choose Themes. Choose the default Windows 10 theme and restart the PC.

16. Check the Screensaver Settings
A screensaver allows you to conserve power if you leave the computer screen for a specific period. It starts automatically when the PC isn’t used for a few minutes. Your computer won’t sleep in Windows 10 if the screensaver configuration is incorrect.
To check the Screensaver settings, go to the Cortana search bar and type ‘Screensaver.’ Click on Screensaver settings.
Once the Screensaver window pops up, select None and click on Ok.
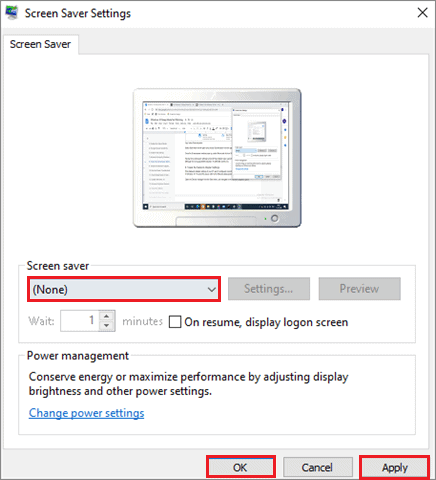
Having the screensaver settings turned off has helped many users fix the sleep mode issue. Although it’s not a guaranteed solution, it’s worth a try.
17. Tweak the Network Adapter Settings
If the Network Adaptor settings of your PC aren’t configured correctly, your computer won’t sleep in Windows 10. To avoid this issue, refer to the following steps given below.
Open the Device Manager from the Start menu, and navigate to the Network adapters option.
Right-click on the network adaptor and select Properties from the drop-down method.
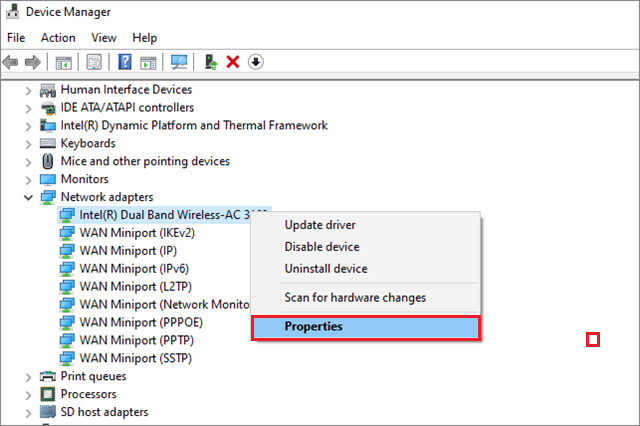
In the window that opens, select the Power Management tab and uncheck the ‘Allow this device to wake the computer’ option.

Click on Ok to save the changes. If your computer won’t sleep in Windows 10 after executing this method, try the next one.
18. Allow Only One Magic Packet To Wake The Computer
Sometimes, the network card installed in a PC might cause the computer to wake up. In this case, you need to reconfigure just one of your network card settings.
Follow the same instructions as we saw in the previous solution and open the Power Management tab. In the last solution, we disabled the ‘allow this device to wake the computer’ option.
Alternatively, we can keep this box checked and also check the ‘Allow device to wake computer’ option below it.

Click on Ok to save the changes and check if this solution resolves the issue for you. If this solution doesn’t work, you can try the next method.
19. Run the Power Troubleshooter
The most significant benefit of running a troubleshooter is that it finds the root cause of a problem. If your computer won’t sleep in Windows 10, you can try running the Power troubleshooter and try to gauge the reason behind the problem.
To start with, open the Settings window using the Windows key + I shortcut. Select Update & Security from the given options.
Next, click on Troubleshoot in the left pane and select Power in the right pane. The troubleshooting will start to identify the problems in your system.
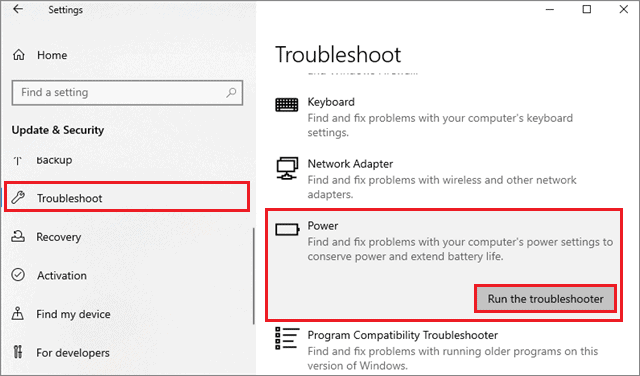
After the process ends, you can see the issues your PC has and work on them accordingly.
20. Check Sleep Mode in Safe Mode
If you have installed any new drivers or software recently, you can face the computer won’t sleep issue. In such cases, you can try and check if the sleep mode works when you run the computer in safe mode.
If the PC transitions to the sleep mode when you are running the safe mode, you need to perform a clean boot to filter down the issue.
To clean boot the PC, press the Windows key + S key combination to open the Windows Search. Next, type System Configuration and press the Enter key to open it.
Select the Services tab and check the Hide all Microsoft services checkbox. Next, click on Disable all to disable the list of services. Now, you need to open the Task Manager using the Ctrl+Alt+Del key combination.
Once the Task Manager window opens, select the Startup tab, and disable each process that has a high startup impact. With the safe mode in operation, only the essential Microsoft processes will be running on your system. Check if the sleep mode issue exists in this mode.
21. Change UpdateOrchestrator Settings
The Reboot task in a Windows 10 PC’s UpdateOrchestrator might block the computer from transitioning into sleep mode. The reason is it forces your computer to install updates irrespective of their availability. In this case, it is necessary to change the ownership so that Windows won’t change settings later.
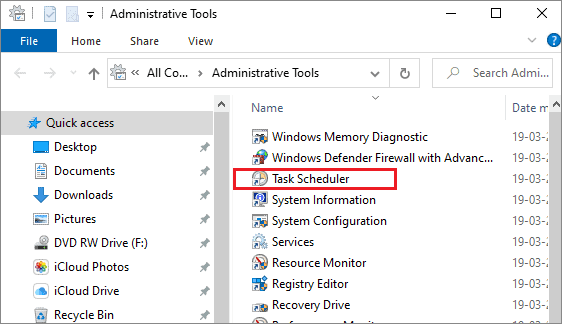
To begin with, open the Control Panel window from the Start menu. Then, search for Administrative Tools and click on it.
You will be taken to a folder where all administrative tools are present. Locate and open Task Scheduler.
Then, navigate to the given location:
Library > Microsoft > Windows > UpdateOrchestratorNext, search for ‘Reboot’ in the entries and right-click on it. Select Properties from the drop-down menu.
Now, navigate to the conditions bar and uncheck the box ‘Wake up the computer to run this task.’
Now, right-click on Reboot and select Disable from the options.
We need to make your account as the owner of this file, so navigate to the following path:
C:\Windows\System32\Tasks\Microsoft\Windows\UpdateOrchestratorNow, locate the Reboot file, right-click on it and select Properties, and make yourself the owner.
Restart the computer for the settings to take effect and see if the Computer won’t sleep in Windows 10.
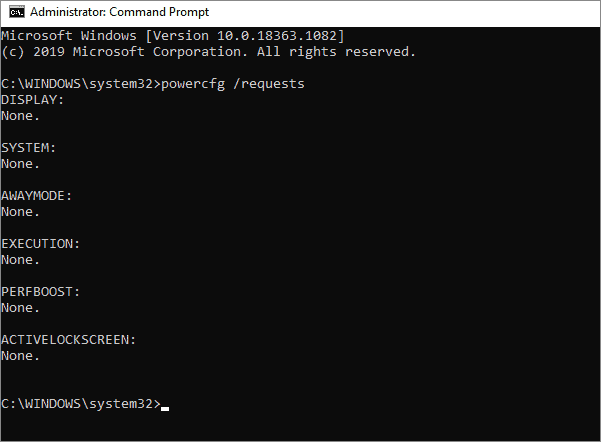
22. Using Power Requests To Check Disrupting Processes
Windows users can quickly identify which command is causing the sleep mode issue by using the power request command. This is an in-built feature that can help you get rid of the problem.
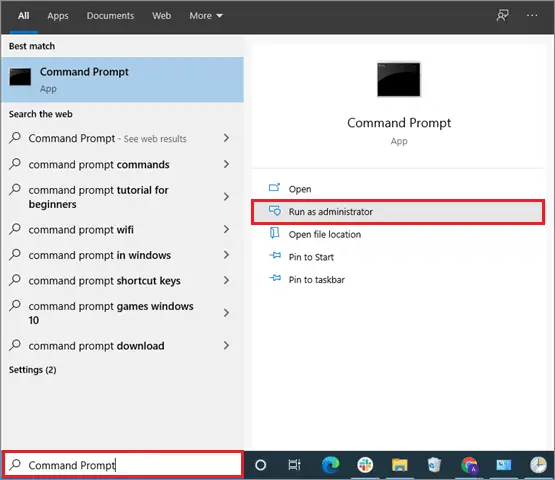
To begin with, open the Command Prompt in the administrator mode from the Start menu.
Once the Command Prompt opens, type the following command and press Enter.
powercfg /requestsOnce you run this command, all the problems of the sleep process problems will be listed in front of you. You can either choose to disable the service or remove the application that is restricting your PC from going into the sleep mode.
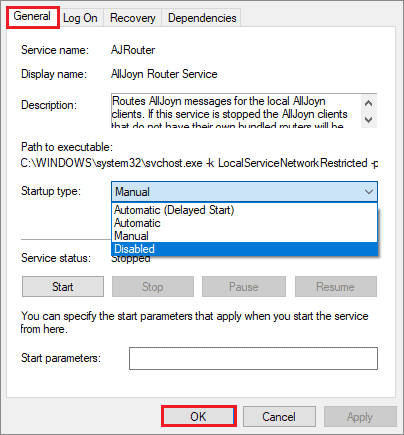
To disable a service, open the Run command using the Win + R shortcut, type services.msc, and click on Run.

Next, double-click on the service and select Startup type to Disabled. Click on Ok to save the changes and exit.
The uninstallation of any applications can be carried out using the Control Panel.
23. Ignore All srvnet Driver Requests
Many users have reported that disabling the power requests from the srvnet driver has resolved the issue for them. The issue disappears automatically when the power requests are disabled.
To begin with, open the Command Prompt in the administrator mode from the Start menu.
Once the Command Prompt opens, write
powercfg -requestsoverride DRIVER srvnet SystemPress the Enter key for the command to take effect. If this doesn’t resolve the sleep mode issue, you can reverse the action by using the following command:
powercfg -requestsoverride DRIVER srvnet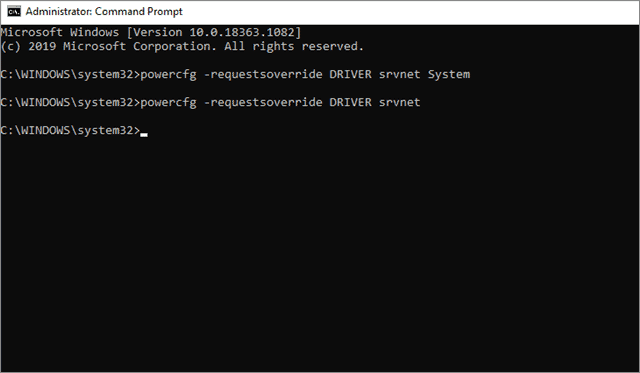
You need to restart the computer to see if the new changes work for you and fix the sleep mode issue.
24. Create Sleep Diagnostics Reports
Some background services running on a Windows 10 PC might cause the computer to think that they need the screen to be on. Hence, your computer won’t sleep in Windows 10. To avoid this issue, we can generate an in-depth sleep report to identify which services are causing the issue.
Open the Command Prompt in administrator mode, to begin with.
Next, run the following command and identify which processes aren’t letting the computer go into sleep mode.
powercfg /SYSTEMSLEEPDIAGNOSTICSYou will also receive the location where the report is saved.
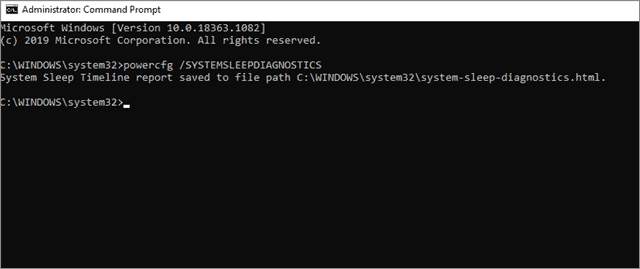
Navigate to the report and open it in a browser. Now, you can successfully identify the processes that are causing the problem.
25. Check for Last Wake Events
Sometimes, Windows 10 PCs also tend to wake up unexpectedly from sleep mode. To know which processes are causing this issue, you can check the last wake events.
Open the Command Prompt in administrator mode and enter the following command:
powercfg -lastwakeThen, type the following command to see which devices are waking up the system.
powercfg -devicequery wake_armed
When you see the device that is causing the issue, go to the Device Manager, right-click on that device, and select Properties.
Then, in the Power Management tab, uncheck the ‘allow this device to wake the computer’ option. Restart the PC to see if your computer won’t sleep in Windows 10.
26. Run a Trace
Running a trace is yet another method to determine which processes are the reason why your computer won’t sleep in Windows 10.
To begin with, open the Command Prompt in administrator mode and type the following command to start the trace.
cd %USERPROFILE%/DesktopNext, enter the following command to start tracing activities.
powercfg /energyThe entire trace will take about 60 seconds to track the process or device that is restricting your computer from going into sleep mode. After the trace ends, you will get the location of the trace report that has been saved on your PC.
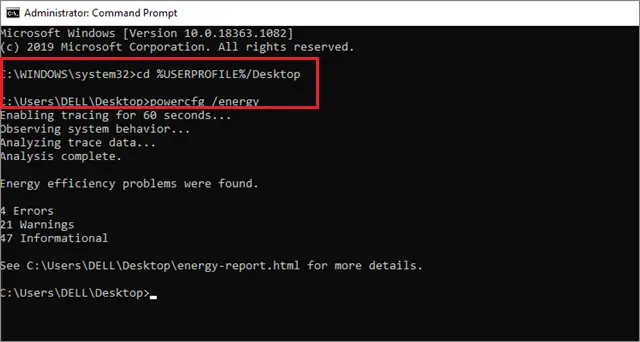
Navigate and open the trace report in your browser and identify the process or device that is causing the issue. Once you have identified the device or process in question, you can either disable that service or uninstall it from the control panel.
27. Power Cycling the Computer
If your RAM or Pagefile isn’t cleared properly, your computer won’t sleep in Windows 10. Therefore, you can get rid of the static electricity used by the components and fix this issue.
Shut down your computer first and unplug the Power cable from both the monitor and the CPU. Next, press and hold the power button on both the CPU and the monitor for 10 seconds. Wait for one or two additional minutes to turn your computer on.
28. Halt the WMP Service
The WMP service is enabled by default on every Windows 10 computer. In this method, we will be stopping this service to identify if it is causing the sleep mode issue in your PC.
Now, press the Windows key + R combination to open the Run command. Type services.msc in the address bar and open the service management window.

In the list of services that opens, locate, and double-click on Windows Media Player Network Sharing Service. Select Stop from the drop-down menu.

Right-click on the service and click on Properties.

Next, click on the Startup Type and select Manual from the list.
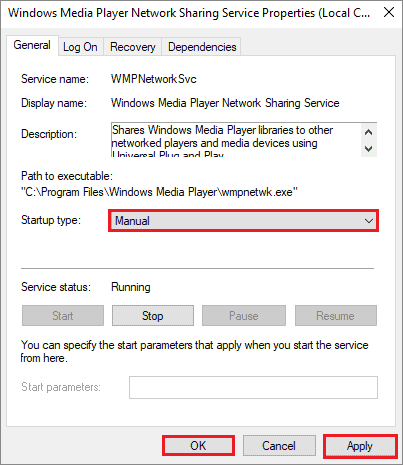
Once you have carried out all the steps mentioned above, check to see if your computer can successfully transition into sleep mode.
29. Check and Stop Wake Timers For Windows Updates
Windows users can easily set wake timers that allow the computer to come out of the sleep mode for certain activities, such as Windows updates. However, incorrectly set wake timers can be annoying, so we will check how to check and stop them in this method.
First and foremost, open the Run command in administrator mode and enter the following command. Press the Enter key to run it.
powercfg /waketimers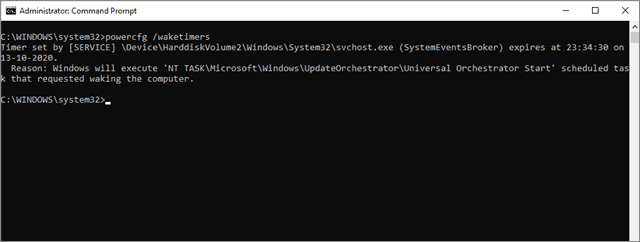
After the command runs, you will see all the wake timers on your screen. Now, we need to disable these wake timers.
Launch the Run command using the Win + R combination and type taskschd.msc in the address bar. Press the Enter button to launch the task scheduler window.

Find out the one that was displayed in the command prompt window. Select the Disable option to prevent the task from running.

After you follow all these steps, try switching your computer into sleep mode to see if it had the desired effect.
30. Disable Wake Timers
Sometimes, it is difficult to disable the services that stop your computer from sleeping, even though you have enabled wake timers. In such cases, users can disable wake timers using the computer’s power plan, which will automatically prevent your PC from being woken up by background services.
First and foremost, open the Control Panel. Now, you have to open the Advanced Power Options window, as we have already seen in solution no.11 of this article.
Then, expand the Sleep option and further expand the Allow Wake Timers option. Then, click on the Setting option from the drop-down menu and select Disable. Click on Apply and select Ok.

Now check your PC to see if the issue has been resolved. If the solution doesn’t deliver the expected results, you can try out the next method.
Conclusion
The Windows sleep mode is an important feature used to give temporary rest to a PC when the user is not working. It allows you to keep a computer open and save the battery without having to shut it down entirely. However, what would you do if your computer won’t sleep in Windows 10?
Users must always remember to execute all the basic solutions to eradicate this problem. Solutions like checking Windows updates, closing Cortana, checking basic sleep mode settings, removing external devices, and many more, should be carried out before moving on to the complex solutions that involve Command Prompt or working on the Advanced Power Options window.
That being said, no single solution will work for every user, so you need to try them out on a trial-and-error basis to determine which method works best for you.
(Updated on 25th February 2021)


