Wireless connectivity has gained rapid momentum with the primary aim to provide portable hardware solutions to the users. Wireless mice and keyboards have steadily come to trend for this purpose. While it’s easy to carry these hardware devices around, you could face a real headache if the wireless mouse is not working in Windows 10, just like when the DVD drive is not working.
There could be a variety of reasons why a wireless mouse won’t work correctly. You may have to switch back to using a mouse with a USB cable, which would take away the luxury of portability. If you are an avid gamer, using a wired mouse would mean sacrificing the freedom and convenience offered by the wireless mouse. In case you are using your laptop and its keyboard is not working, you won’t be able to use your system at all.
How To Fix Wireless Mouse Not Working
There are several simple solutions you can try out on your level to fix the wireless mouse issue. Let’s have a glance at how to execute these solutions properly.
1. Shutdown and Restart Your Computer
Restarting the PC is an essential solution that works wonders for many Windows issues. If your wireless mouse is not functioning in Windows 10, the first thing to do is restart the PC using the navigation keys on the keyboard.
You can open the Start menu by pressing the Windows key on the keyboard. Then, navigate to the restart option using the arrow keys and wait for the restart process to complete. Once the computer reopens, see if the mouse is working properly.
2. Test the USB Mouse
Before you conclude that your USB mouse is not working in Windows 10, it’s essential to determine whether the issue is related to the mouse or the desktop computer hardware. If the wireless mouse doesn’t work on a given USB port, try switching the ports and see if the problem is resolved. If the mouse works on a different USB port, it means the problem lies in the previous USB port.
If none of the ports respond properly, connect the mouse to a different computer and see if it works there. If the mouse works on another system, it’s safe to say that the PC is having a port problem. You can fix the USB ports not working issue by applying a few simple solutions.
If you are using a mouse pad, make sure you check whether your mouse works on other mouse pads. If it does, it means you need to change your mouse pad.
3. Enable the Wireless Mouse
Many users often forget to enable their wireless mouse after they plug it in. To enable the wireless mouse, you need to open the Device Manager using the keyboard shortcut keys.
To begin with, press Win key + R to open the Run command window. Enter devmgmt.msc in the address bar and choose OK.
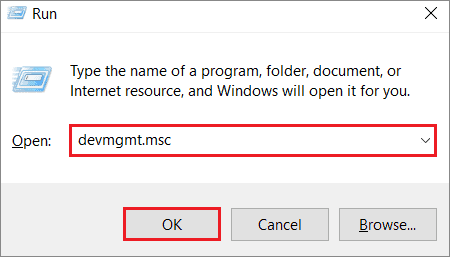
When the Device Manager window opens, press the Tab button to choose the computer device. Then, navigate to Mice and other pointing devices in the given list of options.
Now, you need to expand that option using the keyboard keys. Press the right arrow + Alt to expand it.
From the expanded options, choose HID-Compliant Mouse. Now, press Shift + F10 to open the context menu that usually opens with a right-click. Choose Enable device from the context menu and see if the wireless mouse starts functioning correctly.
4. Update or Uninstall Mouse Driver Software
If the mouse driver is corrupted due to any reason, the mouse won’t work properly on your laptop or PC. Hence, make sure you update or reinstall your mouse drivers using the Device Manager.
The process of updating or uninstalling the mouse driver is the same as mentioned in the previous solution.
The keyboard shortcuts are also the same, except for one change related to the selection of options. In the previous method, we saw how to enable a Bluetooth mouse; in this solution, you have to choose either Update device or Uninstall device from the given options in the context menu.
After you have uninstalled the mouse drivers, you need to download new drivers from the official vendor’s website. You need to determine the model of the mouse for that purpose. For example, if your Logitech wireless mouse is not working, you need to open Logitech’s official website and download the latest driver compatible with your system.
Since your wireless mouse is not working correctly, you will need to execute this method on another Windows system. Once you download the correct driver, transfer it to a USB flash drive, and connect that drive to your computer to install the driver.
5. Update Windows 10
Having an outdated version of the Windows system can cause difficulty in mouse movement. If you are facing any problems with your USB mouse, check and install any potential system updates.
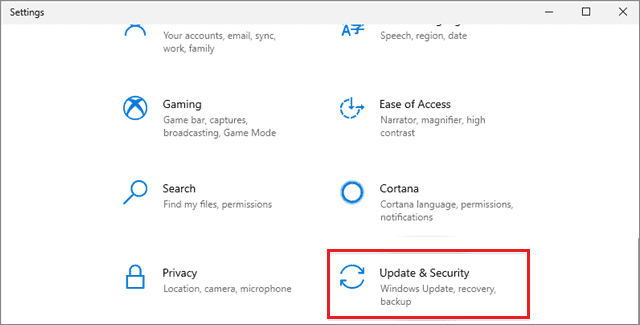
Use the Win key + I shortcut to open the Settings app. Then, choose Update & Security from the available options.
Select Check for updates and press the Enter key; wait until any potential updates are detected.
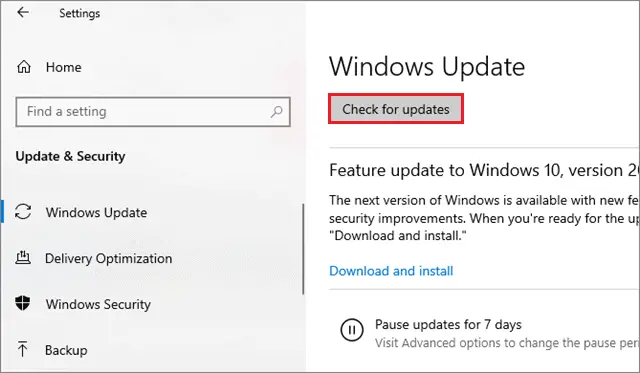
The Windows system installs the updates automatically after detecting them.
6. Change USB Power Management Settings
If your Bluetooth mouse doesn’t work, you can try changing the Power Management settings and see if that resolves the problem. To begin with, open the Device Manager using the Run command window. Then, press the Tab button to select the PC.
Navigate to Universal Serial Bus Controllers using the down arrow key. Press the Alt key + right arrow keyboard shortcut to expand the option.
Next, navigate to USB Root Hub (USB 3.0); this is where your mouse is connected. Press the Enter key to open the properties.
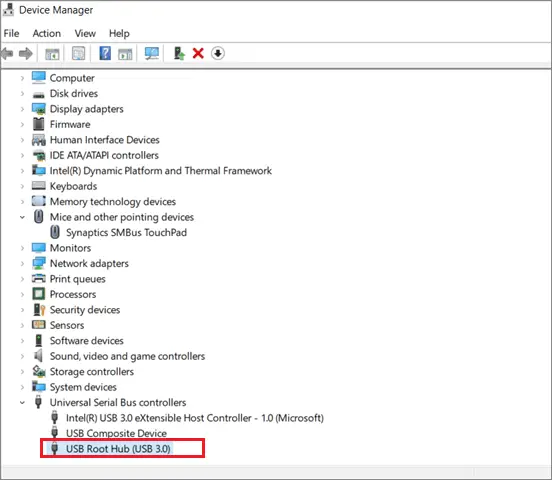
Now, press the Tab key to enable navigation through different tabs. Then, use the right arrow keys to choose the Power Management tab.
Press the tab key again to choose the check box that says ‘Allow the computer to turn off this device to save power.’
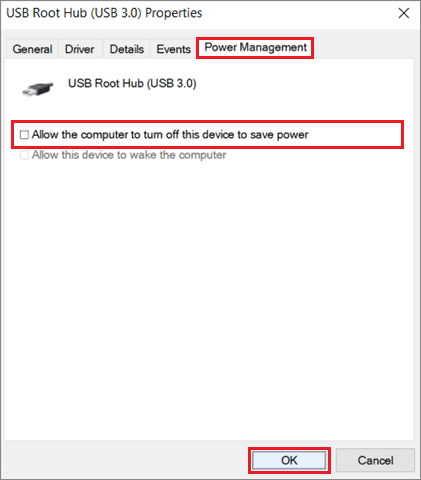
If the checkbox is checked, press the Ctrl + Space keyboard shortcut to uncheck it. Then, press the Tab button to move to the OK option on the window and press the Enter key.
Now, press Alt + F4 to close the Device Manager. You need to restart the PC using the keyboard and then check if the mouse is working properly. Use the Windows logo key on your keyboard to open the Start menu and navigate to the restart option using the arrow keys.
7. Turn Off Fast Startup
The Fast Startup feature in Windows 10 allows users to start a PC faster after being shut down. You need to open the Control Panel to access this feature.
Press the Win key + S to access the Cortana search bar. Type Control Panel and select Open in the right pane. Once the Control Panel window opens, choose Power Options from the available options.
Then, select Choose what power buttons can do from the left panel using the Tab key.
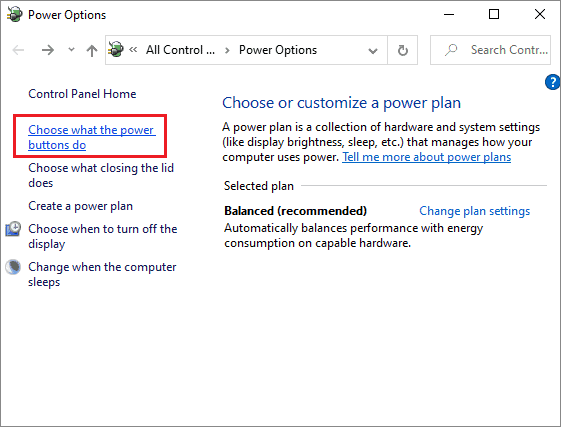
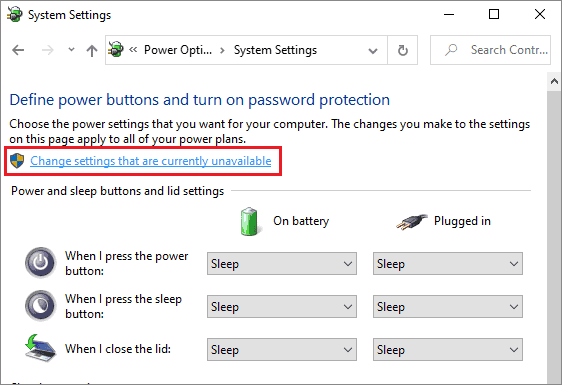
Next, select Change settings that are currently unavailable.
Uncheck the Turn on fast startup option and select Save changes to confirm the setting tweaks.
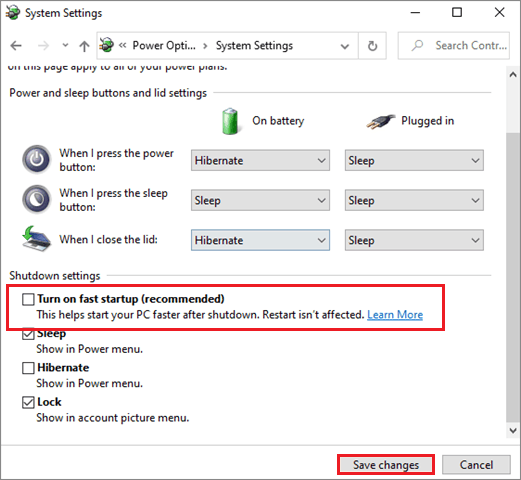
This method could affect your startup and shut down speed, but it solves the issue it is meant to.
8. Tweak BIOS Settings
Some users have reported that enabling the USB Virtual KBC Support has helped them resolve the bluetooth mouse issue. You need to open the BIOS settings on your PC for this purpose.
To enter the BIOS, you need to press the BIOS key specified by your computer manufacturer during the boot process.
Once you open the BIOS settings, you need to select Devices and then go to USB Setup. Now, navigate to USB Virtual KBC Support and choose Enabled. Make sure you save your BIOS settings after making the changes.
Restart your computer after this step and check if the bluetooth mouse has started functioning as expected.
9. Scan for Malware
Unwanted viruses and malware can affect the seamless functioning of your computer. Hence, if your wireless mouse doesn’t work, make sure you conduct a proper malware scan to check if any suspicious files are affecting your PC. You can choose from various antivirus and malware removal tools to scan for viruses and corrupted files.
10. Run the Hardware and Devices Troubleshooter
Windows has a built-in troubleshooter you can use to detect the reason why the wireless mouse is not working correctly.
Use the Win key + I keyboard shortcut to open Settings. Select the Update & Security tab. Now, choose Troubleshoot in the left pane and choose Hardware and Devices in the right-pane.
Then, wait for the troubleshooting process to complete.
Restart the computer once the troubleshooting is done. The Hardware & Devices Troubleshooter has been removed post the Windows 10v1809 version.
11. Perform a Clean Boot
The clean boot process can be used to identify if any software is causing any issues to the wireless device. A clean boot uses only the essential Microsoft services, which helps identify the software that might be causing problems to the mice driver software.
Press the Windows key to open the Start menu, select the Power button, and choose the Restart option. Make sure you sign in as an administrator after the computer restarts.
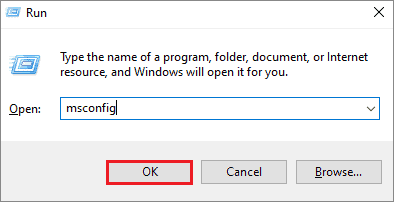
Next, open the Run command from the Start menu or by using the Win key + R keyboard shortcut.
Type the command msconfig and press the OK button. This will open the System Configuration.
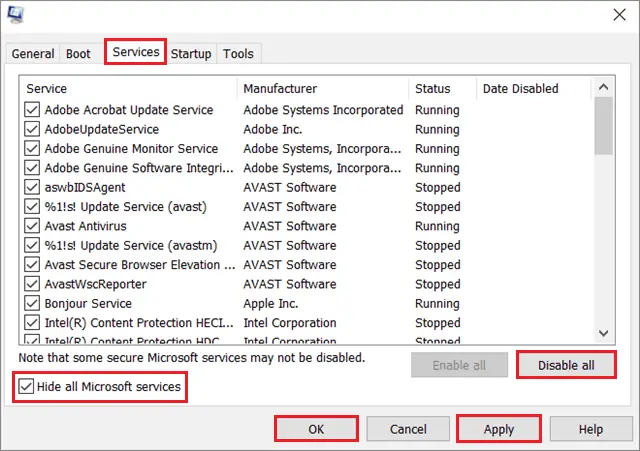
Locate the Services tab and check the Hide all Microsoft services box.
Then, select Disable all.
Next, open the Task Manager and select the Startup tab. Choose each process and disable it. Then, close the Task Manager window.
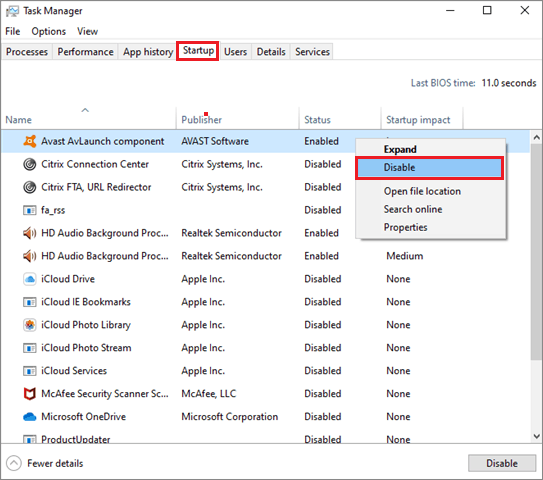
Once you have disabled all the processes, close the Task Manager and the System Configuration window. Reboot your computer to check if the wireless mice have started working.
12. Reinstall Windows
If you have tried out every fix on this list and still the bluetooth mouse won’t work, you can consider reinstalling the Windows operating system. However, since this is a massive step, make sure you consult a computer expert before going ahead with this task. Before moving on with the reinstallation process, don’t forget to backup all the essential files and folders.
Conclusion
Wireless device connectivity of hardware components is steadily becoming a norm amongst computer users. Devices like wireless keyboards and mice offer many benefits to the users. If the wireless mouse is not working in Windows 10, it can deprive the users of several features like portability, convenience, and quick response time in navigation.
However, the solutions mentioned above can help you resolve the wireless mouse problem. Make sure you follow these solutions in chronological order, as mentioned in the article. If your mouse device doesn’t work after executing these simple steps, the best bet would be consulting a computer expert before choosing to replace it.


