Portability is the epicenter of innovation in computers throughout the past decade. The laptop first introduced portability as users did not connect an external keyboard and mouse. But, issues arise if and when the laptop keyboard is not working. And it can be more annoying than a wireless mouse not working issue!
Connecting an external keyboard or using the screen keyboard are the best alternatives if your keyboard stops working. Still, it also means you cannot carry the laptop anywhere without having an external keyboard. Secondly, an external keyboard also causes difficulties if you decide to use it with the laptop touchpad.
What To Do When The Laptop Keyboard Is Not Working
If you decide to use an external keyboard, you also have to start using a mouse to facilitate seamless navigation. Hence, it’s essential to fix the issues that occur with your keyboard. Let’s have a look at the solutions to fix the laptop keyboard not working issue.
1. Check Whether It’s A Software or Hardware Issue
When your laptop keyboard is not working correctly, you need to determine whether it is a hardware or a software issue. Once you start the laptop, enter the BIOS setup using the special key as mentioned in your PC manual.
If the BIOS screen doesn’t open, it indicates that the keyboard has stopped working due to a hardware issue. If you can open the BIOS screen and navigate through it, the keyboard has stopped working due to a software issue.
2. Reboot the PC
Rebooting can resolve several types of errors on your Windows laptop. If you ever encounter the laptop keyboard not working issue, make sure you reboot your laptop before applying any other solution. All you need to do is hold the power button for around 10 to 15 seconds. Once the PC turns off, turn it back on, and see if the keyboard has started working.
You can also boot your PC in safe mode to check if there are any external programs or third-party software causing your keyboard issues. The safe mode allows only the essential Microsoft services; if the keyboard works well in the safe mode, it means an external application is causing the keyboard problem.
3. Clean the Keyboard
Accumulation of dust in between the keys is one of the most common reasons why the keyboard starts malfunctioning. Make sure you shut down the laptop before beginning the cleaning process.
Once the Windows 10 laptop is shut down, overturn it and tap on the base to clean any debris that might be present in the keyboard. When the keyboard is upside down, run your fingers through all the keys to ensure all the dirt is removed. You can try to clean the debris in the spaces between the keys with a compressed air can.
4. Update or Reinstall Keyboard Drivers
If your Windows 10 keyboard drivers are outdated, the laptop keyboard might face issues in working smoothly. Hence, it is essential to update all types of drivers. Here’s a quick guide on how to update computer drivers. You can also choose to uninstall and reinstall the driver again if the latest update doesn’t get the keyboard working as it did before. Rolling back the driver is also another simple process to fix an outdated driver.
5. Disable Filter Keys
In Windows 10, there is a feature called Filter keys that ignores repeated keystrokes to make typing easier. However, it can give rise to specific keyboard issues sometimes. To see if this feature is the cause of the problem, you need to disable it and check if the keyboard starts working properly. This process is also referred to as changing the keyboard layouts of a laptop.
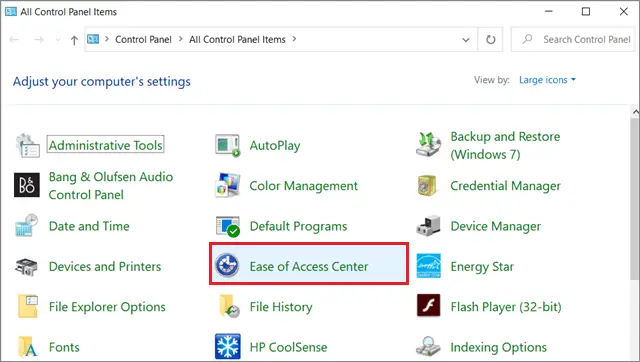
First and foremost, open the Control Panel window from the Start menu and click Ease of Access to edit the keyboard settings.
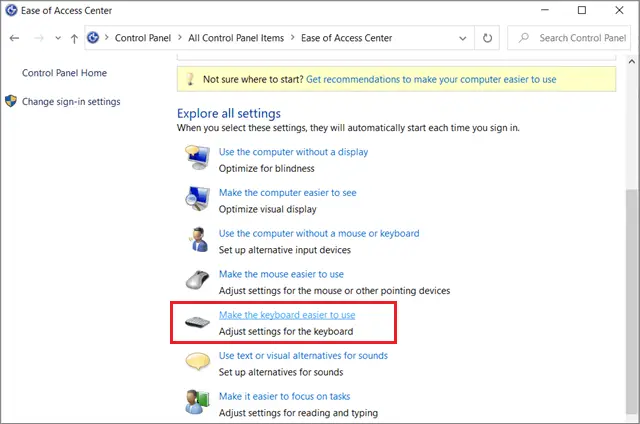
Then, select the Make the keyboard easier to use option.
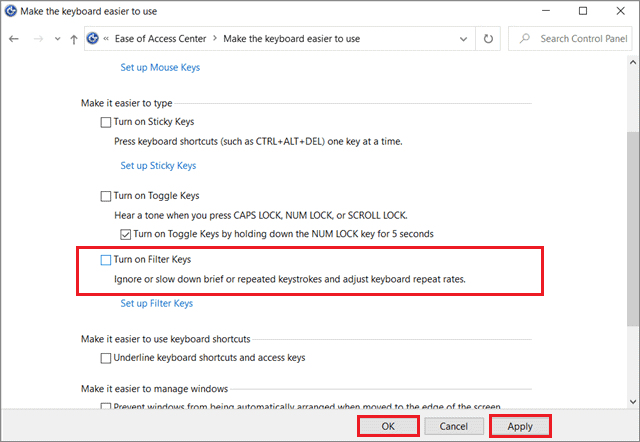
Scroll down to ensure the checkbox of Turn on Filter Keys isn’t ticked. Then, click Apply and OK to save the keyboard settings.
Once you have done these steps, see if the laptop keyboard is working properly.
6. Run the Hardware and Devices Troubleshooter
When the Windows 10 keyboard is not working on your laptop, you can run the Hardware and Devices troubleshooter to fix it. Go to the Start menu and open the Settings application. Then, select Update & Security from the available list of options.
Select Troubleshoot in the left pane, and click on the Keyboard section.
Now, choose Run the Troubleshooter. You can also run the troubleshooter for Hardware and Devices to diagnose the problem, but remember, this troubleshooter is not available for Windows versions v.1809 and above.
7. Tweak Language Settings To Fix Laptop Keyboard Not Working Issue
Sometimes, users often experience issues with specific keys on the keyboard. If you are facing problems with any particular key, you can change the language settings to resolve the issue. This is ideally the first thing to do after you have established the nature of the issue.
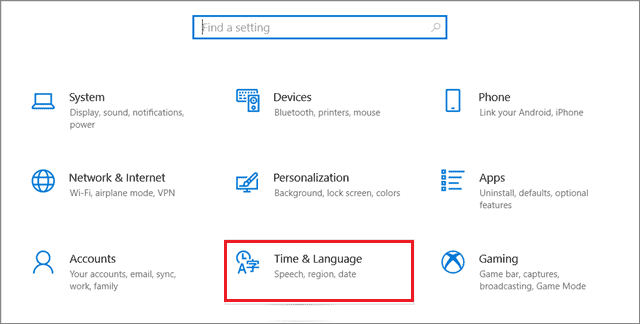
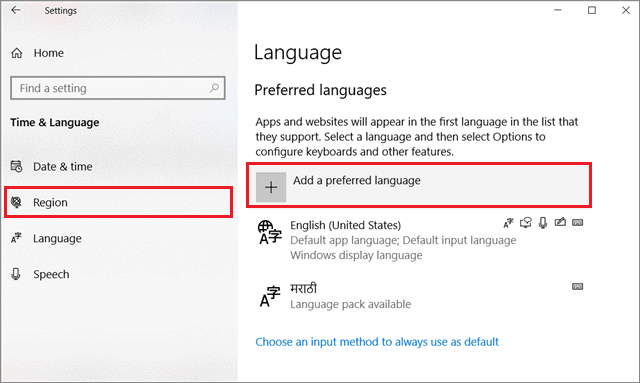
The primary aim is to match your regional settings to your language settings. To begin with, press the Win key + I button to open the Settings window and select Time & Language from the list of options.
Next, select Region in the left pane and click on the Add a preferred language option.
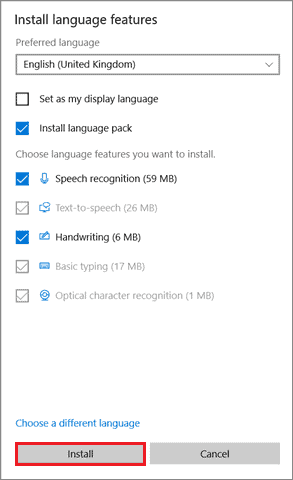
Then, select the correct language from the given list of options and click on Next.

In the next window, select the preferred features, click on Install, and wait until that language is installed properly.
Once the installation is complete, check whether the malfunctioning keys are giving the correct output.
8. Detach the Battery
Your computer may face several issues outputting the keyboard characters on the screen if your Windows laptop battery is defective. In such cases, you need to either repair or replace it. However, we need to first confirm whether the laptop battery is actually the source of our keyboard problem. If your laptop has a removable battery, you can follow the given steps.
Shut down your laptop, remove the battery, and then plug in the power cable. Use only AC power to boot the laptop without the battery. If the keyboard works when the battery isn’t installed, it means you need to change the battery. If your laptop battery is facing any charging issues, you can apply simple solutions to fix the problem.
9. Perform the SFC Scan
The System File Checker (SFC) scan is used to scan the corrupt system files and replace them with new versions. If your laptop keyboard is not working correctly, you can execute the SFC scan to check if any damaged system files are causing any hurdles in the smooth functioning of your keyboard. You can follow the simple guide on how to perform the SFC scan with the Command Prompt on your Windows laptop.
10. Run Malware Scan
If you have already determined that the keyboard malfunctioning is a software-related issue, make sure you use a malware removal tool to perform a virus scan and delete all the corrupted files. You can use any antivirus software or malware removal tool of your choice. Once the scan is complete and successfully eradicated the corrupt files, check if the keyboard has started working properly.
11. Uninstall Secondary Keyboard Drivers
If your laptop keyboard is not working, it might be due to the drivers of external keyboards you may have attached to your laptop in the past. These drivers tend to disable the keyboard automatically. If this is the case, you need to uninstall the secondary keyboard driver that your original laptop doesn’t use.
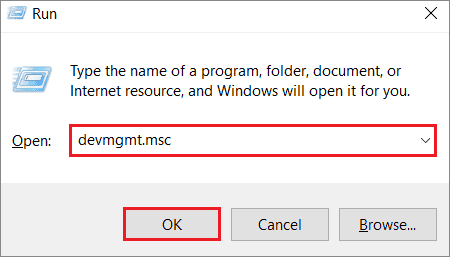
To do so, open the Run command window; type devmgmt.msc in the address bar and press enter to open the Device Manager window.
Next, click on View in the menu bar and select Show hidden devices.
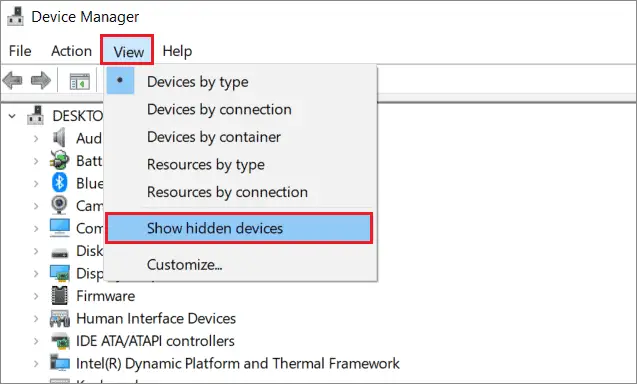
Then, navigate to the Keyboards section and expand it. Right-click on all the options called ‘HID Keyboard Device’ and select Uninstall device.
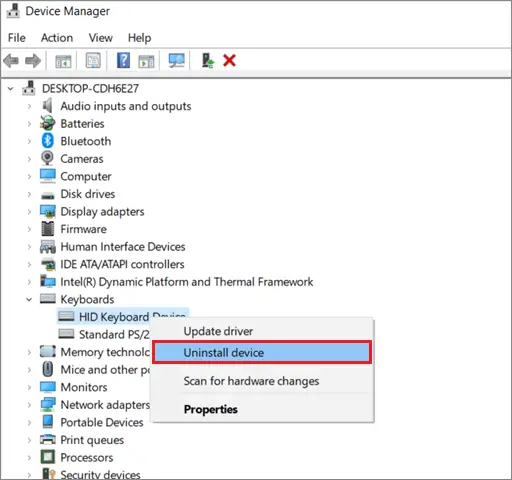
This term might also include other external devices like mice. In case other external device drivers are uninstalled, you need to reinstall them again.
12. Check the Keyboard Connection
Note: You can go through this method only if you are an IT pro or have adequate experience handling keyboard hardware. If not, it’s better to consult a computer technician or perform this step under the supervision of an experienced person.
Sometimes, the keyboard loses its connection with the motherboard. As a result, your keyboard may work irregularly. To fix this problem, you need to open the outer case of your Windows laptop from behind and connect the ribbon cable to the bottom of the keyboard. You can see the user manual for instructions to understand how to dismantle the laptop properly.
13. Replace the Defective Keyboard
If you have tried out all the solutions mentioned above and also consulted a computer technician regarding the keyboard, the last step is to replace the faulty keyboard and install a new one on your PC. The technician should ideally have the final say regarding this step.
Conclusion
The best part of having a laptop is that you can carry it anywhere around with you. One of the main reasons for this feature of portability is the built-in laptop keyboard and touchpad. However, if the laptop keyboard is not working, you may have to sacrifice enjoying this feature by using a USB keyboard.
There are several ways to fix this issue. However, if the keyboard doesn’t work again, you can consult a computer technician. You can also choose to use an external keyboard if you don’t wish to fork out cash to fix the keyboard.


