We need to keep our systems up-to-date to avoid having unwanted issues, bugs, and errors while using the system. Microsoft rolls out frequent updates to fix patches and introduce new features on your Windows computers. As a result, you can experience errors like 0x8007000d and 0x80070020 while installing new updates.
Error 0x8007000d can show up while activating the Windows operating system and performing an update via USB drive. This error can be because of corrupt system files, viruses, missing or incomplete update files, issues with some software. It comes with an error message, ‘Installer encountered an error.’ There can be a different error message as well, depending on the situation.
17 Solutions To Fix Error 0x8007000d
You may find the list of solutions long to fix error 0x8007000d in Windows 10. Well, the reason for this is users experience 0x8007000d in different situations like upgrading, updating, and activating Windows. And also, there is no one fixed reason to face this error in Windows 10.
1. Run Windows Update Troubleshooter
As error 0x8007000d is the Windows update error code, the first thing you can do to fix it is run the Windows Update troubleshooter. The troubleshooter is inbuilt in Windows, and you can access it easily via the Settings app.
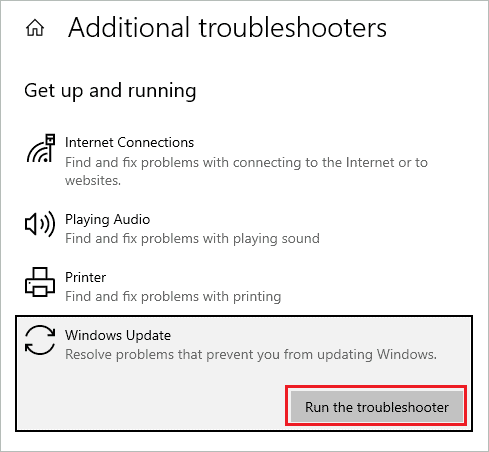
Press Windows key + I to open the Settings app and go to the Update & Security section. Then, from the left panel, go to Troubleshoot and click on Additional troubleshooters.
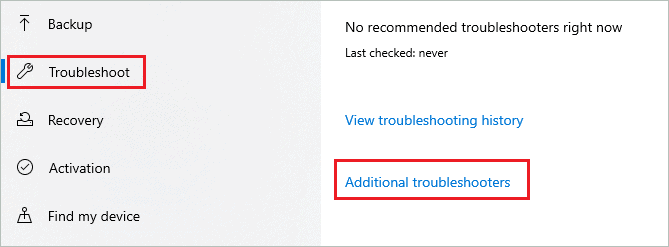
Click on Windows Update and then click on the Run the troubleshooter button.
Let Windows scan and fix the issues. Then, you can reboot the PC after Windows fixes the error and check if you can begin the update process.
2. Run SFC Command
One of the reasons to experience 0x8007000d installation errors is misconfigured and corrupted system files. You can use the SFC (System File Checker) utility to scan and fix Windows problems with system files.
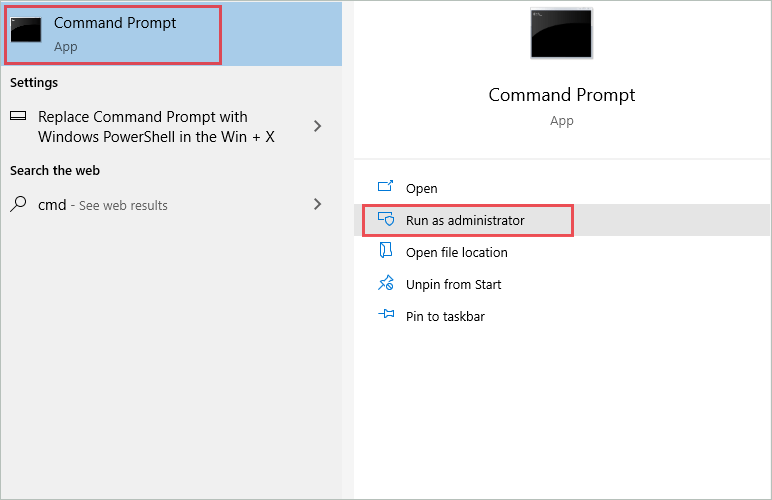
Type cmd in the Start menu’s search box and click on Run as administrator for Command Prompt from the search results.
In the Command Prompt window, type sfc /scannow and press Enter to execute it.
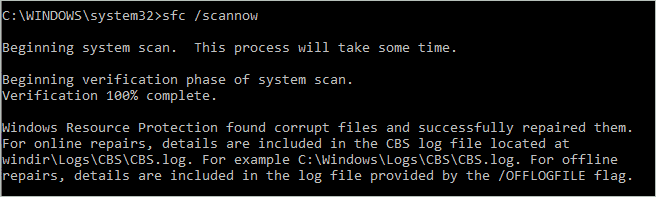
The command execution may take time; make sure you do not close the terminal window in between.
Once the command is executed and Windows repairs the corrupt files, you can reboot the PC.
3. Check for Viruses and Malware
If a virus and malware are residing on your computer, you can have many issues while using it. You can scan for viruses using third-party antivirus programs or Windows inbuilt security features. The below steps are for the Windows Security app.
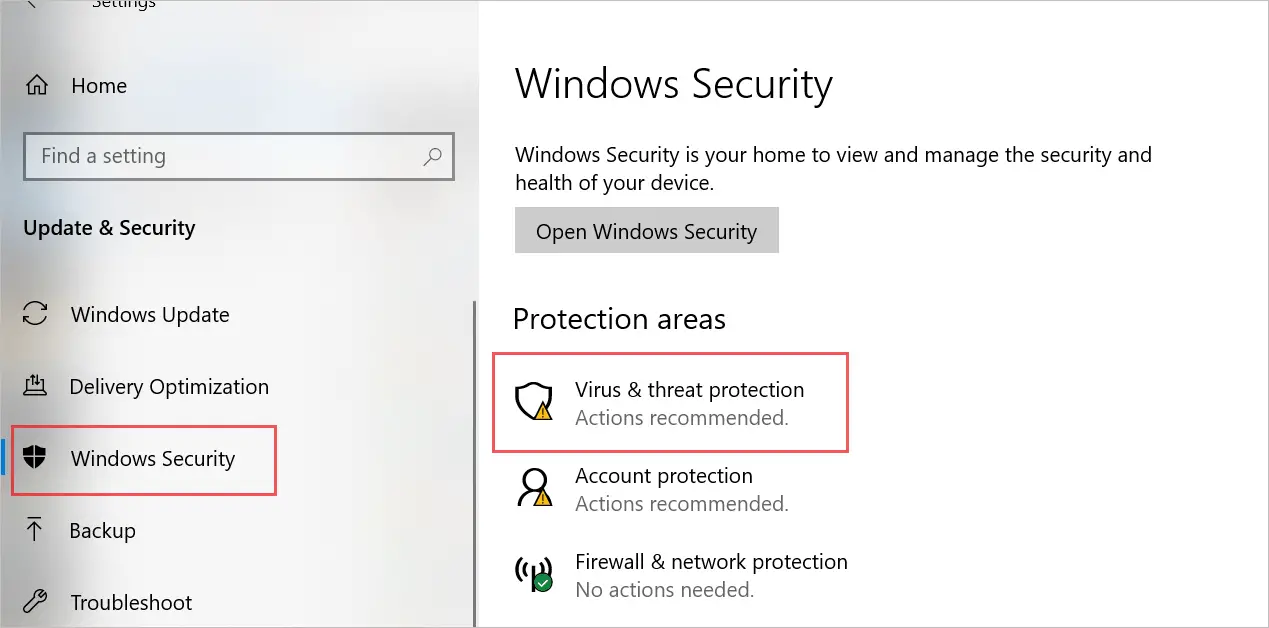
Step 1: Open the Settings app and click on Update & Security.
Step 2: Go to the Windows Security section from the left panel and click on Virus & threat protection under Protection areas.
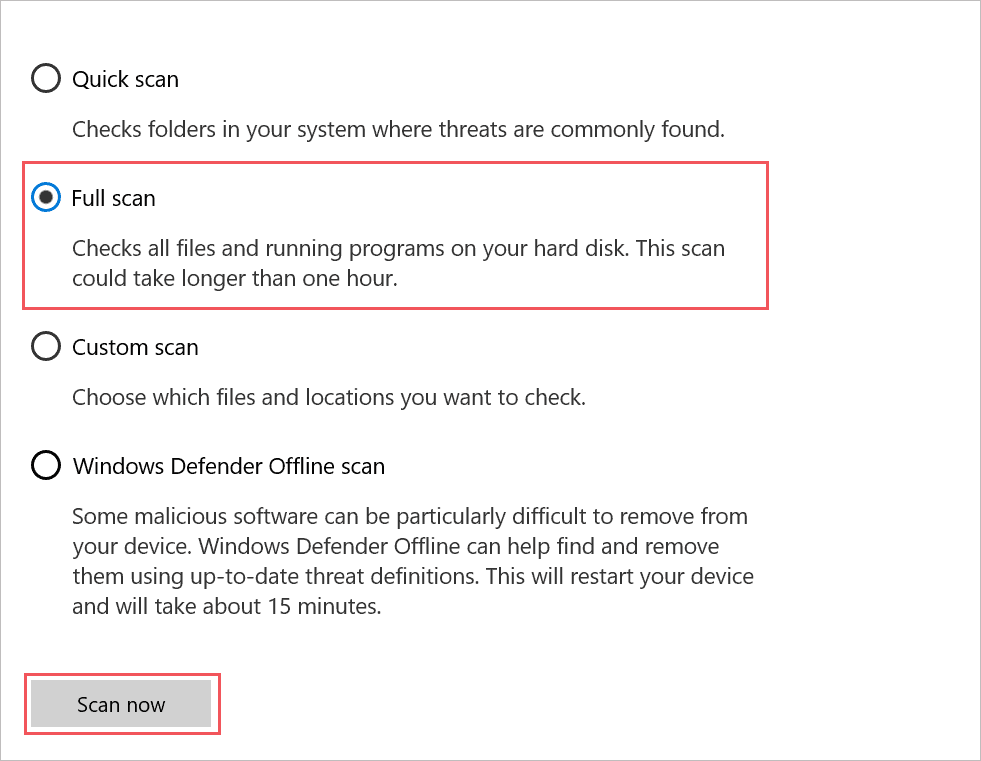
Step 3: Click on Scan options on the next window.
Step 4: Select the Full scan option and click on the Scan now button, to begin with, the scan.
Windows will scan and remove all the viruses from your computer. You need to reboot the PC after the scan. After the PC restarts, check if you could eliminate error 0x8007000d in Windows 10.
4. Uninstall Mixed Reality Portal
Many Windows users got rid of the error code 0x8007000d by uninstalling Mixed Reality Portal. You can try removing this app temporarily from your computer.
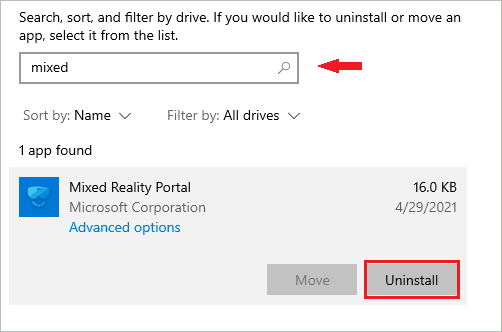
Open the Settings app and go to App. In the App window, search for ‘mixed’ in the search bar.
When the Mixed Reality Portal comes up, click on it and then click on Uninstall button.
After removing the app, reboot your PC and try updating the Windows. You can install the application again once the Windows update is installed.
5. Use DISM Utility
You can use the DISM (Deployment Image Servicing and Management) utility to fix the 0x8007000d error. This utility also needs to be used via Command Prompt terminal.
Open Command Prompt with administrator privileges and execute the below command in the terminal window.
dism /online /cleanup-image /restorehealth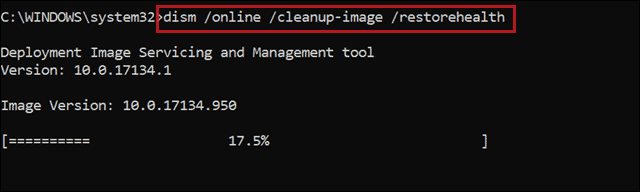
You will be able to activate or update your Windows after executing this command.
6. Reset Windows Update Components via Command
If you still cannot update Windows, you can try resetting Windows update components using Command Prompt. If there are some issues with these components, a quick rest will fix them.
Run Command Prompt as administrator and execute the below commands one by one in the terminal prompt. The commands will stop the Windows update service.
net stop bitsnet stop wuauservnet stop appidsvcnet stop cryptsvcOnce you stop the components, delete the qmgr*.dat file by executing the following command.
Del “%ALLUSERSPROFILE%\Application Data\Microsoft\Network\Downloader\qmgr*.datNow, go to the System32 folder from your Command Prompt. You can type the following command –
cd /d %windir%\system32Press Enter to enter the System32 folder. When you enter the System32 folder, execute the below command one by one.
regsvr32.exe atl.dllregsvr32.exe urlmon.dllregsvr32.exe mshtml.dllregsvr32.exe shdocvw.dllregsvr32.exe browseui.dllregsvr32.exe jscript.dllregsvr32.exe vbscript.dllregsvr32.exe scrrun.dllregsvr32.exe msxml.dllregsvr32.exe qmgrprxy.dllregsvr32.exe wucltux.dllregsvr32.exe muweb.dllregsvr32.exe wuwebv.dllregsvr32.exe msxml3.dllregsvr32.exe msxml6.dllregsvr32.exe actxprxy.dllregsvr32.exe softpub.dllregsvr32.exe wintrust.dllregsvr32.exe dssenh.dllregsvr32.exe rsaenh.dllregsvr32.exe gpkcsp.dllregsvr32.exe sccbase.dllregsvr32.exe slbcsp.dllregsvr32.exe cryptdlg.dllregsvr32.exe oleaut32.dllregsvr32.exe ole32.dllregsvr32.exe shell32.dllregsvr32.exe initpki.dllregsvr32.exe wuapi.dllregsvr32.exe wuaueng.dll|regsvr32.exe wuaueng1.dllregsvr32.exe wucltui.dllregsvr32.exe wups.dllregsvr32.exe wups2.dllregsvr32.exe wuweb.dllregsvr32.exe qmgr.dllNow, you need to reset the Winsock and proxy before starting the Windows Update components again.
netsh winsock resetnetsh winhttp reset proxy At last, restart the Windows update components again by executing the below commands one by one.
net start bitsnet start wuauservnet start appidsvcnet start cryptsvcAfter all the commands are executed, reboot your PC and check if you can update the Windows without any error.
7. Run Program Compatibility Troubleshooter
If you are getting a 0x8007000d error while installing a driver update, you can run Program Compatibility Troubleshooter to resolve the error. At times, there might be some compatibility issue with the setup file preventing you from installing it. Windows inbuilt troubleshooter can be of real help in such situations.
Press Windows key + E to open File Explorer and head towards the driver setup file. Next, right-click on the setup file and select Troubleshoot Compatibility from the context menu.
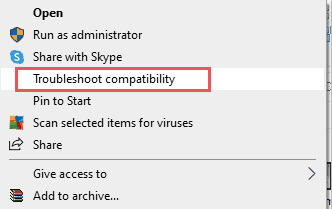
When the Troubleshooter window shows up, click on Troubleshoot program.
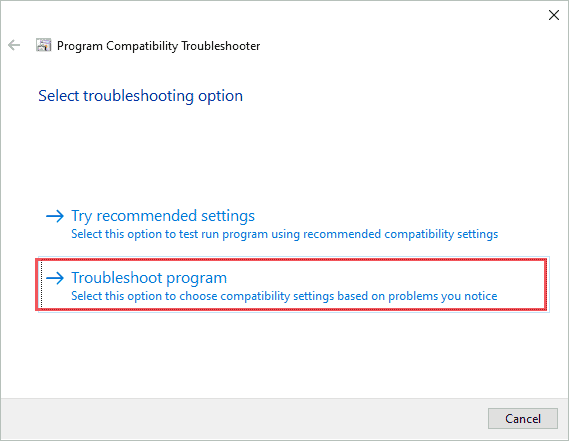
You need to select the issue you are having with the driver on the next screen and click Next. Now, on the next screen, select the older version of Windows. We recommend Windows 7, but you can choose any version. Click on Next.
Select Test the program. You can now run the setup normally, and if it works normally, select ‘Yes, save these settings for this program’ at the end. Mostly, you will get your driver update installed on your computer this way.
8. Delete Contents from SoftwareDistribution Folder
If the downloaded update file is corrupted, you may not be able to install the update. In such a scenario, you can delete the downloaded update files.
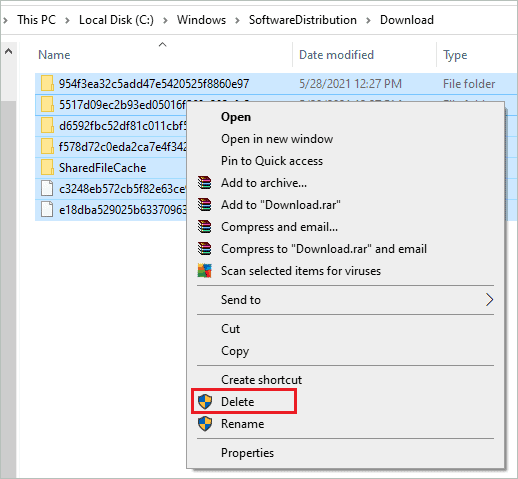
Open the File Explorer and navigate to –
C:\Windows\SoftwareDistribution\Download Select all the contents of the Download folder; you can do so by pressing Ctrl + A key.
Next, right-click on the selected contents and select Delete from the context menu. You will have to empty the Recycle Bin as well.
Alternatively, you can press Shift + Delete to delete the files from the Download folder permanently. If you use Shift + Delete, there is no need to clear the Recycle Bin.
Once everything is deleted, reboot your PC and download the update again. If corrupt downloaded files were an issue, you would be able to install the update this time.
9. Edit Local Group Policy Editor
You can make changes in Local Group Policy Editor to fix error code 0x8007000d in Windows 10. Well, the Group Policy Editor is available only for Professional and Enterprise users. If you are Home users, you can move on to the next solution.
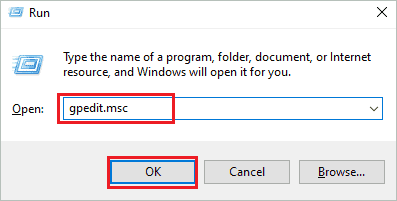
Press Windows key + R to open Run and type gpedit.msc there. Click OK to open Local Group Policy Editor.
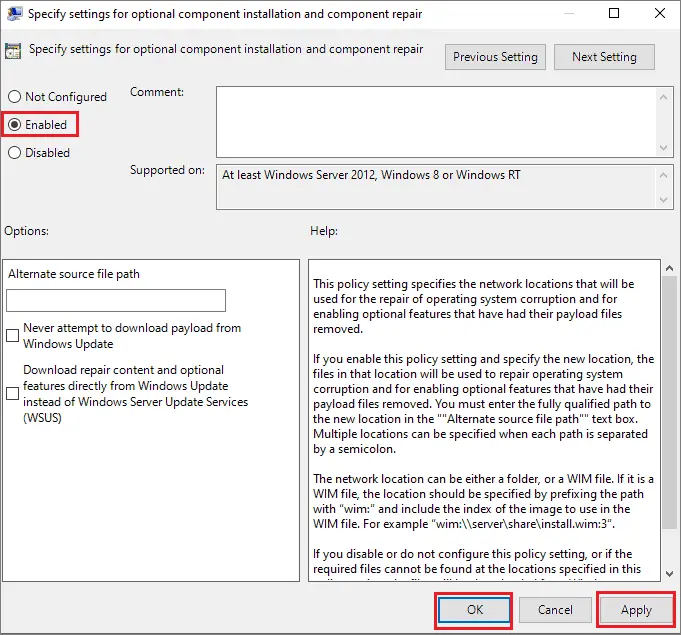
Go to Computer Configuration ➜ Administrative Templates ➜ System from the left panel. Now, search for ‘Specify settings for optional component installation and component repair’ and double-click on it when found.
Next, select Enabled and click on Apply. Finally, click on OK to close the window.
Close the Local Group Policy Editor and reboot your PC. You can now try activating or installing Windows and check if the error is resolved or not.
10. Perform a Clean Boot
If you are not able to activate Windows, you can try performing the clean boot. You can get hold of any third-party software causing the error by performing the clean boot.
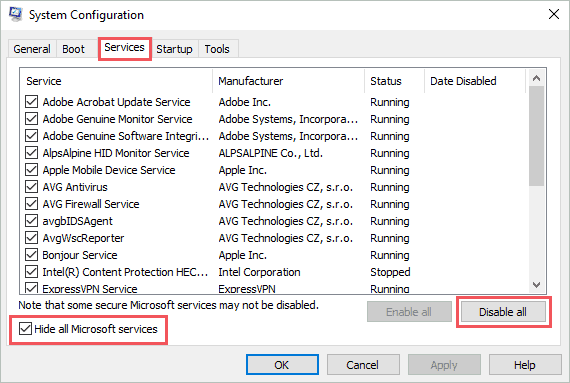
Step 1: Open Run by pressing Windows key + R and type msconfig in the text box. Press Enter to open the System Configuration window.
Step 2: In the System Configuration window, go to the Services tab and check the checkbox next to ‘Hide all Microsoft services.’
Click on Disable all to disable third-party services.
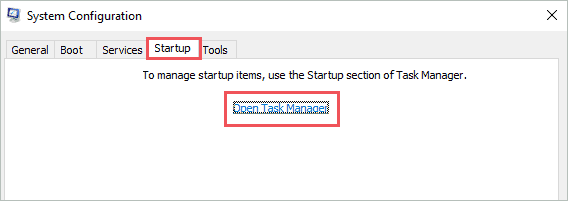
Step 3: Navigate to the Startup tab and click on Open Task Manager.
Step 4: Make sure you are in the Startup tab in the Task Manager. Now, click on the programs that are not needed and click on the Disable button.
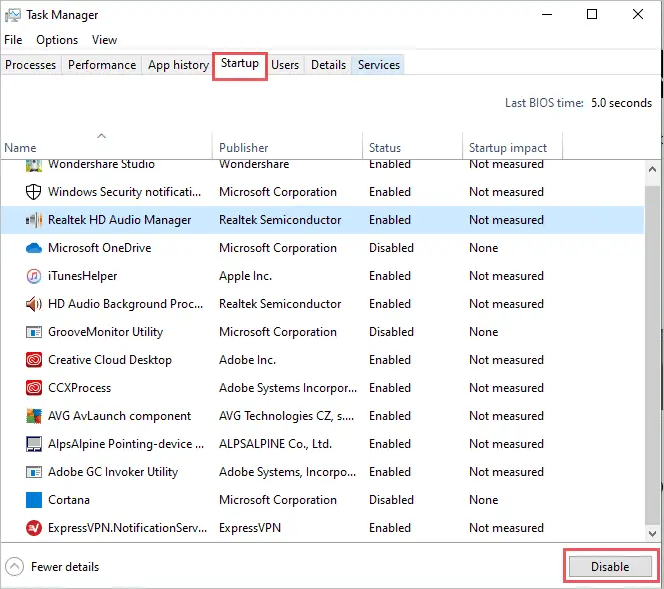
Save all the changes and close all the windows. Then, restart your PC and check whether you can perform an update without getting a 0x8007000d error.
If you were able to install the update, enable the services and programs one by one to find the culprit. The entire process may take time, but you will permanently get rid of the error.
11. Modify Registry
Another way to fix the 0x8007000d error code in Windows 10 is to make changes in the Registry Editor. However, we recommend backing up the registry before making any changes to it. The registry stores the crucial information and can cause issues if something goes wrong.
Open Run and type regedit there. Click OK or press Enter to open the Registry Editor. In the Registry Editor, go to the below-mentioned path.
HKEY_LOCAL_MACHINE\SOFTWARE\Microsoft\Windows\CurrentVersion\WindowsUpdate\OSUpgradeIf you don’t find the OSUpgrade folder, you can create it manually. To do so, right-click on the WindowsUpdate from the left panel and select New ➜ Key.
Name the new key as OSUpgrade.
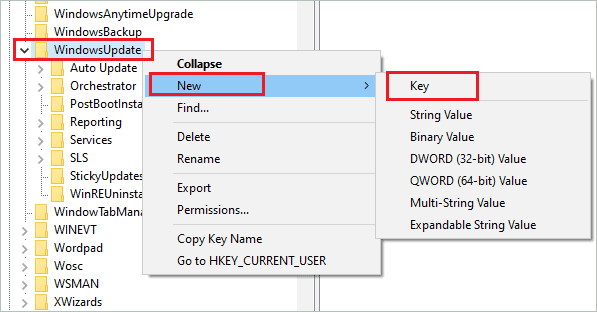
Once the OSUpgrade key is created, right-click on it and select New ➜ DWORD (32-bit) Value. Now, name the DWORD as AllowOSUpgrade.
Next, double-click on AllowOSUpgrade and change its value data to 0x00000001. Once the changes are made, close the Registry Editor and reboot your computer.
12. Clear Windows Previous Installation Files
You can clear the contents of $WINDOWS.~BT folder in Windows 10 to fix the error you are currently experiencing. However, when you delete the contents of this folder, you will no longer be able to roll back Windows to previous versions. You need to proceed with this solution with caution.
Open File Explorer on your computer and go to C:\$Windows.~BT location. You need to delete all the contents from the $WINDOWS.~BT folder.
Once the contents of the mentioned folder are cleared, you can use the Media Creation Tool to update Windows. You will be able to update Windows without a 0x8007000d error.
13. Run Windows 10 Activation Troubleshooter
If you cannot activate Windows 10 because of the 0x8007000d activation error code, you can run the troubleshooter. Well, this troubleshooter only appears if there is an issue with Windows activation.
Open the Settings app and go to Update & Security. Next, navigate to the Activation section from the left panel.
Scroll down to the end of the window and click on Troubleshoot link. The troubleshooter will try to find and fix issues with activation.
If it does not find any specific issues, it will inform you about the same. Then, you can move on to the next solution if the troubleshooter fails to find and resolve the Windows error you are experiencing.
14. Give Full Permission to Root Key in Registry Editor
If you are getting activation error 0x8007000d while activating Windows via Command Prompt, there might be some issues with Root directory permissions. Well, this permission issue will be resolved by making changes in the Registry Editor.
Open Registry Editor and navigate to the below-mentioned path.
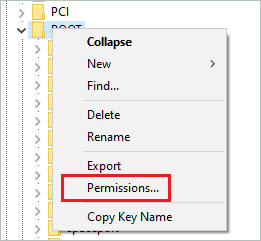
HKEY_LOCAL_MACHINE\SYSTEM\CurrentControlSet\Enum\ROOTOnce you reach the ROOT folder, right-click on it from the left panel and click on Permissions from the context menu.
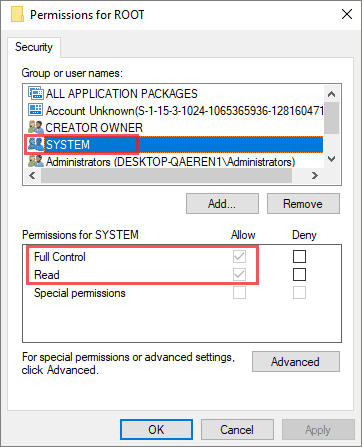
Now, click on the SYSTEM under Group or user names and check under Permissions for SYSTEM. There should be a checkmark next to Full Control under the Allow column.
If the permission is only for Read, proceed with the below instructions to change it. However, if you have complete control, you can skip this solution and move on to the next one.
Click on the Advanced button in the Permissions for ROOT window. Select SYSTEM and then click on the Add button.
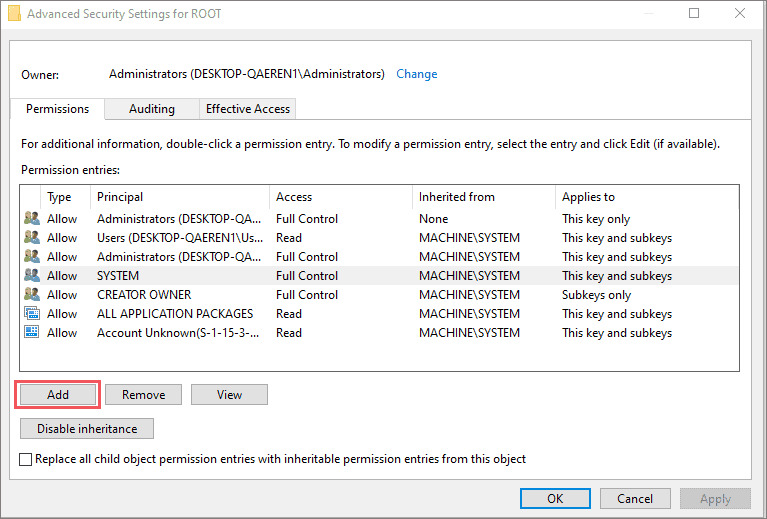
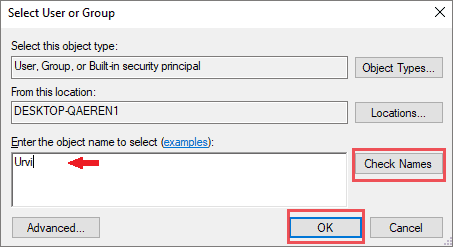
On the next window that pops up on your screen, click on Select a principal. In the Select User or Group dialog box, add your account name and click on Check Names.
Once the account name is confirmed, click on OK.
Now, when you come back to the Permission Entry for ROOT, click on Full Control under Basic permissions.
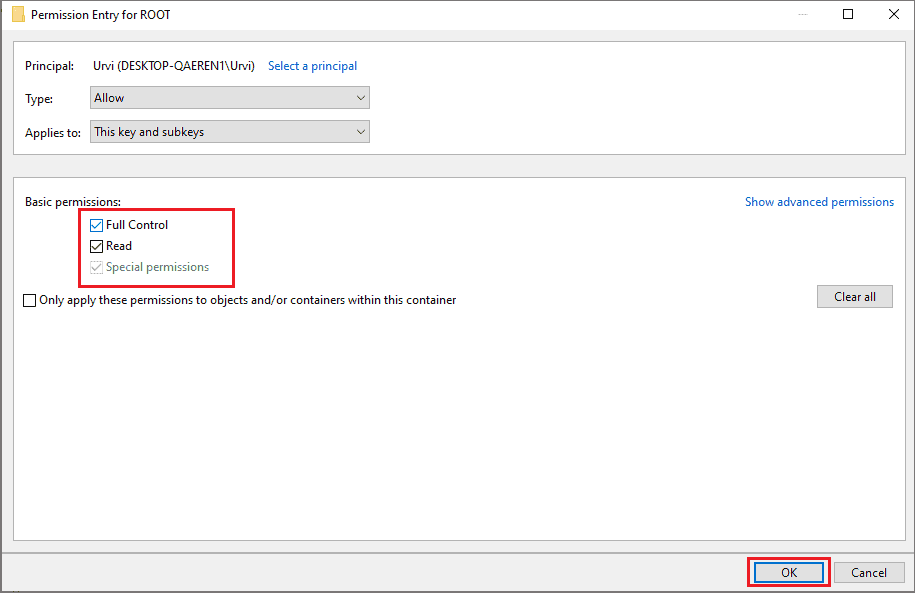
You can try reactivating Windows after changing the permissions and check if it happens without error.
15. Activate Windows by Mobile Phone
The last option to activate your Windows OS is to use a phone. If error 0x8007000d is still troubling you, activating Windows by phone can be of help.
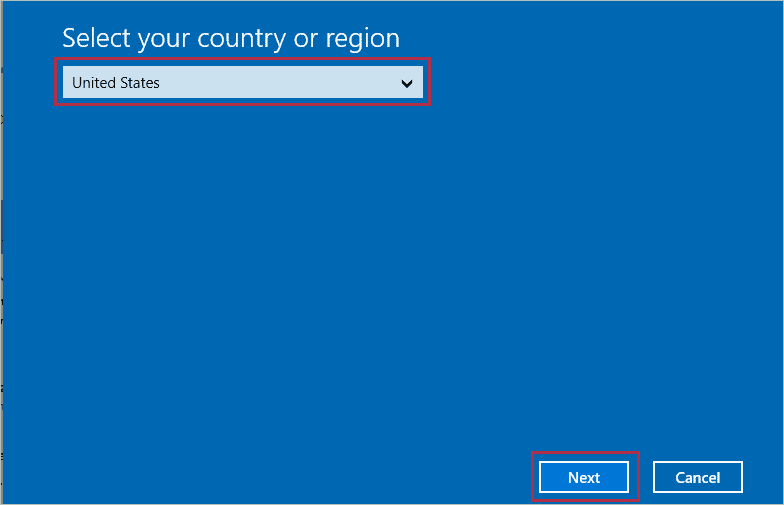
Press Windows key + S and type slui.exe 4 in the search box. Open the same from the search results.
When the blue window appears on your screen, select your country and click on Next.
Now, call the toll-free number you see on your screen from your mobile phone. Make sure you keep the installation ID (IID) ready before you call the toll-free number.
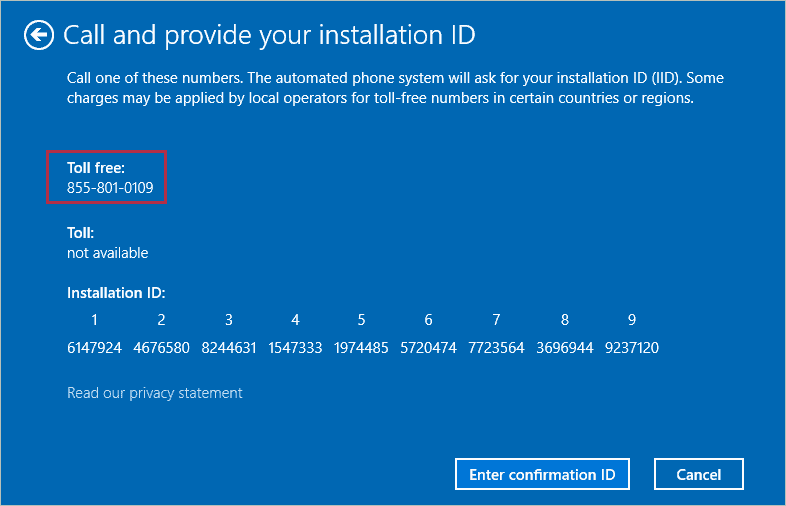
Once you get the confirmation ID, click on the Enter confirmation ID button. On the next screen, you will see boxes to enter the confirmation ID, enter it and click on Activate.
Your Windows will be activated with this process quickly and without any errors.
16. Create a New Bootable USB Drive
If you try to upgrade via a USB drive and experiencing errors like 0x8007000d, you need to create a new bootable flash drive. You can use the Media Creation Tool to create the latest installation media.
The bootable USB drive can have errors if the installation files are corrupted or the USB has some issues with it. A new USB drive will help you get rid of all errors.
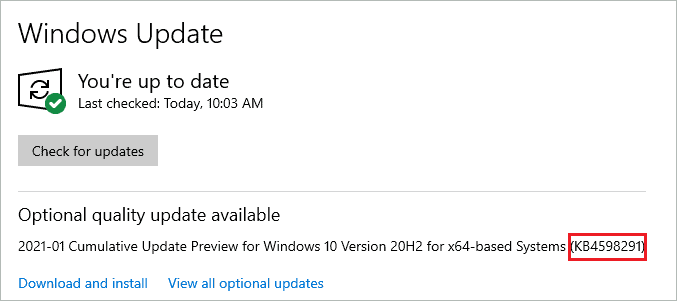
17. Manually Download the Update
You can manually download the update from the Microsoft Update catalog. You need to check the update version number, which is the Knowledge Base (KB) number, to download the update.
To find the KB number, open Settings and go to the Update & Security section. Click on Windows Update from the left panel.
You will see the KB number below the update that is pending.
Once you get the KB number, go to Microsoft Update Catalog and enter the KB number in the search box.
You can download the Windows update file that is required.
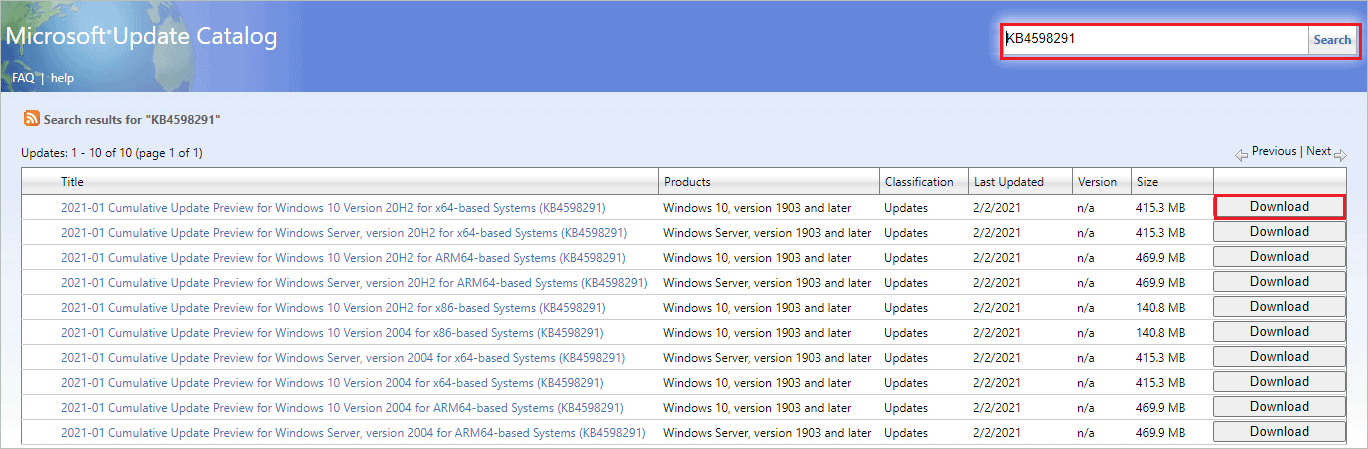
Next, double-click on the downloaded file to install the update.
In this way, you will be able to update Windows 10 OS without any error.
Conclusion
It can be annoying when you cannot update Windows OS and are stuck with old features. The Windows 10 update errors can prevent you from installing the update. Well, error 0x8007000d can cause issues while installing the update and prevent you from activating Windows.
The 0x8007000d error can show up because of different reasons and can be fixed by some workarounds. If the issue is not that severe, Windows troubleshooters can help you get rid of it quickly. However, if the error is because of unknown reasons, you may have to modify registries and change permissions of the ROOT directory.


