Microsoft officially launched Windows 11 on 5th October 2021. People are busy discussing Windows 11 system requirements even before its launch, as Microsoft has been strict and demanding this time. You can manually check for Windows 11 compatibility with your computer.
Knowing your system’s configuration makes it easier to see if your PC is supported by Windows 11 or not. In addition, the guide can help you to check for compatibility with Windows 11 manually. This way of checking compatibility can be helpful if you are not comfortable using the compatibility checker app called PC Health Check.
How to Check for Windows 11 Compatibility?
To check for Windows 11 compatibility, you can go through the minimum system requirements mentioned below one by one and check for its compatibility based on your Windows PC configuration.
Processor
You need a compatible 64-bit processor or System on Chip (SoC) with 2 or more core and 1 gigahertz (GHz) or faster speed. If your processor is 3 to 4 years old, it will be compatible with Windows 11. First, however, you can check the processor details to know if it has the configurations mentioned above.
You can get the details about your processor in the Settings app.
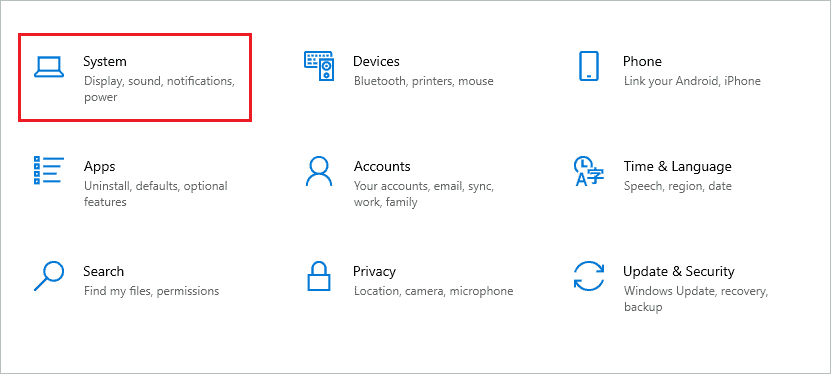
Press Windows key + I to open the “Settings” app and go to the “System” from the Settings menu. Now, from the left panel, click on “About.”
Under Device specification, look for “Processor” and check the details next to it.
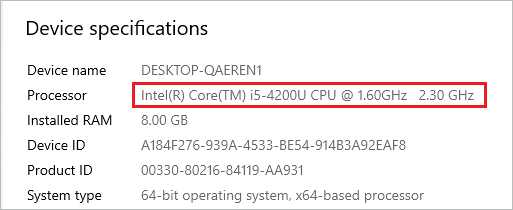
Once you get the details, you can look up the official source to check if the processor is compatible with Windows 11 or not. You can find all supported processor details in Microsoft documentation.
Some of the common processor documentation is mentioned below.
Windows 11 supported Intel processors
Windows 11 supported AMD processors
You can also find the details regarding compatible processors on the manufacturer’s website.
RAM (Random Access Memory)
To check for Windows 11 compatibility, you at least need 4 Gigabytes (GB) of RAM to run Windows 10 on your computer.
You can find the RAM details in the Settings app. So all you need to do is navigate to Settings app ➜ System ➜ About to check the RAM size.
If the RAM does not meet minimum requirements, you can simply upgrade it as it is easier to upgrade RAM than any other hardware piece on your PC.
Storage
The computer needs a minimum of 64 GB of storage available to install Windows 11. In addition, you will need more space in the future to download and install operating system updates. Therefore, it is recommended to have storage space of more than 64 GB.
You can check the storage on your computer by going to the Settings app ➜ System ➜ Storage.
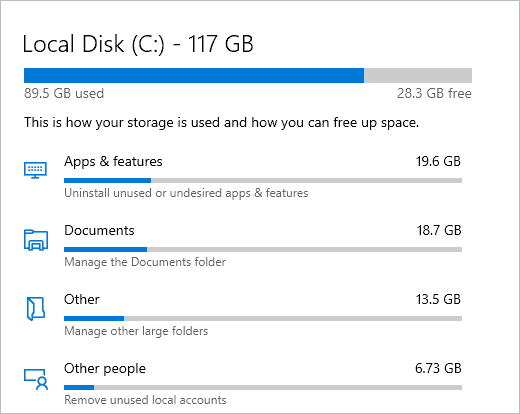
Here, you will see all the drive details and available storage information.
System Firmware
You need to have UEFI firmware that is secure boot capable. At times, the PC may have secure boot capabilities, but it is disabled by default. You need to enable secure boot manually in such a scenario.
To check if your PC is secure boot capable or not, type “msinfo32” in the Start menu and open “System Information” from the search results.
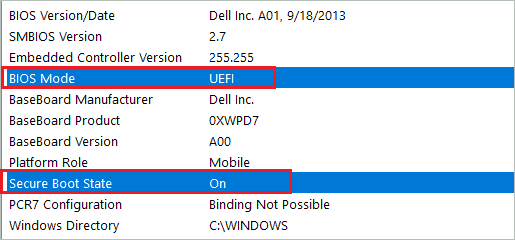
From the left panel, click on “System Summary” and search for “BIOS Mode” and “Secure Boot State.”
The BIOS Mode should be UEFI, and Secure Boot State should be On to run Windows 11. If the Secure Boot State shows Unsupported, it means your PC does not have this capability.
And if the Secure Boot State shows Off, you need to turn it on via BIOS.
You can get the details to enable secure boot on the motherboard manufacturer website.
TPM (Trusted Platform Module)
Microsoft has focused more on the security aspect of Windows 11. Another vital check for Windows 11 compatibility is TPM. It is essential to have TPM on your computer to upgrade to Windows 11. In addition, you need to have TPM version 2.0 on your computer.
TPM provides security and privacy on the hardware level, thus making it difficult for intruders to get into your system.
While doing the manual check for Windows 11 compatibility, you need to make sure TPM is present as well as enabled. If the TPM 2.0 is not enabled from BIOS, there can be issues while upgrading to Windows 11. However, it is easy to enable TPM 2.0 via the BIOS of your PC.
Graphics Card
You need DirectX 12 or later, with a WDDM 2.0 driver graphics card to install Windows 11. Well, this requirement was not an issue on many computers. The PC Health Check app doesn’t even check the graphics card as the eligible device will meet the graphics card requirements.
You can still check graphics card details on your Windows 10 computer manually to avoid issues after installing Windows 11. If your PC meets the processor requirements, it will for sure meet graphics card and display requirements.
Display
The minimum requirement for display is HD (high definition) and 720p display, more than 9” diagonally, along with 8 bits per color channel.
You can get the display details in the graphics card details. You need to go to Settings app ➜ System ➜ Display and click on “Advanced display settings.”
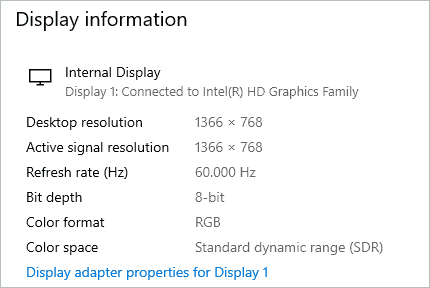
You can find resolution and bit depth here. The other details can be found in the monitor or laptop manual.
Internet Connection and Microsoft Account
Windows 11 Home edition requires Internet connectivity and a Microsoft account. So, if you are thinking of upgrading to the Windows Home edition, you need to have both.
Also, you need Internet access to download and install updates in every Windows 11 edition. Some applications and features may require you to have Internet connectivity.
Feature-specific Requirements
The above requirements are a must to run Windows 11 on your computer. However, some additional requirements are needed to use features and applications on Windows 11. It is something one must check for Windows 11 compatibility. Although these requirements are not a must to upgrade to Windows 11, they can help you explore OS to a greater extent.
The 5G support, microphone, speaker, multi-touch support, camera, and many other hardware components can help you make the most out of Windows 11 OS. In addition, you can check feature-specific requirements to know what is needed to use which app/features in Windows 11.
Final Thoughts
It is essential to check for Windows 11 compatibility before starting the upgrade process. You can either perform all the compatibility checks manually or use the Windows PC Health Check app to do it for you. The manual checks can be done quickly if you are aware of your system configurations or know how to get the details about them.
You need to check the processor, RAM, storage, system firmware, TPM, graphics card, and display of your computer to see if they meet minimum requirements set by Microsoft for Windows 11. It is vital to meet all the basic requirements to use Windows 11 with updates and without issues.


