Windows users are excited as well as nervous about the new Windows 11. The excitement of using new features and the user interface has kept us hooked on Windows 11. However, the minimum system requirements have disappointed many users. It is easy to upgrade to Windows 11 from Windows 10, but only if your system is compatible with the new operating system.
Windows 11 has been made available for everyone on 5th October 2021. And if your system is compatible, you will receive an option to upgrade to Windows 11 in the Windows update settings window. However, not all users will receive updates now; Microsoft said it will send updates to all supported PCs by the first half of 2022.
Many users are happy with Windows 10 features and don’t wish to upgrade to Windows 11. You can check out the detailed guide below and then decide whether you want to upgrade to Windows 11 or not.
What’s New in Windows 11?
Windows 11 features have attracted many tech-savvy users. However, you can check out some of the amazing Windows 11 features below before upgrading.
- Maximize your productivity by optimizing the screen space. Also, get your tasks done quickly with Windows 11 easy-to-use tools.
- Connect with Microsoft Teams with a few clicks for easy calling and chatting
- The multitasking tools like Desktops and Snap layouts make multitasking easy for users.
- Increased gaming performance for gamers
More features will be added to Windows 11 with major updates released by Microsoft in the future. If you are tempted to upgrade Windows 10 to 11 for the above features, check out compatibility and system requirements first.
System Requirements for Windows 11
Many older PCs running Windows 10 smoothly cannot upgrade to Windows 11 because of demanding system requirements. The minimum hardware requirements for Windows 11 are as below:-
- Processor – 1 gigahertz (GHz) or faster with 2 or more cores on a compatible 64-bit processor or System on a Chip (SoC).
- RAM – 4GB
- Storage – 64 GB or more
- System firmware – UEFI, Secure Boot capable
- TPM – Trusted Platform Module (TPM) 2.0
- Graphics card – DirectX 12 or later with WDDM 2.0 driver
- Display – High definition (720p) display greater than 9” diagonally, 8 bits per color channel
You can also check extended Windows 11 system requirements to know feature-based requirements as well. The outdated computers do not meet TPM 2.0 and processor requirements in most cases.
Check Device Compatibility
You need to check device compatibility to upgrade Windows 10 to 11. There are two ways to do so: to use the PC Health Check app and to check for Windows 11 compatibility manually. If you are not aware of PC configurations, using the PC Health Check app will be wise.
If you know the major configurations of your computer, manually checking for compatibility will be an easy job. However, as mentioned above, TPM, processor, and RAM would be significant limitations on older PCs.
In many cases, people have firmware TPM, and it is not enabled via BIOS. You need to know what TPM is and if it’s present on your computer. Also, how to enable TPM 2.0 from BIOS to upgrade to Windows 11.
Along with TPM, you may also need to check and enable secure boot on your computer to perform Windows 11 upgrade. For Asus systems, you can refer to our thorough guide to enable secure boot on Asus computers. And for AMI motherboard, check out how to enable secure boot on American Megatrends BIOS.
In the processor case, you may either need to change your computer’s processor if possible or purchase a new PC with a compatible processor. If the RAM or storage is an issue, you can upgrade it conveniently on the existing system.
Backup Windows 10 Before Upgrade
Although Microsoft Windows 11 upgrade is easy and you don’t need to perform a clean install, there are chances of things going wrong. Therefore, you should backup Windows 10 PC before you upgrade Windows 10 to 11.
If you only wish to backup files, folders, and data, you can use File History. However, if you want to clone the entire system, you can use System Image as a backup tool.
You can downgrade Windows 11 to Windows 10 within ten days of your upgrade, but it is still essential to have a backup in case of a crash or issues during the upgrade.
Once you have the Windows 10 backup ready, you can upgrade to Windows 11. Microsoft has made the upgrade process very easy for everyone, and it is also offering a free upgrade from Windows 10 to 11. You don’t need to do a clean install or create an installation media to upgrade to Windows 11. However, if required, you can opt for that way too.
How to Upgrade to Windows 11 from Windows 10?
There are three ways to upgrade Windows 10 to 11 –
1. Use the Windows Update Utility
2. Use Windows 11 Installation Assistant
3. Use Windows 11 Installation Media
Let’s look at each one of them in more detail.
Use Windows Update
Microsoft recommends upgrading to Windows 11 via Windows Update. It is an easy way to perform Microsoft Windows 11 upgrade. However, you may need to wait until the upgrade is made available for your computer.
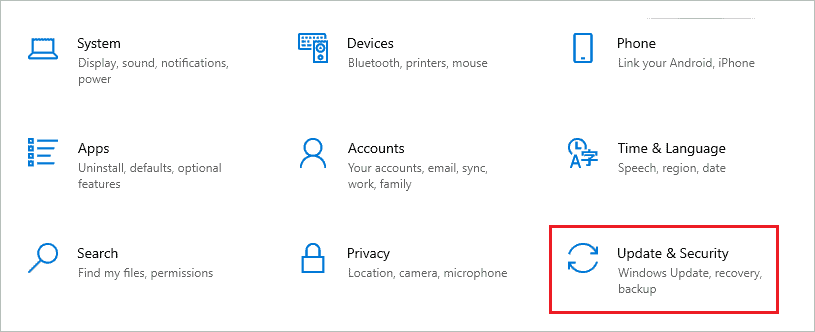
Step 1: Press Windows key + I to open the “Settings” app and go to the “Update & Security” section.
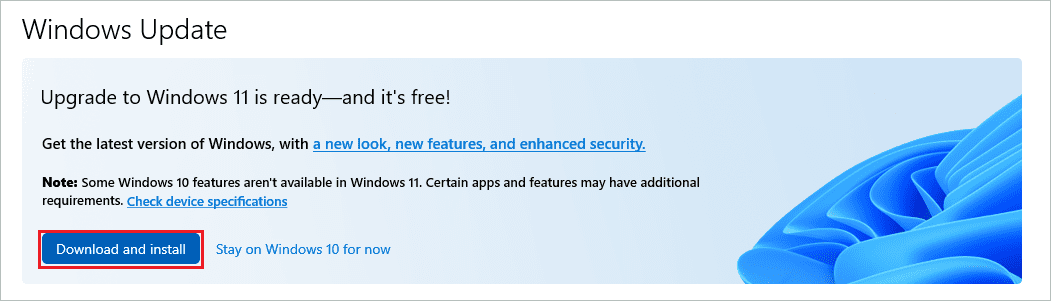
Step 2: Now, go to “Windows Update” from the left pane.
Step 3: Click on the “Download and install” button in Upgrade to Windows 11 is ready – and it’s free.
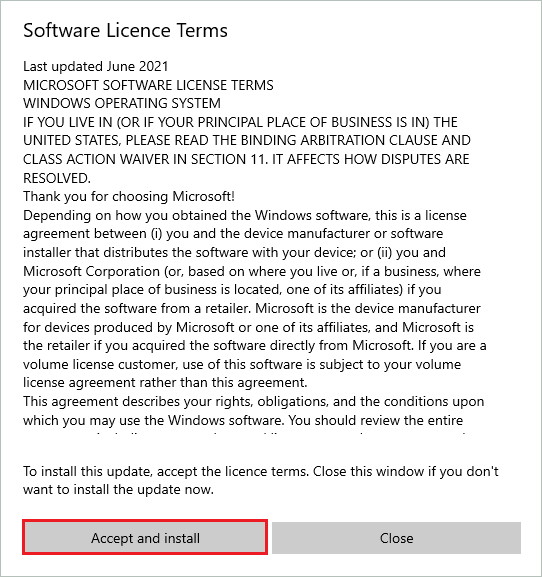
Step 4: Click on “Accept and install” to begin the installation process.
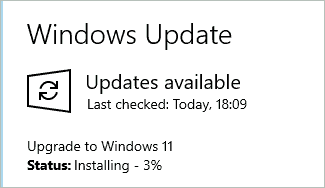
Step 5: The packages for Windows 11 will start downloading and installing one by one. You can check the download and installation progress in Windows Update settings itself.

There will be few downloads and installs happening in the background, thus reducing the overall time of upgrading Windows 10 to 11.
Step 6: Once everything is downloaded and installed, a restart is required. You will see a notification to click on the “Restart now” option to reboot your PC.

Step 7: If you don’t get the notification or missed it for some reason, you can go to Settings app ➜ Update & Security ➜ Windows Update and click on the “Restart now” button.
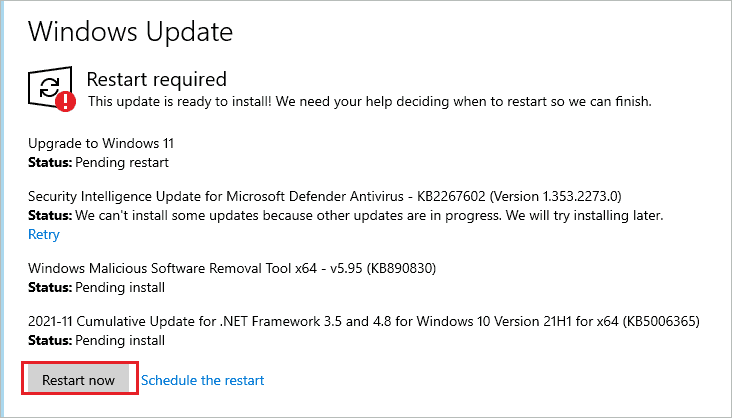
You can also schedule the restart for later if you are currently doing something else on your computer.
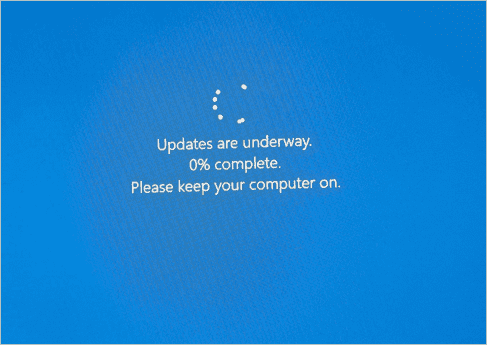
Step 8: On restarting the computer, you will see a blue screen saying, ‘Updates are underway. 0% complete. Please keep your computer on.’ So make sure the system is not turned off in between.
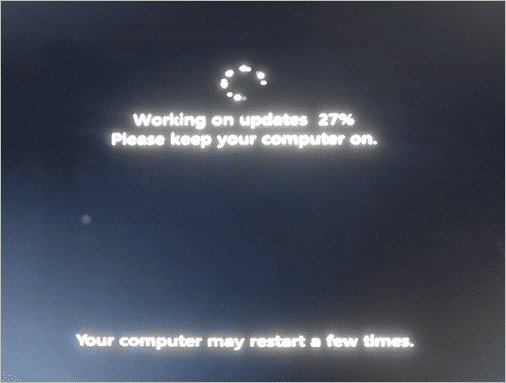
Step 9: The system will go blank for some time, and you will see the ‘Working on updates 27% Please keep your computer on.’ message on the black screen. The percentage shown may differ and increase as the update proceeds.
The PC will restart a few times in the process.
The PC will restart, and you can log in to your preferred account using the old credentials.

The time taken to upgrade Windows 10 to 11 depends on the Internet connection and speed. For us, it took 1.5 hrs, but it will differ from system to system.
One plus point of updating this way is that the settings and files remain as they are. So there is no change in any of your data.
If a Windows 11 update is available for your PC, you will see it here. However, if there are no updates and your PC is compatible, you may receive the update in some days. And we recommend updating the PC using this way only as it is as simple as performing Windows 10 version updates.
Use Windows 11 Installation Assistant
If your PC is compatible with Windows 11 and you have not yet received the upgrade option in the Settings app, you can use Windows 11 Installation Assistant. Make sure you are in the administrator account while performing the below steps.
Step 1: Download Windows 11 Installation Assistant from the official source.
Step 2: Double-click on the executable file and click on Run.
Step 3: The Installation Assistant will check the device compatibility, and if your PC is compatible, you will be presented with a license term. On the license term, choose “Accept and Install.”
Step 4: When the tool is done with all the prerequisites, click on the “Restart Now” button to start with Microsoft Windows 11 upgrade.
During the upgrade, your PC will restart multiple times; make sure the computer is not turned off in between the upgrade.
Use Windows 11 Installation Media
Although Microsoft does not recommend using Installation Media to upgrade to Windows 11, you can still try this method for a clean installation. Unfortunately, this way of upgrading Windows 11 requires technical expertise. However, once you go through the steps, the process may seem easier, especially if you do it for the first time.
Step 1: Download Windows 11 Installation Media and run it on your computer.
Step 2: Accept the license agreement when it shows up.
Step 3: On the “What do you want to do?” window, select “Create installation media for another PC” and then click on “Next.”
Step 4: Select the language along with edition and architecture (64-bit) for Windows 11.
Step 5: Select the media you wish to use. If you use a USB drive, make sure it has at least 8 GB of storage space.
Step 6: Now, attach the USB flash drive to the PC you wish to upgrade. If the PC does not boot via a USB drive, you need to change the boot order in BIOS.
To change the boot order, refer to the documentation and manual that came along with the PC.
Step 7: Once the PC boots with the installation media, select language, time, keyboard, and other preferences on the installation page.
Step 8: Select Install Windows to begin with the upgrade.
If you are using a CD or DVD, you need to burn the ISO file onto it.
The process is similar to creating installation media for Windows 10, so if you have done it for Windows 10, doing it for Windows 11 might be easier. Ensure the power supply is not stopped between the upgrade, especially if you use a desktop computer. The installation may take some time; make sure the system is not turned off in between.
What Are The Risks Of Running Windows 11 On An Unsupported PC?
Is your PC not compatible with Windows 11? If you are thinking of going with the upgrade process irrespective of the compatibility factor, make sure you know the risks. Microsoft does not recommend installing Windows 11 on a PC that does not meet minimum requirements. There can be compatibility issues and errors on such devices.
If you install Windows 11 on a PC that does not meet minimum hardware specifications, you will be restricted from installing security updates as well as feature-based updates along with other Windows updates. Therefore, we recommend not installing Windows 11 on a computer that does not meet hardware, software, and security-based requirements to avoid running into errors and issues.
That being said, it is not as if it can’t be done.
How To Install Windows 11 On A Computer That Does Not Meet The Minimum System Requirement?
Installing Windows 11 on a computer that does not meet minimum requirements is not recommended. However, if you still wish to upgrade to Windows 11 from Windows 10, you can tweak your PC to bypass the system requirement checks.
You can install Windows 11 on unsupported hardware by using third-party apps and scripts from Github. And modifying the registry can help you install Windows 11 without TPM. However, there are chances of damaging the PC and even formatting it while performing upgrades in such situations.
However, once you are aware of the risks and still want to experience the new operating system, you can go ahead and give it a try by following the above guides.
Final Thoughts On Upgrade To Windows 11 From Windows 10
Microsoft has made the upgrade process convenient for its Windows 10 users.
The upgrade to Windows 11 can be done directly from the Windows Settings app. This makes it convenient for users who are not comfortable with installation media and burning discs.
Although this way of upgrading still exists and can be used at your own risk, Microsoft does not recommend using it for installing Windows 11. However, if you don’t wish to wait till you get an update in the Settings app, you can go with Installation Media and Installation Assistant to upgrade Windows 10 to 11.
The main thing to do before starting the upgrade is to check whether your PC is compatible with Windows 11 or not. If the system is not compatible, you cannot install Windows 11 on your computer. The above guide aims to walk through every step and option and help you through the complete Microsoft Windows 11 upgrade process.
FAQs
Can I upgrade Windows 10 to Windows 11?
Yes, you can upgrade Windows 10 to Windows 11 for free if your PC meets the minimum system requirements set by Microsoft.
Is Windows 11 upgrade free?
Yes, for now, upgrading to Windows 11 is free for everyone who has a licensed Windows 10 operating system.
When is Windows 11 officially available?
Windows 11 is officially available from 5th October 2021 for all eligible devices.
Can my PC run Windows 11?
If your PC meets the minimum system requirements, you can run Windows 11. You can check the compatibility manually or via the PC Health Check app.
Which devices will get Windows 11?
All the compatible devices will get an option to update Windows 11 from the Settings app itself.


