Key Takeaways:
- Windows 11 only has Recycle Bin from the legacy Desktop icons.
- You can manually add Control Panel, Network Settings, and This PC to your Desktop.
- There are many ways to customize the Windows 11 Desktop icons.
- You can sort, align, add, and remove the Desktop icons as per your preference.
By default, Windows 11 comes only with Recycle Bin on the Desktop. However, you can add icons of your choice to the Desktop for quicker and easier access. You can also customize Windows 11 Desktop icons by changing the icon image and size, hiding them, disabling drop shadows, and aligning them.
Microsoft offers many customization options to help users personalize their system the way they want. For example, you can change themes, change wallpapers and customize the lock screen in Windows 11. If you are worried about Desktop icons, we have covered you with this complete guide.
How To Personalize Windows 11 Desktop Icons
You can have legacy Desktop icons, customize the image of the item, add shortcuts of your choice, hide and show items on the Desktop, change the size, disable the drop shadows, and align and sort Desktop icons. Check out all the ways to change the Windows 11 Desktop icons below.
Show Legacy System Icons
Do you miss having default Desktop icons like Computer and Control Panel on your Desktop? You can make a few changes in the Windows Settings app and have the legacy system icons.
Step 1: Press Windows key + I to open the Settings app and go to the “Personalization” settings from the left sidebar.
Step 2: Click on “Themes” in the Personalization settings pane.
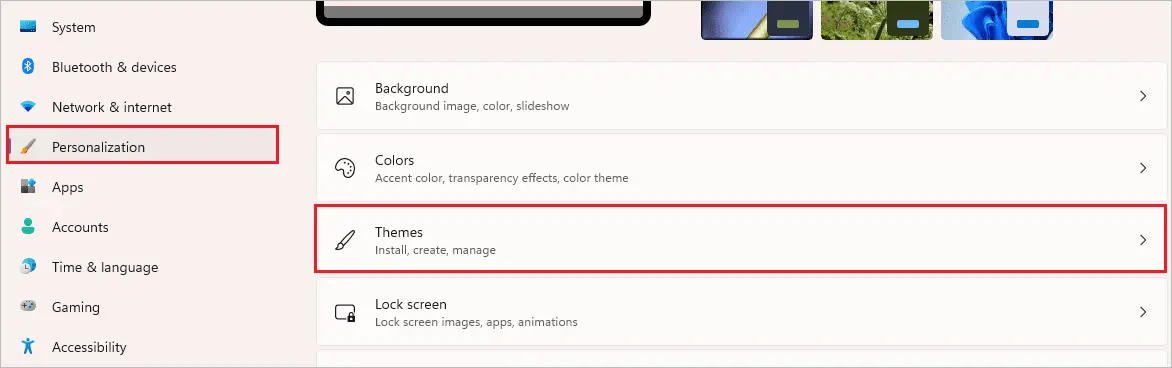
Step 3: Click on the Desktop icon settings option under Related settings.
Step 4: Now, check the checkboxes next to the Desktop icons you wish to see on your Desktop. Then, click on Apply, followed by OK, to save the changes.
The icons will immediately appear on your Desktop screen.
You can remove the custom icon in the same way in the future if required.
Hide or Show Icons on Desktop
If you want to hide the clutter on the Desktop while presenting your screen, you can do so very easily. It is always safe to hide the files on your Desktop while showing your screens to others. You can also unhide them easily whenever you want.
Right-click on the empty space on your Desktop and click on “View” from the contextual menu. Next, click on “Show Desktop icons” so there is no tick next to it.
All the icons will magically disappear as soon as the Show desktop icons option is unchecked.
Click on View ➜ Show desktop icons from the right-click menu if you want the icons to show. You will see all the icons appear on the screen immediately.
Note: If there is a tick next to Show desktop icons, it means the Windows 11 Desktop icons are visible. And if there is no tick, it means the icons are hidden.
Align Windows 11 Desktop Icons
Aligning Windows Desktop icons is essential, or they will be all over the place. You can align the icons manually or let Windows do it for you.
Align Desktop Icons in Grid
You must enable that setting if you want to auto-arrange icons in the grid whenever a new icon is added.
Right-click on the empty space on the Desktop and select “View” from the contextual menu. Then, click on “Align icons to grid” such that it has a tick next to it.
Whenever you add any new Desktop shortcut icon, it will get aligned in the grid on the left corner of your Desktop. However, if you want to manually arrange icons in random places, you need to disable this setting. You can disable Align icons to the grid by clicking on it, such that the tick next to it disappears.
Auto Arrange Desktop Icons
You can enable auto-arrange Windows 11 Desktop icons in a grid form. However, it comes with one con: you cannot move the icons away from the grid. Nevertheless, it is a simple way to have all icons on the left side of the Desktop screen.
Right-click on the empty space and click on View ➜ Auto arrange icons.
As soon as the Auto arrange icons setting is enabled, you will see all icons rearranged in a grid. If you want to move any icons outside the grid, disable Auto arrange icons.
Change Desktop Icon’s Image
If you don’t like the image of your Desktop icon, you can change it easily. However, there is a different approach to changing icons for legacy items like Control Panel, Network, and This PC.
If you wish to change the icon image for the created shortcut, there is a different way. Check out both the sections below and customize the icon as per your wish.
Change Desktop Icon for Legacy Items
To change the icon for the legacy item, go to Settings app ➜ Personalization ➜ Themes.
Next, click on “Desktop icon settings” under Related settings.
Select the icon you want to change in the Desktop Icon Settings and click on the “Change Icon” button.
Now, select the new icon and click on “OK.”
You must also click Apply and OK on the Desktop Icon Settings window to apply the change.
Once the changes are saved, you will see the icon image change on the Desktop.
Similarly, you can change the icon for Control Panel, Recycle Bin, This PC, and Admin folder.
Change Windows 11 Desktop Icon for Folders
Right-click on the folder and select “Properties” from the context menu.
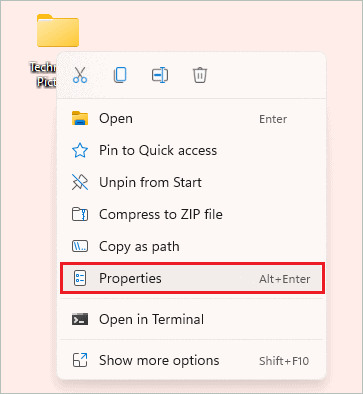
Next, go to the “Customize” tab and click on the “Change Icon” button.
Select the icon and click on OK.
Click on “Apply” on the Properties window to save the changes. Once done, you will see the folder icon updated.
Add Shortcut to Desktop
It is easy to add shortcuts for applications, folders, files, and drives on your Desktop. If you access specific things frequently, you can add them to the Desktop screen for convenience.
Create Shortcut For Folder, Files, and Drives
You can follow the same steps to create a shortcut for folder, file, and drive on your Desktop.
Step 1: Right-click on the folder you want on the Desktop and select “Show more options” from the context menu.
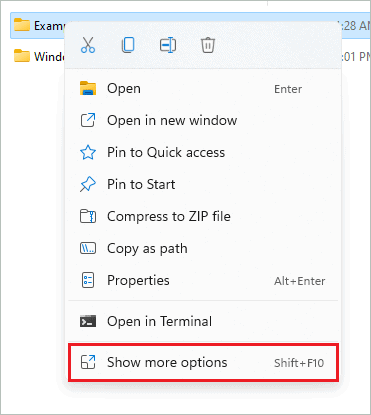
Step 2: When the full menu pops up, click on “Send to.”
Step 3: Click on “Desktop (create shortcut)” from the next menu.
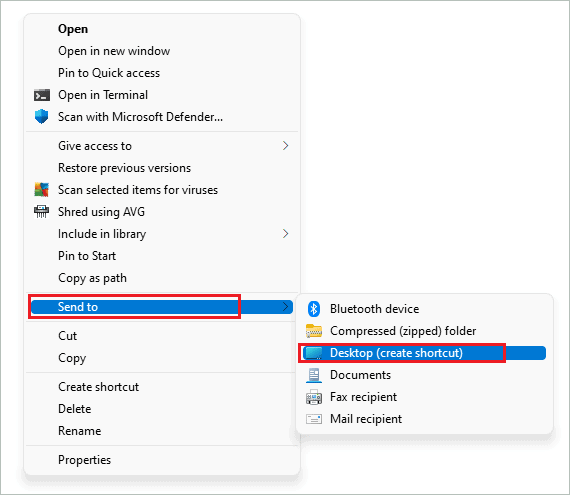
You will have a folder name, followed by the word “Shortcut” on your Desktop.
Create Shortcuts for Applications
Open the Start menu by pressing the Windows key on your keyboard. Alternatively, you can also click on the Start menu icon on the taskbar.
In the Start menu, click on the “All apps” button.
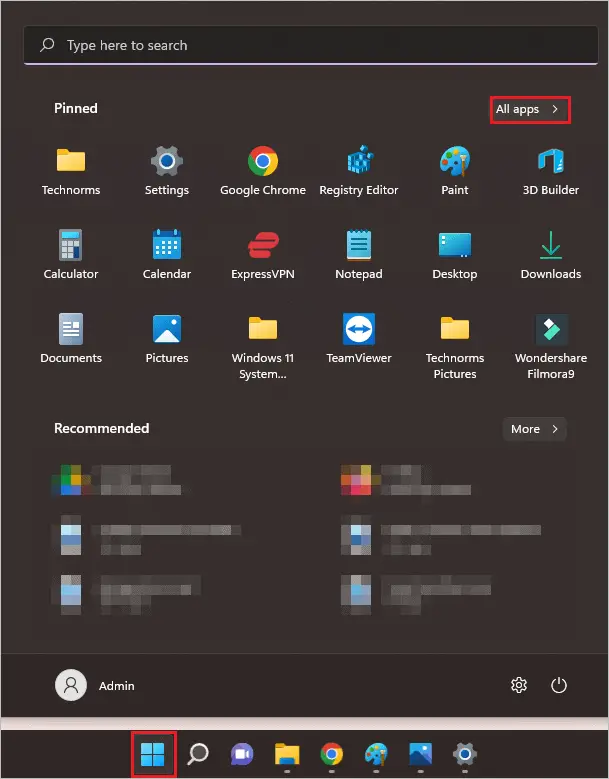
Caption: Click on All apps
Now, search for the app in the All app list. Once found, drag and drop the app to the Desktop screen to create its shortcut.
You will see the shortcut immediately.
Change the Size of Windows 11 Desktop Icons
You can have small, medium, and large icons on your Desktop screen. This depends on the user to user.
Right-click on the empty space on the Desktop and click on “View.”
You can select Large, Medium, or Small icons as per your preference.
You can also use the keyboard shortcut to change the icon size. The hotkeys are as follows:
Large icons – Ctrl + Shift + 2
Medium icons – Ctrl + Shift + 3
Small icons – Ctrl + Shift + 4
The distance between Desktop icons will also increase and decrease gradually depending on your selected size. We recommend using medium-sized icons for better visibility and look.
Sort the Icons on your Desktop
You can sort the icons on your Desktop according to date modified, size, type, and name. This can help you search icons in a better way.
Right-click on the empty space and click on “Sort by.”
You can then select Name, Size, Item Type, and Date modified as per your requirement.
Unfortunately, you cannot select two sorting options at the same time.
Remove the Unwanted Desktop Icons
You can remove the unwanted Desktop icons from Windows 11 PC. However, you can only remove the shortcuts, not the files/folders icon saved on the Desktop.
Right-click on the Desktop shortcut you want to remove; it can be a program icon or folder icon. Then, click on the “Delete icon” from the right-click menu.
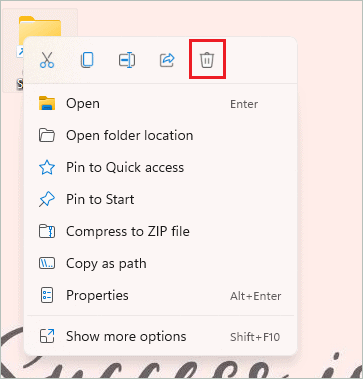
The original folder won’t get deleted if you delete the shortcut folder. Also, the application won’t be uninstalled if the shortcut is removed.
Disable Drop Shadows For Desktop Icons
You can disable the drop shadows for Desktop icons in Windows 11. If you don’t like Windows 11 Desktop icons with drop shadows, you can remove them easily by tweaking advanced system settings.
Open the Start menu and search for “advanced system settings” in the search bar. Then, open “View advanced system settings” from the search results.
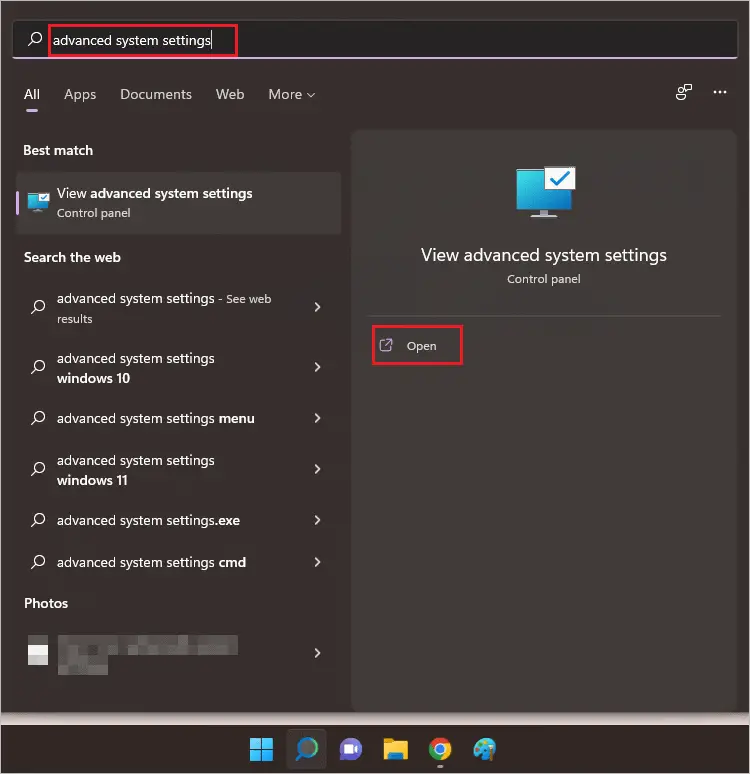
When the System Properties window opens, go to the “Advanced” tab and click on the “Settings” button below the “Performance” section.
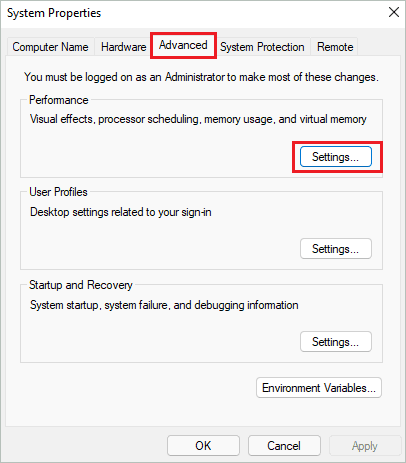
Navigate to the “Visual Effects” tab and select “Custom.”
Next, uncheck the checkbox next to “Use drop shadows for icon labels on the desktop.”
You can reboot your Windows PC once and check if the drop shadows are disabled or not.
Conclusion
Who knew Desktop icons had so many customization options? Well, you can customize the Desktop icon the way you want. You can do it all, from changing the size to adding the shortcuts of your choice. The above guide lists all the possible ways to customize Windows 11 Desktop icons.
You can add folders and apps to your Desktop, hide/show app icon, align and sort items as per your requirements, and disable drop shadows for icons. With the help of detailed instructions in the above guide, you can change the look and feel of your Desktop icons.
FAQs
Why did my Desktop icons disappear in Windows 11?
The Desktop icons are probably hidden on your computer. You can right-click on Desktop and click on View ➜ Show Desktop icons.
How do I go back to the original Desktop icons?
Go to Settings app ➜ Personalization ➜ Themes ➜ Desktop icon settings. Next, check the checkboxes of the original Desktop icons you want. Finally, click on Apply button and OK to have those icons on your Desktop screen.


