Key Takeaways:
- Network issues are commonly reported by users who try to connect to a network.
- It is possible that your network adapter might have some issues.
- You can try to reset Windows 11 network settings to configure all the settings to their default values.
Despite all the advanced features that Windows 11 comes with, users often face network issues. There are many ways you can unearth the issues and find a solution, but reset Windows 11 network settings comes as the last option. You can try to update network drivers, run a network troubleshooter, check your wireless connection for slow WiFi speeds, and go for a reset windows network if none of the previous steps work.
Resetting the networking settings reinstalls the network adapter and sets the device to factory settings. All the networking components, like the adapters in your system, will also get reset, so this step should be done carefully. This is why resetting is the last resort when nothing else solves the connection issues. You may also optimize Windows 11 power settings, so the system performs efficiently.
What is a Network Adapter?
Before learning to reset network adapters, it is good to know these network components. A network adaptor or a network card is a networking component that establishes a connection between your computer and another computer over a wired or wireless network. Adapters let you communicate with another computer, a networking device, or a server. So, no communication with an external device is possible without adapters.
A printed circuit board attached to the computer’s motherboard houses the adapters. Connected Network cards open us to the world of the internet, and we can communicate effectively with other devices on the network. Sometimes, the connection between Windows and the network faces some connectivity issues, slowing the internet connection or even losing it. At such times, network adapter settings can be reset to resolve the connection issue. This is true for the previous version of Windows also.
How To Reset Windows 11 Network Settings
Let’s check out the three methods to reset network in Windows 11.
1. Using the Settings App
The Settings app is a good place to start adjusting any settings in Windows. For example, if you want to reset Windows 11 network settings, the advanced network settings page in the Settings window will help you. Like the microphone settings in Windows 11, you can make many changes in the network options. Here are the steps to perform a network reset in Windows 11.
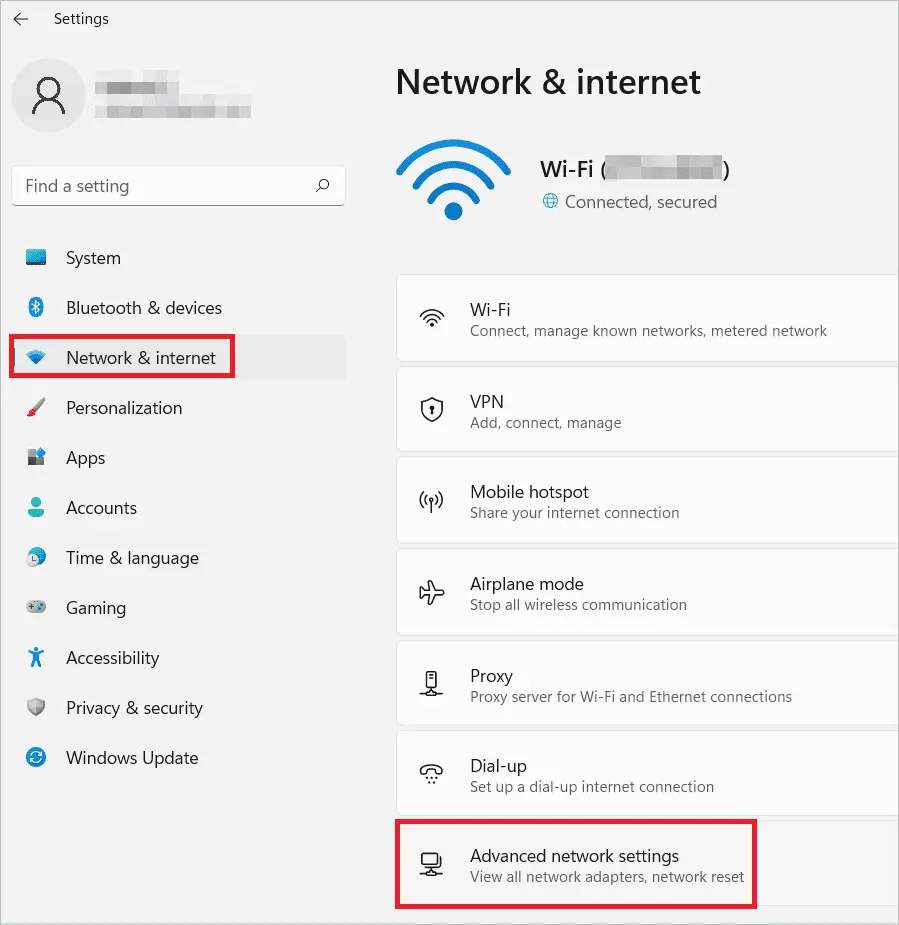
Click the search icon, type “Settings” in the search box, and open the Settings app.

Select Network & internet settings in the left-hand column and Advanced network settings option in the right-hand column.
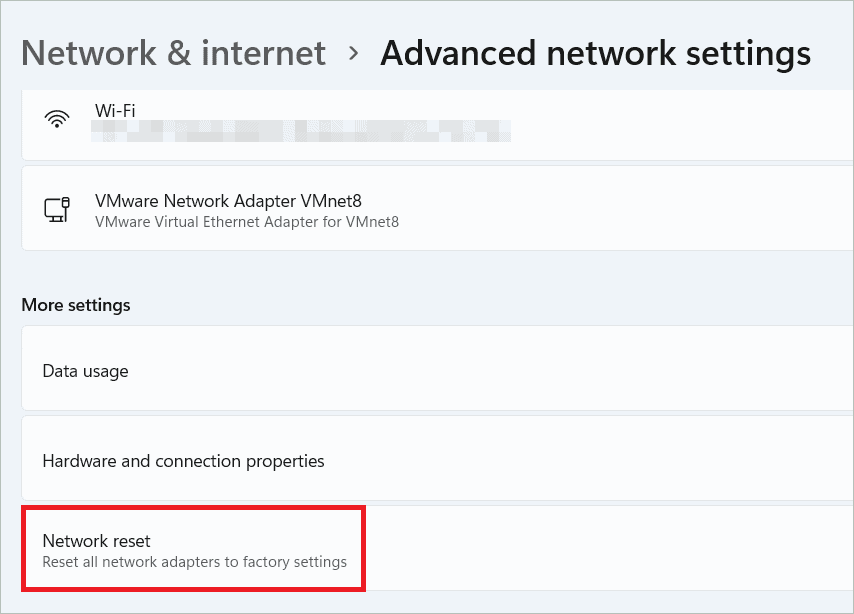
Scroll down and select “Network reset” under More settings.
In the next window, click “Reset now.”

When asked for confirmation, click “Yes” to confirm the reset option.
Once the reset is done, you can restart your computer for the default settings to take effect.
Note: After resetting, remember to reinstall and configure other networking software (if you use any), like virtual switches or VPN client software.
2. Using the Command Prompt
There are a few networking commands that help reset Windows 11 network settings. Typing these ones after the other gives you the desired results by resetting the Wi-Fi network adapters.
Click the search icon and type “CMD” in the search box. Open the CMD window by clicking “Run as administrator.”

Type each of the following network commands followed by pressing Enter.
netsh winsock resetThis command is used to re-establish the communication between your PC and the network.
netsh int ip resetThis command causes the rules to be reset to factory default.
netsh advfirewall resetThis command is used to restore the Windows firewall with Advanced Security Policy to the default policy.
ipconfig / flushdnsThis command flushes the DNS cache.
ipconfig / releaseipconfig / renewThese commands release and renew your IP address.

After entering the networking commands in the command window, save all your work and restart your computer. When your system starts again, the network reset process settings will be set to the default values, and it will get connected to the network.
3. Using the Device Manager
Another method to reset Windows 11 network settings is using the Device Manager. You cannot call it a method but a temporary solution to your immediate issues with the network. Here are the steps to reset a Windows network using the Device Manager.
Type “Device Manager” in the search bar and open the Device Manager interface when it comes up.

In the Device Manager, double-click on Network Adapters to expand it. Right-click on the primary network adapter and select the Disable device option. When asked to confirm, click “Yes”.

Now, right-click on the primary network adapter again and select “Enable device.” Your adapter has been reset now.
How To Automatically Connect to the Internet After Windows 11 Reset
Usually, the TCP/IP settings are configured to Automatic, and there is no issue with connecting back to the internet after you reset Windows 11 network settings. However, if there is any reconnecting issue with the Ethernet or Wi-Fi adapter, you can check the settings and ensure that it is set to Automatic. This can be done for both wired and wireless connections.
Go to Settings > Network & internet > Wi-Fi (if you are connected to a Wi-Fi network).

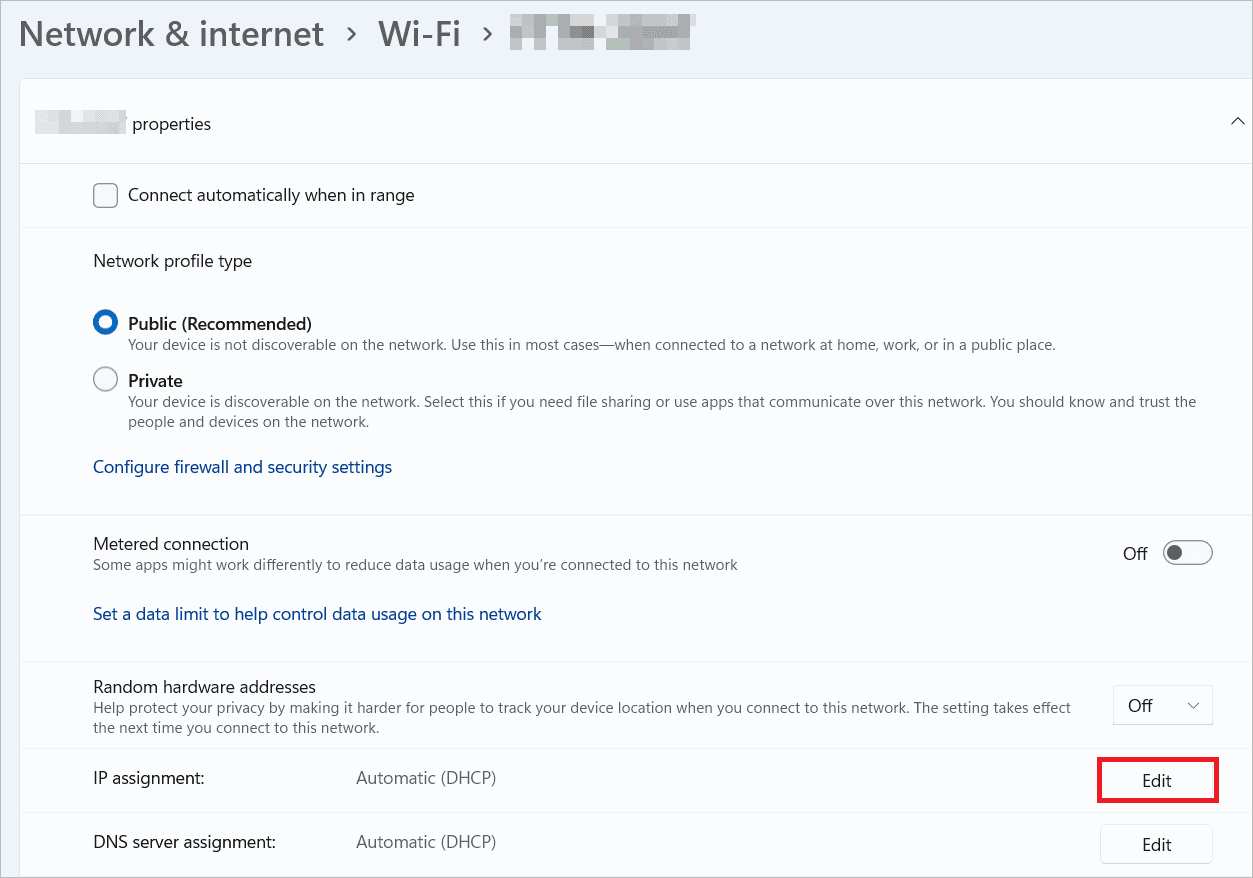
On the next page, select Wi-Fi properties.

Check if the IP assignment is set to Automatic in the network adapter properties window. If not, click the Edit button to change the settings.
Change the settings to Automatic(DHCP) and click the Save button.

Your PC will automatically detect and connect to the internet after the reset.
Note: If you use an Ethernet connection instead of a Wi-Fi connection, go to Settings > Network & internet > Ethernet in the first step. This opens the properties window. Now, follow the same steps as above.
Final Thoughts On Reset Windows 11 Network Settings
Network connection issues are unavoidable, and you must be equipped with solutions to tackle them whenever necessary. If you have a Windows 10 machine, you can learn how to reset network settings in Windows 10. Windows 11 has several methods to resolve these common connectivity issues.
In addition, there are many ways by which you can change the network configurations, and some of them might work for you depending on your particular scenario. In many cases, the network adapter causes issues, disrupting the communication between your system and the network. You can reset Windows 11 network settings so that all the network components are reset to their original settings.


