There are many background tasks running on your system. Sometimes, these processes consume much more resources. Service Host Local System is said to be one of the processes or tasks that consumes high CPU, memory, and disk usage in Windows 10.
Well, if you are also facing high CPU consumption by Service Host Local System, then check out the solutions listed below to fix it. However, before we venture into the solutions, let’s understand what the Service Host Local System is so that you can solve the problem in a systematic manner.
What is the Service Host Local System?
While Windows 10 has this for your convenience sometimes, it slows your system down. Service Host Local System is a bunch of processes that are automatically executed by the system to make the system run faster.
The services like updating windows and many other services that don’t require human intervention is handled by Service Host: Local System. As it handles multiple Windows processes, it ends up consuming a high network, CPU, disk, and memory.
But, on Windows 10, there is a bug that causes Superfetch service to consume a large amount of CPU usage and system resources.
How to Fix Service Host Local System High CPU usage?
The solutions discussed below will help you solve Service Host Local System high CPU consumption in a convenient way.
1. Disable Service Host Superfetch
When the Superfetch service is enabled on your PC, it monitors the applications that you frequently use. And, as you switch on your PC, it automatically loads the files into RAM to make the system speed up faster when you launch those apps.
We recommend that you disable Superfetch service only if you are actually facing a high CPU usage issue. Otherwise, Supertech service helps in running your system faster.
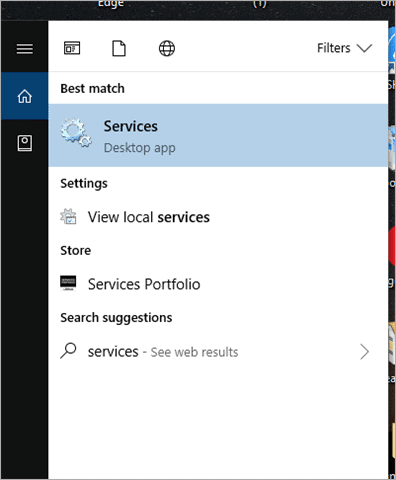
To disable Superfetch Service in Windows 10, first type Services in the search bar.
Now, click on the “Services” app from the search results.
Another option to open the Services app is to open the Run dialog box using Windows+R keys. Type “services.msc” in the box and press enter.
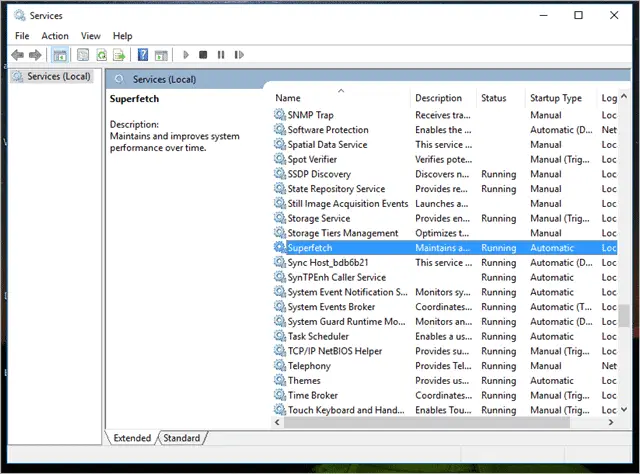
Now, move down and look for Superfetch service and double-click on it to open its properties.
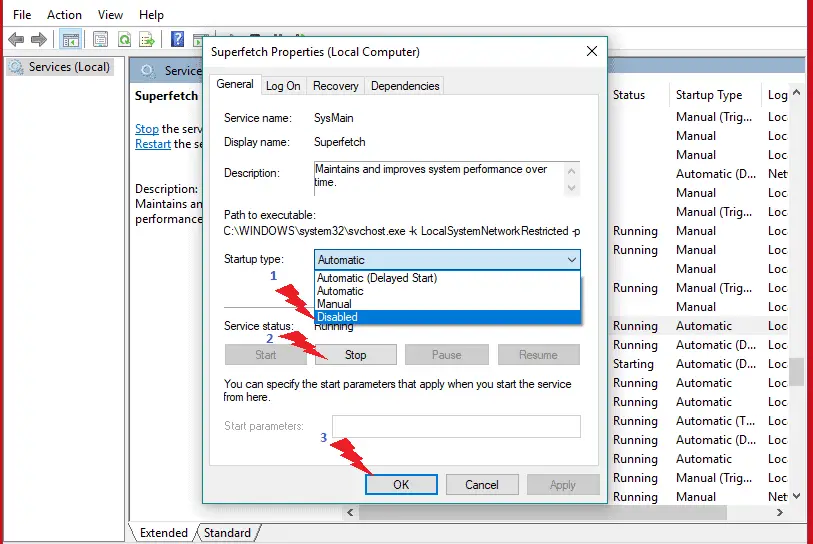
Now in the General tab of the properties, select the Startup type as Disabled.
Click on Stop, and it will shut down the service, and finally click OK to save the changes.
After you have disabled the service host Superfetch service, it is recommended to restart your PC to see the changes.
You should be able to see a remarkable difference. It should lower the amount of resources usage and disk space consumption along with CPU usage.
2. Run SFC scan
In case the Service Host Local System is still causing high disk usage, then you can try running system file checker command. Sometimes, corrupted system files also cause Service Host to consume high CPU usage. You can repair those corrupted files through the SFC scan, as the command used to scan system files is sfc /scannow.
Check our detailed guide on sfc /scannow
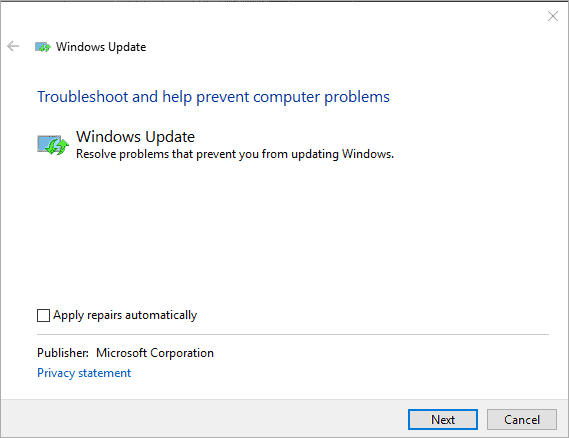
3. Run Windows Update Troubleshooter
Another solution you can try is Windows Update Troubleshooting. Many users have found it helpful. If the Service Host: Local System is taking up too much CPU space and resources, it may have something to do with Windows Update.
Running Troubleshooter can be helpful in this case.
To do that, Press Windows Key + I to open the Settings app.
Alternatively, simply type Settings in the search box and open the Settings app.
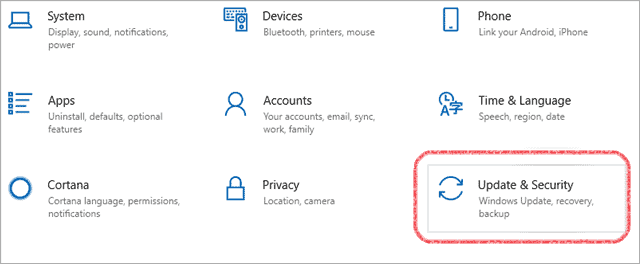
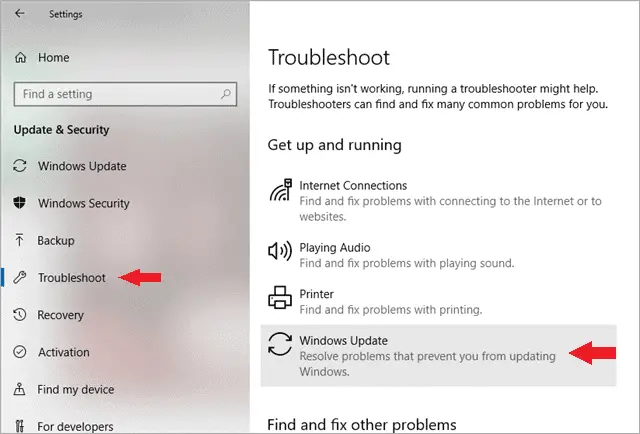
Next, navigate to Update & Security and click on it.
Now, in the left pane, click on Troubleshoot, as shown in the following image, and then click on the Windows Update.
Wait for the Troubleshoot to finish and check if any problem is diagnosed.
Similarly, another way to troubleshoot the issue related to Windows Update is from the Control Panel.
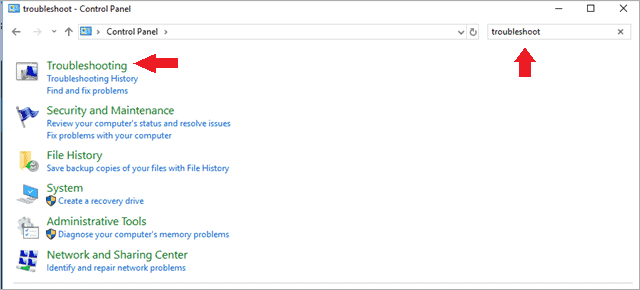
Open Search box by entering Windows + S, and type Control Panel in the search box, and open Control Panel app.
Now, type Troubleshoot in the search box of the control panel, and from the results, click on Troubleshooting.
Now, from Troubleshooting, click on View All that is on the left side.
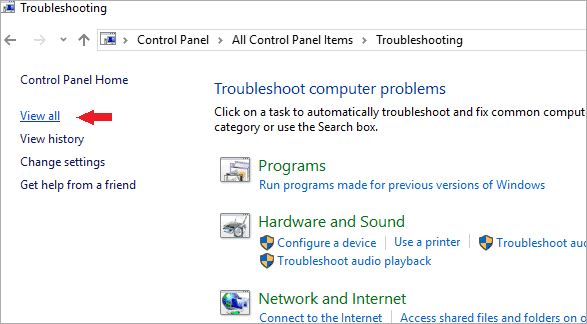
Scroll to Windows Update and click on it.
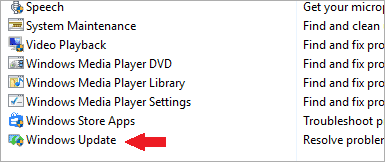
You will see an Advanced option, click on it, and then click Next to run the Windows Update troubleshooter.
Running Windows Update Troubleshooter should resolve the issue for Service Host Local System taking high resources consumption.
4. Kill SVCHost Process to Fix Service Host Local System
The problem of the service host local system high CPU usage can be solved by killing the Service Host process in Task Manager.
To kill the SVCHost process, follow the process mentioned below.
Open Task Manager by pressing Ctrl + Shift + Esc.
Expand to More Details. Now, scroll to the Service Host Local System.
Next, right-click on it and click on End Task from the context menu.
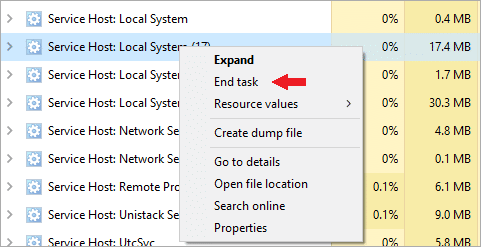
You can also click on the up arrow to open and see all the running processes under Service Host Local System.
At the right bottom corner, you will see the End Task option. Click on it.

You should be able to solve the problem with this process and also monitor your CPU load and disk space.
5. Remove Problematic Applications
Sometimes, there are apps that cause service host local system high disk usage. Yes, there could be third-party software that is problematic for your system.
To fix the problem, you should check the recently downloaded apps or monitor apps that show how much resources they are consuming. Accordingly, delete them from your system.
There may be a few extensions that could be causing this problem. This solution depends upon your self-monitoring process that how you filter apps by seeing their CPU, memory, and disk usage from the task manager. After removing those apps, see if the problem still persists.
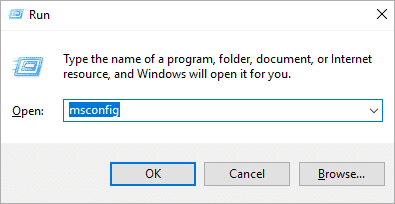
6. Perform a Clean boot
Like we mentioned, third party applications are sometimes responsible for causing high CPU usage on your PC. Performing a clean boot can help in a great way.
To perform a clean boot, first press Windows Key + R.
Now, type msconfig in the box.
Press Enter or simply click on OK.
Go to the Services tab. Next, check the Hide all Microsoft services option at the left corner.
On the right bottom, click on the Disable all button.
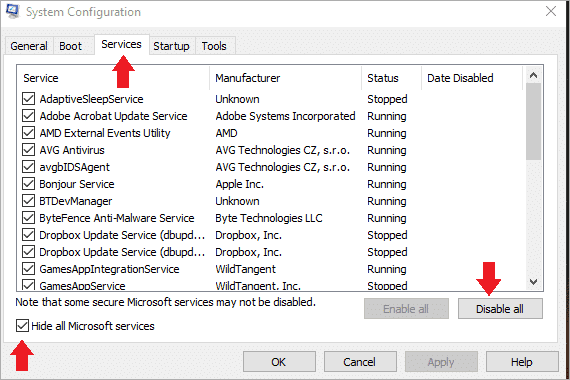
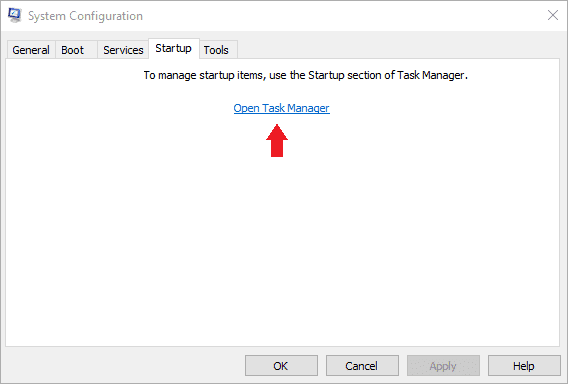
Now, go to the Startup tab and click on the Open Task Manager.
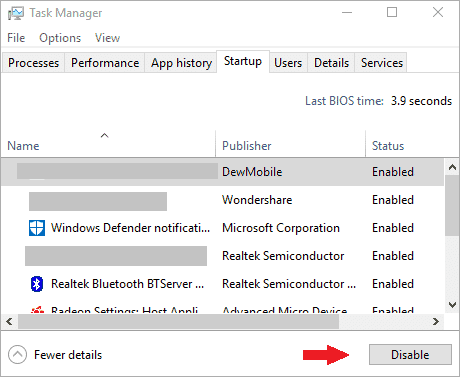
You will see the list of all the applications. Disable the one you don’t require on Startup. You need to click on the app and then on Disable in the bottom right corner.
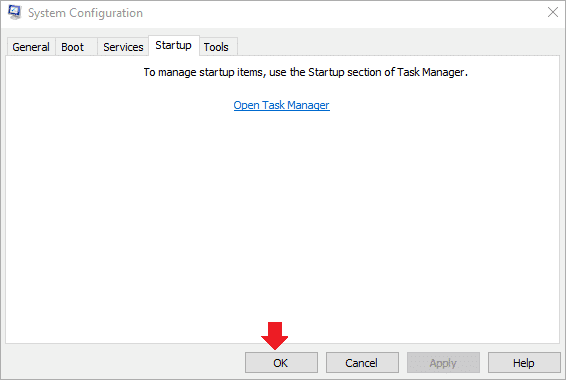
Now in the System Configuration window, click on OK.
After the required settings for the clean boot is done, restart the PC and see if the problem is resolved.
If it is solved, then you can safely assume that one of the applications that you disabled was causing the problem.
Now, to check which app was causing the service host local system high CPU usage, enable the apps one by one and monitor the changes. Once you find the faulty app, you can uninstall or reinstall it. Simple, isn’t it?
7. Change Processor Scheduling
The simple process of Processor Scheduling can also resolve the problem of Service Host causing high CPU usage.
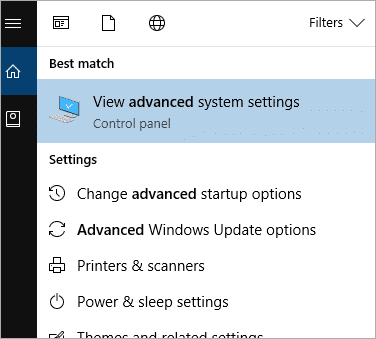
Press Windows Key + S to open the search box and type Advanced. Now open View advanced system settings.
As you are in the Advanced tab, under the Performance section, click on Settings.
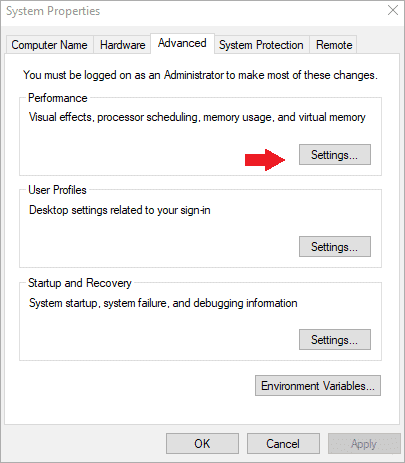
Now, navigate to the Advanced tab, select Programs under Adjust for best performance of. Click on OK to save the settings successfully.
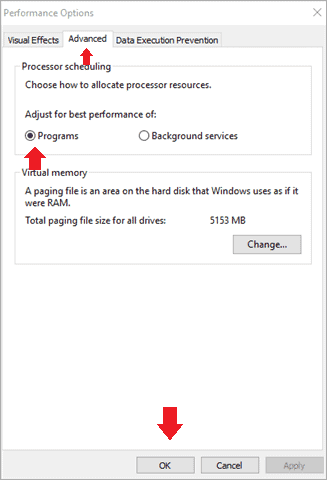
This can resolve the problem of high CPU usage by the Service Host Local System.
8. Disable Background Intelligent Transfer Service
Background Intelligent Transfer Service is used to transfer files between machines using the network bandwidth which is idle. Sometimes, this service can cause high CPU usage. You can disable this service and check if the issue is resolved.
Open services.msc via Run, as explained in the above solutions. Check if you are in the Services tab.
Now, uncheck the box next to the Background Intelligent Transfer Service.
Next, click on Apply, followed by OK.
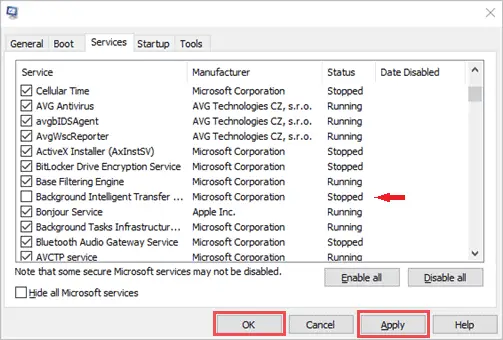
Once done, restart your PC and check if high CPU consumption by Service Host resolves.
9. Change the Registry Value to Fix Service Host Local System
Memory leaks can make the Service Host consume resources. To solve this memory leak issue you can edit the registry file. We suggest you backup your registry before tweaking it. Once you take the backup, follow the instructions below to make the required changes in the registry value.
Search for regedit in the search menu. Click on the Registry Editor from the search result.
After opening registry editor, navigate to
HKEY_LOCAL_MACHINE\SYSTEM\ControlSet001\Services\Ndu
In the right window, double-click on Start and change its value to 4.
Click on OK to save changes.
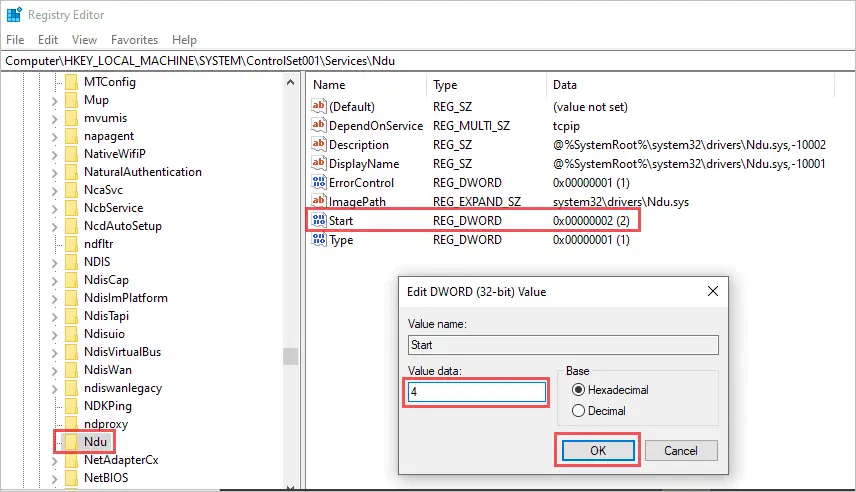
Restart your PC and check if the Service Host Local System stops consuming the resources as before.
10. Disable Automatic Updates
When you disable Windows 10 automatic updates, the Service Host’s task is reduced a bit. Hence, it does not have high CPU utilization.
Open services.msc via Run. Search for Windows Update in the list of services and double-click on it.
In the General tab, select the Startup type as Disabled and then click on OK to save the changes. Once done, refer to solution no 4 to kill the SVCHost process. This will solve your high CPU usage.
11. Disable Downloads from Other PCs
Delivery optimization can cause high CPU usage sometimes. So, you can disable downloads from other PCs option to decrease the load on the resources.
Press Windows key + I to open Settings and click on Update & Security. Click on Advanced options in Windows Update.

In the advanced options, scroll down and click on Delivery optimization. Now, off the switch below, the Allow downloads from other PCs.

Restart the PC to reflect the changes. And when the PC restarts, open task manager and check the resource consumption.
Final Thoughts
Using the above-stated solutions, you can fix the high CPU consumption issues. The Service Host Local Service is a useful service when it comes to managing Windows processes. But, sometimes this Service Host can consume all your resources degrading your system performance. In some cases, disabling Service Host Superfetch can solve this issue. While in others, you may need to take more complex steps depending on how critical the situation is.
While we have identified some of the simpler steps, it is possible that we may have missed out on something. If you know of some other useful solutions to this problem, please do let us know.
Also, check:


