Skype is one of the best apps when it comes to communicating with friends, family, and colleagues. You can have video and audio calls, chat, and share your screen with Skype. Arranging team meetings become easy because of so many features. Sometimes you may end up in a situation where your Skype camera is not working as expected.
Skype has become an indispensable part of the VoIP industry and helps businesses all across the globe. At times, you might want to record a Skype call, but when you face issues with the camera not working on skype, it can be irritating. It can be because of issues in settings, compatibility, and permissions.
Skype Camera Not Working: Here’s The Fix
With the solutions mentioned below, you can easily fix the camera and get started with video calling again. You can apply some of the solutions without having any technical expertise if and when the skype video is not working.
Let’s get started and fix Skype cameras without any delay.
1. Restart PC
A minor glitch in your computer can make the camera not function properly. If your skype camera is not working, a restart can fix it for you.
To Restart Windows PC, click on the Windows icon, followed by the Power button. Select Restart after clicking on the Power button.
Once the PC restarts, open Skype and check if the camera is working. If not, then check out other solutions from the list.
2. Check if Webcam is Working
You need to check if your PC’s webcam is working properly. If the issue is in the camera not working, then no app can help you with flawless video calls.
To check the camera in Windows 10 PC, search for ‘camera’ in the search menu and click on Camera app from the search result. Once the Camera app opens, check if you can see yourself properly and clearly.
If it is blurry, then clean your webcam with a clean, dry cloth. Also, check if any tape or other material is covering your webcam. If you see the preview clearly on the webcam, then your webcam is working perfectly fine. You may need to make changes in some settings to fix the issue of the Skype camera not working.
3. Check Camera Permission in Windows 10
If your skype camera is not working perfectly, then you need to check the permission. You need to allow the camera access to apps in order to have video calls on Skype. You can do so by Settings.
Step 1: Press Windows key + I to open the Settings app and click on Privacy.
Step 2: Scroll down the left panel and go to Camera under App permissions.
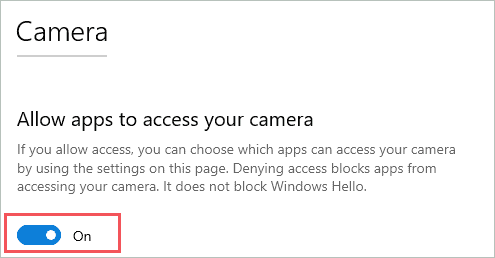
Step 3: Now, turn on the switch under ‘Allow apps to access your camera.’
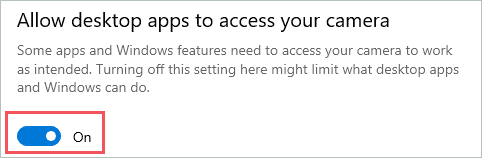
Step 4: Scroll down the Camera section and turn on the switch for ‘Allow desktop apps to access your camera.’
Once both the accesses are given, close the settings and check if the Skype camera started working.
4. Check Skype Settings
You can check Skype video settings to ensure there are no issues there when the skype camera is not working.
To do so, open the Skype app on your system and click on the 3 dots next to your profile.
Select Settings from the menu.
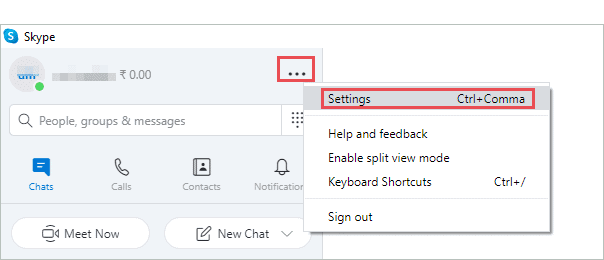
Alternatively, you can press Ctrl +, (Comma) in Skype to open Skype settings.
When the settings open, click on Audio and Video from the left panel.
Next, make sure the selected camera is your functioning camera (in case you have two webcams; internal and external). And also you can clearly see the preview in the frame below the camera.
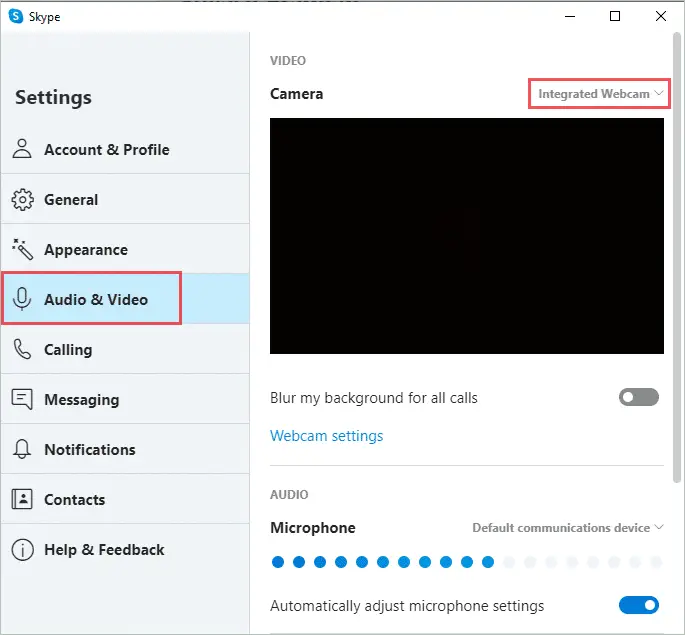
If you cannot see the camera preview in the Settings, then it means your Skype camera is not working. You need to check the below solutions to fix it.
5. Check Webcam Connection
People use external cameras when their monitor or laptop doesn’t have an integrated camera, or the integrated camera is not working. If you, too, are using an external webcam, then you need to check its connection.
Check if the external webcam has loose connections, or the port at which webcam is connected is working properly. You can connect your webcam to another port and check if it functions there correctly.
6. Check your Device and Webcam Compatibility with Skype
It is important to have a device that is compatible with all the apps you are using. This is because some webcams are not compatible with Skype and you might wonder why the skype camera is not working!
So, in such a case, you need to check the webcam manual or description to check if it can work with Skype or not.
In the case of devices, there is a FAQ page on Skype’s official site, which gives the minimum system requirement for Skype. You can check if your device meets the system requirements. If your device and webcam both are Skype-compatible, then check out some other workarounds from the list.
7. Check for Windows Update
Many times a Windows update can fix bugs for you. You can check if there is any update available.
To update your Windows system, follow the steps mentioned below.
Press Windows key + I to open Settings and click on Update & Security. Now, under Windows Update settings, click on Check for updates.

If there are any updates, then download and install them. You will see ‘You’re up to date’ if there are no recent updates available.
8. Update Skype
If there is a compatibility issue with the hardware, then a Skype update can fix it for you. To update Skype, open Skype settings by pressing Ctrl + Comma. On the settings window, click on Help & Feedback.
The help window will show if there are any updates for you. And if you are on the recent version, then this window will show you ‘You’re on the latest version of Skype.’ If you are on the latest version and still Skype camera is not working, then you need to check other solutions.
9. Temporary Close Other Applications that use Webcam
Webcam can be used by other apps present on your system. You can use the task manager to close these apps so that Skype can use the webcam.
Press Ctrl + Shift + Esc to open the task manager. Now, under the Process tab, check apps and software you think are using a webcam. Right-click on those apps and select End task from the context menu.
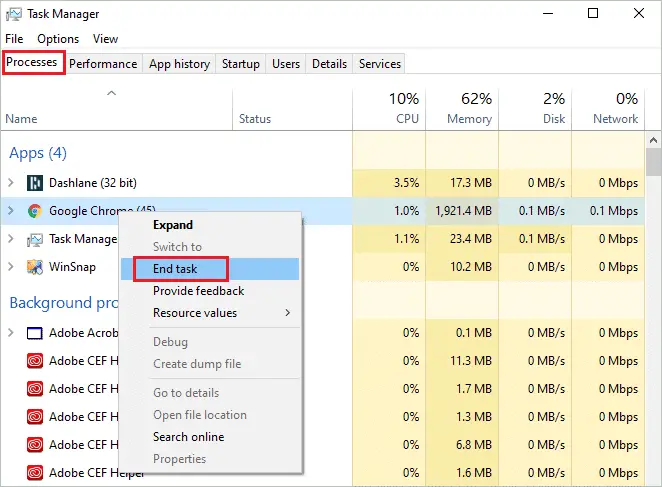
Open Skype and check if you can make video calls. If still, your Skype Camera is not working, then you need to check other solutions.
10. Use Skype Web
The incompatibility issue of the Skype app and device hardware may be an issue. You can try Skype Web instead of the app.
All you need to do is open the browser and navigate to web.skype.com
When you open the link mentioned above, you will see a login page. Log in using your Skype credentials and check whether you can make video calls. If still, your Skype camera is not working, then you may need to make changes in your Chrome settings.
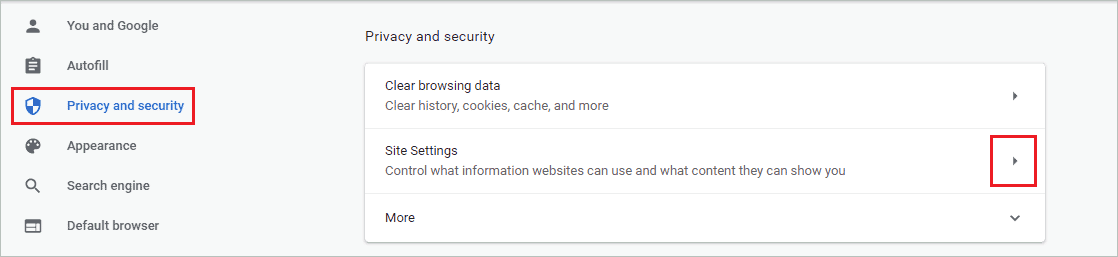
11. Change Chrome Settings to Fix Skype Camera
To use Skype Web in Chrome, you need to give camera access via Chrome browser. You can enable webcam easily via Settings.
Click on three dots in the top left corner of your Chrome browser and go to Settings. Navigate to Privacy and security from the left panel and then click on the arrow next to Site Settings.
Now in Site Settings, search for Camera in Permissions, and when found, click on it. In the Camera permission, check if the selected webcam is the right one. And also, the switch next to ‘Ask before accessing (recommended)’ is ON.
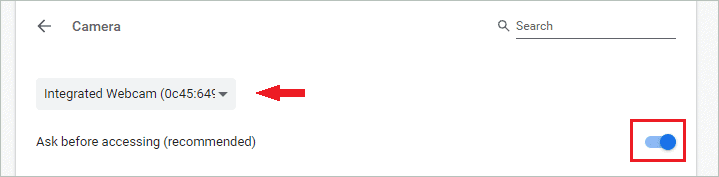
You will be asked for permission whenever any site wants to use your webcam, even Skype web. Once you allow, you can have video calls on Skype web without any issues.
12. Reinstall Skype
If the skype camera is not working, then you can uninstall Skype and then install it again. If there are some bugs in the app itself, then uninstalling it can work for you.
To uninstall Skype, simply search for Skype in the search menu, right-click on the Skype app from the search result. Lastly, select Uninstall from the context menu.
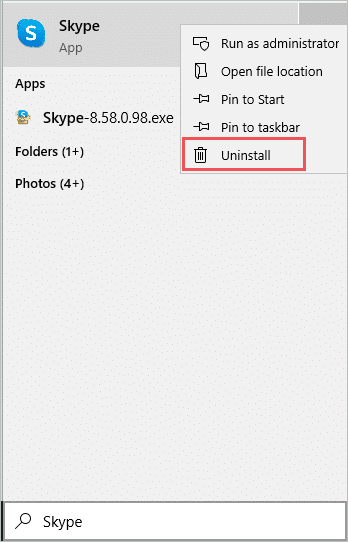
Once you uninstall Skype, you can download and install it again from Skype’s official site.
Related: How To Uninstall Skype For Business From Windows 10
13. Check Internet Speed
Internet speed also plays a major role when you are on the video call and could be the reason why the skype camera is not working. Skype can turn off video if your Internet speed is too slow. You can check your Internet speed and contact your ISP (Internet Service Provider) if there is an issue with the speed or connectivity.
14. Check your Antivirus
A recent update or new antivirus software can cause issues with Skype camera not working. You can check this by disabling antivirus temporarily and trying a video call over Skype. If Skype can access webcam once you disable antivirus, then you need to allow apps to access webcam in your antivirus.
However, if your antivirus doesn’t have such a facility, then you should speak to customer care and get the issue fixed. You can also try another antivirus.
15. Check Skype Status Page
You can check Skype Status Page to know if there is some issue from their side. And if there are any specific issues with video call services, then you may need to wait till they fix it. The fixture from their side may not take that long.
You can start video calling once the issue is resolved from their side.
16. Enable and Disable Webcam Drivers
You can fix the Skype camera not working with this solution. All you need to do is go to the Device Manager and search for your webcam drivers. It can be under Imaging devices, cameras, or devices based on the device configuration.
To know the procedure of how to enable and disable webcam drivers, you can refer to the detailed guide on Windows 10 device drivers.
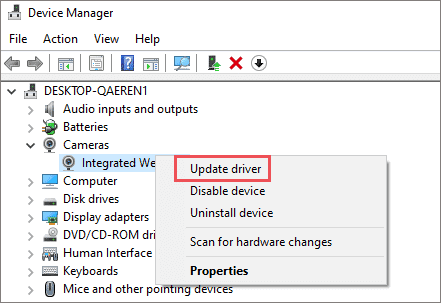
17. Use Generic Drivers
You can use generic drivers if you are using an old webcam. To do so, follow the steps mentioned below.
Step 1: Press Windows key + X and click on Device Manager. You need to log in via the admin account to update your drivers to a generic one.
Step 2: In the device manager, right-click on the webcam driver and select Update driver from the context menu.
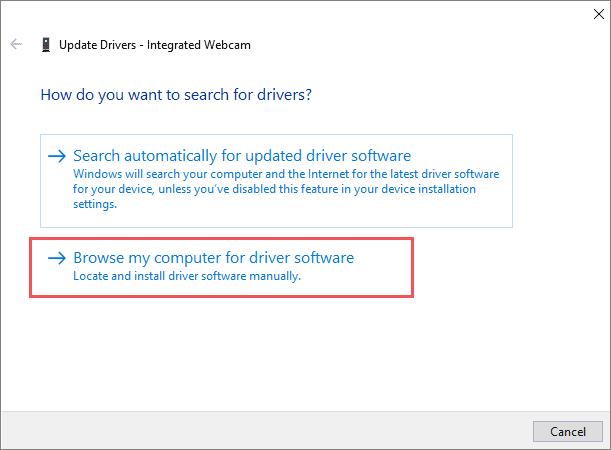
Step 3: Select Browse my computer for driver software on the Update drivers window.
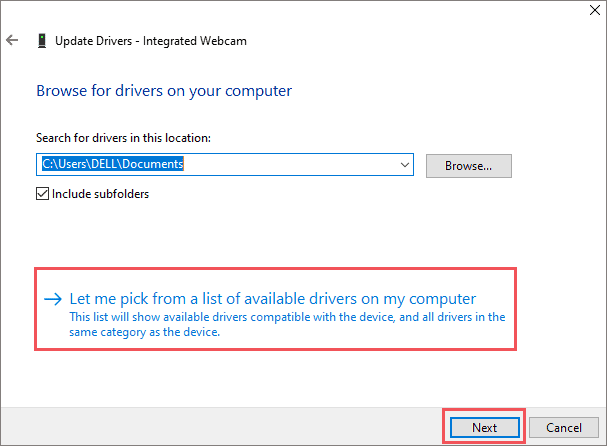
Step 4: Now, click on Let me pick from a list… and then click on Next.
Step 5: Select the USB Video Device and click on Next.
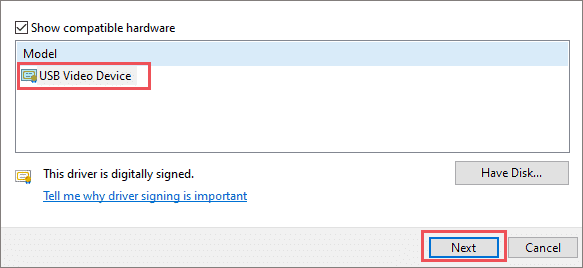
The drivers will now be installed. Once the installation process is complete, restart your device. Launch the Skype app and check if your skype camera is not working or has the Skype video calls started working.
18. Update Webcam Drivers
If you don’t wish to use generic drivers or you don’t have an old webcam, then updating drivers can help when the skype camera is not working. It can assist and fix the Skype camera for you. The outdated or damaged drivers can cause issues like Skype not detecting webcam. In such cases, you need to update drivers.
You can update drivers in Windows 10 manually or by using third-party update software to do it automatically for you.
To do it manually, you need to go to –
Device Manager ➜ webcam drivers ➜ Update driver
Then, follow the wizard on the screen.
19. Reinstall Webcam Drivers
Reinstalling drivers, in the simpler terms, is to uninstall the drivers and to install them again. You need to be careful when to uninstall/remove drivers from your Windows 10 PC. As this can permanently damage drivers.
You can uninstall drivers from the Device Manager. And later download compatible drivers from the manufacturer website of your choice and install it. You can also use some third-party software to do it for you.
20. Refresh your PC
If you feel the issue lies within your Windows 10 PC, then you can refresh your PC. You don’t need to worry about your personal file when you refresh Windows 10. You will lose the programs on your PC, but your files will be intact. You can refresh Windows 10 by initiating it on your own by the Settings app.
21. Replace Webcam
Well, if you are not able to use webcam even on other video calling platforms, then it is time to change it. Sometimes, integrated webcams can also have issues. In such cases, you need an external webcam for video calling.
You can buy a new webcam from Amazon. However, make sure the webcam is compatible with your device and Skype.
Conclusion
Skype can be a savior when you wish to talk with someone face to face. You can have free video calls via Skype. However, sometimes Skype camera may not function as expected. In such situations, you need to tweak in some settings and get the webcam fixed. The solutions mentioned above can help you fix Skype camera not working issue easily. You can try the solutions without any technical expertise.
Related: How to Troubleshoot Webcam Issues in Windows 10


