Sometimes, the mouse cursor disappears from your screen out of nowhere. It is challenging to work with only a keyboard; we need a mouse to operate the computer efficiently. In most cases, the cursor disappears in Windows 10 when you wake up your PC from sleep or upgrade the OS.
Well, the situation may sound dreadful, but some workarounds can bring back the cursor on your screen. Some of the reasons the cursor disappears are faults in drivers, viruses, incorrect settings, and corrupt system files.
22 Solutions To Fix for Cursor Disappears in Windows 10
You can go through the below fixes to get back the mouse cursor on your screen. The list of fixes is long because there is no one reason for the cursor to disappear in Windows 10. We recommend going through the solutions in chronological order.
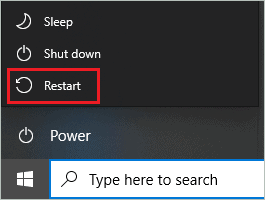
1. Restart your Computer
Restart can fix many temporary glitches of your computer. You can try restarting your computer to get back the missing mouse cursor. Press the Windows logo key and then press Tab along with the down arrow key to go to the restart option.
Press Enter once you are on Restart.
Post the restart check if you can see the mouse cursor on your computer.
2. Check for Windows Update
If the cursor disappears in Windows 10 due to the operating system’s issues, updating Windows with the latest available version can help you fix that.
Press Windows key + I to open the Settings app. Use Tab and the right arrow key to go to the Update & Security section. Press Enter to open that section.
Go to the Check for Updates button using the Tab key and press Enter.

Download and install the updates if available. Once the updates are installed, you may see the cursor back on your screen.
3. Check Mouse and USB Port
You cannot see the mouse cursor on your screen if the mouse is not working properly. You also need to check the USB cable and port of your computer in case of a wired mouse. In case of the wireless mouse, check the mouse.
If there is any damage to the USB cable, you can replace it with a new one and also try connecting it to another USB port. Try connecting the mouse to another system and check if it works well there.
4. Re-enable Mouse
Sometimes, the mouse may get disabled when you upgrade to Windows 10, or the PC sleeps for more time. You can enable your mouse using the function keys and settings app.
The combination of function keys differs from manufacturer to manufacturer. You can use the manual or look on the official website to know the exact function keys. In most cases it is Fn (Windows Function key) + F3/F5/F6/F9/F11.
If the cursor disappears in Windows 10 even after using the function keys, you can try enabling the mouse using the Settings app.
Note: The below settings are for Dell laptops. It can differ for different manufacturers.
Open the Settings app and go to Devices. Press the Tab key and go to Additional mouse options.
Now, in the mouse properties, make sure you are in the Dell Touchpad tab. Navigate to Click to change Dell Touchpad settings and press Enter.
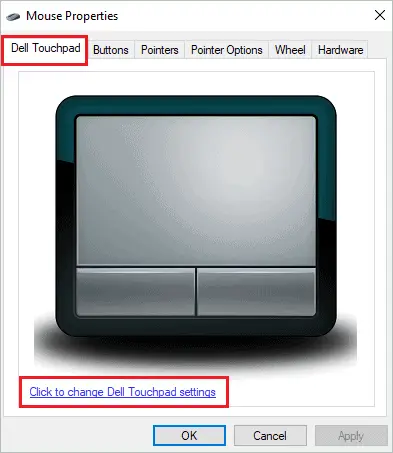
In the Touchpad settings window, make sure the Touchpad is On.

This will make it possible to use the touchpad of your laptop.
If you are using a Desktop computer with a mouse, you can go to the Device Settings tab in the Mouse Properties dialog box. Select the mouse that is not showing a cursor and press Enter once you go to the Enable button in the same window.
Post this, try moving the mouse to check if the pointer is moving on your monitor.
5. Unplug External Peripherals
If still the cursor disappears in Windows 10, you can temporarily unplug all the external peripherals from your computer. The external devices can sometimes conflict with mouse drivers, causing the cursor to disappear in Windows 10.
The external devices include earphones, USB flash drives, wired printers, and other such devices. Once the external peripherals are unplugged, you can reboot your computer and check if the disappeared mouse cursor is back.
6. Use Hardware and Device Troubleshooter
The hardware and device troubleshooter can help you find and fix the problem with the mouse pointer. You can no longer find the hardware and device troubleshooter in the Settings app, and therefore you need to run a command for the same.
Press Windows key and type cmd there. Use arrow keys and open Command Prompt from the search result.
In the Command Prompt terminal, type the following command and press Enter to execute it.
msdt.exe -id DeviceDiagnosticWhen the Hardware and Devices troubleshooting window appears, check the checkbox next to Apply repairs automatically. Navigate to Next and press Enter.
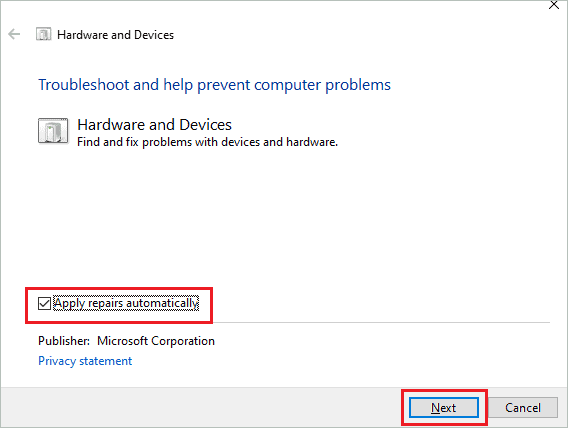
You can now follow the on-screen instructions to complete the troubleshooting.
7. Uninstalled Recently Added Software
Some software can conflict with the system files causing unwanted trouble to the users. If you recently installed some software and started experiencing mouse cursor issues, you can temporarily remove it.
The software from untrusted sources can cause such issues. The cursor disappears in Windows 10 also because of the software compatibility issue. If the cursor is back, you can find a replacement for the uninstalled application or speak to the support team regarding the issue.
8. Check for Virus and Malware
The cursor disappears in Windows 10 because of viruses and malware residing on your computer. You can use the simple malware removal tool or Windows Security feature to scan and remove viruses.
For third-party antivirus software, refer to their website to know how to perform a malware scan. To use Windows Security, follow the steps given below.
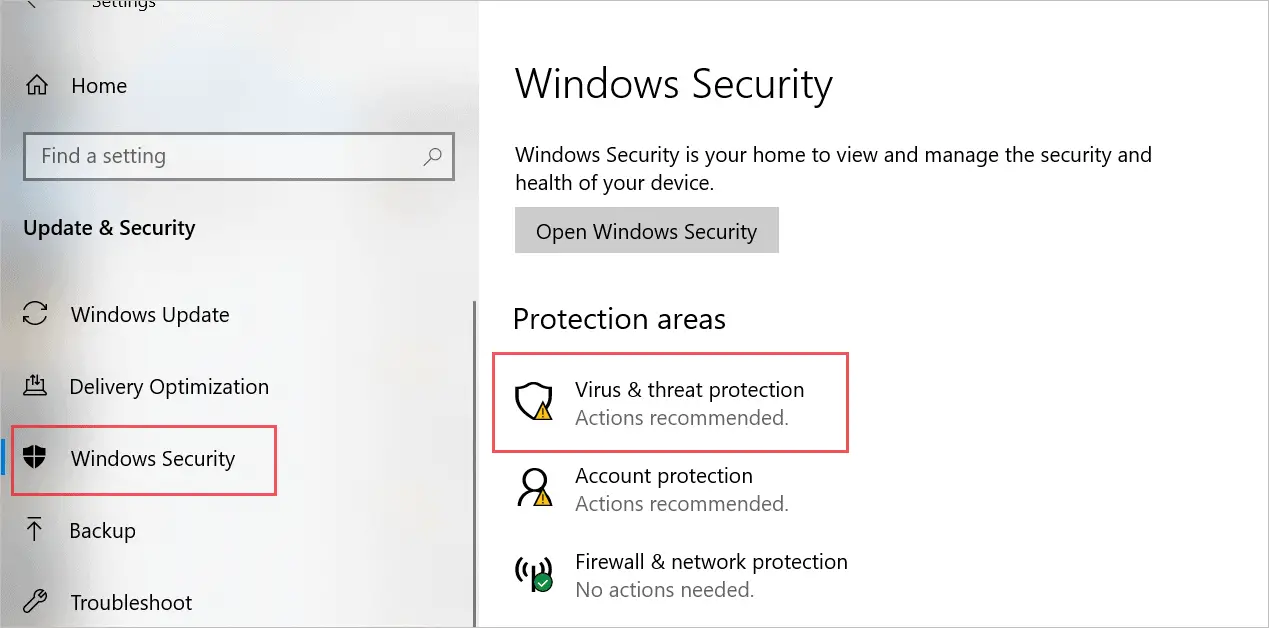
Step 1: Navigate to Settings ➜ Update & Security and go to Windows Security from the left panel.
Step 2: Use the Tab key with the down arrow button and open Virus & threat protection.
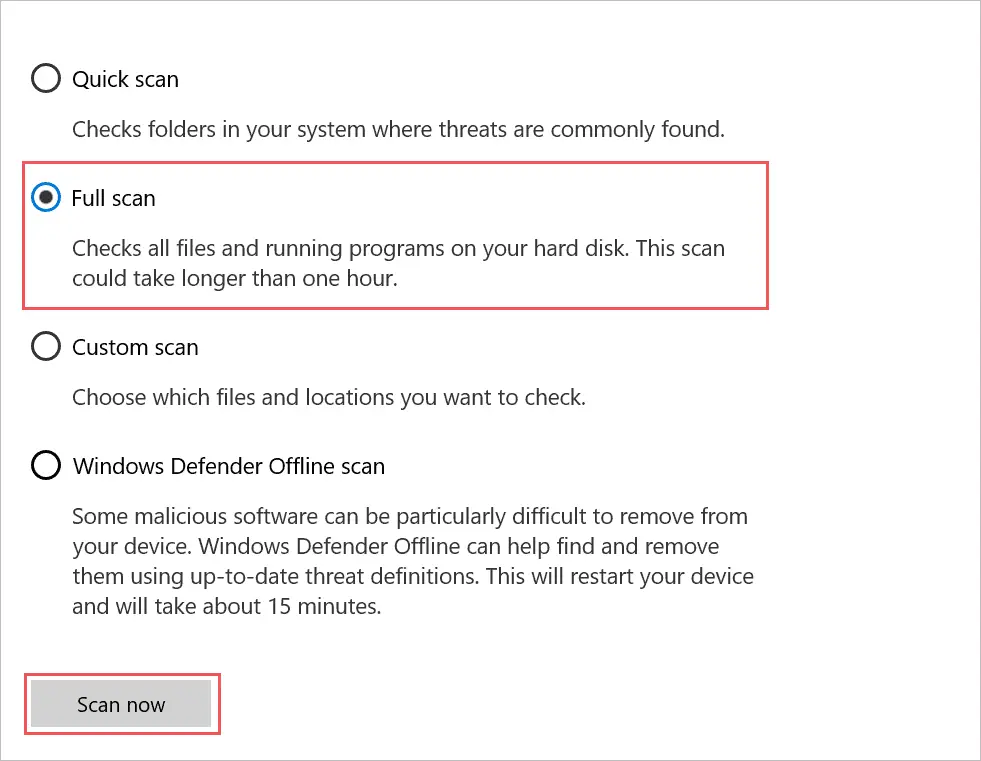
Step 3: On the next window, press Enter on the Scan options link to open it.
Step 4: Select the Full scan option, then go to Scan now button and press Enter.
Now, let Windows complete the scanning process and remove the viruses from your computer. After the scan, reboot your PC and check if the mouse pointer is back or not.
9. Run SFC Scan
The corrupt system file can contribute to Windows 10 problems. If the cursor still disappears in Windows 10 PC, you can run the system file checker (SFC) scan. The SFC scan can fix the damaged system files.
You need to run the sfc /scannow command in Command Prompt terminal to perform the SFC scan. Post the scan, reboot your computer and check if the missing cursor appears on your display screen or not.
10. Delete Temporary Files
Sometimes the temporary files can not only slow down your entire PC but can create unwanted trouble as well. You can delete the temporary files using Disk Cleanup in Windows 10.
Press the Windows key and search for Disk Cleanup. Open the same from the search results. If you have multiple drives, make sure you select the one which has Windows operating system. In the Disk Cleanup window, check the checkbox next to temporary files using the Spacebar.
You can use Tab and Enter to press OK or simply press Enter to delete the temporary files.
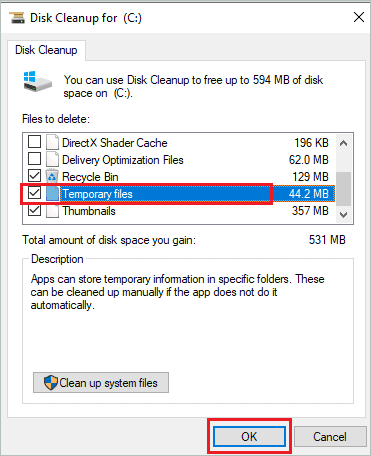
You can delete temporary internet files and recycle bin contents as well using the Disk Cleanup.
11. Update Mouse Drivers
The outdated drivers can cause the cursor to disappear in Windows 10. You can update the device driver with a new stable version to fix mouse cursor issues.
To update drivers, open Device Manager by searching for it and expand Mice and other pointing devices using the right arrow key. You can right-click on the affected mouse device driver by pressing Shift + F10 keys together and select Update driver with arrow keys from the context menu.
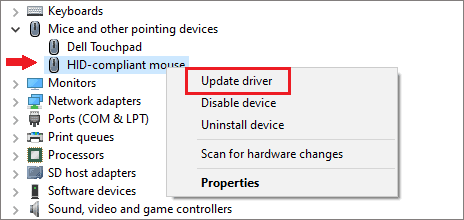
Follow the instruction wizard to complete the update process. If the driver had the issue, you would get the mouse cursor back after updating the device driver.
12. Roll Back Mouse Drivers
If you recently updated the mouse device driver and started experiencing issues post that, you can roll back the device driver. Sometimes, the unstable version or faulty driver software can cause the cursor to disappear in Windows 10.
It is essential to check the compatibility and source before downloading the driver software. You can simply roll back driver and wait for the stable version to release before updating it.
13. Disable Cortana
You can make the mouse cursor visible in Windows 10 by turning off Cortana. You can disable Cortana temporarily and check if that helps you bring back the disappearing cursor on the screen.
14. Change Power Options Settings
A few changes in the power options can help you fix the cursor issue in Windows 10. This solution is only applicable to laptops.
Open Control Panel by searching for it in the Start menu. In the Control Panel, type power options in the search bar and open ‘Change what closing the lid does.’
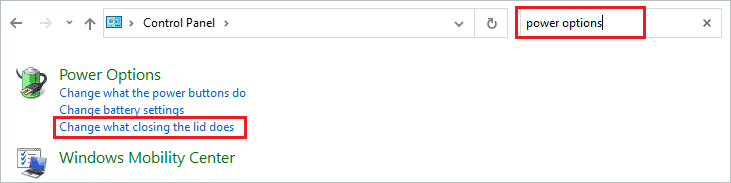
Select Do nothing for On battery and Plugged in option next to When I close the lid. You can use the right arrow key to change the drop-down menu option.
Go to the Save changes button using the Tab key and press Enter.
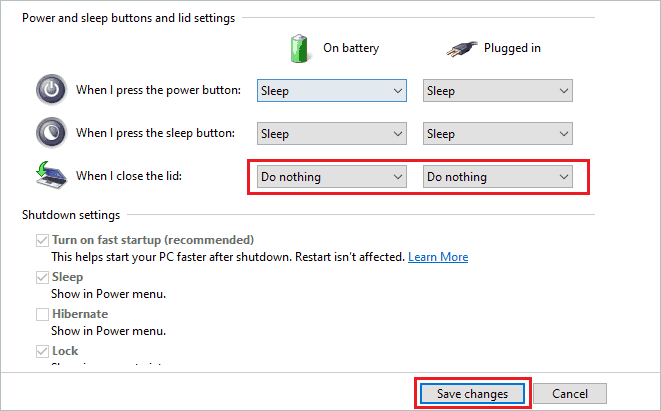
Now, whenever you close the lid, your computer will not go to sleep, and the cursor won’t disappear.
15. Change Pointer Settings
If the cursor disappears in Windows 10 PC even after making changes in power settings, you need to update pointer settings. Follow the below instructions to make the right changes.
Step 1: Press Windows key + R to open Run, type control mouse, and hit Enter.
Step 2: When the Mouse Properties window appears, use the Tab key and go to the Pointer Options tab.
Step 3: Uncheck the checkbox next to ‘Hide pointer while typing’ using the Spacebar.
Step 4: Tab down to Apply the changes.
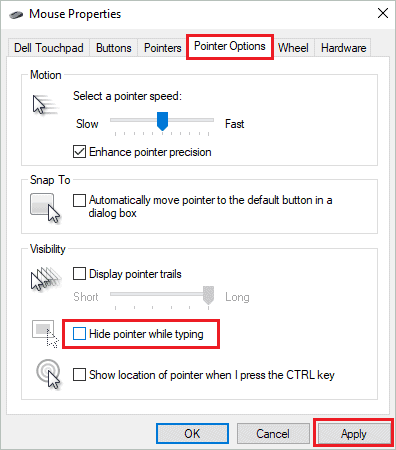
Step 5: Now, navigate to the Pointer tab and set Scheme to None.
Step 6: Uncheck the checkbox next to Enable pointer shadow.
Step 7: Apply the changes and close the dialogue box.
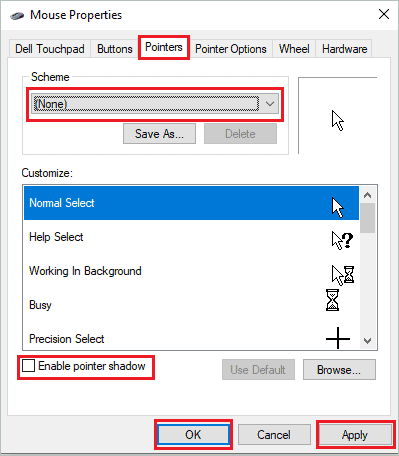
Move your mouse to check if the lost cursor is now visible or not.
16. Disable Tablet Mode
If your laptop supports tablet mode, try to disable it. In tablet mode, the cursor is not visible, as the touch screen is enabled by default. You can disable tablet mode in the notification area.
If you don’t find the tablet mode option in the notification center, you can check the PC manual to know how to disable it. The process can be different depending on the manufacturer and model you are using.
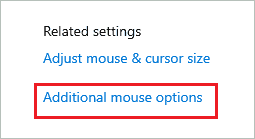
17. Change Cursor Size
Changing the cursor size can help some Windows users get back the missing mouse cursor. It may sound weird, but there is no harm in trying out this simple fix.
Go to Settings app ➜ Devices ➜ Mouse and open ‘Adjust mouse & cursor size’ under Related settings.

On the next screen, change the pointer size by using the right arrow key.
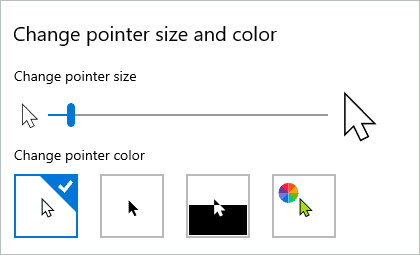
If you don’t like the cursor size, you can change it again once the issue is fixed.
18. Disable NVIDIA High Definition Audio
Sometimes, the audio drivers can cause the mouse pointer to disappear. The Windows users fixed the cursor issues by disabling the NVIDIA and Realtek drivers. You can refer to the official website and disable the driver temporarily.
19. Modify Registry
You can modify registry settings to fix the issues with the mouse pointer. If the cursor disappears in Windows 10 even after trying all the above solutions, you need to make changes to Registry Editor.
Registry Editor stores crucial information about your Windows 10 settings, and therefore we recommend backing up the registry before making any changes.
Open Registry Editor by searching for it in the Start menu. In the Registry Editor, navigate to the below-mentioned path.
HKEY_LOCAL_MACHINE\SOFTWARE\Microsoft\Windows\CurrentVersion\Policies\SystemIn the System folder, search for EnableCursorSuppression and press Enter to open it. Now, change the Value data to 0 and press Enter to save it.
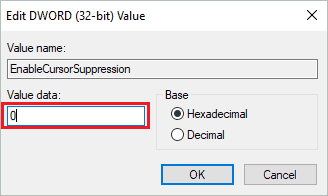
Close the Registry Editor and reboot your computer. You can now check if this resolved the mouse pointer issue or not.
20. Reinstall Mouse Driver
The mouse cursor disappears in Windows 10 because of the issues in device drivers. Reinstalling the device driver can help you get the cursor back.
Open Device Manager and go to Mouse drivers as explained above. Press Shift + F10 to open the context menu of the driver that is causing trouble.
Select Uninstall device from the context menu.
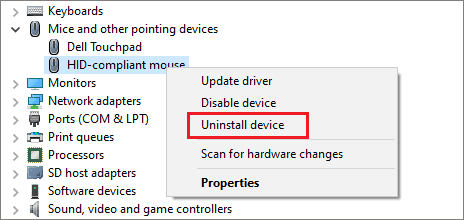
Follow the instruction wizard to remove the driver from your PC. Once the driver is uninstalled, wait for some time and then go to the Action tab in the menu bar of Device Manager.
Select Scan for hardware changes from your keyboard.
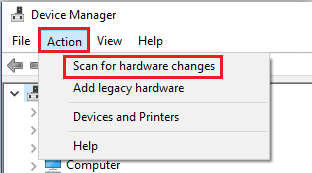
This will reinstall the mouse driver for you. Alternatively, you can restart your computer so that Windows can reinstall the driver.
21. Disable Hardware Acceleration
If the mouse cursor disappears in Windows 10 as soon as you launch Google Chrome, you need to disable hardware acceleration via Chrome settings.
Launch the Chrome app on your computer and press Alt + E to open the 3-dot menu. Select Settings from the menu.
In the Chrome Settings window, search for hardware and toggle the switch next to Use hardware acceleration when available. You can use the Spacebar to toggle the switch.

Relaunch the Chrome browser and then check if the cursor is visible or not.
22. System Restore
The last option to fix the cursor that disappears in Windows 10 is to perform a system restore. You can restore the system to a point where it was working perfectly fine. System restore is an easy process, and anyone can do it.
The system restore will not delete any personal files and data; only the application/software installed after the restore point was created will be removed. As soon as the system is restored, the missing cursor will be back on your screen.
Conclusion
For many Windows users, it is difficult to work without a mouse. Although there are keyboard shortcuts for all the tasks requiring a mouse pointer, it becomes time-consuming and annoying at times. The mouse cursor disappears in Windows 10 because of many different reasons, as mentioned above.
However, it is easy to get it back with the long list of solutions mentioned above. You will have to work with some hotkeys to perform some of the tasks, but it will get the missing pointer back on your screen. At times, a simple restart will work for some users, while others may require a system restoration.
The solution that may work for you may not work for your friend having the same issue. It all depends on the reason, manufacturer, and device driver on his/her system.


