Key Takeaways:
- All the Windows related configurations can be handled via Settings app in Windows 11
- The issues with Settings app are experienced after upgrading to Windows 11
- You can try resetting Windows Settings app to fix the issues with it
Most of the settings are shifted from Control Panel to Settings app with Microsoft Windows 11. When you face the Windows 11 Settings app not opening issue, it becomes challenging to manage major and minor PC configurations. For example, the Settings app can freeze, stop responding, or not open at all.
Many users experienced problems with the Windows Settings app after upgrading to Windows 11. It can be a temporary bug that can be resolved by updating PCs or uninstalling recent updates. Let’s see how to fix the Windows settings not working issue on your computer.
12 Solutions To Fix Windows 11 Settings App Not Opening Issue
The below fixes can help you resolve issues with the Settings app. If the Windows 11 Settings app is not working or not opening, the below list of solutions can fix it for you.
1. Try Different Ways of Opening Settings App
If the Settings app is not opening via the Start menu, you can try the Windows key + I keyboard shortcut or any other way to launch the Settings app. There are different ways to open the Windows 11 Settings app; you can try them all to check if any of the ways can open the Settings app or not.
In most cases, there can be a temporary bug in any one way, but launching the app with an alternate option can let you open it without any issues.
2. Perform a Windows Update
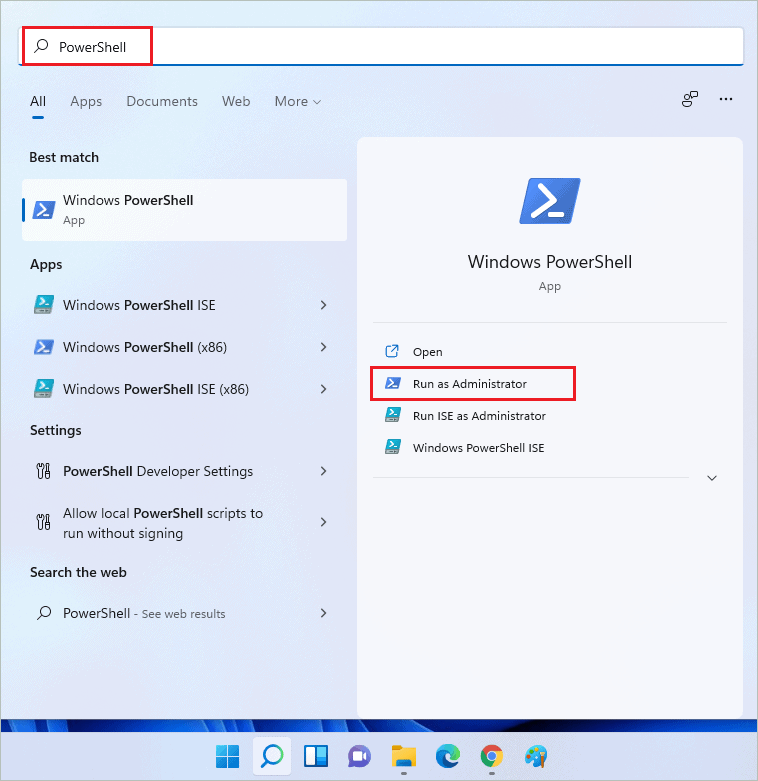
If the Settings app is not opening because of pre-existing issues, there might be an update that can help you resolve it. However, you need to install the update via the PowerShell Windows terminal as you cannot access the Settings app.
Step 1: Press Windows key + S and type “PowerShell” in the search bar. Click on “Run as administrator” for Windows PowerShell. This will open elevated PowerShell for you.
Step 2: In the PowerShell window, type the “Install-Module PSWindowsUpdate” command and press the “Enter” key to execute it.
The command will install the Windows Update module so that you can check and install the update via PowerShell.

Step 3: Once the module is installed, execute the below command.
Get-WindowsUpdateStep 4: Lastly, execute the command to install the update if available.
Install-WindowsUpdateThe update will be installed on your computer, thus resolving Windows 11 Settings app not opening issue.
3. Use SFC and DISM Utility
The corrupt system files can contribute to many issues on your computer. However, you can use Windows inbuilt utilities like SFC (System File Checker) and DISM (Deployment Image Servicing and Management) to scan and repair corrupted files on your computer.
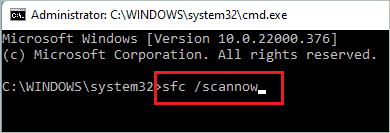
Press Windows key + R to open the “Run” window and type “cmd” there. Press Ctrl + Shift + Enter keys simultaneously to open elevated Command Prompt.

Once the terminal prompt opens, type the “sfc /scannow” command and press the “Enter” key to execute it.
Once the SFC command is executed, you can perform the DISM scan by executing the below command.
DISM /Online /Cleanup-Image /RestoreHealth 
The command execution may take time, but the corrupt file issue will be resolved with this. After the command is executed, you can reboot the PC.
Once the PC restarts, try to open Settings app and check if it opens without any issues or not.
4. Reset Windows Settings App
You can reset the Settings app to resolve the issues with it. There are two ways to reset the Settings app in Windows 11. One is to use the Settings app, and another is to use the PowerShell command.
As the Settings app is not opening, you can use the PowerShell command to reset the Windows 11 Settings app. Once the Settings app is reset, you can use it without issues.
5. Uninstall Recent Windows Update
If you started experiencing problems with the Settings app after updating the PC with a recent update, you could remove the update. You can either go back to previous versions or uninstall the update. This depends on how many days have passed since your recent update.
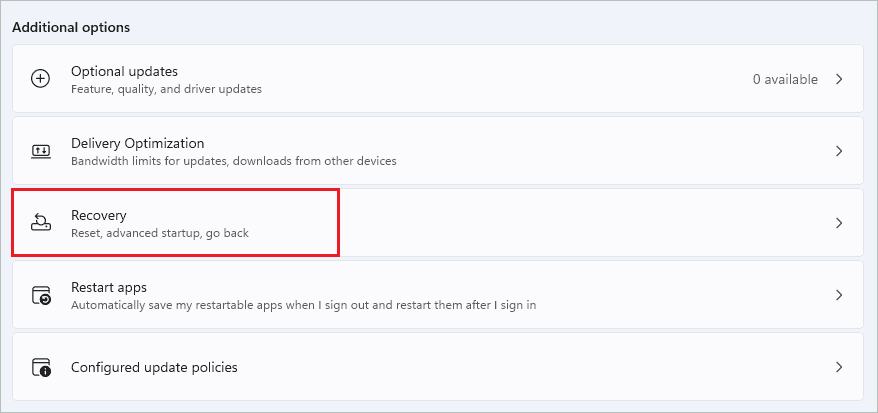
Step 1: Press Windows key + I to open the “Settings app” and go to the “Windows Update” from the navigation pane.
Step 2: In the Windows Update window, click on “Advanced options.”

Step 3: Now, under Additional options, click on “Recovery.”
Step 4: If the Go back button is enabled, click on it and follow the wizard on your screen to remove the recent update. However, if the time limit is passed, the button will be disabled, and you need to perform the below steps to uninstall a recent update from your computer.
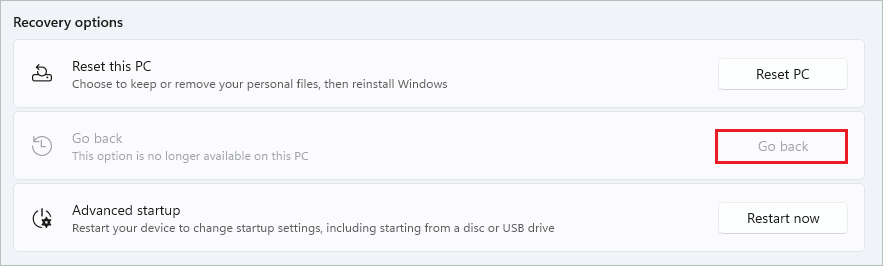
Step 5: If the Go back button is disabled, follow this and all the below steps to uninstall the update manually.
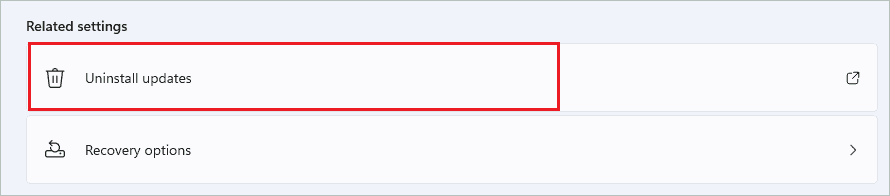
Navigate to the “Windows Update” section again and click “Update history.”
Step 6: Click on “Uninstall updates.”
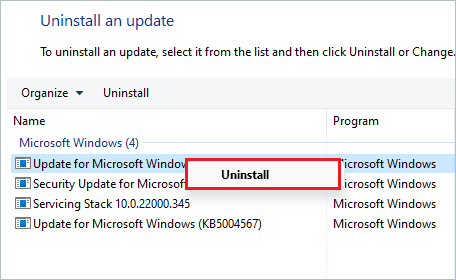
Step 7: A Control Panel window will open on your screen; you can right-click on the most recent update and select “Uninstall” from the context menu.
If you are not sure about the recent update, check the “Installed On” column.
Once the update is uninstalled, reboot your computer and check if the Windows 11 Settings app not opening issue is resolved or not.
6. Boot in Safe Mode
The safe mode starts with limited drivers and applications. For example, you can start Windows 11 in safe mode and then try to open the Settings app. If the Settings app opens without any issues in safe mode, some third-party apps are probably causing the issue.
You can perform a clean boot to find the third-party culprit. However, if the Windows 11 Settings app is not opening in safe mode also, you may need to perform other fixes to resolve the problem.
7. Perform a Clean Boot
You can perform a clean boot to find a third-party culprit. Irrespective of the Settings app working in safe mode, you need to perform a clean boot. The process of finding the troublemaker using the safe mode method is lengthy, but you will resolve the issue permanently.
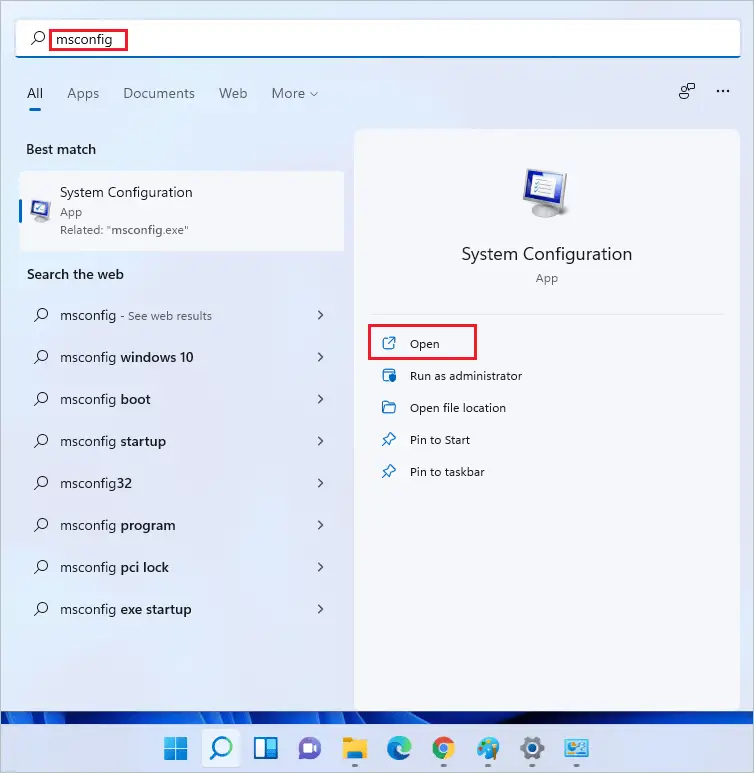
Step 1: Click on the search icon on the taskbar and search for “msconfig.” Click on “Open” for System Configuration from the search results.
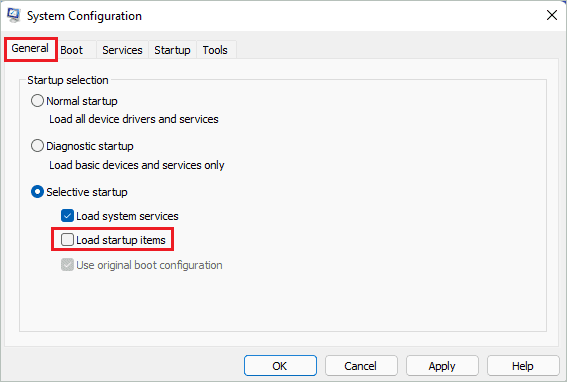
Step 2: In the System Configuration window, go to the “General” tab and select “Selective startup.”
Step 3: Uncheck the checkbox next to “Load startup items.”
Step 4: Navigate to the “Services” tab and check the checkbox next to “Hide all Microsoft services.”
Step 5: Click on the “Disable all” button to disable all third-party services. Click on “Apply”, followed by “OK.”
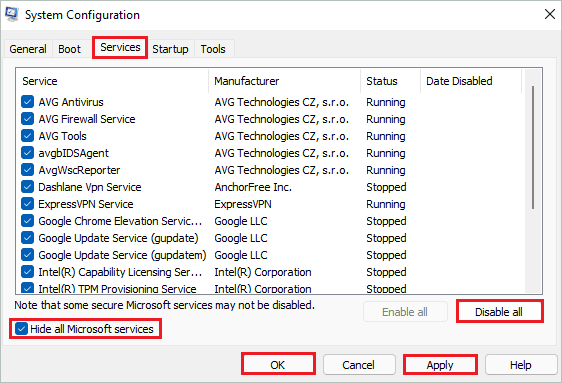
Step 6: Now, reboot your PC and check if the Windows 11 Settings app not opening issue is resolved or not.
If the Settings app starts working, you can enable services one by one and reboot after enabling each service. You can repeat this process until the service that is causing the problem is found.
8. Check Access to the Settings App
If access to PC settings is prohibited, you won’t be able to open the Settings app. However, you can check Local Group Policy Editor and allow access to the Settings app.
Step 1: Search for “gpedit” in the search bar and open “Edit group policy” from the search results.
Step 2: In the Local Group Policy Editor window, go to User Configuration ➜ Administrative Templates ➜ Control Panel.
Step 3: Double-click on “Prohibit access to Control Panel and PC settings.”
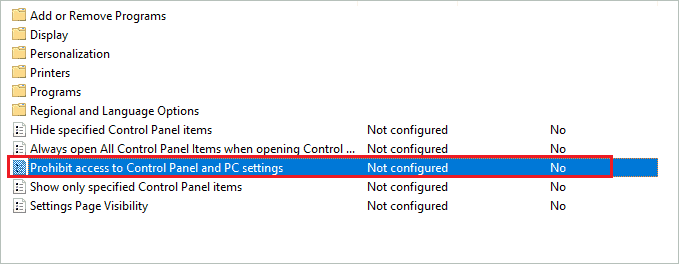
Step 4: Select “Not Configured” and click on “Apply” followed by “OK.”

Once the changes are made, close the Local Group Policy Editor and check if the Settings app opens or not.
You can also reboot the PC before attempting to open the Settings app.
9. Reinstall the Settings App
Although the Settings app is installed on your Windows 11 PC, you can reinstall it via the PowerShell terminal. If there is any bug or issue in application files, reinstallation can fix it.
Open PowerShell with administrator access and execute the below command there.
powershell -ExecutionPolicy Unrestricted Add-AppxPackage -DisableDevelopmentMode -Register $Env:SystemRoot\ImmersiveControlPanel\AppxManifest.xmlWait till the command is executed, and then reboot your PC. After the restart, check if Windows 11 Settings app not opening issue is resolved or not.
10. Create A New User Account
Sometimes, the account files and data can get corrupted, resulting in unwanted issues on your computer like Windows 11 Settings app not opening. You can create a new account with admin privileges and move the data from the current account to the new one.
Open elevated Command Prompt that is one with administrator privileges. Then, type the following command in the Command Prompt window and press the “Enter” key to execute it.
net user /add username passwordHere, change the user name with the account name you want and the password with some strong password.
Now, add the created user to the admin group by executing the below command.
net localgroup administrators username /addMake the changes in the command by changing the username with the newly created account name.
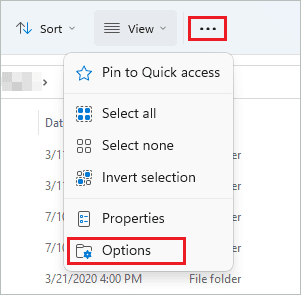
You can sign in to the new user account and check if the Settings app works or not. If the Settings app starts working, open File Explorer from the new account and go to C:\Users\Old_Username.
Click on the 3 dots at the top of the Windows Explorer window and select “Options” from the menu.
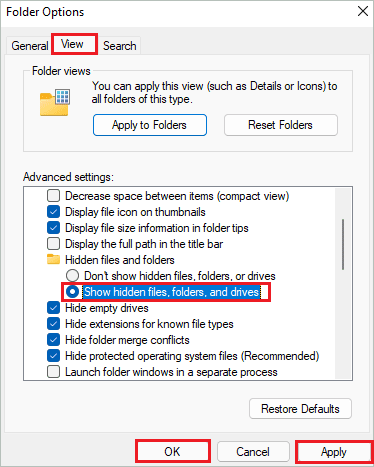
Now, go to the “View” tab and select “Show hidden files, folders, and drives” below “Hidden files and folders.”
Click on “Apply” and “OK” to save the changes.
Copy all the contents from the old user folder and paste it to C:\Users\New_Username. All your data will now be available in the newly created user account.
11. Perform A System Restore
You can perform a system restore to fix Windows 11 Settings app not opening. If the app was working properly after the upgrade and the issue started recently, the system restore can help you.
All your personal files and data won’t be affected by system restore; only the apps that were installed after the restore point was created will be uninstalled. Also, the recent settings will be removed.
However, once the Settings app is fixed, you can make changes in settings again and install the required app.
12. Reset or Refresh the Windows 11 PC
The last option to resolve the Windows 11 Settings app not working is to reset or refresh your PC. When you reset the PC, you remove all the files and data from it. However, when you wish to refresh it, the files and data are kept, but settings and apps return to factory defaults.
Both processes reinstall Windows OS on your PC without any installation media or ISO file. You can choose reset or refresh based on your computer’s files, folders, and personal data.
Final Thoughts On Windows 11 Settings App Not Opening
It becomes difficult to manage settings if the Settings app is not working as expected. You may need terminal prompts or some other way to manage basic Windows 11 settings. However, you can perform some fixes to resolve the issue with the Settings app.
If you face the Windows 11 Settings app not opening issue, it can be because of a buggy Windows update, third-party services, apps, corrupt system files or account files, or simply an access issue. The above guide can help you fix the Settings app not opening issue in Windows 11.
FAQs
Why can’t I open the Windows 11 Settings?
You can’t open the Windows 11 Settings because of corrupt files, third-party apps/services, access issues, problems with the current user account, a recent Windows update, or outdated Windows OS.
How do I reinstall the Settings app?
How to fix Windows 11 Settings app not opening issue?
You can perform an update or remove a recent buggy update, do SFC and DISM scans, reset or reinstall Settings app, perform a clean boot to find third-party culprit, create a new user account, change the access settings or reset, refresh or restore your PC to fix Windows 11 Settings app not opening issue.


