Start Menu in Windows 10 is one of the most used features in Windows 10. It is the easiest way to navigate and access any file, app, or settings via one click or by search menu. However, sometimes you may end up in a situation where your Windows 10 Start menu is not working as expected. Well, this can be because of a temporary glitch or some issues with files and registries.
Windows 10 Start Menu Not Working? Top 18 Solutions To Fix It
If the issue isn’t that serious, then a simple restart may fix it for you, but if the issue is with registry, apps, or files, you may need to dig in deeper for solutions. The solutions discussed below will guide you even if you have little technical expertise.
Note – Most of the solutions will require admin access, so we recommend you to have access to the admin account before getting started with it.
1. Restart Your PC
Which is the easiest and quickest solution to fix Windows 10 start menu not working? Well, it is to restart your PC. Sometimes, this simple trick may also work if there is a minor and temporary glitch in your system. As your Start menu isn’t working, you may need an alternate way to restart your Windows 10 computer.
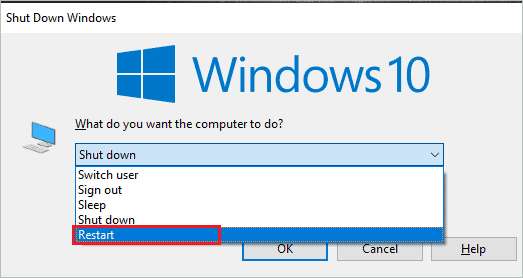
To do so, firstly close all the apps and software currently running on the system and then press Alt + F4. When the window to shut down the system appears on your screen, click on the drop-down menu and click on Restart, followed by OK. Your system will restart once you click on OK.
Once your system is restarted, check if your windows button and start menu on Windows 10 works normally. If there are still issues, then check out other solutions from the list.
2. Restart Windows Explorer
Sometimes, just restarting Windows Explorer via Task Manager works for many users to fix Windows 10 start menu not working issue.
To restart Windows Explorer, press Ctrl + Shift + Esc and open Task Manager. In the Task Manager, go to the Process tab.
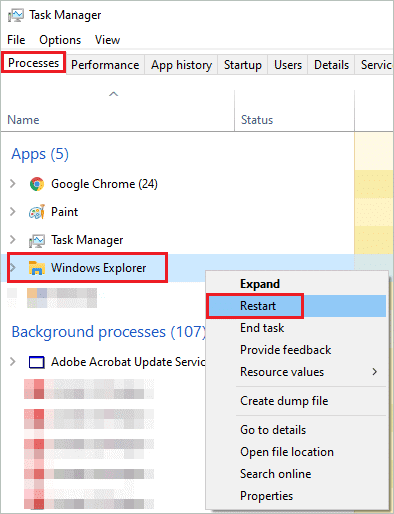
Next, search for Windows Explorer and when found right-click on it and click on Restart from the context menu. Once the Windows Explorer restarts, check if the Windows button not working issue is resolved.
3. Delete Cortana Files using Command Prompt
You can delete the temporary Cortana files to fix Windows 10 start menu not working issue. Windows will recreate the deleted files on its own.
Open Command Prompt with admin privileges by using Task Manager or Run, as mentioned above. When the command prompt opens, execute the below-mentioned commands one after the other.
CD/d "%LOCALAPPDATA%PackagesMicrosoft.Windows.Cortana_cw5n1h2txyewy"Taskkill /F /IM SearchUI.exeRD /S /Q SettingsThe commands will delete the damaged files, and Windows will recreate them. Post the command execution, check if the Windows 10 start menu not working issue is resolved.
Note: if you can’t find AppData folder in Windows 10, you might want to deal with that issue first.
4. Perform SFC Scan
System File Checker (SFC) is a great utility that can scan for corrupted files and provide you a fix for Windows 10 start menu not working issue. Your system may not work as expected if there is any system file missing or corrupted. If this is why the start button is not working, then the sfc scan can fix it for you.
You can run the sfc /scannow command in command prompt as well as the PowerShell terminal. If you are facing issues while opening the command prompt or PowerShell as the start menu is not working, then you can follow the below ways to open it.
Press Windows key + R to open Run, type cmd there, and then press Ctrl + Shift + Enter to open the command prompt with admin privileges. The command prompt window will open for you.
If you wish to execute the sfc command on the PowerShell terminal, then press Windows key + X to open the quick link menu. There you can find Windows PowerShell (Admin); click on it.
Once you open the terminal window of your choice, type sfc /scannow and hit Enter to execute the command. The complete guide on sfc /scannow command can be helpful if you wish to know how to use it in different situations.
5. Run DISM command
The DISM or System Update Readiness tool is a good solution to solve Windows corruption errors.
To use DISM, you have to first open the Command Prompt or PowerShell. You can do so by following the simple steps mentioned in solution number 3.
Alternatively, you can follow the below-mentioned way to open the command prompt.
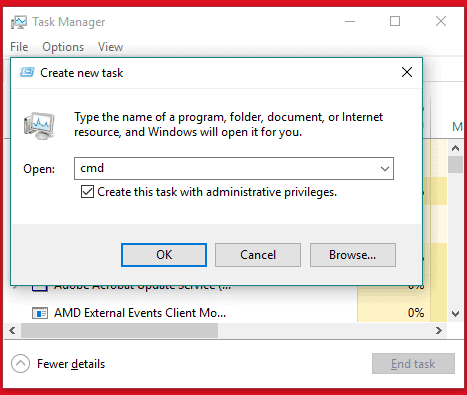
Open the Task Manager by pressing CTRL+SHIFT+ESC. Now, from the top left corner, navigate to File ➜ Run new task. Create a new task by typing cmd in the Open text box and tick the checkbox next to ‘Create this task with administrative privileges’ and then hit Enter.
Now, as the Command Prompt/PowerShell terminal is in front of you on your screen, type the following command and press Enter.
DISM.exe /Online /Cleanup-image /Restorehealth It may take a long time to complete, so don’t exit the window in between, as doing so may cause issues with system files.
6. Try Booting in Safe Mode
Booting Windows in Safe mode can resolve the issue of Windows 10 Start Menu not working.
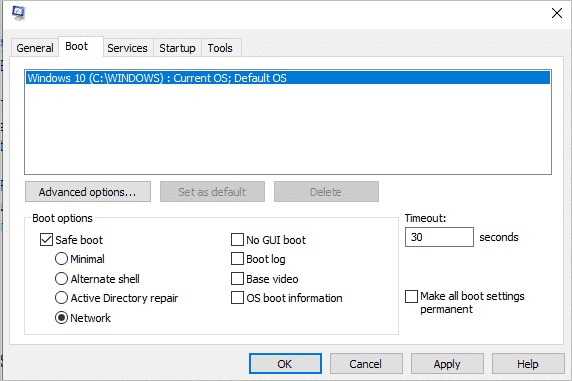
To boot the system in Safe mode, first press Windows key + R and type msconfig in the box and press Enter. In the System Configuration Window, move to the Boot tab, check the box next to Safe boot and select Network. Lastly, click on Apply, and then OK.
Now, restart your PC and check if things are back to normal on your system. Now, again go to the System configuration and uncheck the Safe boot option under the Boot tab. Click Apply and reboot your PC.
If there are still issues with the Windows button and start menu, then you may need to try other solutions from the list.
It is important to disable safe mode, irrespective of whether this solution works or doesn’t work for you. Otherwise, after every restart, your Windows 10 PC will boot in safe mode.
7. Check for Windows Update
If DISM and SFC cannot fix your buggy system files, then a Windows update might fix the issue of Windows 10 Start Menu not working.
To check and update your Windows 10 system, go to Settings by pressing Windows key + I. Next, go to Update & Security and click on Windows Update seen in the left panel.
Now, click on Check for updates.
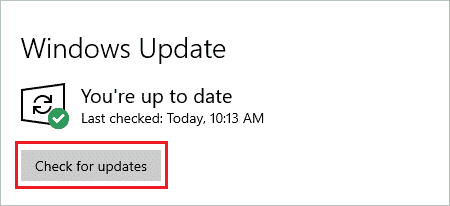
Download and install the updates. You will have to restart your computer to install the update. After the update is done and the system restarts, check if the issue has been resolved.
8. Make Start Menu Cover Your Full Screen
Well, this solution may be weird, but it has fixed the issue of Windows 10 Start Menu not working for some Windows 10 users. To do so, press Windows key + I and open Settings. Click on Personalization and then, in the personalization settings, go to Start from the left panel.
Now, in the Start settings, search for ‘Use Start full screen’ and toggle the switch below it to turn on this setting in Windows 10.

Once done, click on the Windows button and check if the Start menu is working or not.
9. Disable Sign-In Info in Windows 10
If you are facing trouble whenever you restart your computer or update it, this solution can help you fix it. You can disable the sign-in information used to set up your system after the restart or update.
To do so, go to Settings ➜ Accounts. And then, navigate to Sign-in options through the left panel. Next, scroll down to find ‘Use my sign-in info..’ option, and when found disable this option by toggling the switch below it.
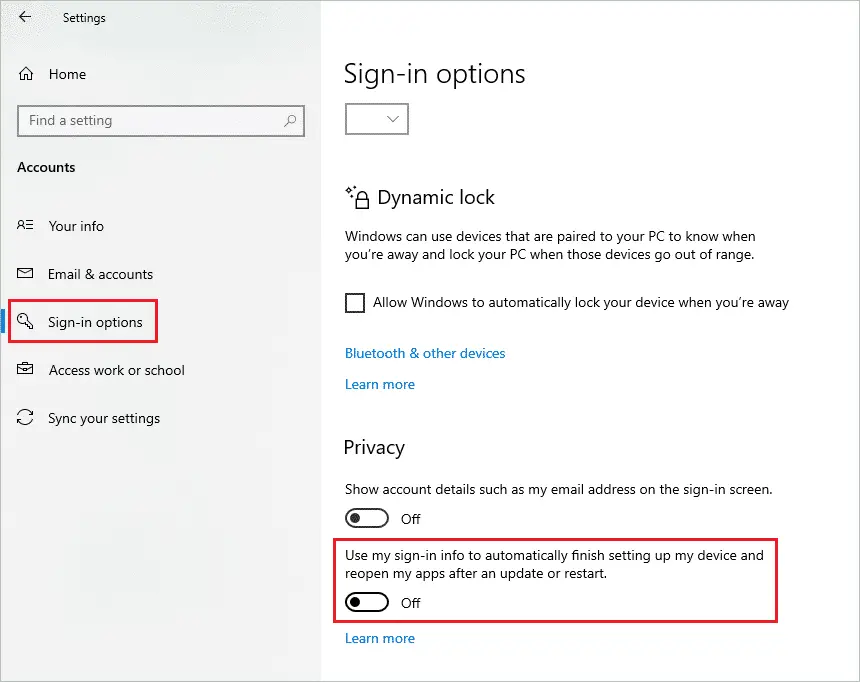
Once done, restart your system and check if the Windows 10 start menu not working issue is resolved.
10. Disable Third-Party Antivirus
If you recently installed a new antivirus or have updated an old one, then there are chances of your antivirus conflicting with some Windows files. This can cause the Windows 10 start menu not working issue for you.
You can disable the antivirus temporarily and check if the issue is resolved. If this resolves your issue, you can look for other malware remover tools to protect your computer from malware and virus. However, if you have paid for your antivirus, you can speak to its customer care and get the issue resolved.
11. Start Application Identity Service
You can fix Windows 10 start menu not working by starting a service named Application Identity. To start this service, you need to open the Services application. Follow the steps mentioned below to start the Application Identity Service.
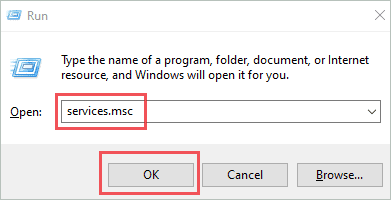
Press Windows key + R to open Run. In Run, type services.msc and click OK.
In Services, search for Application Identity, right-click on it and click on Start from the context menu.
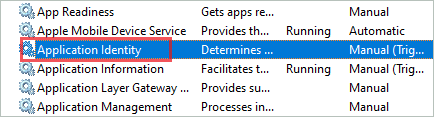
Once done, click on the Windows button on your screen and check if it works normally.
12. Rebuild Index
It may take time to rebuild the index, but if the issue is with the index, then rebuilding it will definitely fix your start menu. Follow the steps mentioned below to rebuild the index conveniently.
Step 1: Press Windows key + R
Type the following command to open Indexing Options.
control /name Microsoft.IndexingOptionsStep 2: In Indexing Options, click on Modify.
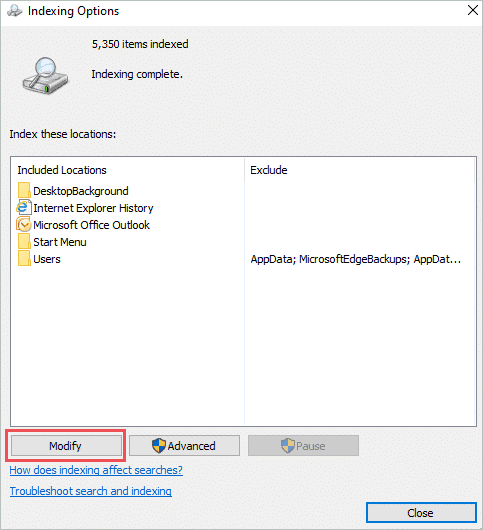
Step 3: When the next window opens, click on Show all locations.
Step 4: Now, in the Indexing Options window, click on Advanced.
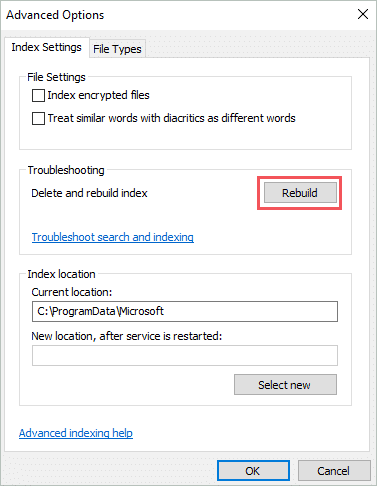
Step 5: In the Advanced Options window, click on Rebuild. The warning message will say that it will take time, click OK.
Once your index is rebuilt, shut down your system, and start it again. To shut down without the start menu, press Alt + F4 together.
13. Modify the Registry Value
The Dropbox can cause trouble while accessing the start menu in Windows 10. To fix this, you need to modify the registry value. It is recommended to back up registry before modifying it.
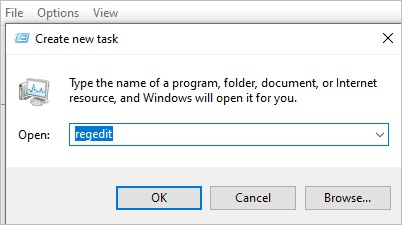
Step 1: Open Task Manager by pressing Ctrl + Shift + Esc, click on File in Task Manager menu bar and then Run a new task from there.
Step 2: When the Create new task window opens, type regedit there, and hit Enter.
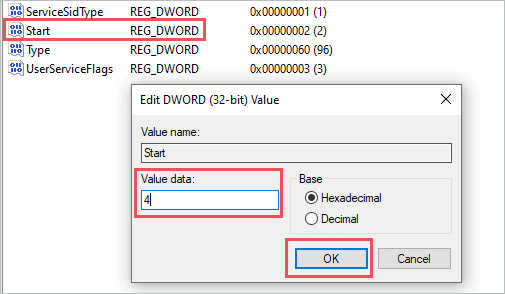
In Registry editor, navigate to–
HKEY_LOCAL_MACHINESYSTEMCurrentControlSetServicesWpnUserServiceIn the WpnUserService folder, click on Start DWORD and modify its value data to 4 and click on OK.
Restart your computer and check if Windows 10 start menu not working issue is resolved.
14. Add New DWORD in Registry
If modifying the Registry editor didn’t help, you can try adding a new DWORD at the mentioned location. As many a time, this has fixed the issue of the start menu for users.
Open Registry editor as mentioned above and then navigate to –
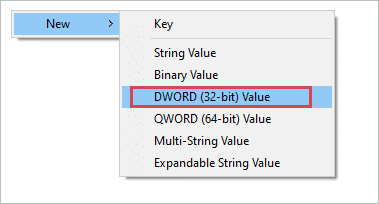
HKEY_CURRENT_USERSoftwareMicrosoftWindowsCurrentVersionExplorerAdvancedRight-click on the empty space and click on New ➜ DWORD (32-bit) Value. Next, name the DWORD as EnableXamlStartMenu.
After creating a new DWORD as mentioned above, restart Windows Explorer by referring to solution number 2. Post that, check if Windows 10 start menu not working issue is resolved.
15. Use PowerShell Command to Fix Windows 10 Start Menu
The PowerShell in Windows 10 is a powerful terminal that can help you do many things. The command mentioned below worked for many users to fix their frozen start menu.
Press Windows key + X and click on Windows PowerShell (Admin). Next, type the following command and hit Enter.
Get-AppXPackage -AllUsers | Foreach {Add-AppxPackage -DisableDevelopmentMode -Register "$($_.InstallLocation)AppXManifest.xml"} Make sure you type in the same command in PowerShell terminal. Once the command is executed, restart your system and check if the issue is fixed.
16. Reinstall the Video and Sound Card Drivers
If you cannot see the start menu or there is an issue while displaying the start menu, then the culprit can be video and sound card drivers. You can reinstall them via Device Manager.
Firstly, log in via the admin account and press Windows key + X to open the quick link menu. Click on the Device Manager, search for Sound, video and game controllers, and expand it when found.
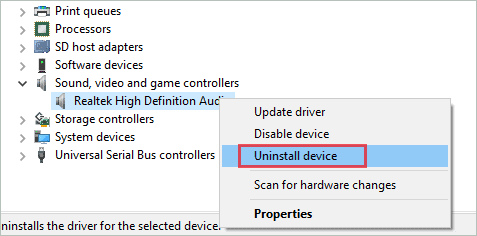
After the uninstall, you can restart the Windows computer, and then check if the issue is resolved. The device drivers in Windows 10 are important for all you can do on your system. Hence, the start menu not working can be fixed by reinstalling the drivers.
17. Create a New User To Fix Windows 10 Start Menu Not Working
If the current account is corrupted and none of the above solutions worked for you, then you can create a new user to get rid of the Windows 10 start menu not working issue. You need to sign-in from the admin account to create a new account.
Step 1: Press Windows key + I to open Settings and click on Account.
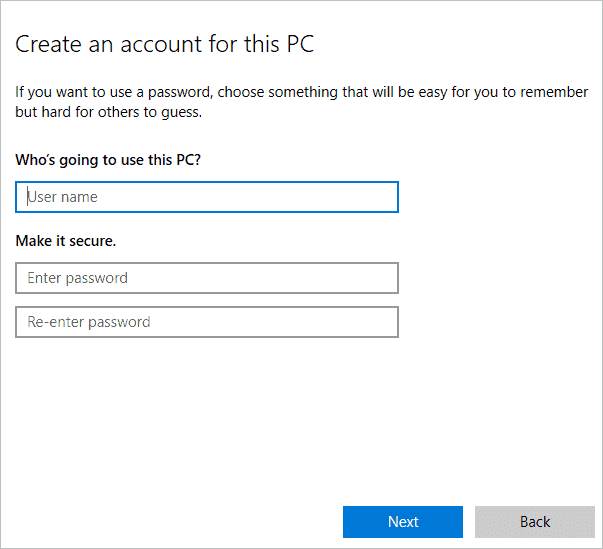
Step 2: From the left panel, click on Family & other users. And in the Family & other users window, click on Add someone else to this PC.

Step 3: When the window pops up, click on ‘I don’t have this person’s sign-in information’ followed by ‘Add a user without a Microsoft account.’
Step 4: Fill in the required details when asked for.
Once done, log in using that account and check the start menu.
18. Refresh or Reset your PC
It may sound like a daunting task, and you will probably want to avoid it completely, but resetting Windows can help you to resolve Windows 10 start menu not opening issue. You can keep your personal files and data when performing your system refresh.
The reset and refresh option in Windows 10 is a bit lengthy process but can easily fix many Windows-related problems. To initiate the reset process, open the Settings app, and go to Update & Security ➜ Recovery.
Click on Get started under Reset this PC and then follow the instructions on the screen to complete the process.
Conclusion
When the start menu doesn’t work, the app and settings accessibility becomes difficult, as you need to remember all the shortcuts and commands to open them. The solutions mentioned above can fix the Windows 10 start menu not working problem for you in an easy way. Many issues in Windows are because of temporary glitch, and restart can always fix it.
However, if you need to perform complex solutions like editing registry and executing commands, then we recommend taking the system image as a backup. A simple and straightforward explanation can help you perform complex solutions in a convenient way.
(Updated on 25th December 2020)


