Nothing is more dreadful than a screen turning blue in the middle of important work. The blue screen error can show up out of nowhere and stay indefinitely on your screen. The PFN List Corrupt in Windows 10 is the error message that appears on the blue screen.
This error is caused by a corrupt Page Frame Number (PFN) list. The PFN list keeps track of the locations of files on a physical hard drive. And therefore, when this list is corrupted Windows operating system does not know how to deal with it. Thus, ending in the blue screen of death. The blue screen of death is unpredictable and makes it difficult to use the computer. You need to fix the blue screen error as soon as possible to avoid delays in your work schedule.
What Causes PFN_LIST_CORRUPT Error in Windows 10?
The blue screen errors like PFN list corrupt do not occur because of one specific reason. The reason may differ from person to person and system to system.
Some of the common reasons to experience these stop code errors are:
- Outdated device drivers
- Malware and viruses
- Hardware issues
- Outdated Windows OS
- Corrupt system files
- Issues with hard drive
- Third-party software issues
It is essential to try out the solutions mentioned below to eliminate PFN List Corrupt in Windows 10.
20 Solutions To Fix PFN List Corrupt In Windows 10
The below fixes will help you get rid of the PFN list corrupt blue screen error in Windows 10. We recommend going through the fixes chronologically to avoid complicated fixes if the issue resolves with simple ones.
If you cannot log in to your system normally, you can enter safe mode in Windows 10 and perform the below fixes.
1. Update Windows Operating System
Microsoft provides frequent updates for Windows 10, which includes bug fixes, new features, security patches, and driver updates. So if the root cause of PFN list corrupt BSOD is outdated drivers or OS, updating Windows will fix it for you.
Press Windows key + I to open the Settings app and go to the Update & Security section.
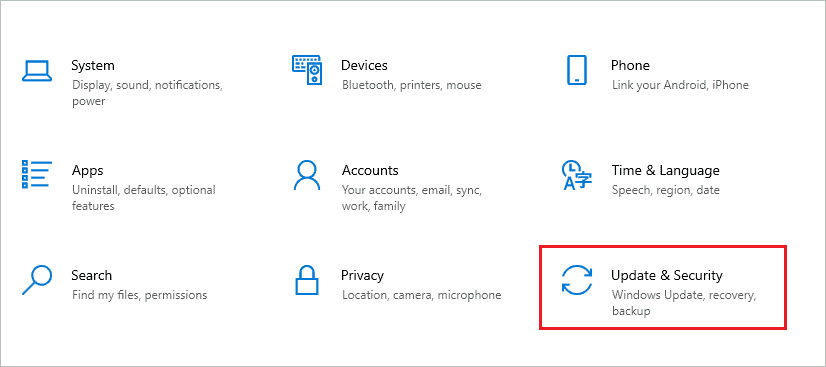
Make sure you are in the Windows Update section from the left panel and then click on Check for updates button.

If there are any updates, download and install them. You will need a solid and reliable Internet connection to complete the download.
After the Windows OS is updated, check if the PFN list corrupt blue screen error is resolved or not.
2. Update Device Drivers Manually
If Windows update didn’t have driver update and you are still experiencing stop code error, you can manually update driver. You can either use Device Manager or automatic driver updater like Driver Booster to update device drivers.
If you are thinking of updating the driver manually, we recommend using the stable and correct driver software for the update. To update drivers via Device Manager, follow the steps given below.
Step 1: Press Windows key + X to open the quick link menu and click on Device Manager to open it.
Alternatively, you can search for Device Manager in the Start menu and open it.
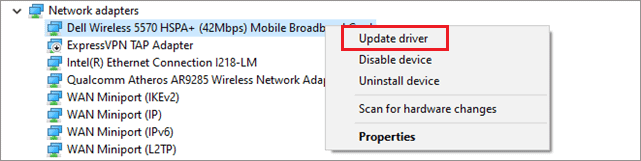
Step 2: In the Device Manager window, expand all the sections and check for outdated or corrupt drivers.
There might be some signs like an exclamation mark, yellow mark, or question mark indicating issues with drivers.
Step 3: Once you find any such drivers, right-click on it and select Update device from the context menu.
You can then follow the instructions on your screen to complete the update process.
An application like Driver Booster can automatically update the outdated drivers for you. So, if you are not familiar with working with Device Manager, you can use such software to ease your update work.
3. Check your RAM
You can experience PFN List Corrupt in Windows 10 because of issues in RAM. To check if the memory is working properly, you can use Windows Memory Diagnostic tool.
Press Windows key + R to open Run and type mdsched.exe there. Press the Enter key to open Windows Memory Diagnostic tool.

When the tool opens, select Restart now and check for problems. Make sure you save the unsaved work and close the opened application/files on your computer before restarting the PC.

The PC will restart, and it will scan the problems with RAM and memory. Now, wait till 100% scanning is complete.
Once the PC restarts normally, you will see all the issues that the diagnostic tool fixed. You will no longer see PFN_LIST_CORRUPT BSOD error on your screen after the scan.
4. Run SFC Utility
The damaged and corrupted system files can cause too many issues and trouble while using the system. You can use the Windows System File Checker (SFC) utility to scan and fix the corrupt Windows system files in Windows 10. The SFC scan can help you fix many Windows errors.
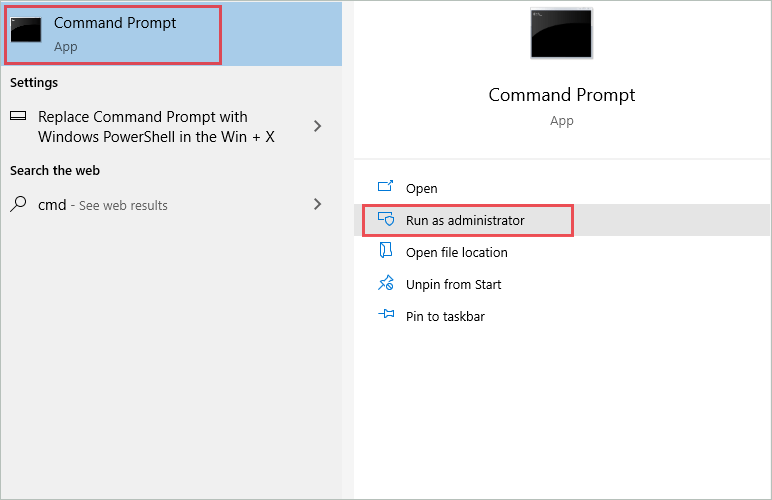
Press Windows key + S and type cmd in the Start menu’s search bar. Click on Run as administrator for Command Prompt.
In the Command Prompt window, type the sfc /scannow command and press Enter to execute it.
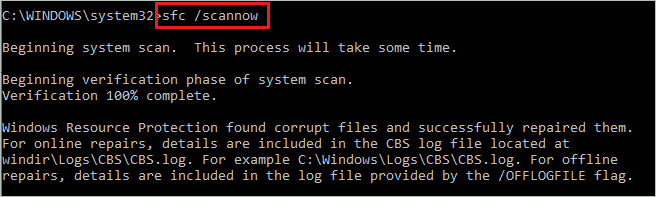
The command execution may take time, so don’t close the terminal prompt in between. If there are any issues, you will see the ‘Windows Resource Protection found corrupt files and successfully repaired them’ message on the Command Prompt.
Once done, you can reboot the computer and then check if the PFN list corrupt in Windows 10 is resolved or not.
5. Use DISM Command
If the SFC scan didn’t help in fixing PFN List Corrupt in Windows 10, you could try using the DISM (Deployment Image Servicing and Management) command.
Open Command Prompt with administrator privileges and execute the command –
dism /online /cleanup-image /restorehealth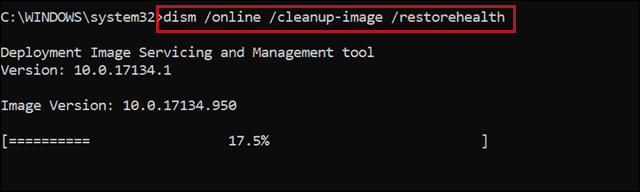
Wait till the command is executed and the complete scan is done. You can then reboot your PC to get rid of the blue screen error.
6. Disable OneDrive
Many users reported that OneDrive could cause issues with PFN. You can temporarily disable Microsoft OneDrive to fix the problem you are facing.
There are many ways to disable OneDrive in Windows 10. If you have Windows Pro or Enterprise, use Group Policy Editor and if you have the Home version, use Registry Editor.
Using Group Policy Editor
Press Windows key + R to open Run and type gpedit there. Click OK to open Group Policy Editor.
In the Local Group Policy Editor, go to Computer Configuration ➜ Administrative Templates ➜ Windows Components ➜ OneDrive.
Now, search for Prevent the usage of OneDrive for file storage and double-click on it.
Select Enabled and then click on Apply, followed by OK.
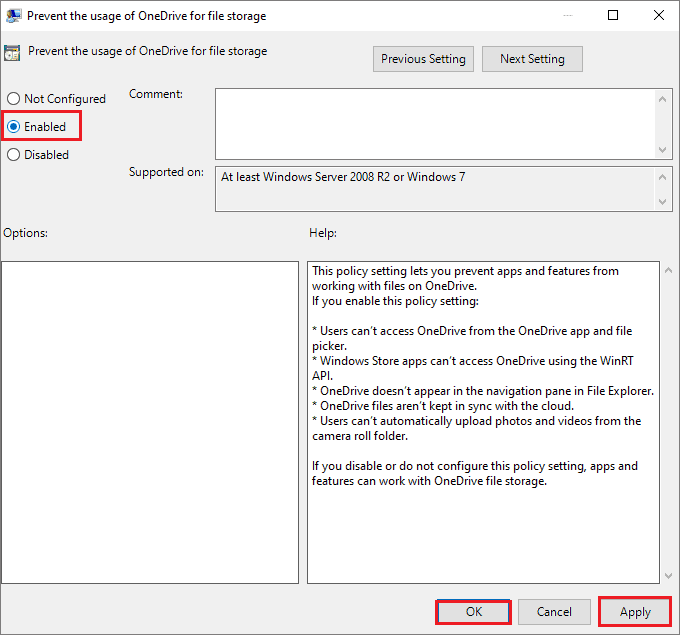
Restart the PC, and OneDrive will be disabled on your PC after the reboot.
Using Registry Editor
Open Run and type regedit there. Press Enter to open the Registry Editor.
In the Registry Editor, navigate to the below-mentioned path.
HKEY_LOCAL_MACHINE\Software\Policies\Microsoft\WindowsIn the Windows key, try to locate the OneDrive key. If it is not present, right-click on Windows and select New ➜ Key.
Name the new key as OneDrive.
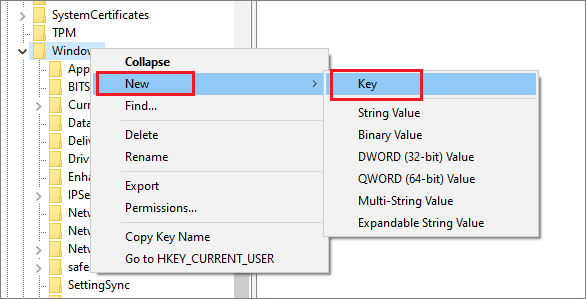
Now, go to the OneDrive key and right-click on the empty space in the right pane. Select New ➜ DWORD (32-bit) Value.
Name the DWORD as DisableFileSyncNGSC.
Next, double-click on DisableFileSyncNGSC and change its Value data to 1. Finally, click OK to save the changes.
Close the Registry Editor and reboot your computer. OneDrive will be disabled until you enable it again from the Registry Editor.
7. Run Hardware and Device Troubleshooter
You can run a hardware and device troubleshooter to fix the PFN List Corrupt in Windows 10. If you have Windows 10 with build 1809 or later, you won’t find it in the Settings app. Windows users before and after build 1809 can use the below way to run hardware and device troubleshooter.
Open Run by pressing Windows key + R and then type msdt.exe -id DeviceDiagnostic there. Press Enter to open Hardware and Device Troubleshooter.
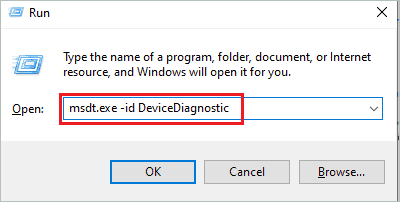
When the troubleshooter opens, click on the Advanced link and then check the checkbox next to ‘Apply repairs automatically.’
Click on Next to begin the troubleshooting.
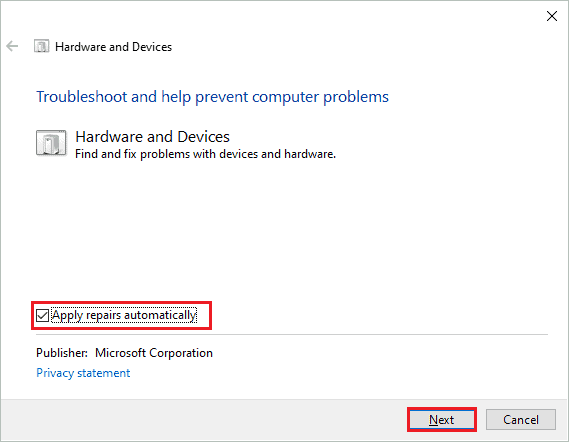
You can follow the wizard on the screen to complete the troubleshooting process.
8. Uninstall Problematic Software and Applications
If a stop code error appeared after installing a specific app, you could uninstall it. The apps from unauthorized sources can cause unwanted trouble in your system. The apps which are incompatible with your computer can cause BSOD errors out of nowhere.
If you are not sure about the culprit, you can perform a clean boot to find it. Follow the steps given below to perform a clean boot.
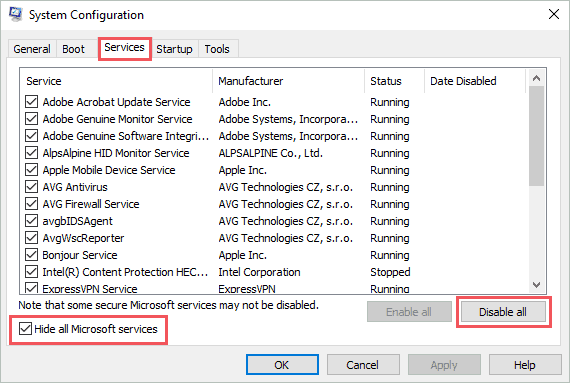
Step 1: Search for msconfig in the Start menu’s search box and open System Configuration from the search results.
Step 2: Now, go to the Services tab and check the checkbox next to ‘Hide all Microsoft Services.’
Step 3: Click on Disable all button to disable all third-party services and applications.
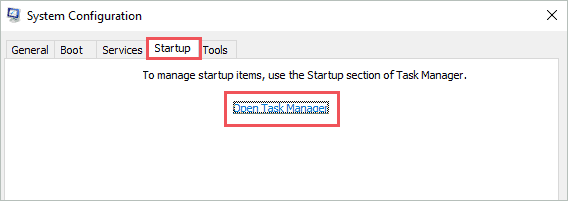
Step 4: Navigate to the Startup tab and click on the Open Task Manager link.
Step 5: In the Task Manager window, go to the Startup tab and check all the applications. Click on the apps/software that is not required during the startup and click on the Disable button.
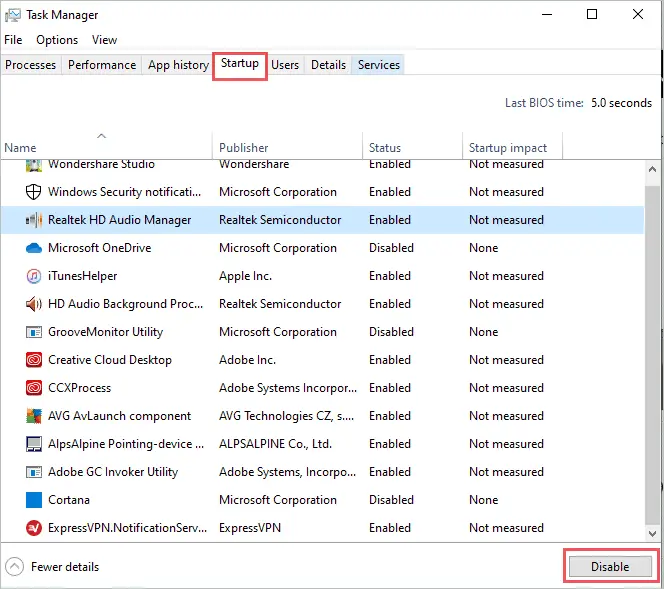
Step 6: Close the Task Manager and save the changes on the System Configuration window.
Restart the PC and check if you got rid of PFN_LIST_CORRUPT blue screen error. If the stop code error is resolved, start the services and startup app one by one to find the culprit. The process may take time, but it will eliminate the BSOD permanently.
9. Check for Virus and Malware
The viruses and malware can cause too many unwanted problems on your computer, and at times it can damage your computer beyond repair. Therefore, it is always recommended to have a good malware removal tool on the PC to avoid such destruction.
If you don’t have any third-party antivirus, you can use Windows Security to scan for viruses and malware on your PC.
Step 1: Open the Settings app and go to Update & Security.
Step 2: From the left pane, go to Windows Security and then click on Virus & threat protection under Protection areas.

Step 3: When the Windows Security window opens, click on the Scan options link.
Step 4: Select the Full scan from the scan options and click on the Scan now button to begin with scanning.
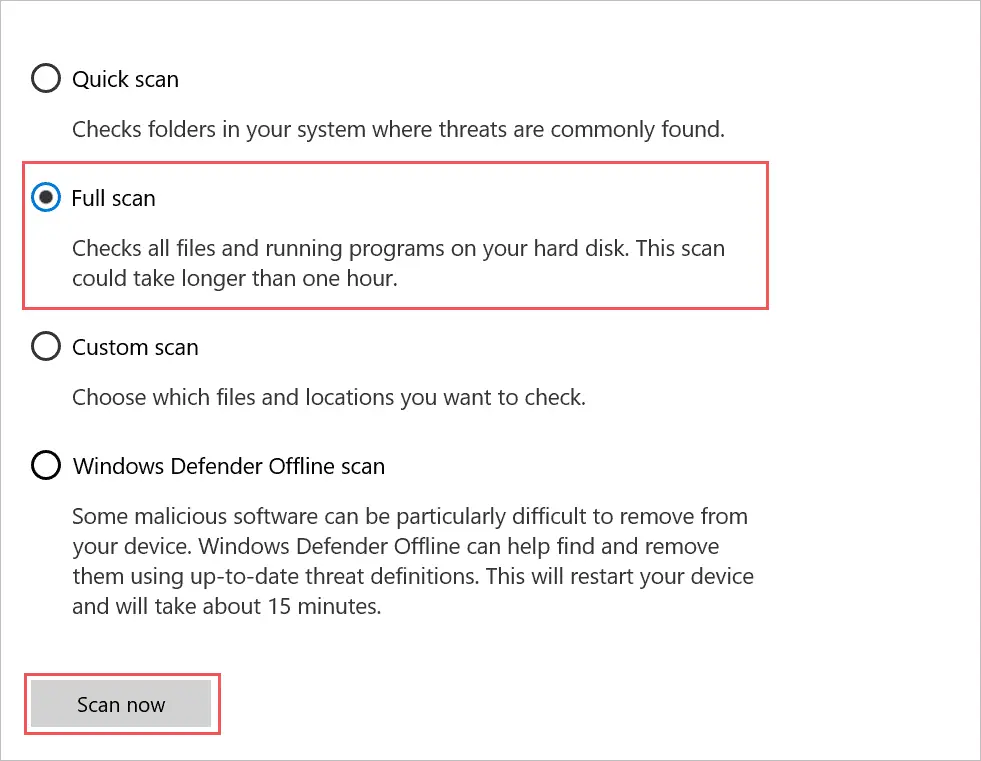
Now, Windows will scan and check for malware on your PC. If the scan finds any viruses and malware, Windows will remove them for you.
After the scan, reboot your PC and then check if the PFN List Corrupt Windows 10 is resolved or not.
10. Execute chkdsk Command
You can check the disk for errors and issues. If the disk has bad sectors or has corrupted files, there can be PFN List Corrupt error in Windows 10. The chkdsk command in Windows 10 can help you check the hard drive and fix disk errors.
Open Command Prompt with administrator privileges and type the following command there.
chkdsk C: /f /x /r Press Enter to execute it.
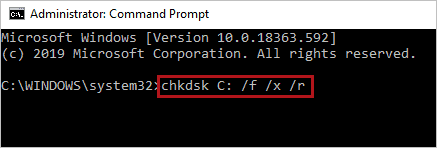
If your system drive (Windows OS is saved) is not C, you can change the C letter in the command with the system drive letter. Then, let the Windows scan and fix the issue with the hard drive.
You can scan all the drives on your PC by changing the alphabet.
11. Uninstall Extra Antivirus Software
If your PC has more than one third-party antivirus program installed, you need to get rid of them. The extra antivirus software can cause many issues with your PC and also lead to blue screen errors in Windows 10.
You can decide on any one antivirus software and uninstall the rest of them.
To uninstall extra antivirus software, open the Settings app and go to the Apps section.
In the Apps settings, search for the antivirus software you wish to uninstall and click on it from the search results.
Click on the Uninstall button.
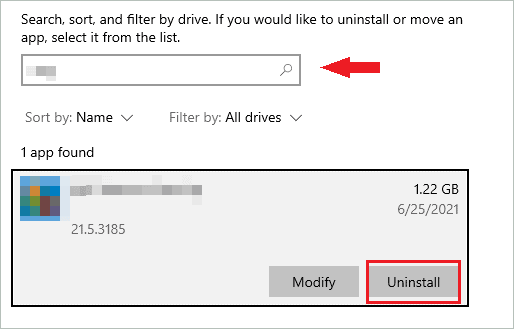
You can also turn off Avast or other extra antivirus software from your computer. Once the changes are made, reboot your PC and check if you were able to fix PFN List Corrupt in Windows 10.
12. Disable Fast Startup
The fast startup feature makes your PC turn on faster. However, many users fixed the PFN_LIST_CORRUPT error by turning off fast startup. You can disable fast startup easily via the Control Panel.
Step 1: Search for the Control Panel in the Start menu and open the same from the search results.
Step 2: In the Control Panel window, set the View by option to Small icons and then click on Power Options to open it.
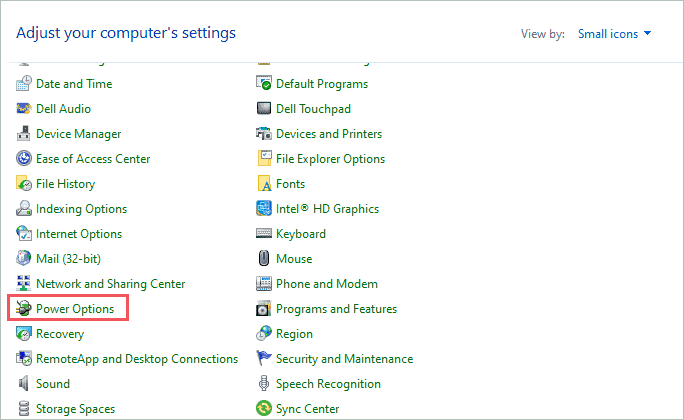
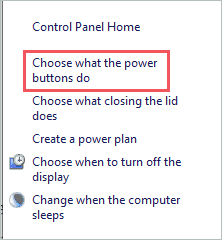
Step 3: Click on Choose what the power buttons do from the left panel.
Step 4: Now, click on the Change settings that are currently unavailable. You will need to enter administrative credentials after clicking on the link.

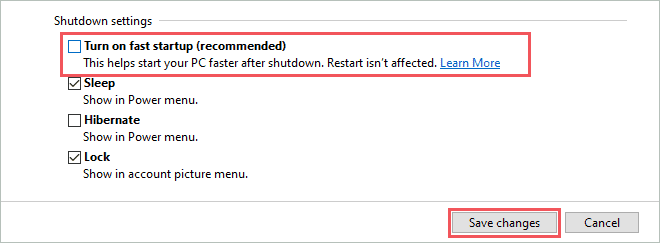
Step 5: Uncheck the checkbox next to ‘Turn on fast startup (recommended)’ and then click on Save changes.
After the changes are done, reboot your PC and then check if the BSOD issues are resolved or not.
13. Repair Registry in Windows 10
The registry in Windows 10 holds crucial information and settings of your computer. If your registry has some errors or is not cleaned for a long time, you can experience PFN List Corrupt in Windows 10 blue screen error.
You can manually fix registry errors so that there are no major issues with your computer. Also, make sure you clean the registry regularly after fixing the errors.
The registry can also be repaired using the SFC (System File Checker) scan. You can refer to solution number 4 for help in performing an sfc scan. After the registry is repaired, check if the PFN_LIST_CORRUPT error is fixed or not.
14. Uninstall Recent Windows Update
Some incompatible Windows updates can cause blue screen errors and other issues on your computer. If you recently updated Windows and started experiencing PFN_LIST_CORRUPT in Windows 10, you can uninstall the recent update from your PC.
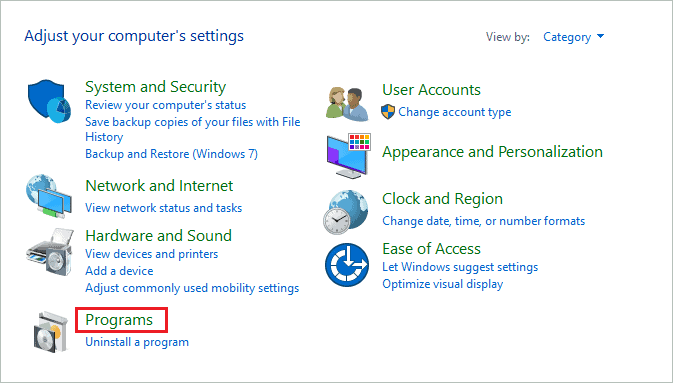
Open the Control Panel by searching for it in the Start menu. Then, click on Programs in the Control Panel window.
Now, click on View installed updates under Programs and Features.

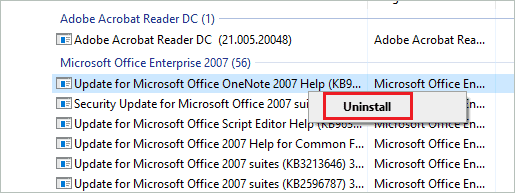
You will see all the installed updates; check the Installed On column to see which are the recent updates.
Once you find the recent update, right-click on it and click on Uninstall.
After uninstalling the update, restart your PC and check if you were able to get rid of the PFN_LIST_CORRUPT stop code error.
15. Use the bootrec Command
You can check the hard disk using the bootrec command and also fix the issues if found. You need to enter Advanced startup to use the bootrec command. Alternatively, you can enter Windows Recovery Environment as well, if you are not able to boot the PC normally.
Follow the steps below to check the hard disk using the bootrec command.
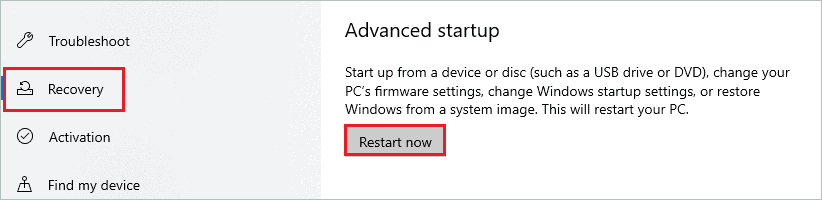
Step 1: Open the Settings app and go to Update & Security.
Step 2: Go to the Recovery from the left panel and click on Restart now under Advanced startup.
Step 3: In the Advanced startup, go to ‘Troubleshoot’ ➜ ‘Advanced options’ ➜ ‘Command Prompt.’
Step 4: In the Command Prompt terminal, execute the below commands one by one.
bootrec.exe /rebuildbcdbootrec.exe /fixmbrbootrec.exe /fixboot Once the commands are executed, reboot the PC in normal mode and check if everything is functioning normally.
16. Roll Back Windows Drivers
If the device driver is updated with any unstable version, you can experience issues with PFN. In such situations, you can simply roll back the driver to the previous version.
Open Device Manager and right-click on the driver, which was recently updated—select Properties from the context menu.
Go to the Driver tab in the Properties dialog box and click on the Roll Back Driver button. Then, follow the instructions on your screen to complete the roll-back process.
If the button is greyed out, you don’t have the option to roll back the driver.
17. Update BIOS
The outdated BIOS can also be one of the reasons for PFN List Corrupt in Windows 10. However, you can update BIOS safely on your own.
Updating BIOS is a complex task, so make sure you have instructions handy while doing so. Any incorrect changes in BIOS can damage your computer beyond repair, so make sure you proceed with caution.
18. Perform a System Restore
If any unknown settings change or software has caused PFN List Corrupt in Windows 10, you can restore the system to a point where everything was working fine. The system restore in Windows 10 allows you to restore your computer to a restore point.
The system restore won’t delete any personal files and folders; it will only remove the installed apps after the restore point was created. You can reinstall the removed applications after restoring your system.
19. Reset your Computer
The final software-based solution to fix PFN List Corrupt in Windows 10 is to reset your computer. The reset will reset the setting to default and also remove all third-party applications from your system.
There is an option to keep personal files and folders when you perform the reset operation. So, if there are any crucial files on your computer, make sure you select the keep files option.
20. Check Hardware To Fix PFN List Corrupt In Windows 10
If resetting your computer didn’t fix the PFN problem, you need to check for faulty hardware. You can ask the expert to check the hardware components of your computer if you don’t have the required technical expertise.
If the motherboard or RAM components are not functioning normally, you can experience stop code errors on your computer. You can also visit an authorized PC repair center to get your computer checked.
Conclusion
The Page Frame Number list is important for the normal functioning of your file system. When it gets corrupted, it causes the Windows operating system to stop working, as it does not know how to resolve it. Therefore, you see a blue screen error on your screen. The PFN List Corrupt in Windows 10 can be resolved easily by tweaking your system settings.
If the reason for the issue is too severe, you may need to perform a system restore or reset your system. And if none of the software-based solutions work, you may need to get your PC checked for hardware faults.


