Windows automatic repairs start on their own when you cannot boot the PC normally more than two times. This automatic repair can sometimes run in a loop, making it impossible to log into the system. The automatic repair loop in Windows 10 can be experienced on blue as well as a black screen.
Getting stuck in loops gets annoying as a computer restarted unexpectedly loop is another loop Windows users experience. Different solutions can help you break the Windows 10 automatic repair loop. However, before moving on to the solutions, let’s see what automatic repair is and what causes it to run in a loop on your computer.
What Is The Automatic Repair Loop Error In Windows 10?
An automatic repair is a tool provided by Windows 10 that helps in resolving startup-related problems. When the system fails to start, as usual, the automatic repair tool runs and fixes the issues that caused problems in Windows startup. When the error message is resolved, your computer usually reboots, allowing you to log in to the system.
However, sometimes the automatic repair is stuck in a loop; even after the reboot, you will see the Preparing Automatic Repair message on the screen. The loop can be on a blue or black screen with one of the below messages.
- On blue screen – Automatic Repair couldn’t repair your PC
- On blue screen – Your PC did not start correctly
- On black screen – Preparing Automatic Repair
- On black screen – Diagnosing your PC
The message mentioned above keeps on coming every time you restart your PC.
What Causes Automatic Repair Loop in Windows 10?
There are some common reasons which can lead to an automatic repair loop in Windows 10. Some of them include:-
- Corrupted registry files
- Corrupted or damaged system files
- Hardware faults in hard drive or memory
- Early launch Anti-malware protection
- Corrupt and missing MBR or BCD
The issue may seem severe here, but with the proper fixes, you can resolve it quickly. The guide is divided into solutions for the automatic repair loop on the blue and black screen, including some standard solutions that may work in both cases. You can refer to both sections according to the issue you are experiencing.
Take Data Backup Before Proceeding With the Fixes

Maybe while performing the fixes, you may lose some or all of your data. To avoid losing important data, we recommend taking the backup of data on a working computer.
Firstly, disconnect the hard drive from your computer. You need to be careful while doing so, as if the hard drive is permanently damaged, the data won’t be accessible.
Once the hard drive is unplugged from the affected PC, connect to a PC that is working perfectly fine using the cable. Now, open File Explorer and copy all the data from the hard drive to the computer that is in a working state.
9 Solutions to Fix Windows 10 Automatic Repair Loop
The solutions mentioned below are common for both blue screen and black screen repair loops. You can try out the common list of options first and then move on to a specific section if the error still exists.
1. Remove the Laptop Battery
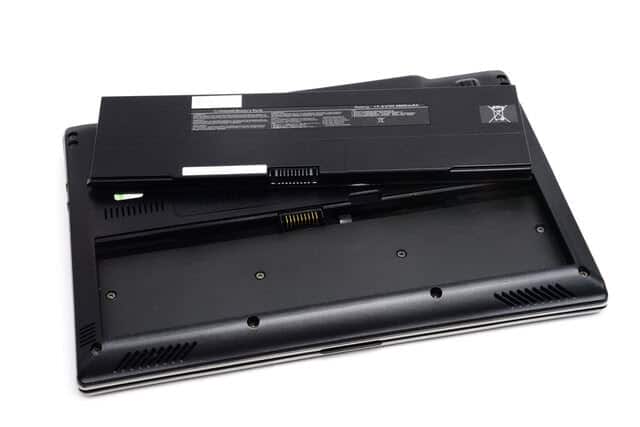
Many average users fixed the Windows ‘Preparing Automatic Repair’ boot loop of death by disconnecting their laptop battery for some time. Well, this fix may only work for laptop users, but you will resolve the issue without losing any data or putting in any more effort.
You need to force shut the laptop by pressing the physical power button and disconnecting the laptop battery. Now, keep the battery disconnected for some time and then reconnect it to the laptop.
After the battery is connected, start your PC and check if you can log in normally or not.
2. Reconnect Hard Drive
Another simple solution is to disconnect and reconnect the hard drive from your computer. You can shut down your PC and then unplug the hard drive very carefully from your laptop or CPU. Now, wait for some time and then reconnect the hard drive to your computer.
You can then restart your computer and check if the automatic repair loop in Windows 10 is resolved or not.
3. Delete Problematic Files using Command Prompt
You can eliminate the automatic repair loop in Windows 10 by deleting the corrupt files and any problematic file. You need to enter advanced repair options using the boot menu to use the Command Prompt, as the normal entry to your system is prohibited by the advanced repair loop.
You can create an installation media using the Media Creation Tool and boot using it to enter Advanced Startup. If you cannot boot using a USB flash drive, you need to change the boot order in BIOS. You can take help from the instruction manual and manufacturer websites for help to change the boot order.
Once everything is done, go to Troubleshoot ➜ Advanced Options ➜ Command Prompt and execute the below command.
cd C:\Windows\System32\LogFiles\Srt\SrtTrail.txtOn the Command Prompt screen, you will see the message ‘Boot critical file c:windowssystem32driversvsock.sys is corrupt.’
It can be any other file, and you need to be extremely careful before performing the next step. If it is any crucial system file, do not delete it and skip this solution. However, if it is a file from any third-party software, you can use the below commands to delete the problematic file from your system.
cd c:\windows\system32\driversdel vsock.sysOnce the commands are executed, restart your computer normally and check if the Windows ‘Preparing Automatic Repair’ loop of death is resolved or not.
4. Enable XD-bit in BIOS
Many users fixed the automatic repair loop in Windows 10 by enabling XD-bit in BIOS. You can refer to the instructions manual that came along with your computer to know how to enter BIOS.
Once you enter the BIOS, change the tab and try to find XD-bit. Once found, enable it and save the changes in BIOS by pressing the right keys.
If you don’t find XD-bit, check out with your manufacturer, as the same setting can have different names on different PCs. You can reboot your PC after making the right changes.
5. Check if the PC is using the right Drive to Boot
It is rare, but sometimes Windows will try to boot to a different drive present on your computer. You can enter the boot menu on your computer and change the drive to a system drive. It can be C or any other alphabet as per your configuration.
6. Update Graphics Driver
The outdated drivers are the reason for many errors on your computer. You can also end up with an automatic repair window because of outdated graphics drivers. You can update the display driver to fix the Windows automatic repair loop.
To update the graphics driver, enter safe mode, as the normal entry to the system is prevented by an automatic repair loop. You can then open Device Manager and update the driver manually.
Make sure you use a stable and correct driver software version to update the driver. And once the graphics device driver is updated, restart your PC in normal mode to use it like usual.
7. Run Startup Repair
You can try running the startup repair using the bootable USB. Once the installation media is plugged in and you boot using it, click on Repair your computer.
Navigate to Troubleshoot ➜ Advanced Options and click on Start-up repair to repair the loop issue.
Windows will scan and fix the problem with a startup so that you can boot your PC normally without any installation media and use it as usual.
8. Replace RAM
Although this is a common solution, we recommend using this solution if nothing from the guide fixes the automatic repair boot loop in Windows 10. Then, you can check if the memory stick on your PC works fine or not and then replace it if the need arises.

You can visit the PC repair shop, get it checked by an expert technician, and then replace it. However, if you don’t have any experience with hardware, avoid doing it on your own.
9. Replace Hard Drive
The faults in the hard drive can also lead to an automatic repair loop. You can check the hard drive first and then get it replaced or repaired as per its condition. You may lose all your data when you replace your hard drive. However, if the hard drive is damaged beyond repair, it will become impossible to retrieve data.
Once the faulty hard drive is replaced, you will be able to use the PC without any loop-based errors and issues.
Fix Automatic Repair Loop in Windows 10 with Blue Screen
If you are experiencing the automatic repair loop in Windows 10 on a blue screen, the below solutions will help you fix it easily.
1. Disable Early Launch Anti-Malware Protection
You can get rid of the automatic repair loop in Windows 10 by disabling early launch anti-malware protection. To disable this, you need to enter the boot menu using installation media.
Once you enter the boot menu, click on Advanced options and go to Troubleshoot ➜ Advanced Options ➜ Startup Settings.
Now, you need to check on what number is ‘Disable early launch anti-malware protection,’ usually, it is 8.
Once the number is confirmed, click the function key with that number. For example, if the option to disable anti-malware protection is on 8, click F8 to activate the settings.
Reboot your PC without installation media and check if you can enter into your system without any error.
2. Run SFC, chkdsk, and DISM Commands
The hard drive’s corrupted system files and bad sectors can cause unwanted trouble while using the computer. It can also be one of the reasons behind the Windows automatic repair loop.
You can use the built-in System File Checker (SFC) and Deployment Image Servicing and Management (DISM) utility of Windows 10 to scan and fix damaged system files. To check for bad sectors, you can use the chkdsk command.
Open Command Prompt from the boot menu and firstly execute sfc /scannow command there.
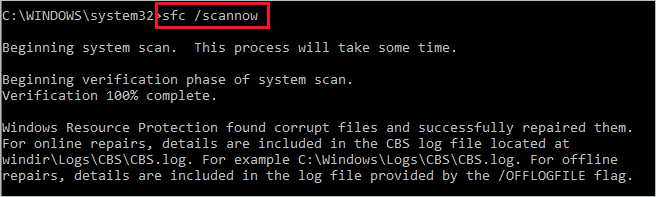
Windows will take some time to execute the command, so wait for the entire command to be executed. Then, if there are any corrupt files, you will see the message saying ‘Windows Resource Protection found corrupt files and the repair process will successfully repair them.’
Once the sfc command is executed, you can run the below command to use the DISM utility.
dism /online /cleanup-image /restorehealth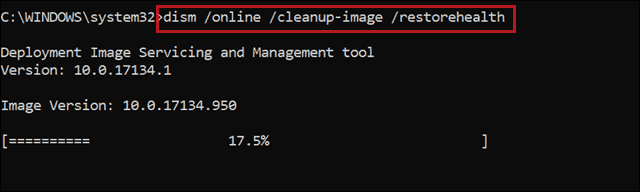
Once the command is executed, you can check for bad sectors and issues in your hard drive using the chkdsk command.
Type the command and press Enter to execute it.
chkdsk C: /f /x /r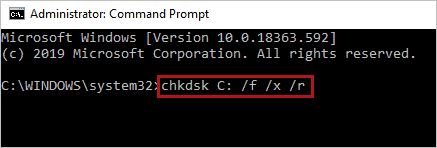
You need to change the C with your system drive alphabet in the command. Once all three commands are executed, restart your PC and check if the error is resolved or not.
3. Rebuild BCD and Repair MBR
The corrupted BCD (Boot Configuration Data) and MBR (Master Boot Record) can cause an automatic repair loop in Windows 10. Well, repairing the MBR and rebuilding BCD using Command Prompt can help you fix it.
Launch the Command Prompt using the boot menu on your computer. Then, in the Command Prompt terminal, type the below commands one by one and press Enter after each command.
bootrec /fixbootbootrec /scanosbootrec /fixmbrbootrec /rebuildbcdexit When you execute the exit command, the Command Prompt will close, and you can reboot your computer normally after that. If there were any issues in BCD and MBR, the above command would resolve them efficiently, and you will be able to use your computer again.
4. Restore Windows Registry
Windows Registry holds all the settings and information related to your computer. It is a complex database that holds crucial data about Windows 10. You can restore it using Command Prompt.
Open Command Prompt using the boot menu and execute the below commands one by one there.
C:CD WindowsSystem32CD configDIRCD regbackDIRCD..REN default default1ren sam sam1ren security security1ren software software1ren system to system1CD regbackcopy * c:\windows\system32\configIf your system drive is not C, make appropriate changes in the above commands as well. And once all the commands are executed, type exit and press Enter to close the Command Prompt.
You can turn off your PC from Choose an option window and then start it again to check if Windows 10 automatic repair loop is fixed or not.
5. Perform a System Restore
If you don’t want to restore Windows Registry, you can perform a system restore to fix the automatic repair loop in Windows 10. The system restore will restore your PC to a point where everything was working fine.
Click on the Advanced options from the Automatic repair blue screen and go to Troubleshoot ➜ Advanced Options ➜ System Restore. Now, select the last restore point and click on Next to start the restore process.
Let Windows finish the entire restore process so that the loop issue will be resolved right away.
Fix Automatic Repair Loop in Windows 10 with Black Screen
The automatic repair loop can come upon the black screen as well. Therefore, you can fix it on the black screen as well with the below-mentioned fixes.
1. Perform a Hard Reboot

Sometimes, the simplest solution will yield the best results. For example, if your screen is just stuck on Preparing Automatic Repair black screen, you can perform a hard reboot to get out of it. A hard reboot will resolve the temporary glitches.
Press and hold the physical power button on your laptop/CPU till your system shuts down. Now, wait for some time and press the physical power button again to start your computer.
If there are no severe problems, your PC will restart without any issues.
2. Disable Automatic Repair
You can disable startup automatic repair using the Command Prompt to end the automatic repair loop in Windows 10.
Use Windows installation media to open Command Prompt. In the Command Prompt window, type the below command to disable automatic repair and press Enter to execute it.
bcdedit /set {current} recoveryenabled NoYou can then run the exit command to close the Command Prompt. Now, boot your PC normally, that is, without installation media. You will be able to use your PC normally without any issues and errors.
3. Boot into Safe Mode
You can perform some of the minor fixes by entering safe mode in Windows 10. The safe mode starts with minimum drivers, apps, and settings, so if any third-party app is causing a nuisance, safe mode will protect you from it.
Once you enter safe mode in Windows 10, you can perform the following fixes.
- Uninstall recently installed app
- Scan for viruses using the malware removal tool
- Update corrupted and outdated drives
- Remove problematic apps
After you try all the above solutions in safe mode, you can boot the PC in normal mode and check if the automatic repair loop in Windows 10 is resolved or not.
4. Refresh or Reset your Windows 10 PC
The refresh and reset process in Windows 10, reinstall the OS without any installation media or disc. If the above solutions do not resolve the automatic repair screen loop, you can reset your PC.
You can also keep your personal files and folders by selecting the right option during the reset process. The reset will delete the third-party applications from your computer, and that can be installed again later. Your settings will also be restored to default.
However, performing a reset will make your computer free of that annoying loop.
5. Clean Install Windows 10
The last resort to fix the automatic repair loop in Windows 10 is to reinstall Windows 10 OS from scratch. All your essential files, folders, applications, and settings will be lost, but you will have a normal working PC again. You can use Windows 10 Media Creation Tool to create an installation disc and use it for the clean installation of Windows 10 on your computer.
Once Windows 10 is installed, you will be able to use your PC without automatic repair loop issues.
Conclusion
The automatic repair tool is a helpful tool to fix all startup-related problems and errors. However, the issue arises when this tool starts creating other errors. One such error is running in a loop; the automatic repair tool can run in a loop every time you start your PC. Nevertheless, it is a common error, and if you are lucky, a simple hard boot can get you out of the loop.
The error can be encountered on blue and black screens. There are different solutions for both the screen and a set of common solutions in this complete guide that can help you fix the automatic repair loop in Windows 10.
FAQs
Why does my computer keep saying ‘Preparing Automatic Repair’?
If there is any startup-related error, your computer will display a preparing automatic repair message on the screen. However, if it displays the same message continuously, your PC is stuck with an automatic repair loop.
How do I bypass automatic repair on Windows 10?
You can disable automatic repair using Command Prompt from the boot menu to bypass automatic repair.
How do I fix the automatic repair loop in Windows 10?
This guide will help you to get rid of Windows 10 automatic repair loop. You can refer to sections in the guide to get more proper steps based on your encounters with the loop.


