Windows 10/11 blue screen errors are more sophisticated than those in older versions of Windows operating systems. You know the exact problem, which makes it easy to resolve. The System Service Exception in Windows 10/11 is a blue screen of death experienced by many Windows users.
The reason for experiencing this error may differ from system to system. Still, the common causes are viruses, corrupted system files, outdated drivers, third-party applications, and bad sectors on the system drive. You can avoid blue screen errors by taking good care of your system and keeping it up to date. Although this error may seem dreadful, it is resolvable by troubleshooting it accurately.
17 Solutions for System Service Exception in Windows 10
You can try the below solutions by logging in to the system normally. Well, this can be possible if you are experiencing System Service Exception abruptly while you are logged in. If you cannot enter the system normally, you can enter safe mode and perform the fixes.
1. Update Windows 10 Operating System
You can update Windows operating system to the latest version to fix the System Service Exception stop code error. The Windows update carries driver updates, security patches, and new features. So if the reason for the blue screen error is outdated drivers, updating Windows will be helpful.
Press Windows key + I to open the Settings app and go to the Update & Security section. Make sure you are in the Windows Update section from the left panel.
Now, click on the Check for Updates button.
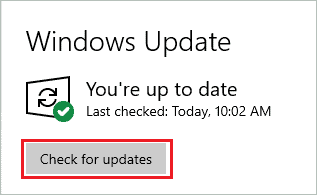
If there are any updates available, download and install them. We recommend installing the optional and pending update as well. Once the PC is updated, check whether the stop code error is resolved.
2. Update Windows Device Drivers
If Windows update doesn’t do the automatic driver updates, you need to update them manually. In addition, the corrupt or incompatible drivers also need to be updated with stable driver software to avoid System Service Exception in Windows 10/11. Also, update drivers with the latest driver software that is stable and correct.
You can update device driver from Device Manager or use third-party software like Driver Booster to update it for you automatically. Ensure you update the graphics driver, as many Windows users fixed System_Service_Exception by updating display drivers.
3. Uninstall Recently Installed Application
Some third-party applications can cause troubles in the system, especially if they have compatibility issues. If you have recently installed any third-party application from a fishy source, you can remove that app from your PC to fix the blue screen error you are experiencing.
Open the Settings app on your PC and click on the Apps section.
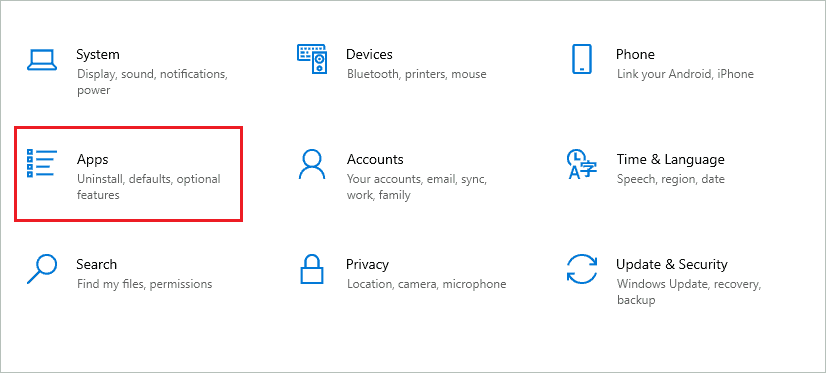
Search for a recently installed app in the search bar and click on it when it appears in the search results.
Lastly, click on the Uninstall button.
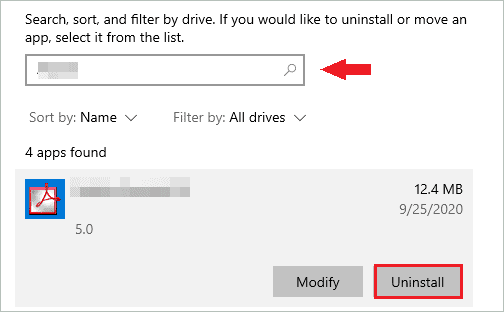
Once the app is uninstalled, restart your PC and check whether the blue screen of death error is resolved.
4. Disable the Webcam
Many Windows users fixed the BSOD System Service Exception in Windows 10/11 by disabling the webcam. Whether it is a built-in webcam or an external webcam, you can disable it from Device Manager.
Press the Windows key + X to open the quick link menu and click on Device Manager to open it. Alternatively, you can search for it in the Start menu and open it from there.
In the Device Manager window, expand Cameras; there you can find the webcam driver. Now, right-click on the webcam driver; in our case, it is Integrated Webcam, and click on Disable device.
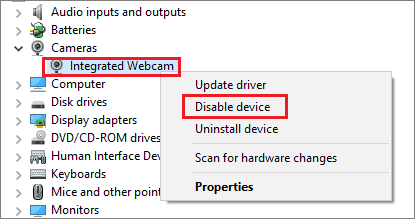
If you don’t find it under Cameras, try searching for it under a different heading. It may differ based on your webcam integrations and system configuration. You may now get rid of the System_Service_Exception error on Windows.
5. Uninstall or Disable Third-party Antivirus Applications
Some antivirus programs can lead to unwanted errors and restrictions. You can disable the third-party antivirus to fix the System Service Exception BSOD error. It is easy to turn off Avast and other antivirus software on your computer. If the blue screen/stop code error is resolved after disabling the antivirus, you can uninstall them permanently.
You can install any other trusted malware removal tool or use Windows Security to protect your PC from malware and other cyber threats.
6. Uninstall Specific Apps on Windows PC
There are specific apps that can cause trouble on some Windows 10 PCs. If you have any of the below-mentioned apps on your computer, we recommend uninstalling it and checking if the System Service Exception in Windows 10/11 is fixed or not.
Asus GameFirst Service
If you are using an Asus computer or laptop, you can remove the Asus GameFist Service app to resolve the blue screen error you are currently experiencing.
Xsplit
The gamers who are seeing the System_Service_Exception while playing should uninstall Xsplit. At times, updating Xsplit can also help fix the BSOD issue.
MSI Live Update
MSI Live Update also contributes to this blue screen error; we recommend removing it and checking if the error is resolved or not.
BitDefender and Cisco VPN
The VPN allows you to have a secure connection on public networks. However, some VPN software can cause unwanted trouble for you as well. You can temporarily disable or uninstall BitDefender/Cisco VPN to fix the issue you are facing. Once the apps are uninstalled, you can check out other VPNs like SurfShark or ProtonVPN for secure connections.
Virtual CloneDrive
Another app that you need to get rid of is Virtual CloneDrive. Many users fixed the System_Service_Exception after uninstalling this app from their PC.
Uninstalling the app mentioned above may or may not work for you. It depends on the drivers, system configurations, and also version of the app you are currently using.
7. Perform SFC and DISM scans
One of the reasons to experience blue screen errors is corrupt system files. To scan and repair Windows system files, you can use Windows inbuilt utilities, SFC (System File Checker) and DISM (Deployment Image Servicing and Management).
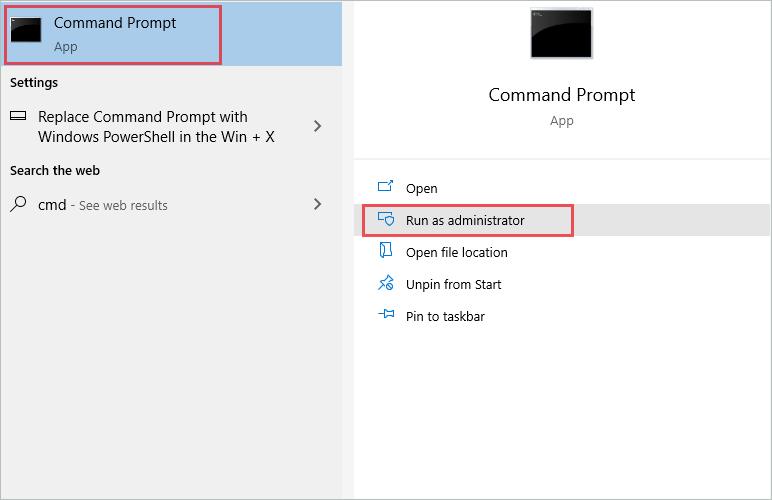
Type cmd in the Start menu’s search bar and click on Run as administrator to open Command Prompt with administrator privileges.
In the terminal window, type the sfc /scannow command and press Enter to fix the corrupted system file.
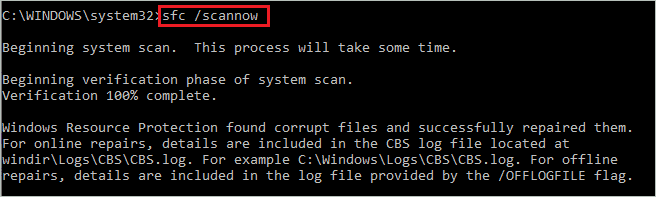
Now, let the SFC utility scan and repair all the issues with system files. Once the SFC command is executed, type the below command and press Enter to use the DISM utility.
dism /online /cleanup-image /restorehealth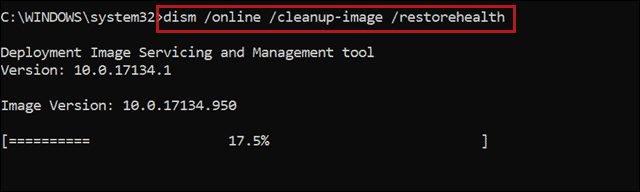
The command execution may take some time, do not close the Command Prompt in between. Once the commands are executed, restart Windows PC and check whether the System Service Exception error is resolved.
8. Check for Virus and Malware
The virus can enter your system from the Internet or USB flash drives you use. As a result, it can reside on your computer and cause System Service Exception in Windows 10/11. You can use Windows Security to scan and remove all the viruses, malware, and threats from your PC.
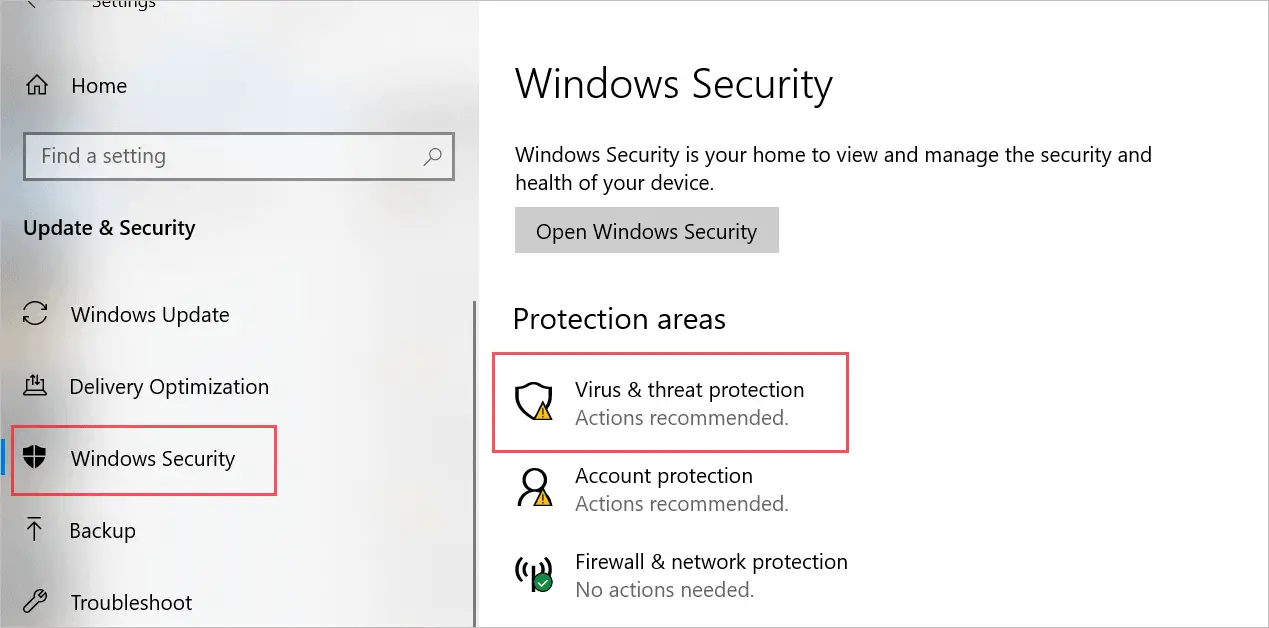
Step 1: Open the Settings app on your PC and go to Update & Security settings.
Step 2: From the left panel, go to Windows Security and click on Virus & threat protection.
Step 3: Click on the Scan options link.
Step 4: Select Full Scan and click on Scan Now button to begin with the scan.

Windows will thoroughly scan your PC and check if there is any virus present on files or programs. The scan may take time, depending on the number of files that need to be scanned. However, all the viruses and malware will be removed from your PC.
After the scan, restart your computer and check if the System Service Exception error is fixed or not.
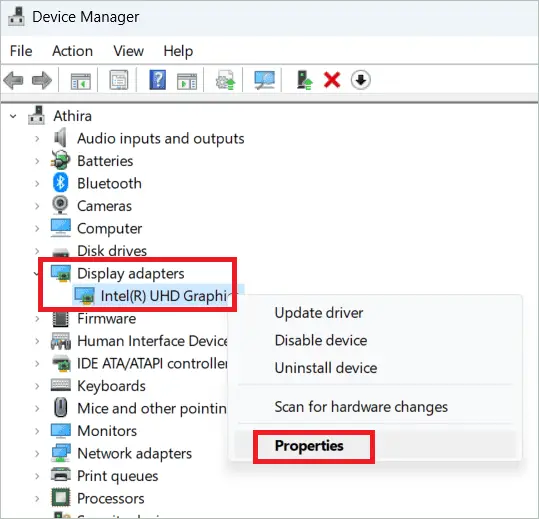
9. Reinstall Graphics Driver
You can reinstall the graphics card driver to fix the System_Service_Exception error in Windows 10. It is easy to reinstall drivers from Device Manager.
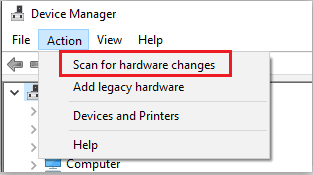
Open Device Manager and expand the Display Adapters section. Now, right-click on the graphics driver and select Uninstall device from the context menu.

If asked for confirmation, confirm the uninstall. Once the driver is uninstalled, go to the Action from the menu bar and click on Scan for hardware changes. This will reinstall the correct driver for you.
You can also restart the PC to reinstall the graphics drivers. If there are any other faulty or corrupt drivers, you can reinstall them as well. There is a yellow exclamation mark next to the drivers with issues so that you can find such drivers for reinstallation.
10. Run Driver Verifier Tool
The Driver Verifier tool performs stress tests on your system’s drivers to find out their issues. Microsoft recommends using the Driver Verifier tool on the computer used for testing and debugging because extreme tests can make your computer crash. You can read the detailed information here.
Once you read all the information and warnings, proceed with the below instructions to run the Driver Verifier tool on your computer.
Open the elevated Command Prompt on your computer. Now, type the verifier command in the terminal prompt and press Enter to execute it.
When the Driver Verifier Manager opens, select Create standard settings and click Next. On the next window, select Automatically select all drivers installed on this computer and click on Finish.
Restart the PC after clicking on Finish. Then, you will know if there are any issues with the drivers.
To check the test results of the Driver Verifier tool, execute the verifier /query command in Command Prompt with admin privileges.
And if you wish to stop the test in between, you can execute the verifier /reset command.
Once you find the drivers with issues, you can update, roll back, or reinstall them.
11. Execute the chkdsk Command
The system drive can have bad sectors and errors. You can use the Windows chkdsk (Check Disk) command to check and repair the bad sectors in the system drive.
Open the elevated Command Prompt and type command –
chkdsk C: /f /x /r Then, press Enter to execute the command.
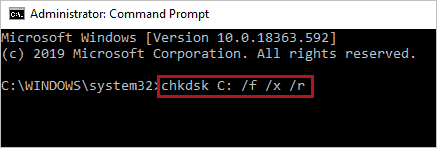
You need to change the C letter in the command with your system drive letter. The system drive is the drive where Windows is stored and installed.
After the command execution, you can use your computer without any blue screen errors.
12. Turn Off Google Update Service
This solution may sound weird, but it helped many users to fix the blue screen System Service Exception in Windows 10/11. You only need to disable the Google Update service from the services app.
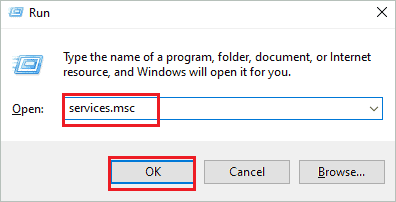
Press Windows key + R to open Run and type services.msc there. Click OK to open the Services app.
Search for Google Update Service in the Services app and double-click on it to open its Properties window.
Ensure you are in the General tab and set the Startup type as Disabled. Then, click on Apply and OK to save the changes.
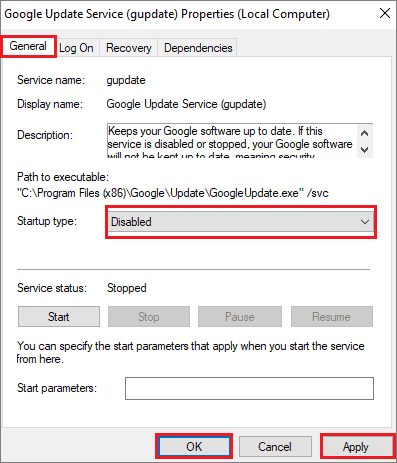
If you have multiple Google Update Services, you need to disable each one manually, as mentioned above.
Once the service is disabled, reboot your computer and check if the blue screen error System Service Exception vanished or not.
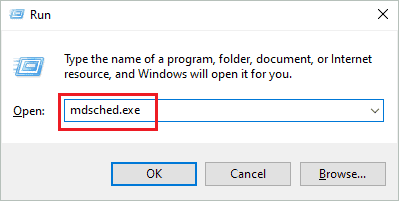
13. Run Windows Memory Diagnostic Tool
You can check for memory-related issues in Windows using the Memory Diagnostic Tool. Many blue screen errors are caused because of RAM memory problems.
Open Run and type mdsched.exe there. Click OK or press Enter to open the Memory Diagnostic Tool.
In the Windows Memory Diagnostic window, select – Restart now and check for problems.
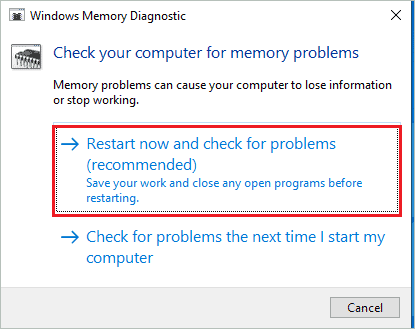
Your PC will restart and check for issues with the memory.
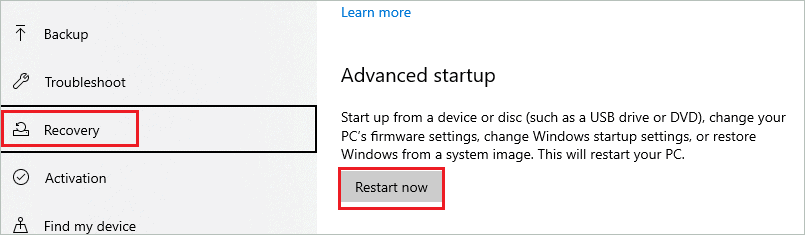
14. Run Startup Repair
Another way to fix the System Service Exception in Windows 10/11 is to run the startup repair. It is easy to run startup repair in Windows 10, and it also helps fix many blue screen errors.
Go to Settings ➜ Update & Security, and then from the left panel, go to the Recovery section. Click on the Restart Now button under Advanced Startup.
Suppose you are not able to open the Settings app. Then, you can try the below instruction to enter Advanced startup.
Press the hardware button to turn off your PC forcefully. Once the PC turns off, press the physical power button again to turn on the computer. Once you see the startup logo, shut the PC again using the power button.
Repeat this process until you see the ‘Preparing Automatic Repair’ message on the screen.
Whatever process you used, follow the below steps to run startup repair.
Step 1: When you see the Automatic Repair screen, click Advanced options.
Step 2: From the next screen, go to Advanced Options ➜ Startup Repair.
Windows will run the startup repair and fix the BSOD error for you.
15. Update BIOS
You can update the BIOS on your PC to fix the System_Service_Exception error message in Windows 10. It can be difficult to update the BIOS, especially if you have done it before. However, BIOS is a crucial part of your Windows 10 PC, and if it is not updated correctly, it can damage your computer permanently.
You can take help from an expert who has an idea for updating the BIOS. Once the BIOS is updated, check if the blue screen error is resolved or not.
16. System Restore
If you have created a system restore point, you can restore your computer to that point to fix the System Service Exception in Windows 10/11. System Restore will not delete your personal files and data. However, the apps that were installed after the restore point was created will be deleted. Also, the settings will be reverted.
This will prevent wrong settings, apps, and new Windows updates from causing the BSOD in Windows 10/11. You can perform a system restore easily and eliminate the issue you are facing.
17. Reset the Computer
Another solution to fix the System Service Exception is to reset the PC. When you reset the computer, Windows is reinstalled. This will help you fix all the minor and major issues with your PC, along with BSOD. In addition, you can keep your personal file and folders by selecting the right option during the reset process.
The third-party apps will be uninstalled. The settings will also be restored to default. However, you can make the settings change again and install the app after the reset.
10 Solutions for System Service Exception in Windows 11
Here are some solutions to tackle the system service exception in Windows 11. Try them out and make your PC functioning normal again.
1. Roll Back GPU Drivers
If you have tried to update or reinstall drivers and nothing worked, try to roll back GPU drivers to resolve the system service exception in Windows 11.
Open the Device Manager and double-click “Display Adapters” to expand it. Right-click on the GPU and select “Properties.”
In the dialog box, select the Driver tab, and click the “Roll Back Driver” button.
Choose a reason for the roll back on the next page and click “Yes”. Wait for the OS to uninstall the latest driver and return to the previous version. Multiple system restarts may be required for this.
2. Disable Startup Programs
Windows 11 does not work best with many programs on your device. So, it is better to disable these startup programs to check if the exception was caused by them.
Right-click on the Start menu and select “Task Manager.”
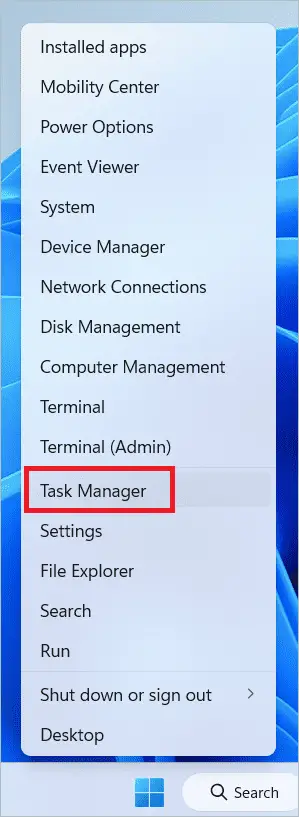
Select “Startup apps” from the left menu. Select a program and click on the Disable button on top.
You can disable all the third-party programs from starting during the booting process.
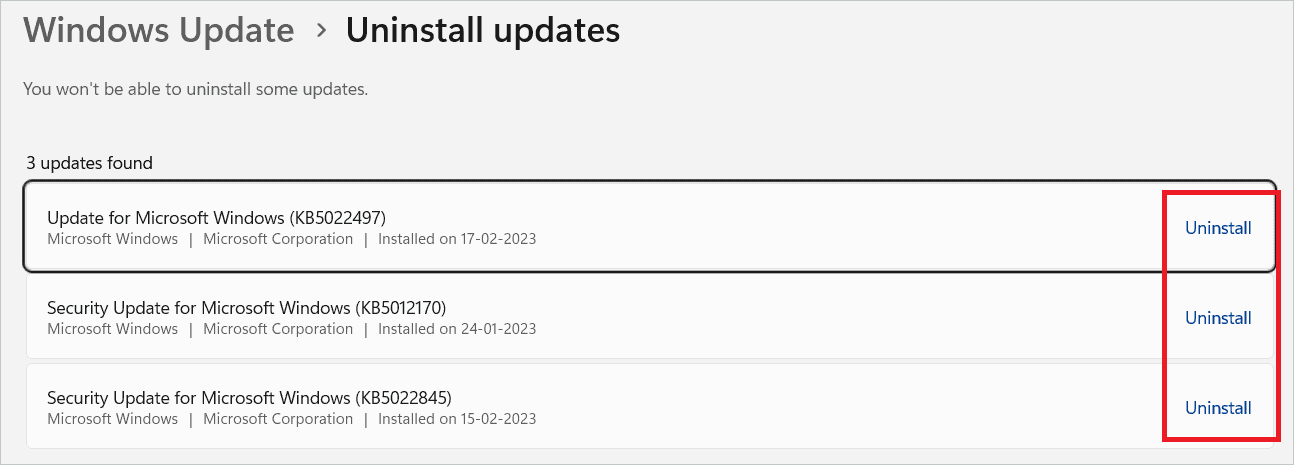
3. Roll Back Updates
If you think a certain Windows update caused the system service exception in Windows 11, you can revert the updates to find a solution.
Open Settings, select “Windows Update” in the left menu and “Update history” in the right.
Select “Uninstall updates” under Related settings.
Locate the update you want to roll back and click “Uninstall” near it.

4. Disable Windows Biometric Service
Windows Biometric Service provides access to Windows devices using biometrics. The assistant tools used by the service can sometimes result in an exception. So, here is how you can disable it.
Open the Run dialog box, type “services.msc” and click OK.
Locate Windows Biometric Service, right-click on it, and select “Properties.”
In the Startup type dropdown box, select “Disabled.” Finally, click “Apply” and then “OK.”
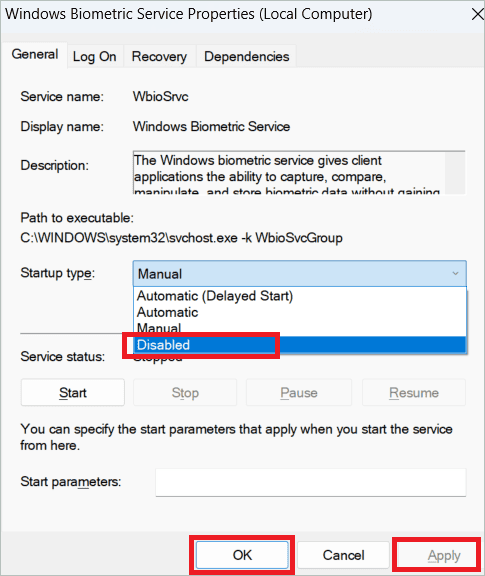
You may restart your PC now.
5. Disk Cleanup
Like cleaning up any cluttered space, you can free up space on your PC using disk cleanup. This would help you resolve the system service exception in Windows 11 if it was caused by an overloaded hard drive.
Type “disk cleanup” in the search bar and open the option when it appears.
In the next dialog box, select the drive to scan and click “OK.”
You will see a list of unwanted files in the Disk cleanup window. Check those you want to delete and click “OK.” To view additional files that are not listed, click on the “Clean up system files” button, select all unnecessary files, and delete them.
6. Turn off Hardware acceleration
Hardware Acceleration is turned on to improve the performance of PCs and reduce latency. But this can sometimes lead to a blue screen error. So, turning off the features is a good try.
Open Settings > System > Display.
Scroll down and select “Graphics” under Related settings.
Click “Change default graphic settings” under Default settings.
Toggle off the “Hardware-accelerated GPU scheduling” and restart your device.
7. Disable CPU and GPU Overclocking
You might overclock your CPU and GPU if you use your PC often and work with heavy applications. This results in an extra load on the system resources. The system then has to run at a higher speed than the manufacturer recommends. The system tends to overheat and lead to device dysfunction and BSOD error. You may disable CPU overclocking to prevent this.
Undoing the changes made in the BIOS firmware or resetting the BIOS to factory settings disables CPU and GPU overclocking. Restart your PC a few times to enter the BIOS and press F9 to load the default settings.
Next, press F10 to save the changes and exit the BIOS. Your PC will now restart and boot normally.
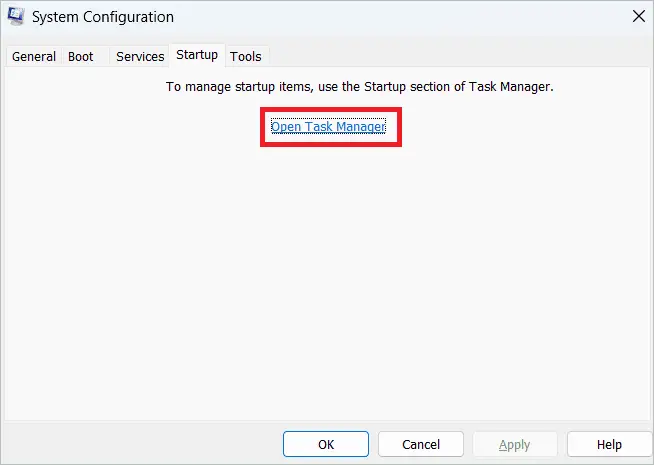
8. Clean Boot the PC
In normal booting, loads of programs initialize and communicate with each other. These sometimes affect the system functioning and cause the system service exception in Windows 11. Clean booting your PC will load only the important applications and drivers, so you can identify what caused the error.
Type “sysconfig” in the search bar and open System Configuration.
In the General tab, select “Selective startup.”
Check the “Hide all Microsoft services” box in the services tab and click “Disable all.” Then, click “Apply.”
In the startup tab, click “Open Task Manager.”
In the Task Manager, disable all the startup apps as we did in a previous method. Close System Configuration and Task Manager and restart your computer. See if you still face the exception. If no, then one of the services you disabled is the problem-causer. Enable each and find out the problematic service and uninstall it.
9. Use DirectX Diagnostic Tool
DirectX is a collection of Application Programming Interfaces used by multimedia apps like games to work with video and audio hardware. Sometimes, the DirectX Graphics MMS service can cause a service exception. Here is how you can resolve it.
Open the Run dialog box, type “dxdiag” and click “OK.”
When the DirectX Diagnostic Tool launches, it diagnoses various components. Once done, click “Next Page.”
In the Display tab, check the Notes section at the bottom to see if there are any errors. Repeat for Sound and Input tabs.
Finally, download DirectX End-User Runtime Installer and install the latest DirectX runtime components.
10. Disable SLI and NVIDIA Surround in NVIDIA Settings
The SLI and NVIDIA Surround in NVIDIA Settings can often lead to system service exception in Windows 11. You can disable them and see if the blue screen error vanishes.
Open the NVIDIA control panel by searching in the search menu. Expand the 3D Settings in the left menu and click “Configure SLI, Surround, PhysX. On the right panel, select “Disable SLI” under the SLI configuration section.
Conclusion
The blue screen errors in Windows 10/11 are abrupt and indefinite. You cannot work in peace once you start experiencing a BSOD loop on your PC. The System Service Exception in Windows 10/11 is a common error that needs to be resolved immediately to avoid further complications with the Windows PC.
The reason to land the blue window depends on the system and usage. Therefore, the list of options in this informative article is long. However, you can try all the solutions individually until you find the best one. And if the issue persists, you may need to reset the PC or perform a system restore.
FAQs
What is meant by System Service Exception?
System Service Exception is a blue screen error that can show up on your Windows 10 computer.
What causes System Service Exception error?
Some of the common reasons to experience System_Service_Exception are:-
- Viruses and malware
- Corrupt system files
- Outdated drivers
- Third-party apps
- Bad sectors in the system drive
How to fix the System Service Exception Error in Windows 10?
You can fix the System Service Exception with working solutions such as updating Windows OS, disabling webcam, reinstalling or updating drivers, turning off Google Update service, updating BIOS, running startup repair, and performing system restore.
How do you stop a system service?
You can go to the Service app and right-click on the service you want to stop. Then from the context menu, click on Stop to stop that service.
What are blue screen errors?
Blue screen errors occur when Windows does not know how to react or resolve any particular issue that occurred on your computer. The blue screen error shows up with a message and error code on your screen.
(Article Updated on 15th May 2023)


