Windows can sometimes cause problems while booting, thus preventing you from logging in to your system. Many users reported experiencing – Your PC did not start correctly message on the screen during the Windows startup. If this is a temporary glitch, simply clicking on the Restart button below the message will resolve the error for you.
However, if you see the PC did not start correctly message every time the computer starts, some issues need to be resolved. This error is similar to the automatic repair loop in Windows 10, as both show up during the booting process, restricting the entry into the system.
This error can happen because of corrupt MBR or BCD caused by sudden power failure or surge. Well, there are some other reasons as well that can lead to the error. However, tweaking the system can help you fix those reasons and get rid of the error.
14 Solutions To Fix Your PC Did Not Start Correctly Error In Windows 10
You may need to use Advanced Startup options to perform some of the fixes mentioned below to resolve Your PC did not start correctly error. If you cannot enter the system via normal mode, you can enter safe mode to use the PC and try out solutions.
However, if your entry is restricted via safe mode, you can only try out the fixes that can be done via Advanced Startup.
Make sure you have clicked once on the Restart button seen on the error screen before trying out the solutions below. This will save your time if the issue is just because of a temporary glitch.
1. Run the SFC Scan
The corrupt system files can lead to many problems, including Windows Automatic Repair loop, Your PC did not start correctly error. You can use the System File Checker (SFC) utility to scan and fix the corrupted system files on your computer.
This utility can be accessed via Command Prompt terminal. And as access to the system is prevented by error, you can use Advanced Startup options to use Command Prompt.
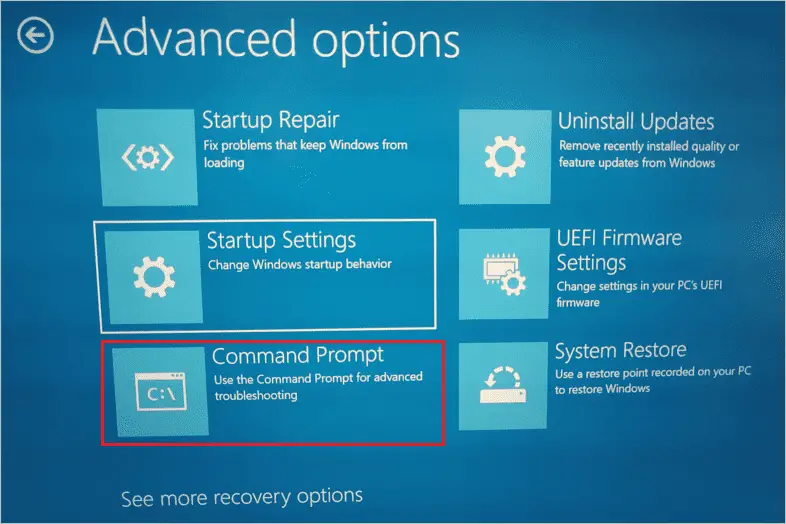
In the Advanced options window, click on “Command Prompt.”
In the Command Prompt window, type the below command and press the “Enter” key to execute it.
This utility will fix all the damaged and corrupt files on your computer. You can then execute the “exit” command to escape the terminal prompt.
You can now boot your computer normally and check if the sfc command helped in resolving the Your PC did not start correctly error or not.
2. Uninstall Recently Installed Software
If you have started experiencing problems with the startup after installing or updating any third-party application, you need to get rid of it. Some application files can hamper the normal boot process of Windows computers, causing Your PC did not start correctly boot loop.
You can enter safe mode and perform the below steps to uninstall the software.
Press Windows key + I to open the “Settings” app and go to “Apps.”
Now, in the search bar, type the app name and when the app shows up in the search results, click on it.
Click on the “Uninstall” button to remove the app from your computer.

After removing the app, reboot the PC in normal mode and check if the error is resolved or not.
3. Update Windows Operating System
You can try updating Windows OS to resolve the startup error. Make sure you update device drivers as well via Windows update. If the error is because of the buggy update or outdated device drivers, this solution will resolve it for you.
Open the “Settings” app and go to “Update & Security.”
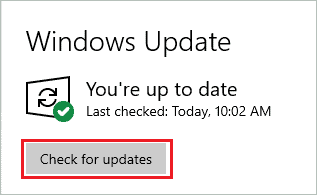
Click on the “Check for updates” button to check if any new updates are available for your PC.
You need to download and install the available updates. A stable Internet connection is required to install the update. After installing the update, boot into normal mode to check if the error- Your PC did not start correctly is resolved or not.
4. Run DISM Command
If there are issues with Windows Recovery Environment (WinRE), Windows Preinstallation Environment (WinPE), and Windows Setup, you can experience the error while booting. You can use the built-in Windows utility called DISM (Deployment Image Servicing and Management ) utility to fix the issues and resolve the error.
Open the “Command Prompt” terminal from the “Advanced options” screen and execute the below command.
dism /online /cleanup-image /restorehealth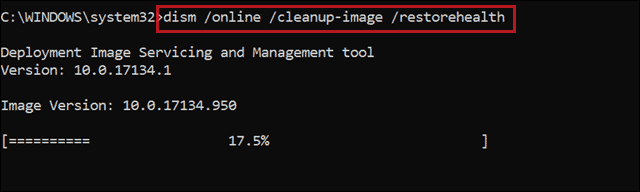
Once the DISM tool command is executed, exit the terminal window and reboot your computer normally.
5. Rebuild Boot Configuration Data (BCD)
The BCD stores the boot-related information in Windows. Whenever your PC boots, it looks for BCD to get the details to boot correctly. However, if this file is corrupted, your PC can run into errors and issues.
Step 1: Open the “Command Prompt” screen via “Advanced options.”
Step 2: Type the below command in the Command Prompt window and press the “Enter” key to execute it.
bootrec /rebuildbcdStep 3: Now, there are two outputs for the above command depending on the situation.
Output 1: Scanning all disks for Windows installations. Please wait, since this may take a while… Successfully scanned Windows installations. Total identified Windows installations: 0 The operation completed successfully.
Output 2: Scanning all disks for Windows installations. Please wait, since this may take a while… Successfully scanned Windows installations. Total identified Windows installations: 1 [1] D:Windows Add installation to boot list? Yes/No/All:
If you see output 1, jump to step ‘5.’ If you see output 2 on your screen, press “Y” and follow all the steps below.
Step 4: You need to remove the existing Windows installation from the BCD and then rebuild BCD. To remove the existing BCD file, execute the below command on your screen.
bcdedit /export c:\bcdbackupStep 5: Irrespective of the output, you need to run the below commands to rebuild BCD on your Windows computer.
attrib c:\boot\bcd -h -r -sren c:\boot\bcd bcd.oldbootrec /rebuildbcdStep 6: If everything is successfully completed, you will see ‘Add installation to boot list? Yes/No/All:’ on the screen. You need to type “Y” and press the “Enter” key to complete the process.
As soon as you see the ‘The operation completed successfully.’ message on the screen, restart your PC in normal mode and use it as before.
If the issue were a corrupt BCD, this fix will resolve Your PC did not start correctly and work like a charm for you.
6. Uninstall Recent Windows Updates
This contradicts the above solution, but if you have recently installed any updates, you can uninstall them to resolve the ‘Your PC did not start correctly’ error. Sometimes, the updates don’t go well with the PCs, causing unwanted trouble and errors. Therefore, you can enter safe mode and uninstall recent Windows updates from your PC to fix Windows automatic repair boot loop error.
Step 1: Launch the “Settings” app and go to the “Update & Security” section.
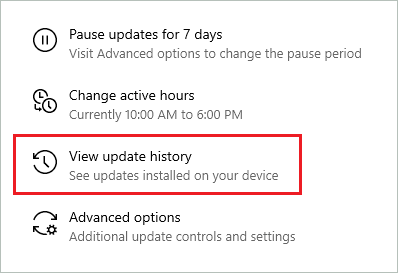
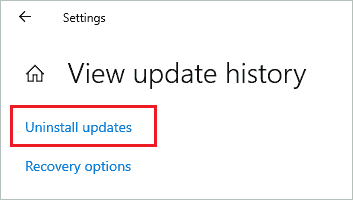
Step 2: Go to the “Windows Update” from the left panel and click “View update history.”
Step 3: On the next screen, click on the “Uninstall Updates” link.
Step 4: When the Control Panel window opens, scroll down to the “Microsoft Windows” section and right-click on the most recent update. Select “Uninstall” from the context menu.
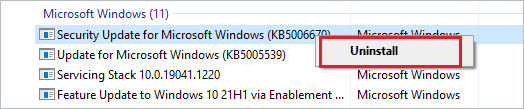
If you are unsure about the recent update, you can check the Date column and uninstall the most recent update.
After uninstalling the update, reboot your computer in normal mode and use it without issues.
7. Disable Early Launch Anti-malware Protection
The antivirus can cause issues during startup. You can disable early launch Anti-malware protection to avoid the antivirus program coming in the way of the boot process. To do so, you need to go to the Advanced startup.
In the “Advanced options” screen, click on “Startup Settings.”
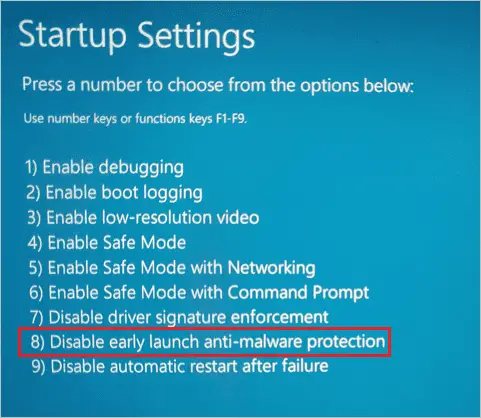
In the Startup Settings, you need to use Function keys to perform any task. Now, search for Disable early launch anti-malware protection.
In most cases, it will be on the 8 number. You need to press the “F8” key via the keyboard to disable the malware. You can also use the “8” number key.
Once the early launch antivirus is disabled, you can reboot the PC normally.
8. Roll Back Drivers to Previous Version
If you have recently installed an update of device drivers manually, there are chances of it messing up with the startup. Sometimes, the unstable or unsupported driver software can cause more harm than good.
You can enter safe mode and simply roll back the driver to a previous version.
This will resolve the ‘Your PC did not start correctly’ error and save you from unwanted problems that may show up in the future because of incompatible drivers.
9. Perform the Startup Repair
You can use Windows Startup Repair to resolve the issues by burning the booting or startup process. Then, all you need to do is enter Advanced startup options and click on Startup Repair to start the repair process. In some cases, it can also be Automatic Repair instead of Startup Repair.
You can then follow the onscreen instructions to complete the Startup Repair. In the end, reboot your computer and check if the Windows 10 PC did not start correctly error is resolved.
10. Fix Master Boot Record (MBR)
If the MBR is corrupted, it can lead to startup and boot-related issues. In addition, you can also see the ‘Your PC did not start correctly’ error because of corrupted MBR. However, it is possible to rebuild MBR via some commands.
Open “Command Prompt” via Advanced boot options. In the Command Prompt window, execute the below commands one by one.
bootrec /fixmbrbootrec /fixbootbootrec /rebuildbcdOnce all the commands are executed, type “exit” and press the “Enter” key to exit the Command Prompt. You can now reboot in normal mode and check if the error is resolved or not.
11. Disable Fast Startup
Sometimes, the fast startup feature can be the culprit for many errors. When the fast startup is enabled, the PC does not shut down entirely by shutting all the drivers, apps, and services. Instead, you can temporarily turn off the fast startup to resolve the startup error experienced by you.
You can perform the below steps by entering Windows 10 safe mode.
Step 1: Go to Settings app ➜ System ➜ Power & sleep.
Step 2: Click on the “Additional power settings” link under Related settings from the right side of the window.
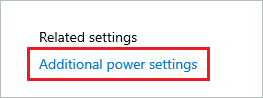
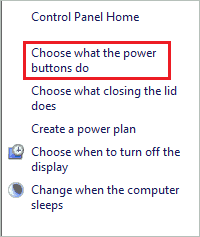
Step 3: When the Control Panel window opens, click on “Choose what the power buttons do” from the left frame.
Step 4: To modify power settings, click on “Change settings that are currently unavailable.” You will be asked to enter admin credentials.

Step 5: Now, on the same window, uncheck the checkbox next to “Turn on fast startup.”
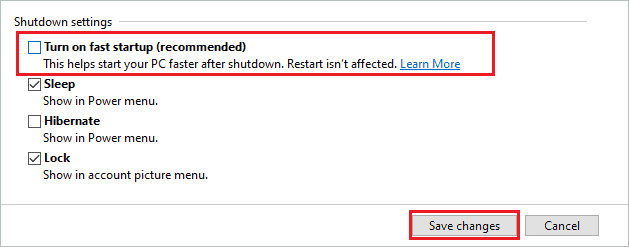
Step 6: Click on the “Save changes” button.
Once you disable fast startup, you will be able to boot your computer without any error.
12. System Restore
If you are still experiencing errors while starting your computer, you can restore your PC to a point where everything is working perfectly fine. The system restore will not delete any data on your device. However, the settings changes that were done after the restore point was created will be removed. Also, system restore will uninstall the third-party apps installed after the restore point was created.
Well, the settings can be redone, and apps can be reinstalled after the system restore. It is easy to perform a system restore in Windows 10, and the error will be permanently resolved after restoring your PC to a previous point.
13. Reset your Computer
If system restore did not prove fruitful, you could reset your Windows 10 PC. During the reset, Windows operating system is reinstalled without any installation media or ISO file. And there is an option to keep your personal files as it is while resetting your PC.
However, all the third-party applications installed will be removed. You can make a note of all the essential apps you wish to reinstall again after the reset. It is easy to reset your Windows 10 via the Settings app.
14. Reinstall Windows 10
The last resort to resolve the error – Your PC did not start correctly is to reinstall Windows 10 from scratch. We recommend backing up your PC before reinstalling Windows. You can create installation media for Windows 10 to install the operating system on your computer. It is easy to create installation media via Windows 10 Media Creation Tool.
Once Windows is reinstalled, you will get rid of all the errors and issues on your computer.
Final Thoughts On Your PC did not start correctly
You can experience different errors and issues that can prevent you from logging in to the system normally. For example, blue screen errors or startup errors; both cause frustration and annoyance when showing up in a loop. One of the errors experienced by Windows 10 users is – Your PC did not start correctly.
Well, sometimes it’s just a glitch, and clicking on the Restart button can resolve the issue. However, other times, you may need to perform some fixes to fix it. You can check out the solutions mentioned in the above guide to eliminate the PC did not start correctly error.
FAQs
What caused Your PC did not start correctly error message?
The common causes for Your PC did not start correctly error is corrupt BCD, MBR, and system files, issues with third-party apps, or recently updated Windows. You can also experience this error because of unstable driver versions and fast startup.
What to do if your PC says your PC did not start correctly?
You can click on the Restart button below the error message. If the error shows up repeatedly, you can enter safe mode or advanced startup options to perform some of the fixes that can help you resolve the error.
How to fix a PC did not start correctly error in Windows 10?
To fix a PC did not start correctly error on your Windows 10 computer, you can repair corrupt BCD, MBR, system files, disable fast startup, uninstall recently installed apps, update Windows OS, perform startup repair, rollback drivers to the stable version, and disable early launch antivirus.


